Code Generation in Visio
|
To illustrate the process of code generation, let's begin by working through the construction of a simple diagram, and seeing the code generated for that. As we go through, we'll look at:
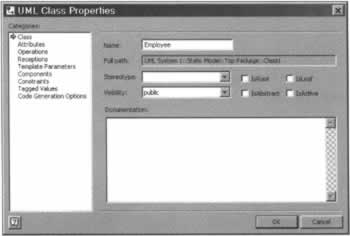
The Employee ClassOur example diagram will feature a class that will work with the employee details of a fictitious company. This class will contain information about the employee such as their name, ID number, hire date, and date of birth. We spent the last chapter looking at diagramming components from within Visio, so we should be familiar with the process, but as we shall see, the number of dialogs that open and close as we progress can become confusing, so its worth paying attention to the procedure again. Since we're going to be using dates in our class, the first thing we'll do is add a System. DateTime structure. Right-click the Top Package node and select New | Package from the context menu. In the UML Package Properties dialog that is launched, enter System into the Name text box, and then click OK. Right-click this package, add a new class called DateTime, and set its stereotype to struct. Now let's get on with creating the Employee class. Right-click on the Top Package node and select a new class. Set the name of the class to Employee, and leave all the other options in the UML Class Properties dialog as they are: Notice the Code Generation Options entry is the list of Categories - we'll see more of this as we go through.
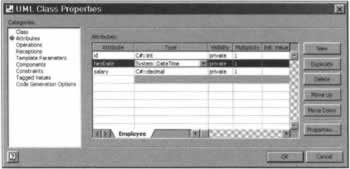
Adding FieldsWe'll begin by adding some fields to our Employee class by clicking on the Attributes entry in the list of Categories, and add the following attributes - they will be fields in our class.
Add the three fields id, hireDate, and salary as shown in the screenshot below. You may find it easier to widen the Type drop-down before you start trying to select the data types, in order to get a better view of the type names: Note that we are already making an implicit choice of language for our eventual code here by selecting C# int and decimal types.
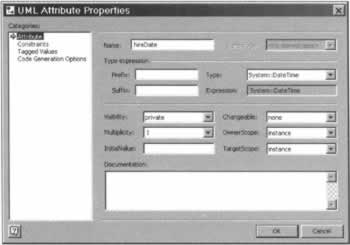
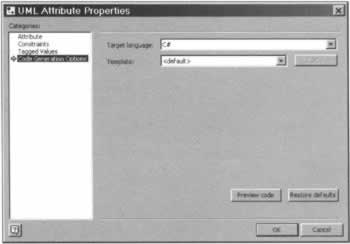
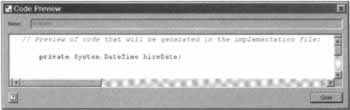
Previewing CodeLet's have a look at the skeleton code that will be generated from one of our attributes - select the hireDate attribute, and click Properties to go to its UML Attributes Properties dialog: We explored the main options on this dialog in the previous chapter, looked at the default values for these options, and discussed how some of them mapped into code. Now we'll actually get to see this in action. Select the Code Generation Options entry: This rather bare dialog allows us to specify the code generation options for this particular attribute. From here we can specify the target language for this attribute, and also preview the code generated for this attribute. We'll talk about the Template drop-down later. For now, select C# as the Target language and click the Preview code button to see the code generated for our hireDate attribute: If you click Close and return to the UML Attribute Properties dialog, then you can quickly experiment with some of the options on this page and preview the code generated to see the effect of these options. Let's see the effect of the OwnerScope option - setting this to classifier produces a static member in C#, or Shared in VB.NET:
public static System.DateTime hireDate; Setting Changeable to frozen produces a constant member:
private const System.DateTime hireDate; Initial values can be set for attributes through the InitialValue field. Note that Visio simply places the text entered into this field directly into the generated code. For example, if your initial value is a string literal then you will have to include the quotes around it, as Visio will not add these for you, thus be wary when specifying such values from Visio.
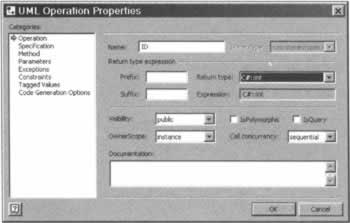
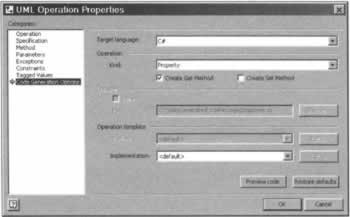
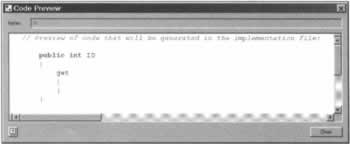
Adding PropertiesNow that we have some fields, let's add some properties to expose them - we will create properties that have get and set accessors automatically generated. To create properties, and other types of methods, we have first to define them as UML operations. Select Operations from the list of Categories on the UML Class Properties dialog and click New to create a new operation. Click Properties to launch the UML Operations Properties dialog. Enter ID for its Name, and select its Return type as a C# int: In the previous chapter, we looked at the meaning of the options available from this dialog - as we go through the chapter we'll see the effect of these options on the generated code. To define ID as a property, select Code Generation Options from the list of Categories. This brings up a set of options that determine how the ID operation will map into code. From the Kind drop-down, select Property, and the Create Get Method and Create Set Method checkboxes will ungrey. ID is to be a read-only property - we only require a get accessor - so only check the Create Get Method checkbox: From the Kind drop-down we can select from a list of operation types - the list of available types will depend on the target language chosen. Here are the types for C#:
For generation into Visual Basic .NET, Visio has no Indexer or Operator kind, and for C++ there is no Indexer, Property, or Event kind. Visio will also adjust the kind of operation to fit the target language. This means that if you select C# as language and define an operation as an Operator, and later you are attempt to generate Visual Basic .NET code for this operation, Visio will automatically adjust this operation kind to Procedure. Let's quickly check out the skeleton code that will be generated by clicking the Preview code button: Note that if you attempt to add some code for the method body from the Method entry in the UML Operation Properties dialog, (we'll look at this in a moment) this code will only be entered into the get accessor, regardless of the presence of a set accessor. That's our ID property done, so let's add two operations, Salary and HireDate with return types as below: From the Code Generation Options dialog, set the Kind of Salary to Property, and check only its Create Get Method. For HireDate, set its Kind to Property and check both the Create Get Method and Create Set Method checkboxes. Click OK to accept these values, and click OK on the UML Class Properties dialog.
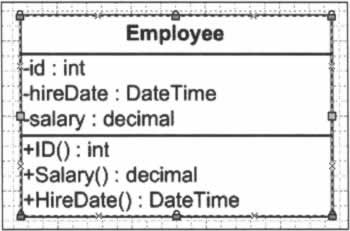
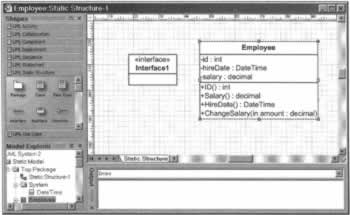
Drag an Employee class onto the page, and it should now look like this:
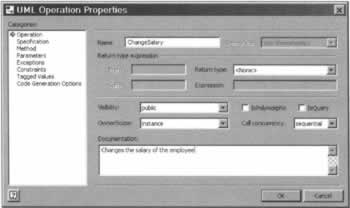
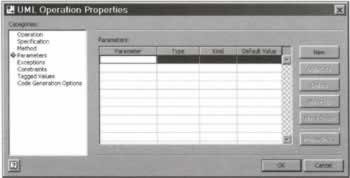
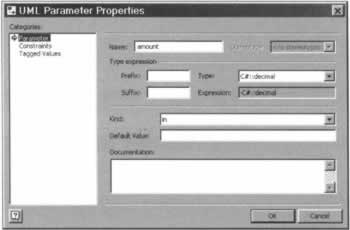
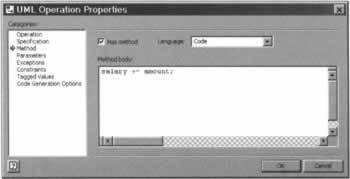
Adding a MethodNow let's add a public method to the Employee class - a simple method to modify the value of the employee's salary. This is accomplished again through the Operations entry in the list of Categories in the UML Class Properties dialog window. Click New to add a new operation, and select Properties to bring up the UML Operations Properties dialog for this new operation. Our method will be called ChangeSalary, and we will leave its Return type set to <None> - this method will not return a value. The screenshot overleaf shows this dialog for our method - note that we have also added some comments for the method in the Documentation field: We can add parameters to the method through the Parameters entry in the list of Categories: The name of the parameter is entered into the Parameter column, its type into the Type column, and in the Kind column we choose if the parameter is to be in, out, or inout. The Default Value column allows a default value for the parameter to be specified - C# does not support default values for parameters, and any value entered here will not appear in code generated in C#. Click New to add a new parameter, and then select Properties to open the UML Parameter Properties dialog: Here we can specify the parameter options as described above - the screenshot shows that we've entered amount for the Name of the parameter and its Type is a C# decimal. Our amount parameter is passed into the method and is not modified, therefore the defined Kind is in. Click OK to accept these values and return to the UML Operation Properties dialog. From here we can add some code for the method body by selecting the Method entry from the list of Categories: When first selected, the Method body text box will be greyed out. To ungrey the text box and enter your code, the Has method checkbox has first to be checked. After this the Method body field becomes active and we can define the code for our method as shown above. In spite of its name, this Language drop-down here does not affect code generation, but only the syntax highlighting in the Method body text box.
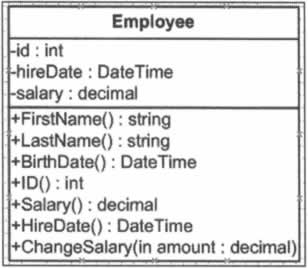
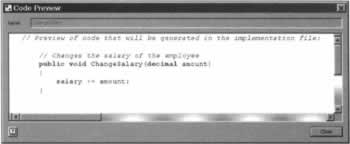
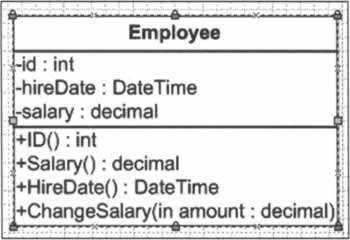
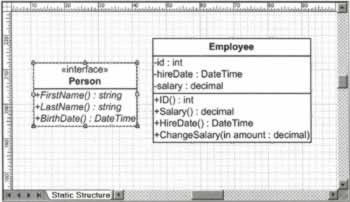
From the Preview code button in Code Generation Options we can look at the code produced - note the comments before the method produced from the text in the Documentation field: Now our Employee class should look like the following, with its three attributes and four operations: Before we actually generate some code from our model, let's look at implementing an interface.
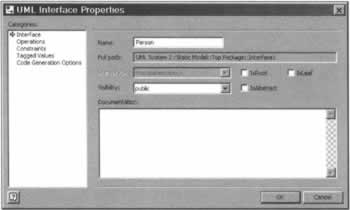
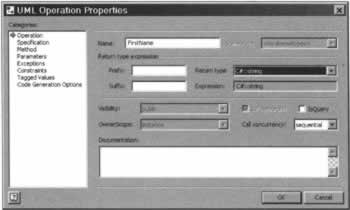
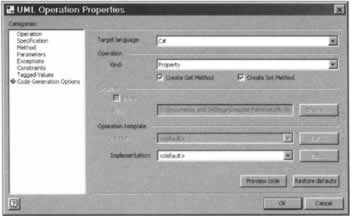
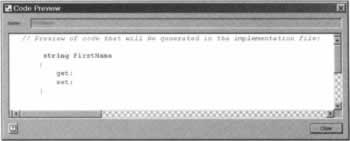
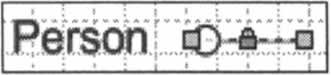
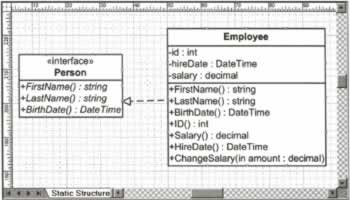
Implementing an InterfaceWe're going to create a Person interface with properties for the first and last name of a person, and their date of birth. Begin by dragging the rectangular Interface shape onto the page: Double-click on the interface to open the UML Interface Properties dialog - here we've changed the name of the interface to Person: To add properties to our interface, select Operations from the list of Categories, and click New to add a new operation, and then select Properties. Our first property will be called FirstName, and will return a C# string: Select the Code Generation Options entry, and we can determine the nature of this operation. We will set the Kind of our operation to Property, and check both checkboxes to define get and set accessors. Let's see what this will generate for us, so click on Preview Code to see the following code: Since Person is an interface, there is no reason to generate any code for the implementation here. Now click Close on the Code Preview window, and click OK on the UML Operation Properties dialog to return to the UML Interface Properties dialog. Add two more operations, both properties, and both with get and set accessors: Now the design of our interface is complete, and so click OK to finish the UML Interface dialog. Our UML diagram should now look like the following: Getting the Employee class to implement the Person interface is trivial - right-click on the Person interface and select Show as Lollipop Interface - it will change to look like the following: Now simply drag the Person interface to one of the connection points of the Employee class and the connection point will turn red. When you release the mouse button, the properties of the Person interface will now appear in the Employee class, and if you right-click the Person interface and select Show as Class-like Interface, your diagram should look like the following: For the sake of completeness, go ahead and add the private fields to the Employee class that will be wrapped by the properties from the Person interface if you like. OK, we've diagrammed our Employee class, and added some C#-specific code details. Now we're ready to generate some code into files!
| |||||||||||||||||||||||||||||||||||||||||||||||||||


EAN: N/A
Pages: 85