Performing Highlight Recovery
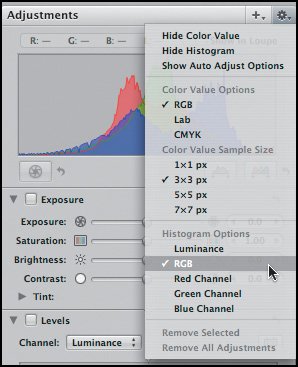
| In the last chapter, you saw how to use the Exposure slider to change the exposure of your image, making it brighter or darker. When you work with a raw file, though, the Exposure slider has an additional function: it can be used to recover overexposed highlights, restoring detail to areas that have blown out to complete white. Aperture accomplishes this seemingly magical operation by exploiting two properties of your image. First, an overexposed image is not necessarily overexposed in all three color channels. Sometimes, only a single red, green, or blue channel will be overexposed. If your image has at least one channel that is not overexposed, then it can use the information in that channel to rebuild the channels that are clipped. Second, most cameras shoot a little more range than is actually visible in the resulting image. This extra range is used for utility functions such as white balance. If your image has some of this extra overhead, Aperture can reach into that data to rebuild clipped highlights. Exploring OverexposureAs you learned in the last chapter, overexposure appears in an image histogram as a white spike on the right side. By default, the Aperture histogram is a graph of the luminance information in your imagea composite of all three color channels. If any one channel is clipped, then the luminance histogram will show a white spike. Using the action menu in the upper-right corner of the Adjustments panel (Figure 6.12), you can change the Aperture histogram to show separate, overlapping histogram displays for each individual color channel. With this three-channel display, it's possible to see whether all three or only a few channels are clipping. In Figure 6.13, you can see that the blue channel is just barely clipped, while the red and green channels are more strongly overexposed. Since much of the blue channel is intact, this image is a good candidate for highlight recovery. Figure 6.12. From the Adjustments action menu, you can change the histogram display to show histograms for specific channels in your image.
Figure 6.13. Although this image has clipping in all three channels, it has very little clipping in the blue channel. We should be able to recover a fair amount of highlight detail.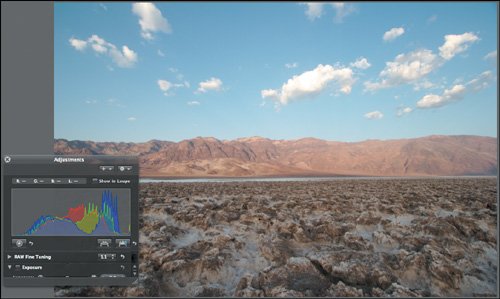 Recovering HighlightsHighlights get clipped because they are overexposed. To use Aperture's highlight recovery feature, simply move the Exposure slider to reduce the exposure for your image. As you move the slider to the left, you should see detail start to reappear in your image. You'll also see the spike on the right side of image shrink as the data that was clipped gets pulled back into the histogram (Figure 6.14). Figure 6.14. With the exposure setting lowered, the highlights have been largely rebuilt. Notice the improved detail in the clouds.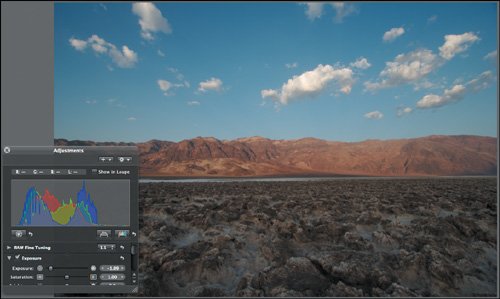 In Figure 6.14, we were able to recover most of the detail in the cloudsdetail that was previously overexposed to pure white. Note that there's one area in the middle cloud that is still solid white. This is the area where all three channels were clipped, so there's no way to rebuild the lost data. The areas where detail has reappeared are areas where only the red and green channels were clipping. Of course, as you reduce the exposure to recover highlights, the rest of your image will get darker. Your goal with most images is to find the point at which you've recovered as much highlight detail as possible without darkening your image too much. The histogram will be your guide in determining when you've restored all of the highlight detail that can be recovered. When the right edge of the histogram is no longer spiking, it's time to stop. (If your goal is an image that is darker, of course, by all means keep reducing the exposure.) Note Though the White Point slider in the Levels adjustment brick performs the same function as the Exposure sliderit changes the white point in your imagethe Levels adjustment does not provide any highlight recovery features. You can recover highlights only using the Exposure slider. When to Adjust Exposure and When to Adjust BrightnessAs you've seen, the Exposure and Brightness sliders perform similar functions: they allow you to change the brightness of your image. Though they achieve this in different waysthe Exposure slider changes the white point, and the Brightness slider changes the midpointin many cases, you can use either control to achieve the brightness change that you're looking for. When you're editing a raw file with overexposed highlights, though, these two controls serve very specific functions. Your editing workflow on an overexposed raw file will usually proceed as follows:
Figure 6.15. To finish this image, we added both Levels and Highlights and Shadows adjustments, being very careful not to reclip the highlights. Note that other adjustments, such as Saturation, can brighten your image enough that your highlights reclip. Be sure to keep a close eye on the histogram when making further adjustments. |