Selecting Images
| Aperture provides some innovative features for comparing, sorting, and organizing images. All of these features require you to first select the images you want to work with. An understanding of how to make and change selections is essential for smooth Aperture workflow and for performing batch edits and adjustments. Selecting a Project to ViewBefore you can select any images to work with, you must select the project that you want to view. When you click the name of a project in the Projects pane, Aperture displays all of the image thumbnails for that project in the Browser pane. If a Viewer pane is visible, then Aperture displays the currently selected image, which is usually the first one in the collection. If your project contains any other objectsalbums, folders, Web galleries, light tables, and so onthen clicking one of these displays only the contents of that item. Viewing Multiple ProjectsIf you want to view multiple projects simultaneously, or an item such as a Web gallery from one project side by side with a book from another project, just select the first project in the Projects pane and then Command-click additional projects. Each new project will be added to the Browser pane as a separate tab. To remove a project from view, click the small X on the tab's title bar. To view two projects side by side, select the first project in the Projects pane and then Option-click a second project. The second project will appear in its own pane, alongside the first project (Figure 2.20). Figure 2.20. With a simple Option-click, you can split Aperture's Browser pane into multiple panes to view different projects side by side.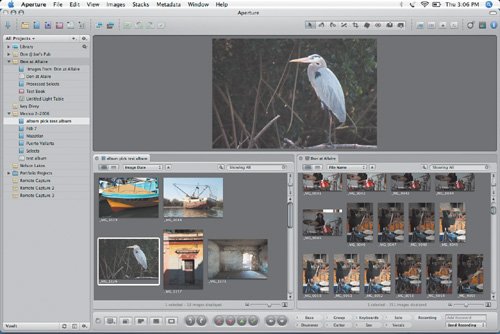 Select an image in either project to display the image in the Viewer pane; however, you can't select images from both projects simultaneously. Once you've selected a project to work on, you're ready to select some images. Selecting images serves two purposes in Aperture:
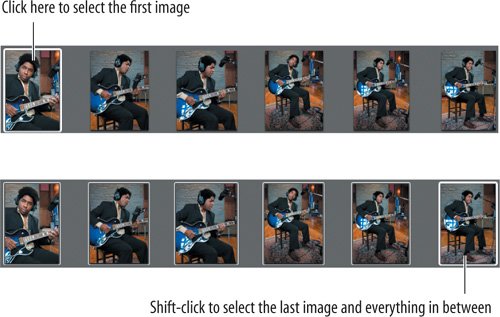
You select images by simply clicking thumbnails in the Browser pane of any layout. To select a single image, click it in the Browser pane. To select a different image, click it. For the most part, Aperture follows all of the standard Macintosh selection rules. To select a range of contiguous images, do the following:
To make a noncontiguous selectionan image here, an image thereuse the Command key instead of the Shift key.
You can also combine both techniques to make complex selections of images. Here's an example:
At any time, you can deselect all images by clicking in any gray space in the Browser pane. If a Viewer pane is visible, then Aperture will display your selected images side by side. Deselect all images and then try the following:
Depending on the size of your screen, Aperture should be able to display a large number of images side by side. This ability to lay images next to each other makes Aperture an excellent tool for reviewing, comparing, and picking images at the end of a long day of shooting. Switch back to Project Management layout (Command-Option-M) and notice that the same images are selected. Aperture maintains the current selection until you alter or deselect it. These are the basic selection processes that you will use repeatedly within Aperture. Tip Note that you can deselect images by Command-clicking them in either the Browser or Viewer pane. Aperture doesn't care whether you deselect using thumbnails or full-res images.
Making Selections Using the KeyboardIn addition to performing selection tasks using the mouse, you can make selections using the keyboard. To deselect the current selection, you can press Command-Shift-A. To select everything, press Command-A (just as you do in other programs). You can easily select multiple images by using the arrow keys.
The Primary SelectAs explained earlier, you select images in Aperture for two reasons: to view a series of images side by side and to perform edits on an image (or images). To serve these two different purposes, Aperture distinguishes between a regular selected imagethat is, an image that is simply selected for viewingand the primary selectthe image that will be altered if you perform an editing operation. To see this distinction, switch to Standard layout (press Command-Option-S) and select three images. Notice that while all three selected images in the Browser pane have a white border around them, one of the images has a thicker border. This thickly bordered image is the primary select (Figure 2.25). Figure 2.25. In both the Viewer and Browser panes, the primary select is surrounded by a thick white outline while the rest of the selected items are surrounded by thin outlines.
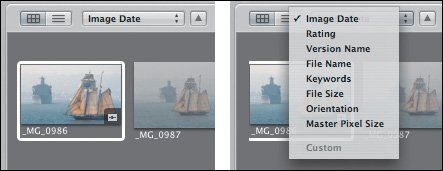
Now look in the Inspector pane (if it is not already open, press I to open it). The Adjustments inspector shows a histogram for the current primary select, and the Metadata inspector shows the metadata tags for the primary select. So even though three images are selected, the parameters of only the primary select are shown. When multiple images are selected, pressing the arrow keys moves the primary select from image to image within the group of selected pictures. To ensure that your edits affect the images you want, it's important to pay attention to the primary select. Some types of edits and changes can be applied to the primary select only, while others can be applied to every image in the current selection. In later chapters, you'll learn how to control this functionality. Sorting Images in the Browser PaneBy default, the Browser pane displays thumbnails sorted by date, but you can easily change the way that the images are sorted by selecting a different criterion from the sort menu at the top of the Browser pane (Figure 2.26). When you pick a new sort criteria, Aperture immediately reorders the thumbnails you are viewing. Figure 2.26. The Sort pop-up menu lets you select a new criterion for sorting the thumbnails in the Browser pane.
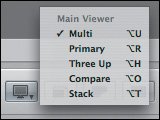
You can manually rearrange the thumbnails in a project by simply dragging them into a different order. Click an image and drag it to a new position. Aperture will display a green line to indicate where the image will be positioned when you release the mouse. Once you've rearranged some thumbnails, the Sort pop-up menu will change to Custom to indicate that you are now viewing a custom sort. Once you've defined a custom sort, you can freely switch between it and other sorting criteria through the Sort menu. Aperture remembers your custom arrangement, allowing you to switch back to it later if you want. Tip In Aperture 1.0.1, moving thumbnails can sometimes result in quirky behavior. Sometimes images won't land in the correct location, or they will always drop into the first position in the Browser pane. If your thumbnail dragging becomes strange, try choosing a different criterion in the Sort menu and then again choosing Custom. This process will usually clear up the problem. Viewer ModesSo far, you've been using the Viewer in its default, normal mode so that when you select an image, it appears in the Viewer pane. As you've seen, you can select multiple images, and they will appear side by side in the Viewer pane. You can change the Viewer pane, though, so that it behaves a little differently when you select an image. You can do so by using the Viewer Mode pop-up menu on the left side of the control bar (Figure 2.27). Figure 2.27. The Viewer Mode menu on the left side of the control bar lets you control the Viewer pane's display of the current selection.
Tip If you aren't currently viewing a layout that shows the control bar, you can either switch to one or activate the control bar manually, by choosing Window > Show Control bar or by pressing Shift-D. By choosing different options on the Viewer Mode menu, you can alter the display of the current selection of images. Multi is the default mode. In Multi mode, clicking an image selects it and displays it in the Viewer pane, if this pane is visible. You can change to Multi mode by pressing Option-U. Primary mode displays only the primary select of the current selection. It allows you to select multiple images for keywording or rating, but view only the primary select (making it easier to edit that image). Three-Up mode, which can be accessed from the View Mode menu or by pressing Option-H, automatically displays the currently selected image alongside the images that appear immediately before it and after it. As you change the current selection, the before and after images update automatically. Three-Up mode can provide a quick way of getting a view of a series of images. If you regularly shoot bracketed bursts of three imagessomething many cameras can do automaticallythen this feature is particularly useful. Stack and Compare modes are more sophisticated modes for comparing images, and they will be discussed in detail in Chapter 4. Tip Though they may seem a little random, the keyboard shortcuts for the various viewer modes are actually easy to remember. They're simply the Option key plus the second letter of the name of the mode. Note If you have multiple monitors attached, Aperture will display a separate set of options for the additional monitors. Consult the Aperture Getting Started manual for details. |