Creating a New List
The first step in creating a new list is to ask yourself: “What kind of information do I want to gather/display?” The answer to this question will help you determine which list template to choose. Perhaps you want to start with a list that is close to your end goal and then add, delete, and alter the default columns to provide the solution you are trying to achieve. For example, if you are planning to collect information such as names and addresses, you can choose the Contact list template to create your initial list and then modify it. Perhaps you want to start with a bare-bones list and build it entirely from scratch. In that case, you would likely choose the Custom List list template to create your initial list.
| Tip | If the list items in the list you want to create always begin with a document, consider using a document library instead of a list. Document libraries are discussed at length in Chapters 5 and 6. |
In the following exercise, you will create a list for the buyers at Wide World Importers to track the status of tasks involved in the buying process. This task list will be based on the Tasks list template. Once the list is created, you will alter the display name so that it displays Common Buyer Tasks.
OPEN the SharePoint site where you would like to create the new list. The exercise will use the http://wideworldimporters site, but you can use whatever site you wish. If prompted, type your user name and password, and click OK.
BE SURE TO verify that you have sufficient rights to create lists. If in doubt, see the Appendix on page 435.
1. On the Site Actions menu at the top right of the page, click Create to display the list templates on the Create page.
| Tip | Oddly, a Meeting Workspace doesn’t have a Create option on the Site Actions menu. Therefore, you must click the list name in one of the Web Parts on the home page, then click View All Site Content in the left navigation panel, and then click Create on the toolbar. |
2. In the Tracking group, click Tasks to display the New List page.
You will use this page to create a task list based on the Tasks list template. You can name your new task list anything you want.
| Tip | There is no restriction to the number of copies of any list template that you can create in a site. You can create as many task lists as you like. |
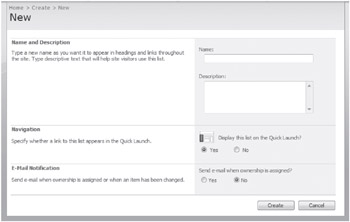
3. In the Name textbox. type BuyerTasks to establish a display name for the new list. Because there is no textbox with which to provide the URL name, this textbox also supplies the value that Windows SharePoint Services uses for the internal names.
| Important | When you initially create a list in Windows SharePoint Services, you are establishing two name values: the display name, usually labeled Name or Title, and the URL name, also know as the internal name. However, only the display name can be changed after the item is created. When the URL name cannot be set on a Windows SharePoint Services Create page, the display name (usually labeled Title) is used to populate both names. |
| Tip | Best practices to follow when initially naming a list in Windows SharePoint Services include the following: The initial name should be descriptive, intuitive, and easy to remember. The initial name should be concise. The initial name should not contain spaces. The initial name should be consistently used throughout the site. More details about these naming recommendations and the reasons they are needed can be found in the Naming a URL sidebar in Chapter 3. Your organization may also have specific naming conventions that you will want to follow. |
4. In the Description textbox, type the description List for tracking buyer process to help users understand the purpose for the new list.
5. Check that the option indicating whether you want to see this new list on the Quick Launch is selected. This is a default setting.
| Tip | Again, Meeting Workspaces are different. Because there isn’t a Quick Launch on the home page, the Quick Launch option is not presented. Instead, there is an option to Share List Items Across All Meetings in a series. |
6. Click the Create button to complete the list creation. The BuyerTasks default list view page (AllItems.aspx) is displayed. ![]()
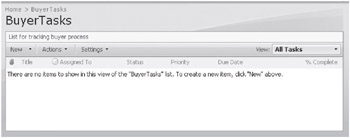
7. Go to the Home page of the site by clicking a link to it on the breadcrumb or top link bar, The new BuyerTasks list is now showing in the Quick Launch.
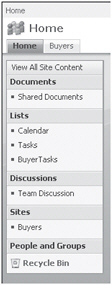
Because this list was named without a space, it would be useful to change the display name so that it has a space in it. The remainder of this exercise demonstrates that revisions to the list name only impact the display name and not the URL name.
8. On the Quick Launch, click BuyerTasks to redisplay the BuyerTasks default list view page.
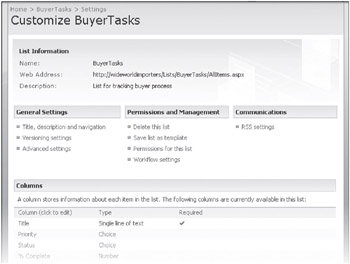
9. On the Settings menu, click List Settings to display the Customize BuyerTasks page.
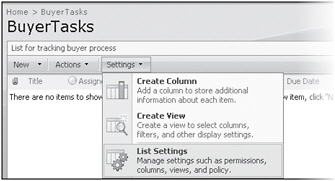
10. In the General Settings area, click Title, description and navigation to display the List Settings: BuyerTasks page.
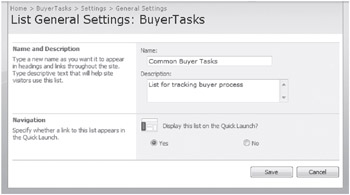
11. Replace the BuyerTasks text by typing Common Buyer Tasks (with spaces) into the Name textbox.
12. Click the Save button to save the change and display the Customize Common Buyer Tasks page. ![]()
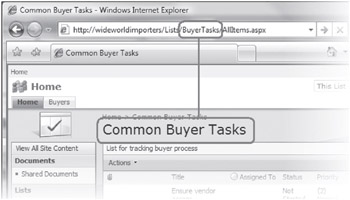
13. On the breadcrumb, click Common Buyer Tasks to display the Common Buyer Tasks default list view page.
The bold title near the top of this page and all other pages associated with this list now reflects the modified display name. However, you can see that the browser’s address bar still reflects the initial name (internal name) given to this list. To change the name in the address bar requires Microsoft Office SharePoint Design or Microsoft Office SharePoint Server.
14. Go to the Home page of the site by clicking a link to it on the breadcrumb or top link bar. The Quick Launch shows the new display name.
CLOSE the browser.
EAN: N/A
Pages: 201