Creating a New Web Part Page by Using a Browser
SharePoint sites are provisioned with one or more Web Part Pages. Users can create additional Web pages that can be stored and accessed via document libraries.
In the following exercise, you will create a document library to store Web Part Pages. You will then create a Web Part Page and provide a link to the Web Part Page from your home page so the rest of your team can view it.
OPEN the SharePoint site in which you would like to create Web Part Pages. This exercise will use the http://wideworldimporters site, but you can use whatever site you wish. If prompted, type your user name and password, and click OK.
BE SURE TO verify that you have sufficient rights to create a document library. If in doubt, see the Appendix on page 435.
1. Click Site Actions, and then click Create. The Create Page Web page is displayed.
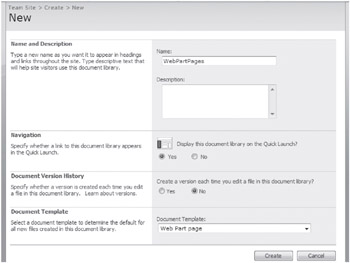
2. Under Libraries, click Document Library. The New page is displayed.
3. In the Name textbox, type WebPartPages.
| Tip | Any URL in SharePoint is limited to 260 characters and must not contain the characters /\ : * ? “ < > | # { } % & ~ or tab characters and multiple periods. Spaces in URLs should be avoided because they are replaced by the characters %20 and therefore take up three characters. The Name that you type in the Name textbox is used to create the URL as well as the Title of the document library and therefore should be short but meaningful. You can alter the title with a user-friendly name at a later date. |
4. In the Document Template area, on the Document template: drop-down list, select Web Part page.
| Tip | You do not need to create a special document library to store your Web Part Pages. You can instead store them in the Shared Documents document library that is created when you create a team Web site. However, if you plan to create a number of Web Part Pages, you can place them all in their own document library. By creating a document library that uses the Web Part Page document template, you can also create Web Part Pages by clicking the New button. |

5. At the bottom of the page, click the Create button. The All Documents view of the new Web Part Pages document library is displayed. ![]()
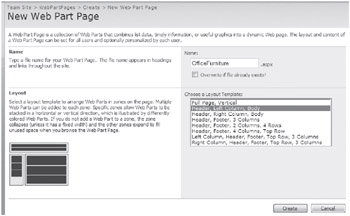
6. Click the New button. The New Web Part Page page is displayed.
7. In the Name textbox, type OfficeFurniture.
| Tip | Any URL in SharePoint is limited to 260 characters. Like SharePoint lists and libraries, the Name that you type in the Name textbox is used to create the URL as well as the Title of the Web page. Later in this exercise, you will alter the title with a user-friendly name. |
8. In the Layout area, on the Choose a Layout Template list, click Header, Left Column, Body.

9. At the bottom of the Web page, click Create.
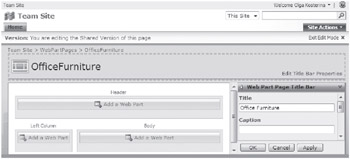
After a few moments, the new Web Part Page is displayed with three distinct Web Part Page zones: Header, Left Column, and Body. The page is currently empty except for the top link bar and the Site Actions link. No Web Parts are placed within the Web Part Page zones.

10. Click Edit Title Bar Properties. The Web Part Page Title Bar appears.
11. Under Title, type Office Furniture and click OK. The Web Part Page Title Bar closes.
| Tip | Because you created this Web Part Page within the SharePoint team site, the Team Web Site Gallery contains a Web Part for each list or document library created in the WideWorldImporters team site plus the eight built-in Web Parts described earlier in this chapter. If you completed all of the exercises in this chapter, the number of Web Parts in the Team Web Site Galley should be one more than the number at the end of the previous exercise because you created a new document library in this exercise called Web Part Pages. You can now customize this Web Part Page by using the techniques described earlier in this chapter; such as changing the position of the Web Parts and modifying the Web Part titles. |
12. Click Site Actions, and then click Site Settings. The Site Settings page is displayed.
13. In the Look and Feel area, click Top link bar. The Top Link Bar page is displayed.
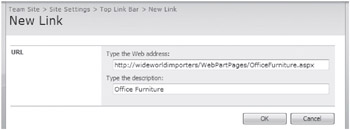
14. Click New Link. The New Link page is displayed.
15. In the Type the Web address textbox, type http://wideworldimporters/WebPartPages/OfficeFurniture.aspx. You need to adjust the URL for your SharePoint site and document library location.

16. In the Type the description textbox, type Office Furniture and then click OK. The Top Link Bar page is displayed, and a second tab labeled Office Furniture appears to the right of the Home tab.

| Tip | Alternative methods used to make the new Web Part Page visible are to have the Web Part Page document library appear on the Quick Launch, to place a List View Web Part of the document library on the home page, or to add a link item that points to the new Web Part Page if you have a links list. |
CLOSE Internet Explorer.
EAN: N/A
Pages: 201