Creating a Simple Subscription
| 1. | From Report Manager, open the report to be subscribed to, and select the Subscriptions tab. |
| 2. | On the Subscriptions tab, click New Subscription. |
| 3. | If necessary, select Report Server Email in the Delivered By drop-down list. |
| 4. | Enter the recipient list in the To text box. If you have multiple recipients in the list, the entries need to be separated by semicolons (;). |
| 5. | If the user has permissions to manage all subscriptions, the Cc and the Bcc text boxes as well as the Reply to text box appear. The same rules apply to these as to the To text box in regard to the formatting of email addresses. |
| 6. | Modify the Subject line as required. |
| 7. | To embed a copy or to attach a copy of the report, check the Include Report check box. Depending on the rendering format, the server will decide if it can embed the report or include it as an attachment. |
| 8. | To send a link to the only version of the report, check the Include Link check box. |
| 9. | Pick the rendering format from the Render Format drop-down list. Remember that WebArchive embeds results in the report; everything else is an attachment. |
| 10. | Modify the priority and add a comment if desired. |
| 11. | If dealing with a parameterized report, set the parameters for the report. |
| 12. | Select a time to process the subscription. To set a new schedule, select the When the Scheduled Report Run Is Complete option and click the Select Schedule check box. If the report is executed from a scheduled snapshot, the subscription fires after the snapshot has been executed by clicking on the When the Report Content Is Refreshed option. |
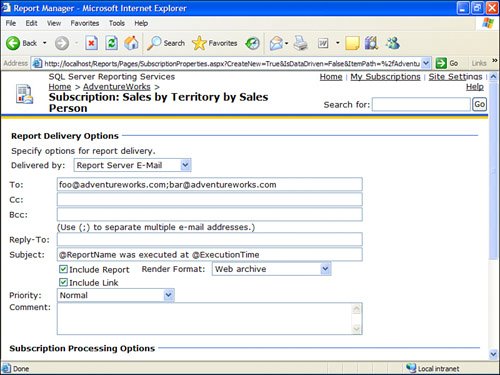
After you have completed entering the necessary information, the window should look similar to Figure 19.1.
Figure 19.1. Email delivery subscription.
File Share Delivery
As previously mentioned, another way to deliver reports is directly to a file share. This can also be done through both SQL Server Management Studio and Report Manager. Complete the following steps to complete the task through Report Manager:
| 1. | From Report Manager, open the report to be subscribed to, and select the Subscriptions tab. |
| 2. | On the Subscriptions tab, click New Subscription. |
| 3. | Select Report Server File Share in the Delivered By drop-down list. |
| 4. | 4. Enter the desired filename in the File Name text box. The Add a File Extension when the File Is Created check box tells the server to add the extension when the file gets created. As long as it is checked, the end user should not add the extension to the file. |
| 5. | Enter the path to drop the report in the Path text box. |
| 6. | Select a render format from the Render Format drop-down list. Because the files are static, it is not recommended to pick a format that can be used interactively or might include multiple files. In other words, stay away from HTML. |
| 7. | Enter the credentials for a user with permission to access the share in the Username and Password text box. Use the <domain>\<username> format. |
| 8. | Specify file overwriting options. Choosing the Do Not Overwrite the File if a Previous Version Exists option keeps delivery from occurring if a similarly named file exists. It is recommended to use one of the other two to keep such issues from becoming problematic . |
| 9. | If dealing with a parameterized report, set the parameters for the report. |
| 10. | Set the schedule as you did earlier when setting up Email Delivery. |
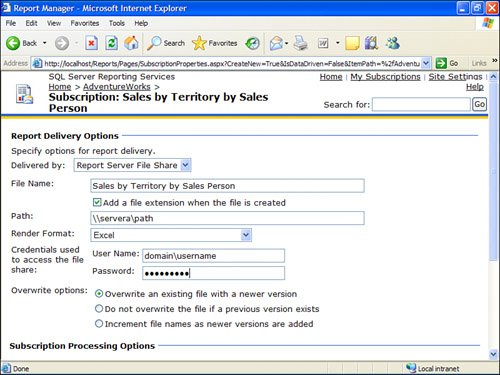
When complete, the screen should look similar to Figure 19.2.
Figure 19.2. File share delivery subscription.
Recall from earlier, SQL Server Management Studio can be used to create subscriptions to reports. To demonstrate how to use SQL Server Management Studio to produce subscriptions, we will rebuild the subscriptions you just created using Report Manager.
To start, let's rebuild the subscription using email delivery using SQL Server Management Studio:
| 1. | Navigate to the Subscriptions folder under the report to which you want to subscribe. | ||||||||||||||||||||||||
| 2. | Right-click and select New Subscription. The Report Subscriptions properties page should open. | ||||||||||||||||||||||||
| 3. | From here, the options are the same as in Report Manager. | ||||||||||||||||||||||||
| 4. | Select Report Server Email in the Notify By text box. | ||||||||||||||||||||||||
| 5. | Fill in the To field and, if visible, the CC and BCC fields. | ||||||||||||||||||||||||
| 6. | Choose Delivery Options and a Render format. | ||||||||||||||||||||||||
| 7. | Optionally, modify the priority and add a comment. | ||||||||||||||||||||||||
| 8. | If the report has parameters, fill in the parameter values. | ||||||||||||||||||||||||
| 9. | Click the Scheduling tab and enter information regarding when to process the subscription. The screen should look similar to Figure 19.3. Figure 19.3. Email delivery subscription through SQL Server Management Studio.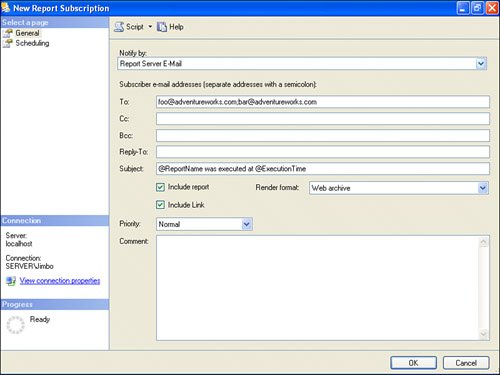 | ||||||||||||||||||||||||
| 10. | Click OK. Now let's rebuild the file share subscription using SQL Server Management Studio:
|
EAN: 2147483647
Pages: 254