Configuring Printers
| The primary utility for configuring the print service is Print & Fax preferences, which has been substantially revised in Mac OS X 10.4. Its settings determine which printers are listed in the Print dialog, which printer is selected by default in the Print dialog, and the default paper size selected in the Page Setup dialog.
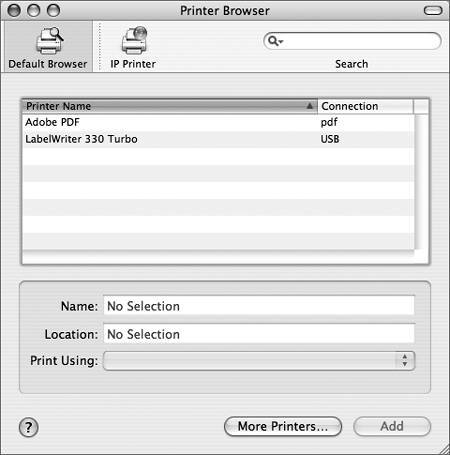
In addition to configuring the print service, Print & Fax preferences acts as a gateway to other print utilities. To open a printer's queue, select the printer and click Print Queue. When you click the Add Printer button (+) or Printer Setup, System Preferences opens Printer Setup Utility. Adding PrintersYou use Printer Setup Utility (/Applications/Utilities) to add and configure printers in Mac OS X. The standard Mac OS X installation includes printer drivers for Brother, Canon, Epson, EFI, Hewlett-Packard, Lexmark, Ricoh, and Xerox printers, so users can easily connect to the most common printers. However, you should always check with the manufacturer to see if updated printer drivers are available for your particular printer. Mac OS X also includes Gimp-Print drivers, which are open-source printer drivers that support many older printer models for which the manufacturer might not have the Mac OS X driver. NOTE Gimp-Print drivers vary in quality. Some Gimp-Print drivers are better than the vendor's and use less disk space. More often, the vendor-supplied drivers offer more functionality. Gimp-Print drivers are most useful for customers who have very old printers or printers that are not supported by the vendor, and for customers who do custom, high-end printing. To add a printer, click the Add Printer (+) button in Print & Fax preferences or the Add button in the Printer List in Printer Setup Utility. Both methods open the Printer Browser window, which provides three methods for adding a printer. You can select a printer by browsing a list of discovered printers (click Default Browser), manually specifying the IP address of a networked printer (click IP Printer), or adding a printer by selecting the printer's connection method and PPD (click More Printers).
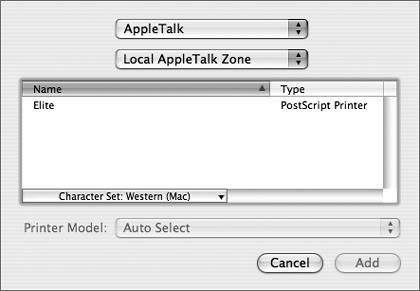
Regardless of the method you use to add a printer, a PostScript Printer Description (PPD) file describing the features of the printer is created in the hidden directory /etc/cups/ppd. The file is created regardless of whether or not the printer uses PostScript. The PPD file is copied or generated from files that were installed along with the printer driver. PPD files for standard CUPS and Gimp-Print drivers reside in /usr/share/cups/model and /usr/share/cups/model/C, respectively. PPD files for Macspecific drivers provided by printer manufacturers reside in subfolders of /Library/Printers/PPD. NOTE If a printer feature, such as duplex printing, isn't available or functioning, make sure the correct PPD is selected for the printer and the option is selected in the Installable Options pane in the printer's Show Info dialog in Printer Setup Utility. A PPD file describes the features offered by the printer. PPD files provided by printer manufacturers usually include more printer features than those provided with CUPS or Gimp-Print. After you click the Add button, you might be presented with a sheet asking you to identify the printer's options. These are printer features the manufacturer supports with the PPD, even if they are not installed in your printer. Select only those options you have installed. NOTE If you are encountering persistent printing problems or are moving the computer to a new location, you can choose Printer Setup Utility > Reset Printing System. This command resets the printing system to its default state, deleting all added printers and print jobs. You can then start over and add the necessary printers. Adding a Printer Using the Default BrowserIn the Default Browser pane, Printer Setup Utility lists all of the printers that it was able to discover. These include networked printers discovered through AppleTalk or Bonjour, and local printers that use the standard USB and FireWire drivers provided by Apple. NOTE Printer Setup Utility will only display AppleTalk printers in the Default Browser when AppleTalk is enabled in Network preferences. Because AppleTalk is turned off by default, you might not see all network printers. If you do not see a specific network printer listed in the Printer Browser, try turning on AppleTalk in Network preferences or click More Printers and choose AppleTalk from the topmost pop-up menu. This will also enable AppleTalk and show any AppleTalk printers available on your network. After you select a printer, Printer Setup Utility will query the printer to determine the appropriate PPD file to use. Some networked printers do not return enough information to enable Printer Setup Utility to select a PPD. In those cases, Generic PostScript Printer will be selected and you can choose a more appropriate PPD with the Print Using pop-up menu. Adding a Printer in the IP Printer PaneIf the desired networked printer is not listed in the Printer Browser window, click the IP Printer icon in the toolbar to open a pane in which you can add a printer by specifying its IP address. Quite often, IP printers are part of a printer queue, or print server that provides printing services for a small or large network. IP printing allows you to add printers that use the LPD (Line Printer Daemon), IPP (Internet Printing Protocol), and Socket (HP Jet Direct) protocols.
Adding a Printer Using the More Printers SheetWhen you click the More Printers button at the bottom of the Printer Browser window, a sheet appears. The topmost pop-up menu in this sheet lets you specify the method your computer uses to access the printer. Choices include:
The lower portion of the pop-up menu lists manufacturer-specific connection methods. Some third-party printer drivers include their own USB, FireWire, or network connection drivers. You need to use the More Printers sheet to add these printers. To add a Windows-shared printer, in Printer Setup Utility click Add, click More Printers, and choose Windows Printing from the pop-up menu. You can list printers by Windows workgroup or domain. Select the one you want, and then click Add. Adding a Networked PostScript PrinterDirectly-connected USB printers are discovered and added to the list of available printers automatically. For networked printers, you can select the auto-configured Bonjour printers, network print servers, or add networked PostScript printers manually in Printer Setup Utility. In this exercise, you'll add a networked printer to the Printer List for use with Mac OS X applications. If you don't have a networked printer, just read these steps so that you understand the procedure:
Printing to a Networked PrinterNow that you have added a printer in Printer Setup Utility, make sure you can print to it.
|


EAN: 2147483647
Pages: 233