2.3 JUnit
2.3 JUnit
JUnit is the basis for most of the code examples contained in this book. This Open Source framework for the automation of unit tests under Java was originally written by Kent Beck and Erich Gamma, and is available through [URL:JUnit]. Historically, JUnit is an offspring of a similar framework for Smalltalk [Beck94]; its current variant is SUnit, which will be described in detail in Appendix B. There is no doubt that JUnit has become a quasi-standard tool for Java unit testing, which shows both in the large number of introductory and advanced articles (see Bibliography and List of References, Further Reading), and in the choice of enhancements available for JUnit (see Appendix A, Section A.2, JUnit Expansions). It has been widely accepted in a large number of Open-Source projects.[2] In addition, JUnit meets most of the testing requirements we've established thus far. Now, what does the creation and running of test cases look like in JUnit?
Installing and Running Tests
Let's start from the beginning—the installation. The most recent JUnit version can be downloaded from [URL:JUnit].[3] To use the framework in your own projects, you have only to include the junit.jar file into the class path of the JDK version you are using, load the sources into your project, or just use the built-in JUnit support of your favourite IDE.[4] In its archive, junit3.8.1.zip, JUnit supplies examples (in the folder junit/samples/) and tests for the framework itself (in the folder junit/tests/) in addition to the Jar file. We will now use these to get an idea about the different types of test runs. JUnit offers three different TestRunner classes:
-
junit.textui.TestRunner writes the test results to stdout.
-
junit.awtui.TestRunner is a simple AWT-based graphic tool.
-
junit.swingui.TestRunner is a complex Swing-based graphic tool.
All three classes have a main() method so they can be accessed from the command line. As a parameter, they require the fully qualified name of a test class, which includes the class' package name. We will further explain how this looks in the sections that follow.
Let's use the example tests included in the JUnit archive to have a look at the different set of test runners. First, we type the following in the command line to change to the folder JUnit used to unpack the files:
> cd wherever/junit3.8.1
Provided that a JDK is available in the current path, we first call the textual test runner:
> java -cp junit.jar;. junit.textui.TestRunner junit. samples.AllTests
And after a few seconds ...
......................................... ......................................... ..................................... Time: 1.462 OK (119 tests)
The result is rather sober: each dot of the output shows us a successfully completed test. In addition, we are informed about the test runtime, the total result (OK), and the number of tests. Failed tests would have reflected in an F or E text output and led to a different total result.
This picture looks slightly different when using the AWT tool. The lines
> java -cp junit.jar;. junit.awtui.TestRunner junit. samples.AllTests
open a window and start our tests (Figure 2.1).
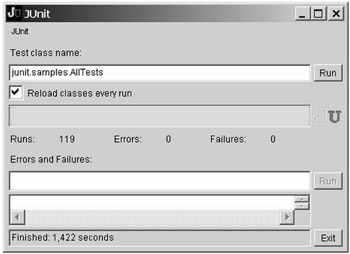
Figure 2.1: The AWT test runner.
And yet another window appears when using the Swing test runner (Figure 2.2). Note that Figures 2.1 and 2.2 do not show that the bar above the Runs/Errors statistic is bright green—a sign that the test run was successful. If just one test goes wrong, then the color in this progress bar changes to red.
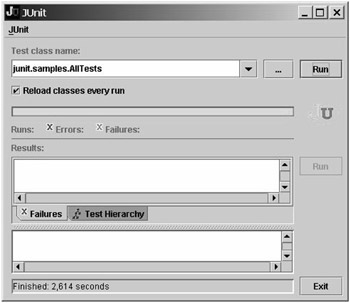
Figure 2.2: The Swing test runner.
Having a green bar or a red bar is commonly accepted JUnit wording to describe if your tests are currently working or failing.
In the further course of this book, we will mainly use the AWT-based TestRunner class, because it works for all JDK versions from 1.1 up, and its set of functions is sufficient for our purposes. Which test runner you will use in productive operation is mainly a question of taste. Nowadays some Java IDEs (e.g., Eclipse) come with tightly integrated JUnit test runners of their own. All of them meet an important criterion from our set of requirements: the success or failure of a test run can be seen at a glance.
Creating Test Classes
JUnit defines test cases in separate classes. These classes are derived from junit.framework.TestCase or from a subclass. This separation between test class and class under test means that JUnit meets another requirement from our requirements catalog.
To keep things simple at the beginning, we will test a piece from the Java library, the class StringBuffer. First, consider our empty test class:
import junit.framework.*; public class StringBufferTest extends TestCase { } The import of junit.framework.* will haunt us across the entire book, because it represents the central JUnit package.[5] Here the name of the test class is composed of the name of the target class and the ending Test. This is pure convention, facilitating the automatic detection and removal, if necessary, of test classes. Before Version 3.8 we needed a constructor with a String parameter for the framework to work; this constructor is now optional.
Next, we compile and call the test runner with the test class' name as its argument:
> java junit.awttui.TestRunner StringBufferTest
Obviously, nothing good happens now; the TestRunner shows its brightest red and produces an error message (Figure 2.3).
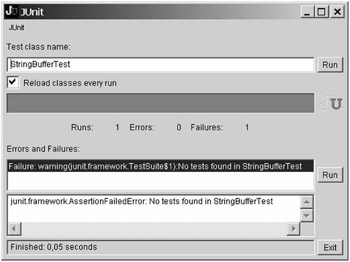
Figure 2.3: StringBufferTest without tests.
The only surprising thing is this: How does the runner know that we have not written any test yet? The answer lies in a convention which makes our lives (and future testing) easier: unless otherwise specified, JUnit considers all public, non-static, and parameterless methods whose names start with test as test methods. This mechanism works with Java's Reflection mechanism and saves us the trouble of having to explicitly register each single test case somewhere.
We are now ready to add the first test case, which we want to use to test for correct initialization of an empty StringBuffer. We do that by declaring the following method within the StringBufferTest class:
public void testEmptyBuffer() { StringBuffer buffer = new StringBuffer(); assertTrue(buffer.toString().equals("")); assertTrue(buffer.length() == 0); } Although this example is very simple, we can see a few basic things. For instance, the second part of the name describes what we are testing—in our example, the behavior of an empty buffer.
Another typical structure is the method body, which first creates an object and then checks certain properties as to their compliance with our expectations. Those little one-line tests are usually called assertions. The method assertTrue(),[6] for example, takes a boolean expression as a parameter, and the expression's result is verified at runtime. If it is true, then the program continues. It if is false, then the test case terminates at this point, a failure is registered, and the next test case—if there is one— will be started.
To run modified and added tests, we will no longer use the command line from now on, but the test runner's Run button. Note the tick next to "Reload classes every run"; this is important because it ensures that we can start all tests of a modified class without having to start up the tool every time. The very first test brings us back to a green bar—reason enough for another try:
public void testAppendString() { StringBuffer buffer = new StringBuffer(); buffer.append("A string"); assertEquals("A string", buffer.toString()); assertEquals(9, buffer.length()); } Here we see a variant of the Assert command—assertEquals(expected, actual)—that tests two returned objects for equality. JUnit lets us use this command in variations for most primitive types and also for real objects. The equals operator (==) is used to compare primitive types, while the equals() method is used to compare objects. We will see more varieties of this central JUnit method as we progress in this book.
Unfortunately, running the test results in yet another red bar (Figure 2.4). This time, the test runner reports a failure, namely, an assertion that failed. The use of assertEquals() ensures that the error message is unique: expected: <9> but was: <10>. We made a mistake when creating the test, and correcting it will take us back into the green zone:
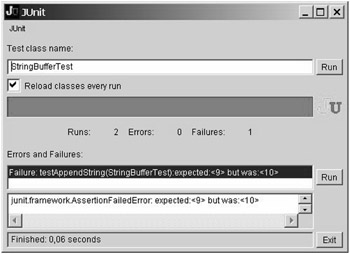
Figure 2.4: Test runner reports a failure.
public void testAppendString() { StringBuffer buffer = new StringBuffer(); buffer.append("A string"); assertEquals("A string", buffer.toString()); assertEquals(10, buffer.length()); } JUnit distinguishes between a failure and an error. An error occurs when an exception makes its way up to the test method while the test is running. The difference between "failure" and "error" is an important JUnit concept you should always keep in mind. For example, the following test case results in a NullPointerException and is registered by JUnit as an error:
public void testProvokeError() { StringBuffer buffer = null; buffer.append("A string"); }
Fixtures
Taking a closer look at the two test cases we have written so far, we can see a small code duplication:
public void testEmptyBuffer() { StringBuffer buffer = new StringBuffer(); assertTrue(buffer.toString().equals("")); assertTrue(buffer.length() == 0); } public void testAppendString() { StringBuffer buffer = new StringBuffer(); buffer.append("A string"); assertEquals("A string", buffer.toString()); assertEquals(9, buffer.length()); } The code was duplicated to generate our test object. This is typical for a set of tests referring to a specific component. Often, you will create not a single object but an entire mesh of objects, representing the starting point for all test cases of a test class. This "test basis" is also called a fixture.
JUnit allows us to extract the code required to create a fixture into the setUp() method. This method is executed before the actual test code—and most important, once for each single test. This ensures that the changes effected on objects of the fixture by that one single test case cannot influence another test case. The integration of a fixture into our test class looks like this:
public class StringBufferTest extends TestCase { private StringBuffer buffer; protected void setUp() { buffer = new StringBuffer(); } public void testEmptyBuffer() { assertEquals("", buffer.toString()); assertEquals(0, buffer.length()); } public void testAppendString() { buffer.append("A string"); assertEquals("A string", buffer.toString()); assertEquals(10, buffer.length()); } } We can see that the local variable buffer blossomed into an instance variable, which can be accessed from within all tests. In addition, we have replaced all remaining assertTrue() calls by more meaningful assertEquals(). This provides a clearer error message, which makes it easier for us to identify the cause of a failure.
As a counterpart to setUp(), JUnit also offers a way to release resources reserved in setUp—files, database links, and so on—in a tearDown() method after a completed test run. This tearing down occurs after the completion of each test, regardless of whether or not the test was successful.
Creating Test Suites
So far we have used a hidden feature of our test runner: it takes the name of a class as parameter and tries to find a set of tests in this class. In order for that mechanism to work, the class is searched for a static suite() method, which returns an instance of TestCase or TestSuite, both of which implement the Test interface. If this method is missing, then the test runner builds a test suite from the set of all test cases with test methods beginning with test.
To bring the theory into practice we provide a first implementation of this famous suite() method:
public class StringBufferTest extends TestCase { ... public static Test suite(){ return new TestSuite("StringBufferTest"); } } This example is simple, so simple that it hardly does anything except generate an object of the TestSuite class. This suite does not contain any test yet, so the result of the test run is rather unspectacular: Runs: 0 Errors: 0 Failures: 0.
Now let's add our two test cases to the suite:
public StringBufferTest(String name) { super(name); } public static Test suite() { TestSuite suite = new TestSuite("StringBufferTest"); suite.addTest( new StringBufferTest("testAppendString")); suite.addTest(new StringBufferTest("testEmptyBuffer")); return suite; } The addTest(...) method allows us to add tests to a suite. One single test case is created with the optional constructor of the test case class, which takes the name of the test method as parameter. This constructor is redundant in all other circumstances. This approach allows us to create test cases that do not observe the naming convention, but it is meaningful only in very rare cases. In addition, this approach is not type-save, which means that the statement of a nonexisting method name, due to a typing error for example, will become apparent as NoSuchMethodException only at runtime.
Although our previous example merely reproduces the default behavior (which means that we actually wrote superfluous code), implementing the suite() method can indeed be very useful in other cases. For example, it allows the execution of a subset of all test cases of a class or the composition of "normal" test suites into a higher-level suite. The nesting depth for suites can be arbitrary in that we can group single tests to a suite and then combine this suite with other suites or single tests to a new suite, ad infinitum. In this way, TestCase and TestSuite instances form a composite pattern [Gamm95].
One good example is the junit.samples.AllTests class we have already used. Its suite() method looks like this:
public static Test suite() { TestSuite suite = new TestSuite("All JUnit Tests"); suite.addTest(VectorTest.suite()); suite.addTest(new TestSuite( junit.samples.money.MoneyTest.class)); suite.addTest(junit.tests.AllTests.suite()); return suite; } This example uses a variant of the TestSuite constructor which requires a class object as parameter—MoneyTest.class in our example. A test suite created like this implements the known default behavior of test runners, which is to create a suite including all test cases of the specified class whose method names have the prefix test.
[2]For example, in Apache's Tomcat and Avalon projects [URL:Apache].
[3]We use JUnit Version 3.8.1 in this book.
[4]You find support at [URL:JUnit] for integration into various IDEs.
[5]So please understand that we sometimes leave out the import line to save space.
[6]assertTrue() was assert() before JUnit Version 3.7. Since assert rose to a reserved key word in JDK 1.4, assert() became deprecated in JUnit.
EAN: 2147483647
Pages: 144