6.1. Click the Mouse
| To get started, you'll need to change how you set the center of the clock within the control. To do so, add two new member variables to the ClockFaceCtrl class: Private xCenter As Integer = 0 Private yCenter As Integer = 0 In the SetScale( ) method, see if these members are still zero (meaning that the user has not moved the clock). If so, set the center to the middle of the control, as you did previously: If Me.xCenter = 0 And Me.yCenter = 0 Then Me.xCenter = Width \ 2 Me.yCenter = Height \ 2 End If g.TranslateTransform(xCenter, yCenter) Notice that if you do change the xCenter and yCenter values, the effect will be to recenter the clock. That's just what you'll do in the mouse events. Click on the ClockFace control to put it in designer mode. You will not see a typical designer; in fact, the message tells you to drag components from the server explorer or toolbox and to use the Properties window. Fortunately, as shown in Figure 6-1, you are still free to set event handlers through the Properties window. Figure 6-1. Setting event handlers for the control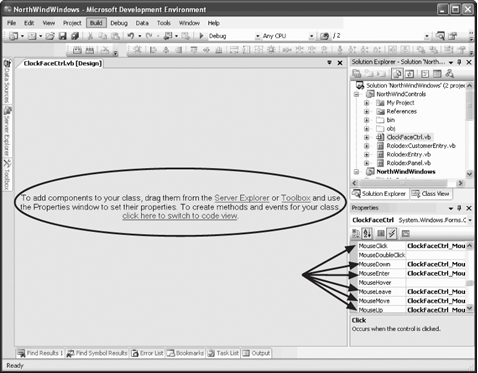 The simplest event to code is the MouseClick event, shown in Example 6-1. Example 6-1. MouseClick event handlerPrivate Sub ClockFaceCtrl_MouseClick( _ ByVal sender As System.Object, _ ByVal e As System.Windows.Forms.MouseEventArgs) _ Handles MyBase.MouseClick Me.xCenter = e.X Me.yCenter = e.Y Me.Invalidate( ) End Sub In this code, you extract the x and y location of the mouse click from the MouseEventArgs object passed in as a parameter. You use these values to set the xCenter and yCenter member variables and then you invalidate the control, forcing a complete redraw using the new values as the center of the clock. The result is that clicking on the control makes the clock jump to wherever the control was clicked. You can verify this by rebuilding and running the application. When you click the mouse in the ClockFace control, you should see something like Figure 6-2. Figure 6-2. Clicking to a new position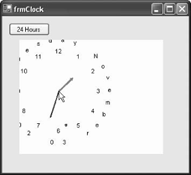 6.1.1. Using MouseDown, MouseUp, and MouseMoveIt would be nice to allow the user to drag the clock around in the control. You can capture the MouseDown event to know when you have begun dragging (and set the cursor to a hand to indicate that you are dragging). The MouseUp event tells you that you are done. MouseMove is a bit of a problem, because you don't want to move the clock every time you move the mouse, but only if you are dragging (signaled by the mouse button being down). To accomplish this, you'll add a member variable: Private isMoving As Boolean = False You are now ready to implement your three event handlers, as shown in Example 6-2. Example 6-2. MouseDown, MouseUp, and MouseMove event handlersPrivate Sub ClockFaceCtrl_MouseDown( _ ByVal sender As System.Object, _ ByVal e As System.Windows.Forms.MouseEventArgs) _ Handles MyBase.MouseDown Me.Cursor = Cursors.Hand Me.isMoving = True End Sub Private Sub ClockFaceCtrl_MouseUp( _ ByVal sender As System.Object, _ ByVal e As System.Windows.Forms.MouseEventArgs) _ Handles MyBase.MouseUp Me.xCenter = e.X Me.yCenter = e.Y Me.Invalidate( ) Me.Cursor = Cursors.Default Me.isMoving = False End Sub Private Sub ClockFaceCtrl_MouseMove( _ ByVal sender As System.Object, _ ByVal e As System.Windows.Forms.MouseEventArgs) _ Handles MyBase.MouseMove If isMoving = True Then Me.xCenter = e.X Me.yCenter = e.Y Me.Invalidate( ) End If End Sub When the mouse is pressed down, the isMoving member is set to true, and the cursor is set to a hand. When the mouse moves, the clock is moved. When the user releases the mouse button the isMoving member is set back to False and the cursor is returned to the default. Note that the three lines of logic to move the clock in MouseMove, MouseUp, and MouseClick are identical. Let's factor those out to a helper method, Relocate, shown in Example 6-3. Example 6-3. Relocate helper methodPrivate Sub Relocate(ByVal e As System.Windows.Forms.MouseEventArgs) Me.xCenter = e.X Me.yCenter = e.Y Me.Invalidate( ) End Sub You can now simplify the previous methods, as shown in Example 6-4. Example 6-4. Simplified versions of the MouseClick, MouseUp, and MouseMove event handlersPrivate Sub ClockFaceCtrl_MouseClick( _ ByVal sender As System.Object, _ ByVal e As System.Windows.Forms.MouseEventArgs) _ Handles MyBase.MouseClick Relocate(e) End Sub Private Sub ClockFaceCtrl_MouseUp( _ ByVal sender As System.Object, _ ByVal e As System.Windows.Forms.MouseEventArgs) _ Handles MyBase.MouseUp Relocate(e) Me.Cursor = Cursors.Default Me.isMoving = False End Sub Private Sub ClockFaceCtrl_MouseMove( _ ByVal sender As System.Object, _ ByVal e As System.Windows.Forms.MouseEventArgs) _ Handles MyBase.MouseMove If isMoving = True Then Relocate(e) End Sub To see the effect of what you've done, rebuild and run the application. You should be able to drag the clock face around using the mouse. Notice also how the center of the clock face follows the mouse; the hands of the clock radiate from this point. 6.1.2. Using MouseEnter and MouseLeaveFinally, just for fun, we'll set the background color when the user's mouse enters the control, and reset it when the mouse leaves. Add a new member variable to ClockFaceCtrl: Private currentColor As Color Add handlers for the MouseEnter and MouseLeave events and implement them, as shown in Example 6-5. Example 6-5. MouseEnter and MouseLeave event handlersPrivate Sub ClockFaceCtrl_MouseEnter( _ ByVal sender As System.Object, _ ByVal e As System.EventArgs) Handles MyBase.MouseEnter Me.currentColor = Me.BackColor Me.BackColor = Color.Aqua End Sub Private Sub ClockFaceCtrl_MouseLeave( _ ByVal sender As System.Object, _ ByVal e As System.EventArgs) Handles MyBase.MouseLeave Me.BackColor = Me.currentColor End Sub 6.1.3. Rebuild and Run the ApplicationNot only is the background color set to light blue when you move the mouse over the clock, but when you drag the mouse within the control, the clock is moved against the new color background until you release the mouse button, as shown in Figure 6-3. Figure 6-3. Dragging the mouse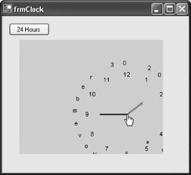 6.1.4. Setting FontsAs you saw in the earlier versions of this program, the text was drawn, one letter at a time, by using an instance of the Font class: Public Sub DrawLetter( _ ByVal g As Graphics, ByVal brush As Brush, _ ByVal ctrl As ClockFaceCtrl) 'get the font to draw Dim theFont As Font = ctrl.myFont The myFont instance was initialized as a member of the ClockFaceCtrl class: Dim myFont as new Font("Arial",80) To add some flexibility (and make things look nicer) we'll set the font to Verdana, and provide a public accessor: Private myFont As Font = New Font("Verdana", 80) Private myFontFamily As String = "Verdana" Public Property FontFamily( ) As String Get Return myFontFamily End Get Set(ByVal value As String) myFontFamily = value End Set End Property We also want to allow the user to set the Font size and other font characteristics. To do so we'll need to provide public properties that allow the client class to set these values within the clock itself, as shown in Example 6-6. Example 6-6. Adding FontSize, bold, and italic propertiesPrivate myFontSize As Single = 80 Private isBold As Boolean = False Private isItalic As Boolean = False Public Property FontSize( ) As Single Get Return myFontSize End Get Set(ByVal value As Single) myFontSize = value End Set End Property Public WriteOnly Property Bold( ) As Boolean Set(ByVal value As Boolean) isBold = value End Set End Property Public WriteOnly Property Italic( ) As Boolean Set(ByVal value As Boolean) isItalic = value End Set End Property Add new controls to the form, as shown in Figure 6-4. Resize the Clock Face Control within the form to 267,212 and set it location to 13,43. Place the other controls under the clock and realign the 24 Hours button. Open frmClock and populate its font list box in the Load event handler, setting "Verdana" as the default font, as shown in Example 6-7. Figure 6-4. Adding new controls to the form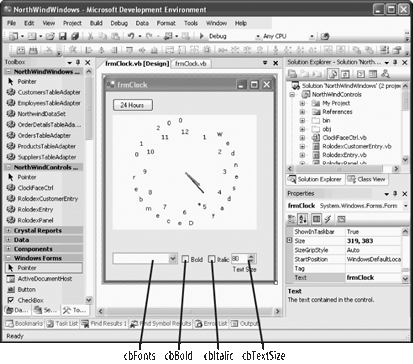 Example 6-7. Clock form Load event handlerPrivate Sub frmClock_Load( _ ByVal sender As System.Object, _ ByVal e As System.EventArgs) Handles MyBase.Load For Each aFontFamily As FontFamily In FontFamily.Families Me.cbbFonts.Items.Add(aFontFamily.Name) If aFontFamily.Name = "Verdana" Then cbbFonts.SelectedIndex = Me.cbbFonts.Items.Count - 1 End If Next ChangeClockFont( ) End Sub Set the event handlers for all the controls to the same event handler, as shown in Example 6-8. Example 6-8. OnFontHasChanged event handlerPrivate Sub OnFontHasChanged( _ ByVal sender As System.Object, _ ByVal e As System.EventArgs) _ Handles cbbFonts.SelectedIndexChanged, _ cbBold.CheckedChanged, _ cbItalic.CheckedChanged, _ numFontSize.ValueChanged ChangeClockFont( ) End Sub Factor out the code to set the new font to create the ChangeClockFont method shown in Example 6-9. Example 6-9. ChangeClockFont methodPrivate Sub ChangeClockFont( ) If Me.cbbFonts.SelectedItem Is Nothing Then Return Me.ClockFaceCtrl1.FontFamily = Me.cbbFonts.SelectedItem Me.ClockFaceCtrl1.Bold = Me.cbBold.Checked Me.ClockFaceCtrl1.Italic = Me.cbItalic.Checked Me.ClockFaceCtrl1.FontSize = Me.numFontSize.Value Me.ClockFaceCtrl1.Invalidate( ) End Sub Return to the Clock control and update its OnTimer method, shown in Example 6-10. Example 6-10. Revised OnTimer method Public Sub OnTimer( _ ByVal source As Object, _ ByVal e As System.EventArgs) Using g As Graphics = Me.CreateGraphics( ) SetScale(g) CreateFont ( ) DrawDate(g) DrawFace(g) DrawTime(g, bForceDraw) bForceDraw = False End Using End Sub 'OnTimer Create the helper method CreateFont, shown in Example 6-11. Example 6-11. CreateFont helper method Public Sub CreateFont( ) ' get font family as set by form.ChangeClockFont Dim fntFamily As New FontFamily(Me.myFontFamily) ' initialize style to regular, then modify if set by ChangeClockFont Dim fntStyle As FontStyle = FontStyle.Regular If Me.isBold Then fntStyle = FontStyle.Bold If Me.isItalic Then fntStyle = FontStyle.Italic If Me.isBold And Me.isItalic Then fntStyle = FontStyle.Bold Or FontStyle.Italic ' check that font exists on this machine ' if so, set my font to the new font ' otherwise, put up msg. box If fntFamily.IsStyleAvailable(fntStyle) Then Me.myFont = New Font(fntFamily, Me.FontSize, fntStyle) Else MessageBox.Show("That is not a legal font on this machine. Resetting...", _ "Illegal Font", MessageBoxButtons.OK, MessageBoxIcon.Error) End If End Sub Now run the application and you should see the results shown in Figure 6-5. Figure 6-5. Clock with new font set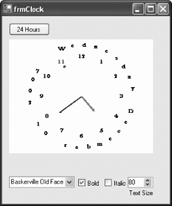 As the user changes the font (or turns on and off bold and italics) the various events checkedChanged, etc.) are fired. Your event handler calls the factored out method OnFontHasChanged which sets all the font characteristics and invalidates the clock (forcing it to be redrawn with the new settings). Every time the clock is updated due to a timer event, the clock's font is set as well, ensuring that the clock continues with the new font settings until the user changes them again. Finally, I'm not sure why you would want to, but you can change the font to WingDings2 and make a very entertaining (if not very informative) clock, as shown in Figure 6-6.
Figure 6-6. Wing ding clock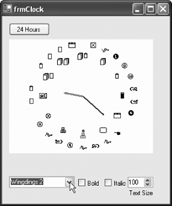 By taking responsibility for drawing your own object, you can achieve precisely the look and feel you want, at the expense of writing a bit more code. As Microsoft adds more controls to the Toolbox, you'll find yourself doing this less often, but when you do need to draw figures dynamically, there is no substitute for doing so programmatically. |

EAN: 2147483647
Pages: 162