2.2. Using the Details View to Create the Detail Form
| In the same way that you want to allow the user to search for a customer, you'd like to be able to search for a supplier. In addition, when looking at the supplier, you'd like to see which products that supplier offers. 2.2.1. Adding New TablesThe first step is to add new tables to the NorthWindDataSet. To do so, choose the menu selections Data This opens the NorthwindDataSet.xsd designer. Right-click anywhere in the designer (except on the Customers table) and choose Add Figure 2-11. Adding a new data table adapter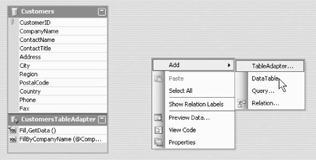 This opens the DataComponents Configuration Wizard. The first step is to choose the connection you want to use (in this case, you can continue to use the NorthWind Connection). The next step is to choose whether you are using SQL Statements, new stored procedures, or existing stored procedures. In this case, you'll use SQL Statements. In the next step, click on the Query Builder window . The Add Table dialog will open, as shown in Figure 2-12. Figure 2-12. Adding a table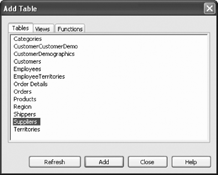 Select the Suppliers table. Click Add and then click Close. When you return to the Query Builder window, select the checkbox beside All Columns, to select all the columns in the Suppliers table, as shown in Figure 2-13. Figure 2-13. Query Builder window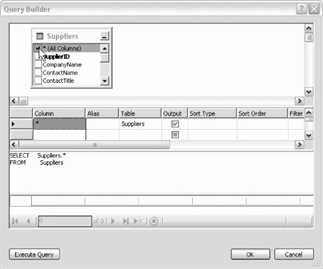 Click OK and then Next, to open the Choose Methods to Generate dialog box, as shown in Figure 2-14. The Fill method will fill the DataTable, as you saw previously. The GeTData method will return the DataTable filled by the Fill method. The third checkbox instructs the wizard to create the Insert, Update, and Delete methods you'll need to update Figure 2-14. Choose Methods to Generate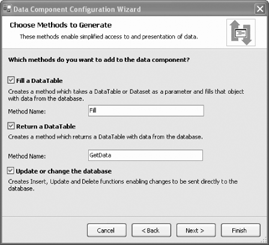 the database with changes to these tables. Accept all these defaults and click Next and then Finish. Once the Suppliers table is added, repeat these steps to add the Products table. Notice that the one-to-many relationship between the Suppliers and Products is recognized in the XSD designer, as shown in Figure 2-15. Figure 2-15. Relationship between Products and Suppliers Also notice that the NorthWindDataSet now has three tables listed under it: Customers, Suppliers, and Products. 2.2.2. Create a Details View DeclarativelyCreate a new form to display the Suppliers and their Products, name it frmSuppliers. Set the size of the new form to 886,450 and add the details of the Suppliers to the form. Previously, you created labels and text boxes by hand, and then linked them up to the columns in the table. This time, open the Data Sources window, and click on the Suppliers table. Notice that one of the choices is Details, as shown in Figure 2-16. Figure 2-16. Suppliers details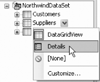 Choose Details and then let the drop-down box close. Now drag the Suppliers table onto your form. Hey! Presto! Four controls are added to the tray, and a set of labels and bound text boxes are added to the form, as shown in Figure 2-17. Delete the SuppliersBindingNavigator (you won't be navigating through suppliers from here) and rearrange the labels and text boxes on the upper portion of the form, as shown in Figure 2-18. We want to reserve the lower portion of the form to display a supplier's product information. We do not want the user to edit the supplier ID so change the enabled property of SupplierID to False. 2.2.3. Declare Master/Detail RelationshipThe Suppliers and their Products are in a master/detail relationship. You can reflect this on your Suppliers form by clicking on the Products table and choosing DataGridView. Drag the products table onto your form, and then click on its smart tag. Change the data source, as shown in Figure 2-19. Figure 2-17. Controls created by dragging suppliers onto form Figure 2-18. Rearrange Suppliers form control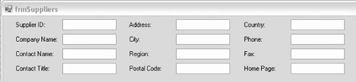 Figure 2-19. Creating master detail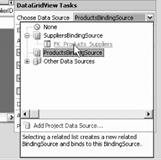 Figure 2-20. Edit data grid columns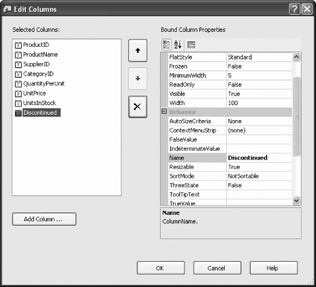 Figure 2-21. Suppliers form with grid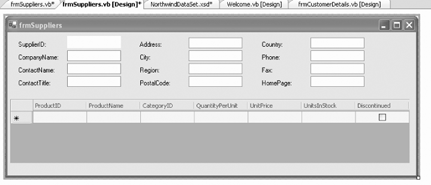 Click on the smart tag again and choose EditColumns to pick the columns you want to display. This opens the Edit Columns dialog, as shown in Figure 2-20. Delete the SupplierID, UnitsOnOrder, and ReorderLevel columns. Resize both the grid and the form to make it look as you'd like it to, as shown in Figure 2-21. 2.2.4. Feeding the Suppliers to the Suppliers PageYour next task is to reproduce the logic used in the previous example to find the Suppliers, and to feed the supplier to this page. As you did last time, return to the Welcome page, and drag the Suppliers table onto the Welcome page. Immediately delete all the controls it places on the form. You are left with a SuppliersBindingSource and SuppliersTableAdapter in the tray, which is just what you want. Click on the SuppliersBindingSource and create the parameterized query, as shown in Figure 2-22. Open frmSuppliers.vb and copy the member variable and property from frmCustomerDetails. Open the handler for the SuppliersFind button click event. The logic is very similar to the Customers Find dialog so copy and paste and then edit, as shown in Example 2-4. Figure 2-22. Suppliers parameterized query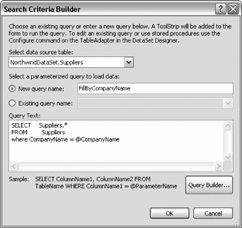 Example 2-4. Suppliers form Find button Click event handler Dim filteredView As Data.DataView = _ New Data.DataView(NorthwindDataSet.Suppliers) filteredView.RowFilter = "CompanyName Like '%" + txtSupplierName.Text + "%'" Dim rowsFound As Int32 = filteredView.Count Select Case rowsFound Case 0 ' no records found MessageBox.Show( _ "No matching records found", _ "No records found", _ MessageBoxButtons.OK, _ MessageBoxIcon.Exclamation) Case 1 frmSuppliers.CompanyNameParameter = filteredView.Item(0)("CompanyName") frmSuppliers.Show( ) Case Else dlgPickMatchingCompany.FilteredView = filteredView Dim result As DialogResult result = dlgPickMatchingCompany.ShowDialog( ) If result = DialogResult.OK Then Dim rowView As Data.DataRowView rowView = dlgPickMatchingCompany.lbMatching.SelectedItem Dim companyName As String = rowView.Row.Item("CompanyName") frmSuppliers.CompanyNameParameter = companyName frmSuppliers.Show( ) End If End Select Modify the Load event handler to use the FillByCompanyName method you created for the Suppliers table, as shown in Example 2-5. Example 2-5. Suppliers form Load event handler Private Sub frmSuppliers_Load( _ ByVal sender As System.Object, _ ByVal e As System.EventArgs) _ Handles MyBase.Load Me.SuppliersTableAdapter.FillByCompanyName( _ Me.NorthwindDataSet.Suppliers, Me.m_CompanyNameParameter) Me.ProductsTableAdapter.Fill(Me.NorthwindDataSet.Products) End Sub When you enter a supplier company name, it is resolved just as the customer name was, and then the detail page is displayed, as shown in Figure 2-23. Figure 2-23. Suppliers detail form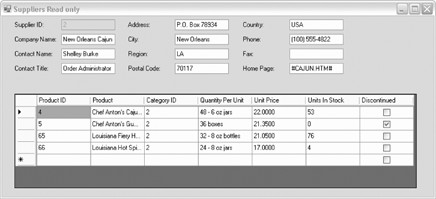 2.2.5. Factor Out Common CodeThe idea of having nearly duplicate code in two methods should send a shudder down your spine. Let's combine the btnSuppliersFind_Click method and the btnCustomersFind_Click methods into a single method named btnFind_Click, as shown in Example 2-6. Example 2-6. Common Find button Click event handler ''' <summary> ''' Common find button event handler ''' </summary> ''' <param name="sender">the find button itself</param> ''' <param name="e">place holder for event args</param> Private Sub btnFind_Click( _ ByVal sender As System.Object, _ ByVal e As System.EventArgs) _ Handles btnSuppliersFind.Click, btnCustomersFind.Click ' cast the sender to be of type button and get its name Dim btn As Button = CType(sender, Button) Dim btnName As String = btn.Name ' common code ' determine which text field to draw from ' based on the button name Dim text As String = String.Empty Dim table As System.Data.DataTable = Nothing ' which text box to get the name from ' which data table to filter Select Case btnName Case "btnSuppliersFind" text = txtSupplierName.Text table = NorthwindDataSet.Suppliers Case "btnCustomersFind" text = txtCustomerName.Text table = NorthwindDataSet.Customers End Select Dim filteredView As Data.DataView = _ New Data.DataView(table) ' this row filter can now be generalized filteredView.RowFilter = "CompanyName Like '%" + text + "%'" Dim rowsFound As Int32 = filteredView.Count Select Case rowsFound Case 0 ' no records found MessageBox.Show( _ "No matching records found", _ "No records found", _ MessageBoxButtons.OK, _ MessageBoxIcon.Exclamation) Case 1 'which form you show depends on the button name Select Case btnName Case "btnSuppliersFind" frmSuppliers.CompanyNameParameter = _ filteredView.Item(0)("CompanyName") frmSuppliers.Show( ) Case "btnCustomersFind" frmCustomerDetails.CompanyNameParameter = _ filteredView.Item(0)("CompanyName") frmCustomerDetails.Show( ) End Select Case Else dlgPickMatchingCompany.FilteredView = filteredView Dim result As DialogResult result = dlgPickMatchingCompany.ShowDialog( ) If result = DialogResult.OK Then Dim rowView As Data.DataRowView rowView = dlgPickMatchingCompany.lbMatching.SelectedItem Dim companyName As String = rowView.Row.Item("CompanyName") ' which form you show depends on the button name Select Case btnName Case "btnSuppliersFind" frmSuppliers.CompanyNameParameter = _ filteredView.Item(0)("CompanyName") frmSuppliers.Show( ) Case "btnCustomersFind" frmCustomerDetails.CompanyNameParameter = _ filteredView.Item(0)("CompanyName") frmCustomerDetails.Show( ) End Select End If End Select End Sub
This common event handler can now replace the two previous event handlers. While this may be slightly more complex than either was individually, it is easier to maintain, because changes have to be made only in one place (cutting down the likelihood of error).
2.2.6. Updating DataThe data on your customer form is bound to the underlying data through the CustomerTableAdapter and the CustomerBindingSource. To allow the user to update the data, drag a button onto the tab and change its Text property to Update. Name it btnUpdate, as shown in Figure 2-24. Double-click on the button to go to the defaultClick event handler. We'll want some feedback when the update is done. Add a label to the top of the tab named lblTitle. Set its font to blue, size 24, and set its text to Company Name Here. Update the load method to set the label's text to the name of the company, as shown in Example 2-7. Figure 2-24. Adding the Update button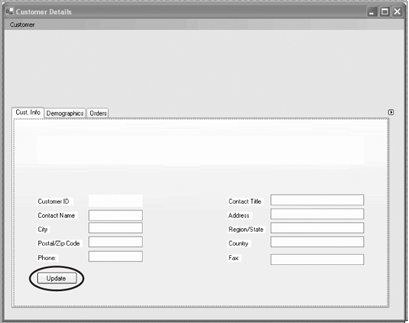 Example 2-7. Customer details form Load event handlerPrivate Sub frmCustomerDetails_Load( _ ByVal sender As System.Object, _ ByVal e As System.EventArgs) _ Handles MyBase.Load CustomersTableAdapter.FillByCompanyName( _ NorthwindDataSet.Customers, m_CompanyNameParameter) lblTitle.Text = m_CompanyNameParameter End Sub You need to tell the DataConnector that you are done editing the data (so that the updates will be written back to the table in the Dataset). You also need to tell the CustomersTableAdapter to Update, passing in the changes in the Customers table. Example 2-8 shows how to code the Click event handler for the Update button on the Customer Details page. Example 2-8. Customer Details Update button Click event handlerPrivate Sub btnUpdate_Click( _ ByVal sender As System.Object, _ ByVal e As System.EventArgs) Handles btnUpdate.Click Me.CustomersBindingSource.EndEdit( ) If NorthwindDataSet.Customers.GetChanges( ) IsNot Nothing Then Me.CustomersTableAdapter.Update(NorthwindDataSet.Customers.GetChanges( )) Label1.Text = "Updated!" End If End Sub EndEdit applies the changes in the bound fields to the underlying data source (the table in the Dataset).
That's it. Make your changes, click update, and hey! Presto! The database is updated, as shown in Figure 2-25. |
 ShowDataSources. Right-click on the NorthWindDataSet and choose Edit Data Source With Designer.
EAN: 2147483647
Pages: 162