|  
Hack Halo 2.MAP files with this popular application. ADI is a popular tool for modding Halo 2 maps. Map modders such as MrMurder and GTJuggler use ADI for most of their work. The leader of the ADI project The Swamp Fox humbly shifts the credit for ADI's success to the Halo modding community. According to The Swamp Fox, key modders such as Iron_Forge, ViperNeo, and pfhorslayer make up the backbone of the Halo-modding community. He credits these modders with the success of the ADI application. These people have defined ways to access parts of the map and mod them. The Swamp Fox considers ADI to be a tool that you can use to speed up the processes originally created by these expert modders. ADI is available from the HaloMods Download page (http://files.halomods.com/). Because the location of the download moves around from time to time, be sure to look for sticky posts in the forums these are posts that are kept at the top of the forum so they are easier to find.  | ADI doesn't stand for anything; the acronym came to The Swamp Fox in a dream and he liked the sound of it. |
|
Halo 2 .MAP files contain a great deal of metadata. This data determines how the Halo 2 game engine behaves. The metadata is stored in tags and applications such as ADI allow a user to browse through the tags and make changes (see Figure 6-1). For example, if you wanted to alter the properties of the Banshee, you would browse to the [vehi] tags and adjust the Banshee's metadata (see Figure 6-2). Figure 6-1. The main ADI window 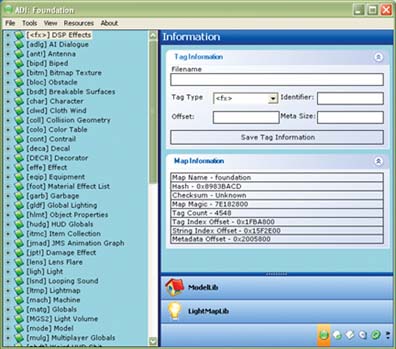
The fact that so much metadata is stored in Halo 2 maps is testament to how well the Halo 2 engine was developed. These properties grant game developers a great deal of flexibility when it comes to customizing the game. Of course, the other substantial benefit is that Halo 2 modders can alter this information to change the behavior of everything from lighting to weapons. Originally, changes to the metadata had to be made using hexadecimal (hex) editing [Hack #54]. However, hex editing is a complex process and it presents enough of a barrier to entry that few people actually use the technique. This is where applications such as ADI enter the picture. As The Swamp Fox says, these programs present the metadata in a legible format and allow you to easily make alterations. If you wanted to, you could try to make the same changes with hex editing, but most of the time, you'll probably want to use the modding apps. ADI has a built-in dynamic link library control shell. This means that the app can alter any metadata that someone writes a plug-in to read and write. So even if ADI doesn't support every type of metadata on its own, someone can add it later. To stay up-to-date with your plug-ins, be sure to visit http://www.hxbdev.com and http://www.halomods.com. Figure 6-2. Editing the Banshee tag in ADI 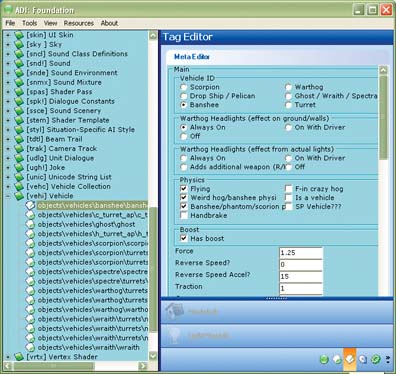
| To use all of ADI's features, you will need to have the files shared.map, single_player_shared.map, and mainmenu.map in the same directory as the file (such as a Halo 2 map) that you are modding. These files are Halo 2 maps that can be found in the /F/games/Halo 2/maps folder on the Xbox hard drive. You can copy these files to your PC via FTP. |
|
I will use ADI to get you acquainted with the various aspects of the Halo 2 .MAP files. Here is a brief explanation of the tools incorporated into the program. Upon opening a map file, you will be presented with an overwhelming amount of information listed in metadata tags. On the bottom right of the main window is the toolbar. By selecting the tabs on the toolbar, you can access various ADI functions: 6.1.1. 6.1.1.1. Tag Information. When a meta tag is selected, its full filename will be displayed along with the following information:
Type -
The tag type. For example, [effe] tags are for effects, [proj] tags are for projectiles, and [mode] tags are for Halo 2 models.
Tag Identifier -
This is the tag's reference in hex code. These references are used when the map or other meta tags need to reference the tag.
Offset -
If you open the map in a hex editor, you can use this number to find the meta tag. Some hardcore modders still use this method despite the more user friendly tools that are now available.
Meta Size -
This information is useful when looking to inject certain things into your modded levels. Injecting meta tags over one another is a relatively sophisticated mod. There is also some map information that for the most part isn't needed unless you're doing all of your modding in hex. 6.1.1.2. Meta Functions. The following meta functions are available:
Save Meta -
Enables you to save the selected piece of metadata in a folder for possible alteration and injection.
Inject Meta -
Allows you to inject saved metadata over existing metadata to add new effects or reuse existing effects in your levels. Most of the interesting mods involve combining effects from various places and putting them together to create something new.
Recursive -
By selecting this option, you are able to save all the related metadata to the tag that was initially selected. This is useful for saving projectiles from single-player maps for injection into multiplayer. However, as of this writing, this tab was not yet enabled for injection. 6.1.1.3. Tag Editor. This is where the plug-ins for ADI do their work. The plug-ins allow you to alter values in the hex code. This can affect such things as the speed of a projectile, its life span, or the damage it inflicts per hit. What can be adjusted in the Tag Editor depends on the plug-in. Not all of the Halo 2 tags are covered by an ADI plug-in. 6.1.1.4. Raw Data Editor. As of this writing, this feature had not been implemented yet. 6.1.1.5. Meta Scanner. This is where modders do the majority of their work. This feature enables swapping dependencies to create new effects and even projectiles. This tab is also used to "fix" the dependencies of injected metadata. The Meta Scanner gives modders access to the inner workings of weapons and effects used to create new weapon mods. For example, when you open the Rocket Launcher projectile, you can view all of its dependencies (see Figure 6-3). Figure 6-3. The ADI Meta Scanner showing the Rocket Launcher's dependencies 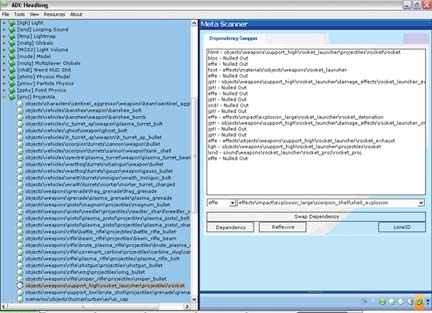
On the right side in the Meta Scanner, you can see the projectile's dependencies. Here is an explanation of these items:
Hlmt / Object Properties -
The projectile's model (if any), its collision model, and any physics or shaders that it is using.
Foot / Material Effects List -
Some of the projectile's sound on impact as well as general impact effects.
Jpt! / Damage Effect -
The actual damage of the projectile and any force, screen shake, explosion delay, or other effects associated with it.
Effe / Effects -
The effects generated on either impact, flight, or the projectile itself. The order of these effects, required for making your own projectiles, can be learned by looking at unmodded projectiles.
Ligh / Light -
The light the projectile generates as it travels toward its target. By examining other light sources and linking them into projectiles, you can dramatically change a projectile's appearance.
Lsnd / Looping Sound -
The sound effects played when the projectile is in flight. Only certain projectiles have this dependency. Some other tags that aren't listed in the Rocket Launcher projectile are:
Cont / Contrail -
The smoke or plasma trail left in the wake of a projectile (e.g., tracer fire).
Mgs2 / Light Volume -
The more solid light effects contained in the game. For example, the Spectre emits a cone of light when the boost is used. Once you start getting to grips with what these dependencies do and more importantly what they look like in the actual game settings you can start to swap using the Swap Dependency button in the lower portion of the Meta Scanner window. From here, it's simple to move down through the roots of the projectile that you're working on and view the rest of the dependencies. Next, you should investigate the Effects tag. To do this, you must navigate to the [effe] tag and then open effects\impact\explosion_large\scorpion_shell\shell_explosion in the Meta Scanner window (see Figure 6-4). On the right side in the Meta Scanner you can see the effect's dependencies, which are:
Ligh / Light -
This is the light generated by an explosion. Larger explosions produce more light. This can also be edited in the Tag Editor to increase the intensity and burst along with red, blue, and green light within the light.
Snd! / Sound -
The effect produces this sound. Unlike the [lsnd] tag, this isn't a looping sound it's played only once. Figure 6-4. The dependencies of the Scorpion shell effect 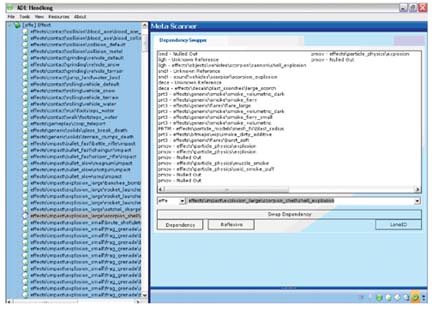
Deca / Decal -
This is the charring or plasma burns left behind by the detonation. Some of these are bigger than others and can negatively affect the frame rate especially if used on a rapid fire weapon or in a concentrated area. In these cases, the game engine will overlay them on top of each other. When you look at these explosions, they will cause some server lag issues until they fade.
Prtm / Particle Model -
This tag is where some of the more solid effects are produced (e.g., the Covie Carbine clip or SMG clip on a reload). Also contained in here are two very useful effects: effects\particle_mod-els\mesh_fx\blast_ring and radius. These generate a shockwave effect around the explosion. They can be added to most explosions but require swapping in if the effect doesn't already have a Prtm dependency. To do this effectively is a matter of trial and error. The idea is to swap a tag like [prt3] to [prtm] the same way you swap a dependency in the Meta Scanner (using the tag drop-down box). Once you have changed the [prt3] to a [prtm], swap in the dependency for the one you want. It's best to avoid swapping both at the same time it sometimes doesn't work.
Prt3 / Particle -
These are the visual effects of the explosion. For example, they could include smoke, fire, or electrical effects. Spend some time looking at the explosion you want to mod and try to spot the dependencies in the effect. If you want to make changes, you should note the size of the tags and the order in which they appear. The majority of the tags are labeled clearly, so finding effects that you have seen in the game is generally easy. However, if you're having trouble finding something, just note the name of the [prt3] and go to the Bitm tags. Scroll through the list until you find the corresponding bitmaps. To look at bitmaps, you must have the map you're modding, mainmenu.map, single_player_shared.map, and shared.map in the same folder.
Pmov / Particle Physics -
The [pmov] tag affects the shape and volume of the effects generated in the [prt3]. The ordering of the [prt3] dependencies corresponds with the order of the [pmov]s below them. Don't swap the unknowns in the dependencies as they tend to mess up your map file and cause load problems. Use your imagination to create new projectiles. When you get the hang of swapping meta, you may want to start to inject effects and projectiles from other multiplayer maps or even single-player maps. 6.1.1.6. Tag Editor / Meta Editor. Open the projectile in the Tag Editor and you will find the following attributes:
Grenade -
Whether the projectile is a grenade or not.
Projectile Type -
A numeric value for the type of projectile.
Particle Size -
This value affects the physical size of certain projectiles when they are in flight. The higher the number, the larger the projectile will appear.
Bounce life before exploding -
This value determines how long after a bounce the projectile will continue to move before it detonates in the air.
Bounce distance before exploding -
How far a grenade will bounce before causing an airborne detonation. The upper limit is 5.
Glow radius -
The glow surrounding the projectile in flight. For example, the rocket projectile glow. The higher the number, the brighter the glow.
Damage effect distance -
The effect of this value is currently unknown.
Projectile life distance -
How far the projectile travels when fired. The higher the number, the farther the projectile will fly.
Life span -
The time the projectile will last after being fired. This value works in tandem with the previous life distance flag.
Minimum explosion delay -
The shortest time it takes certain projectiles to detonate on impact.
Maximum explosion delay -
The longest time it takes certain projectiles to detonate on impact.
Weight / arc -
The effect of this value is unknown.
Initial projectile speed -
The starting speed for the projectile as soon as it's fired from the weapon. If the value of the Final projectile speed attribute is higher, it will steadily increase to its maximum speed.
Final projectile speed -
The maximum speed of the projectile.
Homing turning ability 1 and 2 -
The only two weapons that allow homing or heat seeking are the Plasma Pistol's charged bolt and the Needler. Rockets will only heat seek vehicles and require a target lock on. The Needler and Plasma Pistol only need the name of the target in the reticule. Once fired, the projectile will track depending on the value in the top box. The second one is unchangeable. If you wish to make a weapon fire heat-seeking rounds, you must save and inject the Needler's [WEAP] tag into another weapon or use the Needler as the default gun. Once you have your projectile injected, you can start to make it faster or slower, bigger or smaller, or even add a heat-seeking feature. The choice is yours to make. You may want to increase the damage the projectile does on impact. To make these changes, you should open the [jpt!] tag in the Tag Editor (see Figure 6-5). The types of damage are self-explanatory and have little or no effect. Let's examine the rest of the attributes: Figure 6-5. Projectile effects in the Tag Editor 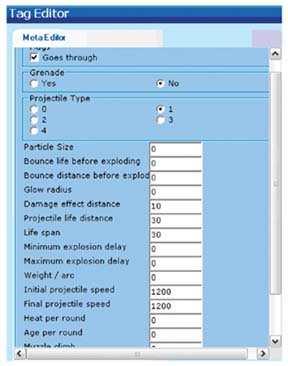
Flags Explosion and Headshot -
When these are selected, they ensure that any Projectile with two [jpt!] dependencies has the minimum and maximum range added to its damage effect. The Headshot flag means that the damage multiplier is applied to any shot hitting the target's head. In addition, the appropriate headshot point will be added to the carnage report. | Keep in mind that only some weapons feature the headshot bonus. |
|
Minimum Range and Maximum Range -
This is for the explosion effect on grenades and large detonations. The effect is in meters, but getting it right is a matter of judgment and in-game testing.
Damage Minimum and Maximum -
The minimum and maximum damage the projectile causes on impact. If they are different, the final value is randomly generated between these two values.
Force -
This is an interesting value. When tagged onto projectiles, it mimics the explosive push associated with a projectile's impact. Think of it as a kickback effect. In multiplayer split-screen games, it's a fun tool as it can be used to throw some scenery and players off levels or into danger and explosions. However, for unknown reasons the force of a projectile in a system link game will only affect the host of the game. Temporary "physics" can be gained if the Host player enters the driving seat of a vehicle and other players get into the remaining seats they will be affected while in the same vehicle. As you can imagine, this severely limits the application of this effect.
Stun 1, Stun 2, and Stun Time -
The Halo 1 stun effect from the Plasma Rifle and Ghost were dropped in Halo 2, so these two flags don't work. | After you make any change to a map in ADI, you must sign your map before you test it out. As with other modding apps, ADI has this option built into the program see Sign Your Custom Maps [Hack #53] for more information. Once you've signed the map, you'll need to FTP it over to your modded Xbox ([Hack #54] shows this being done with CuteFTP, but you should be able to use your favorite FTP client). |
|
|