Hack 29. Super Weapon on Metropolis
|
Add a Scarab Gun to your arsenal. This hack allows you to use the weapon from the Covenant Scarab tank. The Scarab is the giant spider-like vehicle that you face on the Metropolis level. Sgt. Johnson uses a Scarab to "open" the doors on The Great Journey level. The Scarab gun Easter egg is a portable version of the Scarab vehicle's main weapon. The gun was originally located in hex code by a group of Halo modders. The hex code reference for the Scarab gun looks like this: Scarab Main Gun Handheld 0D7D8ED8 A86FAB80 0DE12FA8 FD541B93 1,124b scenarios\objects\covenant\military\scarab\weapons\main_gun\ scarab_main_gun_handheld Next, the modders switched the Warthog vehicle models with Banshees and explored the marine base area of Metropolis from the air. They located the gun on top of one of the sky bridges, floating above an orange cone. The Scarab gun actually uses the model of a Plasma Rifle. Reaching the gun without modding was the next challenge. FrogBlast solved this by finding a glitch with a loading zone. This glitch allows a player to have a Banshee in the second part of the level. To find the weapon, start a campaign game on the Metropolis level. You should play on Normal difficulty or above. The reason for this is that you need the Banshee to be aggressive enough to follow you. In addition, you will have a much easier time if you grab the Sputnik skull [Hack #16] before you attempt to get the gun. This changes the physics of Halo 2 by lowering the mass of certain objects. Having the Sputnik skull will make it easier for you to knock things around and you will be able to melee the Banshee into place. When the level begins, get into the Warthog and drive over the bridge until you reach the tunnel entrance. At this point, hijack one of the Ghosts that comes out of the tunnel, and destroy everything except for one of the Banshees. Drive slowly down the tunnel, making sure that the Banshee is following you (see Figure 3-26). If the Banshee does not follow you, you should double check to make sure that you aren't playing on the Easy difficulty setting. Figure 3-26. The lone Banshee entering the tunnel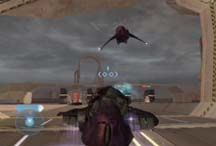 When you are luring the Banshee down the tunnel, you must watch it care-fully. If you don't stay close to it, it can disappear at checkpoints. If this happens, and reverting to the last checkpoint does not get you back to where you were, then you should reboot your Xbox without saving the game. This will get you back to where you last saved the game. In general, you will want to stay in your stolen Ghost as much as possible. When the Banshee gets stuck, you can try to lure it to you or you can melee it into a better position. Even with the Sputnik skull, it isn't easy to get the Banshee to cooperate there will be many times when it acts like a fly on a window. The positive effect of the Banshee's disorientation is that it is trivial to hijack it. When the Warthog carrying marines comes into view, blow it up immediately. If you let the Marines have their way, they will destroy the Banshee. Making sure that the Banshee is still following you, drive over the first barrier and proceed to take out all the Covenant forces in the area. Make sure that the Banshee is never too far away or it will disappear. When the area is clear, find the Banshee again (it will most likely be stuck in the debris) and melee it several times. You will not destroy it by hitting it. However, the melee attack will make the Banshee follow you again. Slowly move into the red room on the right side of the tunnel, after the second barrier. Remember, the Banshee should still be following you. Next comes the hard part the Banshee will attempt to fly up a vertical shaft. If it goes up this shaft, it will never come back down (see Figure 3-27). Figure 3-27. Don't let the Banshee go up this way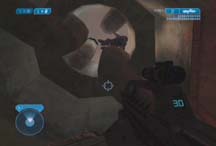 You will have to revert to the last checkpoint if it does this. Instead of letting it go up the vertical shaft, you want to move the Banshee into the smaller tunnel that leads to the next loading zone. Shoot the Banshee's wings off and then Melee it into the tunnel. As soon as the Banshee gets into the tunnel, jack it and ride it through the cut scene. In Figure 3-28 you can see the Banshee next to the tunnel entrance (the tunnel is on the right side of the image). Figure 3-28. Moving the Banshee into place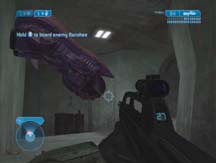 If you jack the Banshee at the right time, the message "Loading…done" appears, at which time you must be pressing X and be in the process of hijacking the Banshee. The craft will now be on the other side of the loading zone with you as the pilot (see Figure 3-29). Figure 3-29. Success!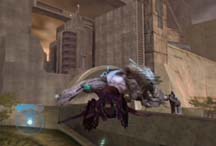 Fly to the sky bridge, grab the gun, and have some fun! (see Figure 3-30) Figure 3-30. The Scarab gun is located on top of a high bridge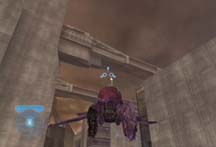 The gun appears to be a normal Plasma Rifle (see Figure 3-31). Figure 3-31. The prize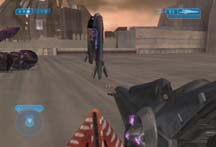 Just be careful not to shoot the ground at your feet. Once you have this weapon, you almost have to feel sorry for the Covenant (see Figure 3-32). Figure 3-32. Enjoying the new weapon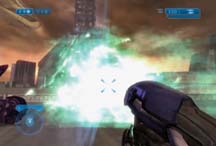 |
EAN: 2147483647
Pages: 166