Hack 9. Find the Most Difficult Skull.
|
The "I Would Have Been Your Daddy" skull is the most difficult Easter egg to activate. This skull alters the Marines' dialogue. It's on the Outskirts level and requires that you play in Legendary mode. The mission objective to watch for is entitled "Find the marines from second downed Pelican." When you complete the activation for this skull, the notification "I would have been your daddy" appears onscreen. Some of these interesting audio tidbits have been recorded. For example, one of the marines has been recorded saying:
2.5.1.2.5.1.1. Finding the SkullThe "I would have been your daddy" (IWHBYD) skull is in a room on a balcony, so you will need to get onto the rooftops to access the secret area. The room contains a Sniper Rifle and Sniper ammo, and if you're lucky (see "Spawning the Skull," later in this hack), it will contain the skull. At the end of Sniper Alley, there is a way to get up onto the rooftops (see Figure 2-10). Use this structure to crouch jump [Hack #1] onto a low orange roof. Figure 2-10. One way to get up onto the rooftops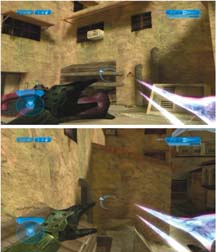 Once on this roof, you will be able to crouch jump over to the other side of Sniper Alley. It looks like an impossible jump, but the Master Chief will make it across (see Figure 2-11). Figure 2-11. You will make it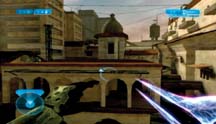 When you have made it to the other side of Sniper Alley, run across the roof and head to the right. Most likely, you will need to take out a sniper hiding on the left side just below your level. Jump across a couple of rooftops and turn to your left. You will see a balcony with a laundry line (see Figure 2-12). Jump across and you will find the room that contains the IWHBYD skull. Even if the skull is not there, you can tell that you're in the right place because there will be posters with a skull and the numbers one and seven. Figure 2-12. IWHBYD is inside a room next to this laundry line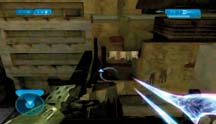 2.5.1.2. Spawning the SkullThe IWHBYD skull is still clouded in mystery. In fact, it seems to be the most hotly discussed and disputed Halo 2 Easter egg. The problem is that no one (as of the time of writing) has discovered the exact spawn algorithm. There are many theories, but for most people, whether or not the skull appears is still a matter of luck. Without knowing the exact steps involved, getting this skull is simply a matter of trying until you get it to work. Finding the spawn spot is actually quite straightforward getting the skull to spawn is not. At the time of writing, a video [Hack #77] is available that demonstrates a method that is often successful (http://halo.bungie.org/oldnews.html?item=12071). Halo 2 hackers have claimed that hex files show three triggers for the IWHBYD skull. Most likely, two of these are Sgt. Johnson boarding the pelican and the invisible Elites appearing in Sniper Alley. However, the third trigger remains a mystery. Bungie has suggested that there is a clue in the room where the skull spawns. People have suggested that the numbers one and seven on the posters in the skull's room represent the seven waves of Elites that attack anyone who picks up the skull. However, user E-Slayer posted (in the http://www.highimpacthalo.com forum) another theory about these numbers. He suggests that they indicate a checkpoint that occurs 17 seconds after Sgt. Johnson leaves on the Pelican. Based on this theory (and a post by user Twelve Large to the same forums), here is a complete guide to spawning the skull:
Normally, the next checkpoint will activate, and the IWHBYD skull will spawn. However, if you take a few shots at the Elites below the skull room, the game won't give you a checkpoint, but the skull will still spawn. This way, if you die during the waves of Elites that appear after you pick up the skull, you will be back on the red roof, and you can just go grab the skull again. If it spawned the first time and you didn't get the checkpoint, it will always be there. 2.5.1.3. Activating the SkullAn interesting issue with the IWHBYD skull is that finding it isn't enough to complete the activation. To activate the skull, you must survive an onslaught of angry Elites. After you pick up the skull, you will be teleported to the ground level. Not only will you have to survive seven waves of Spec. Ops. Elites, but you will also lose the weapons that you were holding when you picked up the skull. When you appear on the ground, you will only have a Plasma Pistol. Each wave of Elites has more soldiers than the previous one. The first wave has one Elite, the second has two, etc. To give yourself an edge in the battle, you may want to use the Infinite AC hack [Hack #42] before you try for the IWHBYD skull. Defeating the last Elite will activate the skull. If the Elites take you down, and your checkpoint no longer spawns the skull, move back a checkpoint [Hack #31] so that you can try again. The skull should spawn, and you can try the fight again. People have come up with a number of ways to deal with the challenging skull activation fight. One option is to use the crates on the ground to build a barricade. This will slow down the advancing Elites. However, you can also hop up onto the balcony with a Battle Rifle and Plasma Pistol. This combo will allow you to take out the Elites from a safe distance. According to some information that Cody Miller posted in a forum at http://bungie.org, the Elites spawn in regular positions and they assume you are in the balcony facing the street below. An Elite with the Battle Rifle will spawn on the ledge to your right, a Plasma Sword Elite on the left, and a Beam Rifle Elite on the street below you on the right. Make sure that you take out the Elite with the Beam Rifle as soon as you can; he's a monster. These three are the most important enemies to watch. After a wave spawns, check the right side first for a Battle Rifle Elite, then the left side for the Plasma Sword. After that, look for the Elite with the Beam Rifle. Having a fully charged plasma pistol is essential. When there is only one Elite remaining, find a way to drop your Battle Rifle on the balcony (either by swapping it with the Plasma Sword up there, or by using dual wielding to bring another weapon to the balcony). Next, run along the balcony away from the street. You'll be teleported down with a fully charged plasma pistol, but you'll lose the other weapon. Once this happens, quickly get back onto the balcony and retrieve your Battle Rifle. Repeat this procedure for each of the seven waves. It's always fun to smack the very last Elite with your Battle Rifle. Who's your daddy now? |
EAN: 2147483647
Pages: 166