2.2 Developing Hello World
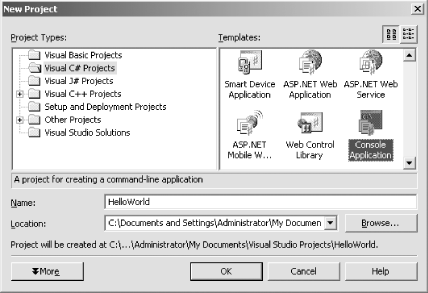
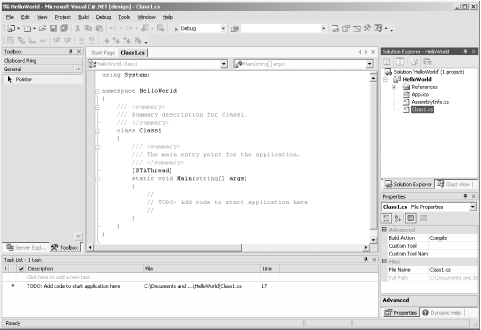
2.2 Developing "Hello World"There are at least two ways to enter, compile, and run the programs in this book: use the Visual Studio .NET Integrated Development Environment (IDE), or use a text editor and a command-line compiler (along with some additional command-line tools to be introduced later). Although you can develop software outside Visual Studio .NET, the IDE provides enormous advantages. These include indentation support, Intellisense word completion, color coding, and integration with the help files. Most important, the IDE includes a powerful debugger and a wealth of other tools. Although this book tacitly assumes that you'll be using Visual Studio .NET, the tutorials focus more on the language and the platform than on the tools. You can copy all the examples into a text editor such as Windows Notepad or Emacs, save them as text files, and compile them with the C# command-line compiler that is distributed with the .NET Framework SDK. Note that some examples in later chapters use Visual Studio .NET tools for creating Windows Forms and Web Forms, but even these you can write by hand in Notepad if you are determined to do things the hard way. 2.2.1 Editing "Hello World"To create the "Hello World" program in the IDE, select Visual Studio .NET from your Start menu or a desktop icon, and then choose File->New->Project from the menu toolbar. This will invoke the New Project window. (If you are using Visual Studio for the first time, the New Project window might appear without further prompting.) Figure 2-1 shows the New Project window. Figure 2-1. Creating a C# console application in Visual Studio .NET To open your application, select Visual C# Projects in the Project Type window and select Console Application in the Templates window. You can now enter a name for the project and select a directory in which to store your files. Click OK, and a new window will appear in which you can enter the code in Example 2-1, as shown in Figure 2-2. Figure 2-2. The editor opened to your new project Notice that Visual Studio .NET creates a namespace based on the project name you've provided (HelloWorld), and adds a using System statement because nearly every program you write will need types from the System namespace. Visual Studio .NET creates a class named Class1, which you are free to rename. When you rename the class, be sure to rename the file as well (Class1.cs). To reproduce Example 2-1, for instance, change the name of Class1 to HelloWorld, and rename the Class1.cs file (listed in the Solution Explorer window) to hello.cs. Finally, Visual Studio .NET creates a program skeleton, complete with a TODO comment to get you started. To reproduce Example 2-1, remove the arguments (string[] args) and comments from the Main( ) method. Then copy the following two lines into the body of Main( ): // Use the system console object System.Console.WriteLine("Hello World"); If you are not using Visual Studio .NET, open Notepad, type in the code from Example 2-1, and save the file as a text file named hello.cs. 2.2.2 Compiling and Running "Hello World"There are many ways to compile and run the "Hello World" program from within Visual Studio .NET. Typically you can accomplish every task by choosing commands from the Visual Studio .NET menu toolbar, by using buttons, and, in many cases, by using key-combination shortcuts. For example, to compile the "Hello World" program, press Ctrl-Shift-B or choose Build->Build Solution. As an alternative, you can click the Build button on the Build button bar (you may need to right-click on the toolbar to add the Build button bar). The Build button icon is shown in Figure 2-3. Figure 2-3. Build button iconTo run the "Hello World" program without the debugger, you can press Ctrl-F5 on your keyboard, choose Debug->Start Without Debugging from the IDE menu toolbar, or press the Start Without Debugging button on the IDE Build toolbar, as shown in Figure 2-4 (you may need to customize your toolbar to make this button available). You can run the program without first explicitly building it; depending on how your options are set (Tools->Options), the IDE will save the file, build it, and run it, possibly asking you for permission at each step. Figure 2-4. Start Without Debugging button
Use the following steps to compile and run the "Hello World" program using the C# command-line compiler:
|
EAN: 2147483647
Pages: 182
