| At the top of the Attribute Editor for lights is a set of values that hasn't been discussed yet: Color, Intensity, and toggles for Specular, Diffuse, and Illuminates by Default. You'll use these attributes frequently to adjust a light's intensity and appearance. Intensity A light's Intensity attribute controls the brightness of the source. You can set it to any value, positive or negative. If the intensity is raised, more light is emitted from the source (see Figure 10.20). Usually, you set the value between 0 and 1 for a medium-intensity fill light. For sunlight effects, you might go as high as 1.5 or so. With Decay Rate added (described later in this section), the light's Intensity value might need to be set much higher because the strength can fall off rapidly with distance. All Maya's default lights have no decay rate (although the Area light gives the impression of light decay) and illuminate objects at full intensity, regardless of distance. Figure 10.20. By changing the Intensity from 1 (image on the left) to 2.5 (image on the right), the room looks much brighter and the shadows remain fully dark. 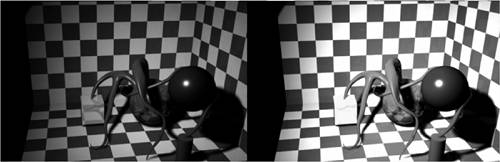
You can also use negative values for the Intensity attribute. By setting a negative value, the light actually "absorbs" other light. If you have an area of the scene that you want to be pitch-black but have light illuminating it, you can use a light with a negative Intensity setting to help eliminate the problem. Illuminates by Default By default, lights automatically illuminate all objects in the scene. When you disable the Illuminates by Default check box, the light is removed from the defaultLightSet and affects only objects it's linked to. Light linking is handled in the Relationship Editor for lights (Window | Relationship Editors | Light Linking). In this dialog box, you can select a light and then choose which objects it illuminates (see Figure 10.21). The "active" objects that will be illuminated are highlighted in gray on the left side of the dialog box. Figure 10.21. Setting up light linking in the Relationship Editor. 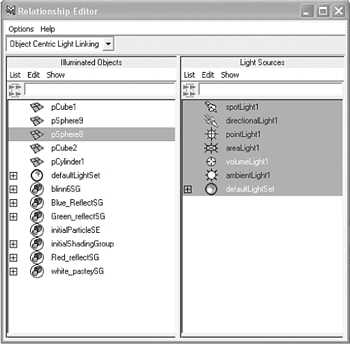
Emit Diffuse and Emit Specular In special cases, a light can emit only diffuse or specular shading (see Figure 10.22). The Emit Diffuse and Emit Specular attributes are not available with Ambient lights. Emit Diffuse is particularly useful for creating soft fill lights to simulate light reflection; you need to disable the Emit Specular attribute so that no highlights are generated. Emit Specular can also be useful for lighting metal objects (such as chrome logos) when you want to add specular highlights to the metal without brightening other areas. Figure 10.22. The leftmost object is lit by a normal light that emits specular and diffuse components. The center shows specular only and the right shows diffuse only. 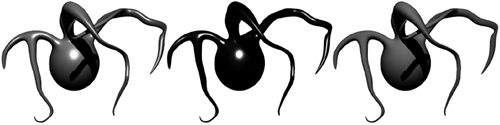
Color Each light can have its own color assigned, and modifying the color of a light follows the same procedure and uses the same Color Chooser dialog box you see when modifying color for a material. You can also map textures to a light's color, causing the light to project the texture like a slide projector. Or if you animate the texture variables or use a movie as the source, the light acts as a movie projector. Decay Rate Specific to Spot, Area, and Point lights, this attribute determines the rate at which the light intensity fades (decreases) at a distance. Several types of decay are available in the Attribute Editor's Decay Rate list box. The following list describes some settings to try: No Decay The light does not diminish with distance; it reaches all objects in the scene. Linear The intensity of emitted light decreases at a constant (linear) rate as distance from the light source increases. Linear decay is the most frequently used type because it's easier to control; you don't need to raise the light's Intensity attribute to enormously high values to compensate. Quadratic A physically accurate mode of decay, also known as inverse square. Quadratic decay is determined by proportionally decreasing the light intensity along the square of the distance. Light intensity generally must be raised substantially with this mode. Cubic Decreases the intensity of light faster than the rate seen in reality. Cubic Decay is evaluated by a decrease in intensity that's relatively proportional to the cube of the distance. The lit area falls off almost instantly with Cubic Decay. This type of decay can be used to create a lit area that seems as though it's burning within surrounding darkness. Light intensity must generally be raised to a very high value to make the light appear.
tip IPR rendering is a helpful tool for interactively adjusting light decay; it's hard to visualize otherwise.
Tutorial: Lighting the Lobby In this tutorial, you'll add some lights to illuminate the lobby you textured in Chapter 9. The lighting will mimic the diffuse sunlight from the front windows. In the rear of the lobby, accent lighting will be added to finish off the look. Load the scene file noted next to the DVD icon. On the DVD  Chapter_10\movies\ch10tut09.wmv |
On the DVD  Chapter_10\ch10tut08start.mb |
First, select all the lights in the Outliner and delete them to start with a fresh slate. Create a fill light in the center of the lobby (Create | Light | Point Light). In the Channel Box, set Translate X, Y, and Z to -1.816, 3.275, and 3.884. Open the Attribute Editor, enable the Depth Map Shadows option with the Dmap Filter Size set to 5, and set the Intensity attribute to .2. Now, you'll duplicate this light to produce a soft wash of light from the front of the lobby. Duplicate the Point light (hotkey: Ctrl+d), and move the second light by using the Translate settings in the Channel Box. Set Translate X to 2.3, Y to 3.275, and Z to 3.9. Repeat step 3, but set Translate X, Y, and Z to 0, 3.275, and 1.9. Select all three Point lights and group them (hotkey: Ctrl+g). Name the group LobbylightFill_01. Now, duplicate the group (hotkey Ctrl+d) and move the new group up in the Y-axis to 4.2. To light the rear of the lobby, select the first Point light and duplicate it (hotkey: Ctrl+d). Set Translate X, Y, and Z to 0, 3, and -5.498. In the Attribute Editor, click the color swatch and set this light to a slightly yellow color to look like sunlight filtering into the lobby. In the Color Chooser, the settings are HSV: 53, .125, 1. Check that the Depth Map Shadows option is on, and set Dmap Resolution to 512. Now all the soft lights are in place and you can render a test frame. A soft lighting style has been chosen because of the large windows in the front of the lobby. Using this technique and creating groups of lights with low-intensity settings, you can soften the lights and disguise where the light source is coming from. Another popular method of achieving this look is by using Global Illumination (GI). The Maya default renderer doesn't include GI options, but Maya's Mental Ray renderer does. Create a Directional light. In the Channel Box, set Translate X, Y, and Z to -21, 11, and 20 and Rotate X, Y and Z to -17.5, -45, and 0. While still in the Channel Box, set Color R, G, B to 1, .964, .855 and Intensity to 1.5. Also, be sure to select Use Depth Map Shadows. One last variable to set for this light is to enter the Attribute Editor and set the Dmap Filter size to 3. Notice that many of the variables you've been modifying in the Attribute Editor can also be modified in the Channel Box to save time. Now, create a Spot light. In the Channel Box, set Translate X, Y, and Z to -1.311, 3.4, and -7.668 and Rotate X, Y, and Z to -90, 0, and 0. While still in the Channel Box, set Color R, G, B to 0.737, 0.926, 1; Intensity to .1; Cone Angle to 80; Penumbra Angle to .8; and Dropoff to 8. Also, be sure to select Use Depth Map Shadows. If you look at the geometry in the scene, you'll notice that the canned lighting is arranged in groups of four, so you're going to create a single column of lights and then group and duplicate as needed. Begin by duplicating this light three times and modify only the Translate Z variable of the three new spotlights: spotLight2: -4.699, spotLight3: -6.047, and spotLight4: -7.675. You should now have a column of lights that fit neatly within the canned fixtures to the far left of the lobby. Group the four spotlights, duplicate them, and move them in the Translate X-axis to 1.203. Duplicate a second time and set Translate X to 2.539. Duplicate a third time and set Translate X to 3.896. Duplicate a fourth time and set Translate X to 5.119. The canned lighting for the entire first floor lobby should now be in place. tip If render time is becoming an issue, remove the Spot lights in the center of the room and leave only the ones that are around the border of the ceiling. You need to place a couple of more Spot lights at the front of the planters. So create a new Spot light, and in the Channel Box, set Translate X, Y, and Z to -3.551, 0.792, and 7.746 and Rotate X, Y, and Z to 0, 9.411, and 0. While still in the Channel Box, set Intensity to .2, Cone Angle to 70, Penumbra Angle to .8, and Dropoff to 8. Also, be sure to select Use Depth Map Shadows. Duplicate this light. Group the two Spot lights and then set the group's Scale X value to -1. At this point, you should have a nice, evenly lit space when you render, as shown in Figure 10.23. As you pick different viewpoints to render, you might find areas with more or less shadow than you'd prefer. Try adjusting the current lights in those areas, and you can even add more lights now that you have a better idea of how each light type affects surfaces. Load the scene from the DVD if you'd like to compare. Figure 10.23. The rendered lobby scene with the lights added. 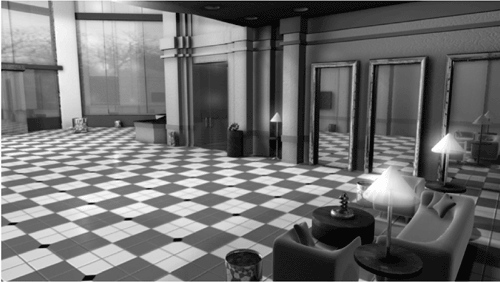
On the DVD Chapter_10\ch10tut08end.mb |
Going Further Try adding lights to the scene with the female character you modeled in Chapters 6, "Polygon Character and Subdivision Surfaces Modeling," and 7, "More Subdivision Surfaces Modeling," and then rendering the scene. Lighting a character can be a lot of fun and can make a good model look spectacular. Adding lights not only illuminates objects in your scene, but also helps define the shape of the model. Using the basics you have learned in this chapter, you should be able to efficiently light your scene. Try using the three-point lighting method discussed in Chapter 1 (see Figure 10.24). Figure 10.24. The female character from Chapters 6 and 7 has been lit with three-point lighting. Notice the light colors as well. 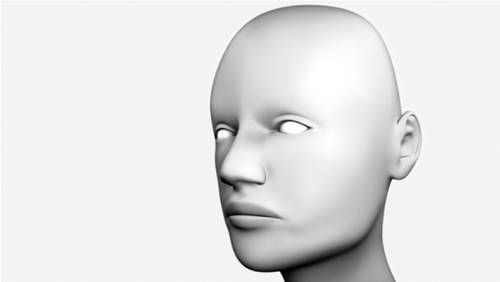
|
|