| Maya allows you to not only assign textures to your objects, but also to paint them in real time. Although this sounds like an ideal way to texture everything, in practice it's limited in value because of the awkward man-machine interface. Most of the time, you paint features that are required to be in specific locations, and then take the resulting 2D image to a paint program, such as Photoshop, for further editing. Interactive texturing requires a fast video card operating in shaded, hardware-textured mode so that you can see the results of your paint strokes. Note that you can paint channels other than color, such as transparency. However, interactive shaded views do not display attributes other than color, so you must remember as you paint that you're directly editing transparency, for example, rather than color therefore, white means opaque and black means clear. Tutorial: 3D Paint Tool In this tutorial, you'll paint on the first sphere from the "Creating Solid Materials" tutorial. The sphere is a polygon primitive, so it needs a texture map applied. After applying a texture map, you'll begin painting in solid colors, and then using the Visor, which is an entire library of brushes and paintable objects at your disposal. On the DVD  Chapter_09\movies\ch09tut06.wmv |
On the DVD  Chapter_09\ch09tut06begin.mb |
Begin by selecting the first sphere on the left side of the table. Open Hypershade (hotkey: Alt+h), create a new Blinn material, and apply it to the sphere. Now, set the UV texture projection for the sphere by clicking Hotbox | Edit Polygons | Texture | Planar Mapping | option box, selecting Z-axis, and clicking Apply. To make the painting process easier, isolate the sphere by selecting it, and then choose Display | Hide | Hide Unselected Objects. Center and zoom in on the sphere by using the hotkey f to focus. Activate 3D painting by clicking Hotbox | Texturing | 3D Paint Tool | option box to open the 3D Paint dialog box, shown in Figure 9.21. Reset the dialog box with the Reset Tool button at the bottom. Note that the cursor now appears in the 3D view as a paintbrush, but if you try to paint the sphere at this point, a red X appears over it, indicating that it's not ready for painting. Go to the File Textures section of the 3D Paint dialog box, where you can size and assign a new bitmap to any channel you want. Make sure Attribute to Paint drop-down list is set to Color, and click the Assign/Edit Textures button. In the Assign/Edit Textures dialog box that opens, set the Size X and Size Y values to 256, and click the Assign/Edit Textures button. A 256x256 pixel map has been assigned to the Color channel of the material used on the sphere. This new bitmap has already been filled with your previous solid color, so you might not notice an immediate difference. If you hold your mouse over the sphere, you'll see a circle cursor now. Begin by changing the color to white, and then paint a spot in the middle of the ball. Scale the brush size down by holding down the b key and LMB-dragging to the left. You can also size the brush by entering a value for the Radius (U) attribute of the 3D Paint dialog box. Change the color to black and paint a slightly smaller black spot in the middle of the white one. Now, change the color back to white again, and scale the brush small enough to paint the number 5 by hand. You can choose from many pen and paint styles that are available in Visor (hotkey: Alt+v). Make sure Paint Effects is the selected tab. Choose the Pens folder and pick the marker named inkRedShadow.mel. Now, you can paint the text "Maya Fundamentals" on the sphere. Try adjusting the inkRedShadow marker to various colors and preset Paint Effects as you paint on the sphere, as shown in the Visor window in Figure 9.22. Figure 9.22. Testing 3D Paint Effects. 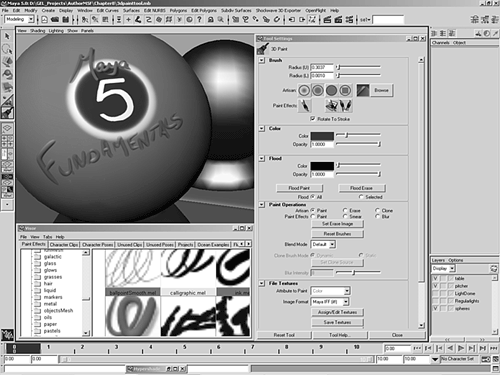
Besides simple pens, you can also paint in 2D by using the other Paint Effects materials. You'll find them in other folders in the Paint Effects tab in Visor. As you apply inkRedShadow to the Color channel in real time, these Paint Effects apply only flat 2D image changes to the texture's color bitmap. Try painting some more with other presets offered in Visor it's fun! When you're done, change the Attribute to Paint drop-down list to the Bump channel (under File Textures in the 3D Paint dialog box). Try painting in this channel, and then render an image to see the result. Shininess and all other attributes, other than color and bump, remain the same. Both the Color and Bump channels are decorated with your handiwork. note You'll explore using and editing Paint Effects in more detail in Chapter 14, "Paint Effects." Get out of 3D Paint mode by switching to the cursor (hotkey: q). With the painted sphere selected, open the Attribute Editor, and navigate to the Color channel of the material assigned to the object. You'll find that Maya created a bitmap from your paint work. Note that if you want to load the book's sample textures (the .iff files noted next to the DVD icon), you need to redirect these image pointers to the images on the DVD-ROM. On the DVD Chapter_09\3dPaintTextures\tut6color.iff |
On the DVD Chapter_09\3dPaintTextures\tut6bump.iff |
On the DVD Chapter_09\ch09tut06end.mb |
If at any point you became lost during the 3D Paint tutorial, you can load the scene file listed next to the DVD icon.
|