The Maya Interface
| When you start Maya for the first time, it looks like the window shown in Figure 2.1. I'll take you on a tour of the interface now and explain what it all means. Some elements of the interface are explained in more detail in the following sections. If the need or use for some features seems hard to fathom, just file it away for future reference. As you get the bigger picture, the logic of this layout will make more sense. Figure 2.1. The Maya interface.
Coming down the left side of Figure 2.1, at the top is the title bar, followed by the menu bar features common to all computer applications. The Status Line contains most of the toggles and buttons used for object manipulation and frequently used functions, such as the Quick Render button (the director's clapboard icon). Below the Status Line is the Shelf, a Maya innovation for easily adding customizable quick buttons. Depending on the project you're working on, you might have several custom macros you keep visible in the Shelf to speed up your work. Moving down the left side, next is the vertical Tool Box. The top half of the Tool Box consists of the select and transform tools, which are used constantly to move, rotate, and scale things (collectively, an object's position, rotation, and scale is known as its transform). The Show Manipulator Tool and the Last Selected Tool buttons round out this section. You use the Show Manipulator Tool button to adjust an operation's "history," such as when you previously applied a texture to an object and now need a manipulator to change where that texture is applied. The Last Selected Tool button is just that a quick way to get back to the last tool you used. It's helpful speed up your workflow. The icon in this box changes to match the last tool used. The bottom half of the Tool Box consists of a set of Quick Layout buttons, which adjust the panel layout to several popular configurations. Next is the Maya News home page button, which pops up a web browser pointing to the Maya home page. Below those buttons is the Time Slider, which serves several functions: first, to show the current time point of the animation, and second, to allow the animation to be scrubbed (that is, clicking in the Time Slider and dragging the mouse left and right to see the animation move forward and backward). Next is the Range Slider, which allows animators to focus on a specific part of the animation. Numerical entries at either end of the Range Slider set the overall animation start frame (from left to right), the focus range start frame, the focus range end frame, and the overall animation end frame. If you were working on a cartoon scene for TV that lasted 1 minute, you would probably set the overall start and end frames to 0 and 1800 because there are 30 frames per second and 60 seconds in a minute. If a problem occurred at the 12-second point, you would look at frame 360 and probably set the range to frames 300 and 420; this makes it much easier to see what's going on. Below the Range Slider is the Command Line and the Help Line. The Command Line is helpful because it's where Maya talks back to you, confirming whether things are working or letting you know when it's detecting errors with what you're asking Maya to do. The Help Line also gives you feedback, letting you know what Maya expects you to do next. In the 3D panel (currently set to the Perspective view in Figure 2.1) at the upper left, you can see the panel menus. The grid is enabled, and the panel label at the bottom center displays the default perspective camera named "persp." The panel's axis orientation is shown at the bottom left. The selected object is set to be rotated, so colored circles circumscribe the object. These handles are the "manipulators." They change appearance for Move and Scale modes. On the right side of the interface, at the far right of the Status Line, are three toggle buttons for picking what appears at the far right of the interface. You can also choose to have nothing at the right side of the panel, for maximum 3D panel space. The toggle choices are Attribute Editor, Tool Settings, or Channel Box/Layers, from left to right. In earlier versions of Maya, it was always the Channel Box, and many users will probably favor that mode. Here's what these features are used for:
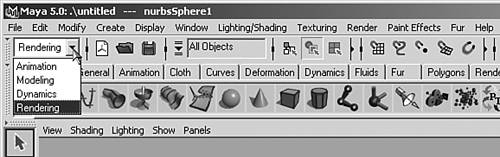
At the lower right are the playback controls for animation. The outermost buttons rewind to the start or fast forward to the end. The next buttons in move the time one frame backward or forward. The next buttons in go to the last or next keyframe, the adjacent point in time where the animator has set a "pose" for the object in question. In computer animation, the computer handles all the interim motion, and the animator sets only the most extreme or "key" positions. The two innermost buttons (the simple triangles) are the play forward and play backward buttons. The speed of playback is adjustable, and is set by clicking the Animation Preferences button. Two other buttons in this area enable Auto Key mode and the Script Editor. (Auto Key mode is covered in Chapter 11, "Animation Basics," and scripting is described briefly in Chapter 16, "Your Next Steps: Efficiency and Artistry.") The Menu BarA few items are useful to note about the menu bar. First, the six leftmost entries in the menu bar File, Edit, Modify, Create, Display, and Window always stay the same, but the other menus change based on the mode you are in. You set the mode in the list box at the far left in the Status Line. The four modes in Maya Complete are Animation, Modeling, Dynamics, and Rendering (see Figure 2.2). The hotkeys for these four modes are F2, F3, F4, and F5. Also, you can tear off any menu item that has double lines above it to create a customized mini-toolbox, so that frequently used tools can float on your desktop, as shown in Figure 2.3. Figure 2.2. Changing modes. Compare this to Figure 2.1 and notice that the first six menu items are the same, but the others have changed.
Figure 2.3. Click on the double lines to tear off a dialog box. Note the floating dialog box at the bottom right.
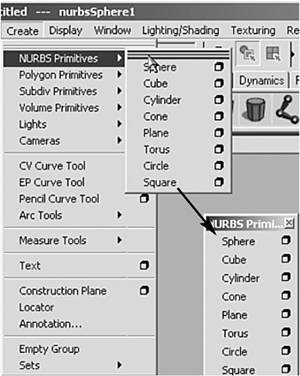
The Option BoxMany menu items have a small box to the right of the command name (see Figure 2.4). This is the option box, which you click to open a dialog box containing all the creation settings for the command. Whenever the option box is used, the settings become the new defaults for that tool. Figure 2.4. Choosing the option box.
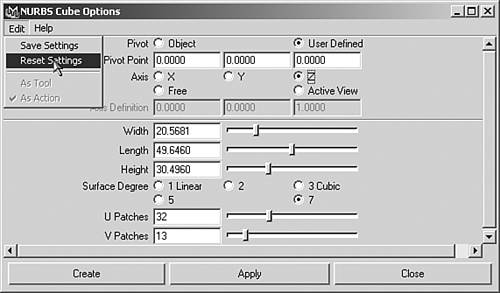
tip When in doubt, you should always choose the option box and then reset it. Do this by default when you're following the tutorials in this book because Maya remembers option box settings even after restarting. That means you won't get the result you expect if the tool has been adjusted before by anyone using your copy of Maya! Simply choose Edit | Reset Settings from the menu bar in the option box to put it back to factory-installed values (see Figure 2.5). In the long run, you'll customize the tools you use frequently so that you don't need to always reset the option box. As a beginner, however, it's easy to forget that you previously changed the settings, and the tutorials you're following in this book do not always specify resetting the options for every single Maya function. Figure 2.5. Resetting the option box.
The Status LineTake a closer look at the Status Line shown in Figure 2.6 to learn about a few of its alien-looking controls. At far left is the mode selector, described previously in "The Menu Bar," to change modes. Figure 2.6. Maya's Status Line, a collapsible bar of buttons.
Next is an arrow bar a collapser that's a clickable switch for hiding a section of the Status Line. Use these collapsers to display what you need and hide items that clutter the Status Line for your current work. When the vertical line has a right-pointing arrow in it, something is hidden within it. Next are the typical File icons for New, Open, and Save. Next is another list box that controls masking "presets" for object selection, which tells Maya to ignore certain types of objects when you make selections in a 3D panel. The icons to the right of the list box show the masking selections that have been made. Because animating with Maya relies on selecting the right things in the right order, switching off the ability to select only certain types of items makes the process much easier. Your project often has critical areas that are crowded, and a single click selects many things or the largest thing if you don't use selection masks. The selection mask list box acts as a preset for the buttons in the Select by Type area farther to the right. For example, in Animation mode, only joints and handles can be selected (the character's "pull points" for animation) in the Select by Type area; you wouldn't want to select anything else when posing and keyframing. The three buttons to the right of the selection mask enable you to switch between three modes: Hierarchy, Object, and Component mode. At the beginning of a project, you usually remain in Object Selection mode. In this mode, you can select entire objects and mask your selection to pick only certain kinds of objects lines, surfaces, lights, and so forth. Component Selection mode enables you to adjust subcomponents of an object, such as pulling a sphere into a capsule shape by picking just the top half of the sphere and stretching it out. Hierarchies is the animation term for linking one object to another. For example, you link a car's tires to the car body so that you need to animate only the motion of the car body the tires follow automatically. In this case, you say that the tires are children of the body, and the car body is the parent to the tire objects. Maya also uses a tree metaphor with the words root and leaf. In Hierarchy Selection mode, selection masks let you pick only the parent ("root") or only the children ("leaf") most helpful when you're setting up object hierarchies, which are discussed in more detail in Chapter 11, "Animation Basics." The range of buttons to the right of the Hierarchy/Object/Component switches changes depending on which of these three modes you have chosen. When a button describing a type of entity such as curves, surfaces, lights, or cameras (when in Object Selection mode) is pushed in, it can be selected. When it's not pushed in, it cannot be selected. For example, you might want to pick a vase object that was created from a profile spline, but you could accidentally pick the spline instead of the vase object because both coexist, even after the spline has produced the vase. One solution is to hide objects not being edited. However, it's usually more expedient to set the selection mask so that you can pick only surfaces, not curves. If many different kinds of objects are cluttering the scene, selection masks can become invaluable. tip Some selection mask buttons cover several things; for example, the Select by Object Type-Rendering mask covers lights, textures, and cameras. If you right-click over the button, you get the option to enable or disable each of these subtypes (see Figure 2.7). When some subtypes are on and some are off, the button turns brown. For example, if you keep lights selectable but not cameras or textures, the little sphere icon on the button has a brown background to indicate a partially enabled selection. Figure 2.7. Right-clicking over a selection mask displays subtypes to enable or disable.
Next is the Lock Selection button, handy for avoiding accidentally clicking off an object and deselecting it. When you know you want to work on something for a while, you lock it. Next is the Highlight Selection Mode button, a toggle to highlight the selected object in the display, which is on by default. Next are the snap tools, which ease modeling and modifying objects by making it seem as though an object or part of an object is drawn toward another; when the mouse approaches within a certain distance, the entity being moved by the mouse jumps to the nearest snap-to element. The snap-to element could be curves, points, view planes, the grid, or any combination of them. The rightmost snap icon (the big U magnet by itself) makes an object "live," thus turning the object itself into a building template. With this mode, you might use a human face mesh to create a Lone Ranger mask; curves would automatically snap to the face surface. You use the Operations List buttons to view upstream and downstream connections and enable or disable them. The Construction History toggle is next, and Maya uses it to record construction. All the parameters used to make an object are stored with the object, allowing you to change them later. Having Construction History enabled can make files large and slow to load, however, so you might opt to turn it off sometimes. More often, animators delete an object's history when the object has been built successfully, instead of turning off all history with this button. tip History is not related to the Undo operation. You can have history off and still use Edit | Undo to undo anything. History embeds only the construction history in an object, such as how many divisions are used to create an extruded object. With history on, animators can return to the project at any time and set more or fewer segments. The hotkey for undo is Ctrl+z, as in nearly all Windows programs. By default, the Undo option records your past 10 edits, but it can be set to any value, including indefinite, by choosing Window | Settings/Preferences | Preferences | Undo. Next are the Quick Render and Interactive Photorealistic Renderer (IPR) rendering buttons. Clicking them pops up a window, and the computer then takes a few seconds to a few minutes (or even hours) to compute a full-quality render. IPR rendering is slower, but when finished, it can update the rendering in nearly real time as you adjust lights and materials in a scene. Next is the Render Globals button, which controls the size of the rendering and many other parameters. Finally, at the rightmost side of the Status Line is the Numeric Input tool. It can operate in four modes:
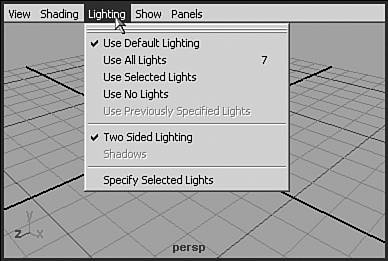
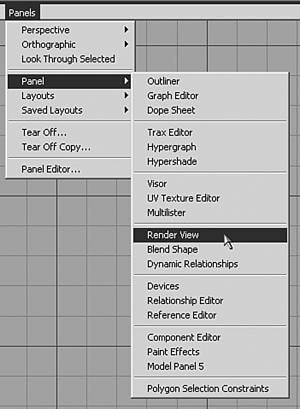
Panel MenusEvery view panel you work in has a common set of menus at the top, as shown in Figure 2.8. Figure 2.8. The panel menu that appears in any view of a 3D scene, shown here with the Lighting menu selected.
trap If the panel menus do not appear, you can enable them in Window | Settings/Preferences | Preferences, and then click the Interface entry under the Categories list on the left side of the dialog box. Make sure there's a check mark in the Show Menubar In Panels check box. These are a few of the more important panel menu items:
tip You can LMB-click and drag at the dividing line between any two or more panels and move it to favor one panel over the other. You can also do this at the center point of the four panels. Tutorial: Interacting with Maya The following tutorial gives you a chance to try out some of these hotkeys and key combinations. Because these actions are the most fundamental ones in Maya, run through this tutorial a few times so that it becomes more of an internalized skill, like typing or playing a musical instrument. As any typist or musician knows, repetition is the key!
|


EAN: 2147483647
Pages: 198
- Challenging the Unpredictable: Changeable Order Management Systems
- The Second Wave ERP Market: An Australian Viewpoint
- Enterprise Application Integration: New Solutions for a Solved Problem or a Challenging Research Field?
- Data Mining for Business Process Reengineering
- A Hybrid Clustering Technique to Improve Patient Data Quality