| This book has made custom hotkeys an integral part of the tutorials for good reason. Beginners who are not exposed to this workflow enhancement, as well as marking menus, are missing a big part of what makes Maya so efficient. However, the marking menus and hotkeys were created to show you how to determine the tasks you perform most often and set up tools to speed or automate many of them. Tutorial: Building a Marking Menu Choose Window | Settings/Preferences | Marking Menus. In the Marking Menus dialog box that opens, click the Create Marking Menu button to open the dialog box, as shown in Figure 16.3. Figure 16.3. Maya's Edit Marking Menu dialog box. 
On the DVD  Chapter_16\movies\ch16tut01.wmv |
Each of the nine light-gray squares represents a location on the marking menu that you attach to a function. You can add information to each block or edit it by right-clicking on one of the squares and choosing Edit Menu Item. This brings up a spot to insert MELscript, but don't panic! You're going to let Maya automatically create the MELscript you need to dump into those little boxes. The MELscript appears in the Script Editor as you use Maya, translating each of your actions into the equivalent MEL code. Open the Script Editor by clicking the button to the far right of the Command Line. On the Script Editor's menu, enable the Echo All Commands setting (Script | Echo All Commands). note Remember: When you turn on Echo All Commands, you can see every script and action that Maya runs with MEL. By default, the Script Editor echoes only the most significant commands for feedback in Maya's Command Line. Maya is built on MEL, so every action you perform in Maya is carried out in this scripting language. By watching the commands in the Script Editor, you can begin to grasp how Maya works and absorb the MEL syntax. Your screen might be cluttered with all these windows open, so rearrange the Edit Marking Menu dialog box and Script Editor so that you can see both. Just drag and resize the windows until you have them arranged to your liking so that you can continue working efficiently. tip If your Script Editor is filled with information you don't need, you can always clear its display by clicking Edit | Clear History on the Script Editor's menu. The following steps create a CV Curve marking menu. For each function you add to the marking menu, you perform the function first, and then MMB-drag the MELscript from the Script Editor to one of the gray squares in the Edit Marking Menu dialog box. First, access the CV Curve tool by clicking Create | CV Curve Tool in the Hotbox. Check the new information in the Script Editor. Each line shows a different command, so you need to figure out which one actually runs the CV Curve tool. In this case, the line is CVCurveTool;, so highlight that line in the Script Editor (see Figure 16.4). Then, simply MMB-click over the highlighted text and drag it to the left-center gray box in the Edit Marking Menu dialog box. Maya automatically copies the necessary information to the box. Figure 16.4. Highlighting the correct command in the Script Editor. 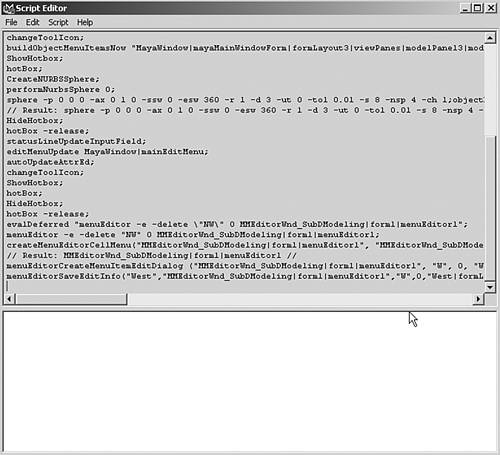
tip There's another method for copying MELscript: Copy the highlighted text (hotkey: Ctrl+c) in the Script Editor, right-click on one of the gray boxes in the Edit Marking Menu dialog box, and click Edit Menu Item on the shortcut menu. In the dialog box that opens, create a new menu item by pasting (hotkey: Ctrl+v) the code line in the text box right under the label Command(s). Here's another method some Mayans prefer: Tear off the Create menu. Ctrl+Alt+Shift+click on a command, and it's added to the Shelf, complete with its icon. Finally, MMB-drag the new icon to your marking menu to add it. In the Edit Marking Menu dialog box, right-click on the left-center gray box and choose Edit Menu Item from the shortcut menu. The Edit West dialog box opens; it's called "West" because the gray boxes are named after compass points. You need to give the menu item a label that appears when you access this marking menu. In the Label text box in the Edit West dialog box, change the name to CV Curve. Now, you need to enable the option box to appear beside the CV Curve item in the marking menu. To do that, select the Option Box check box near the bottom of the dialog box. Tell the option box what to do when clicked. First, copy the code line from the Command(s) section and paste it in the Option Box Command(s) section. For most creation procedures in MELscript, all you have to do is add the word Options to the end of the standard command. In this case, the command name should be CVCurveToolOptions; (see Figure 16.5). The semicolons are critical, so make sure they don't get omitted. Also, remember that you must match the letter case exactly when entering command names because MELscript is case sensitive. Figure 16.5. The completed Edit West dialog box. 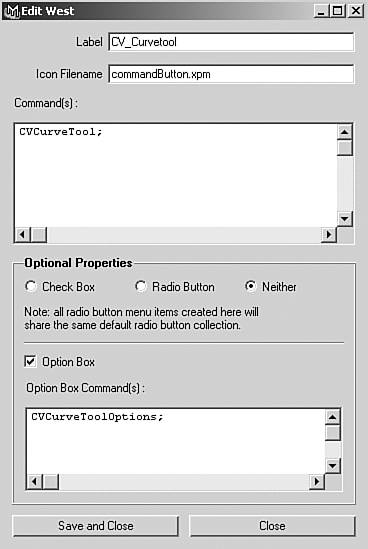
You've finished creating the Create CV Curve item for this marking menu. Click the Save and Close button to save your changes and close the Edit West dialog box. Make sure the Edit Marking Menu dialog box is still open for the next task.
tip You can test each menu item after creating it. In the lower-left corner of the Edit Marking Menu dialog box, click the box that says Click Here to Test to open the menu. It's not just for show; it actually works! Click the CV Curve item in the marking menu that pops up to test it (see Figure 16.6). Then, click the CV Curve option box in the marking menu, and the CV Curve Options dialog box should open. Figure 16.6. Testing the first marking menu. 
Now, you can add a few more items to this marking menu. Using the same methods as before, add the following actions as items on your menu. Name of Tool | Menu Action |
|---|
Pencil Curve | Create | Pencil Curve Tool | EP Curve | Create | EP Curve Tool | 3 PT Arc | Create | Arc Tools | Three Point Circular Arc | 2 PT Arc | Create | Arc Tools | Two Point Circular Arc |
After adding these tools to your marking menu, the Edit Marking Menu dialog box should look similar to Figure 16.7. Figure 16.7. Five entries are used for the CV Curve marking menu. 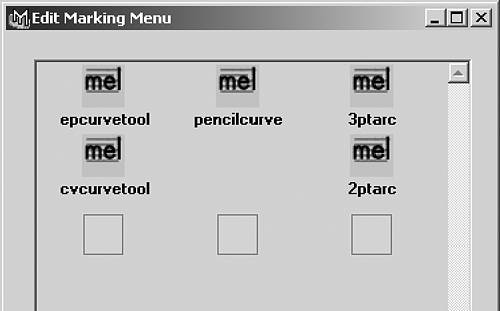
Now that you have finished adding items to the marking menu, you need to name and save it. In the Edit Marking Menu dialog box, type curves in the Menu Name text box, and click the Save button. This menu is then added to the list of other menus in the Marking Menus dialog box. Select the menu in the list at the top of the dialog box. To make the marking menu accessible in the Hotkey Editor, select Hotkey Editor in the Use Marking Menu In drop-down list box (see Figure 16.8). Click the Apply Settings button, and close this dialog box and the Script Editor. Figure 16.8. Configuring the curves marking menu to appear in the Hotkey Editor. 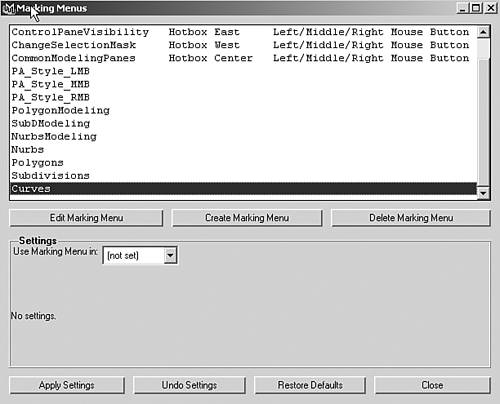
tip You can fine-tune your marking menus by forcing the option box settings of the objects you create. Instead of just creating an object and copying the code for its creation, open the options box for that object. Configure the options box to the settings you'll use most of the time, and then create the object. In the Script Editor, to the right of the object's creation code, will be several tags, each specifying these option box settings for the object. Highlight the entire line of code and proceed as before. With option boxes for tools, the method is a little different, but you can always experiment until you find the code for the settings you want.
Tutorial: Setting Hotkeys You've built the marking menu; now, you need to set the hotkeys that activate it: Open the Hotkey Editor by choosing Windows | Settings/Preferences | Hotkeys on Maya's main menu. On the DVD Chapter_16\movies\ch16tut02.wmv |
In the Hotkey Editor, select User Marking Menus in the Categories list. All the menus should be listed under the Commands section (see Figure 16.9). You have probably noticed that each command has two names: one with a Press tag and one with a Release tag at the end of the name. With these commands, you can specify an on/off action so that Maya knows when to enable or disable a particular command action. Figure 16.9. Displaying marking menu commands in the Hotkey Editor. 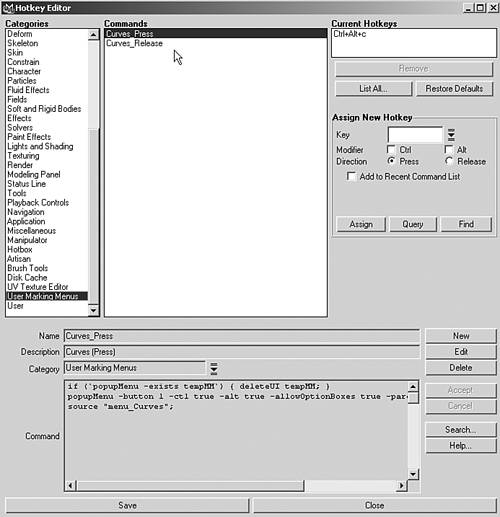
The next step is to set a hotkey for the curves marking menu. The Current Hotkeys section to the right lists any hotkeys currently assigned to the selected command. Under that area is the Assign New Hotkey section. In the Key text box, type the letter c, and place a check mark in both the Ctrl and Alt check boxes. Be sure to use the lowercase c because hotkeys are case sensitive. Click the Query button to find out whether that key is already in use. In this case, it's already assigned to the Frame Selected action, so you need to add a modifier to the button. To the right of Modifier, select the Ctrl and Alt check boxes. This tells Maya that when you press Ctrl+Alt+c, you want to access the curves marking menu. Now, click the Assign button. Maya opens a message box telling you that the marking menu won't work unless you attach the release hotkey. Click the Yes button in the message box to have Maya set both press and release hotkeys. Under Current Hotkeys, you should see the Ctrl+Alt+c hotkey combination. After you finish assigning those hotkeys, click the Save button at the bottom of the Hotkey Editor, and then click the Close button. Try the hotkeyed marking menu in a 3D view panel. Press Ctrl+Alt+c, and then LMB-click and hold in the panel. The marking menu you made should appear.
You've built a complete marking menu from scratch. The MMB drag-and-drop function from the Script Editor works for automating other tasks as well, as you'll see in the next section. Automating Single or Multiple Tasks: Hotkey, Marking Menu, or Shelf Almost any action you take in Maya has corresponding MELscript displayed in the Script Editor, if the Echo All Commands option is enabled. You can assign any action to a marking menu, as you learned in the previous tutorial. You can also assign an action to a hotkey or to the Shelf. User Hotkeys The Hotkey Editor (Window | Settings/Preferences | Hotkeys) you saw in Figure 16.9 allows you to edit the hotkeys assigned to Maya's primary functions. To view all the currently assigned hotkeys in the Hotkey Editor, click the List All button under the Current Hotkeys section to open the List Hotkeys dialog box (see Figure 16.10). Figure 16.10. A listing of all currently assigned hotkeys. 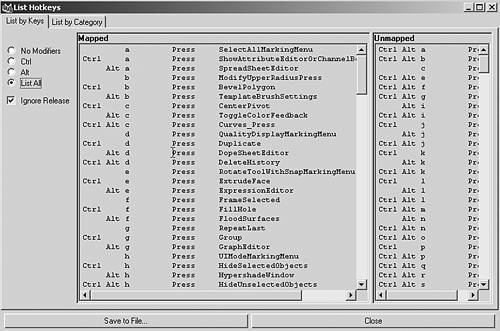
In the Hotkey Editor, the bottom half functions just as the marking menu command setup did. You click the New button in the Hotkey Editor, select command text from the Script Editor, and MMB-drag it to the Command area. You can then assign a hotkey and its name, description, and category. Use the catch-all "User" category if your new hotkeys don't neatly fit into the other categories. The Shelf Using the same MMB drag-and-drop technique as before, you can drop items onto the Shelf to create a button there with a default "MEL" icon. When you click the Shelf button, that function is performed. You can create new custom shelves for all your needs. They show up as tabs on the Shelf, and you create new shelves by clicking the down arrow at the far left of the Shelf and selecting New Shelf. You can also edit the Shelf contents and the icons used for the buttons: Click the down arrow at the far left of the Shelf and select Shelf Editor, where you can assign the graphical icon to represent the Shelf button and edit the code and labels for the Shelf. Tutorial: Shelf and Hotkey Items In this tutorial, you set up a Shelf button for making a specific letter of text and a hotkey for duplicating it in a unique way. You can then use this method to build your own hotkeys and Shelf items. On the DVD Chapter_16\movies\ch16tut03.wmv |
Open the Script Editor by clicking the Script Editor button at the right of the Command Line. Make sure there's a check mark by the Script | Echo All Commands menu option so that all your actions are recorded. Then, choose Edit | Clear History from the menu so that you have a clean slate. Minimize the Script Editor so that it's out of your way. To create a new Shelf, click the down arrow at the far left of the Shelf, and select New Shelf. Name it Maya_5_Fundamentals. Create the curves of a letter A. To do this, choose Hotbox | Create | Text | option box, and then reset the options and replace the default text "Maya" with a capital A. Click the Create button, and the curves are created. Use the frame hotkey (f) to zoom to the new curves. With the curves still selected, open the Bevel Plus dialog (Hotbox | Surfaces | Bevel Plus | option box). Reset the options, and clear the create bevel Start and End check boxes to make a simple capped extrusion. Then, click the Bevel button. An extruded capital A appears (see Figure 16.11). Check it in shaded mode to see what it looks like. Figure 16.11. Creating a beveled capital A. 
Restore the Script Editor. In its text area, highlight the actions you just performed, checking to include the steps that made up the creation of the extruded letter A. Now, MMB-drag the highlighted text into the lower half of the Script Editor. Here, you can remove all lines that start with // or that were later undone. The resulting script looks like Figure 16.12. Select this edited text, MMB-drag it to the Shelf, and a MEL icon button should appear. Test this new Shelf button by clearing the system with Hotbox | File | New Scene, and then clicking the MEL icon that remains in the Shelf. You should get an instant re-creation of your A. Figure 16.12. Dragging selected script to the Shelf. 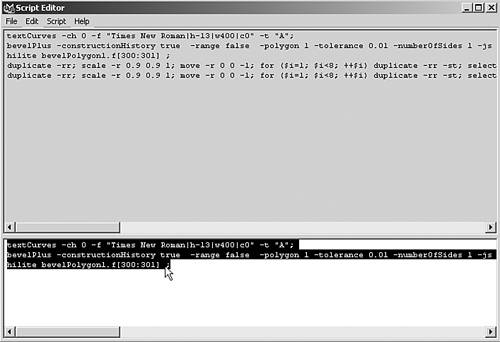
To edit this Shelf item, open the Shelf Editor by clicking the down arrow at the far left and choosing Shelf Editor. In the Shelves dialog box that opens, click the Shelf Contents tab. Enter Aicon in the Label & Tooltips text box, and clear the Icon Name text box (see Figure 16.13). Click the Change Image button and select the Aicon.bmp file from the Maya 5 DVD-ROM. It's simply a 32x32 pixel BMP file, rendered in Maya, of a textured version of this very scene. You could render your own if you want, or create one from scratch in a paint program. Figure 16.13. Editing the new Shelf item. 
On the DVD  Chapter_16\aicon.bmp |
Clear the history in the Script Editor with Edit | Clear History. Make an extruded A if you don't already have one in the scene. Open the Duplicate Options dialog box (Hotbox | Edit | Duplicate | option box), and reset the settings. Then, set Translate Z to 1, Scale X to 0.9, and Scale Y to 1.1. Enter 8 in the Number of Copies text box, and click the Duplicate button. Look in the Script Editor for the line beginning with duplicate rr and select the entire line (see Figure 16.14). If you put your mouse just to the left of the line, the mouse direction flips, and you can easily select the entire line with one click. Figure 16.14. The duplication settings and the selected script that caused the duplication. 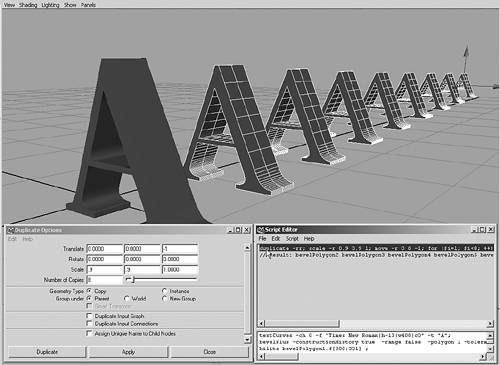
Open the Hotkey Editor (Hotbox | Window | Settings/Preferences | Hotkeys). In the Categories list, select User, and then click the New button. Enter ScaleDupe in the Name text box and 8 copies, stretched in the Description text box. Then MMB-drag the selected line in the Script Editor to the Command area of the Hotkey Editor, and click the Accept button. ScaleDupe is then displayed in the Commands list box. In the Assign New Hotkey area, enter s in the Key text box, select the Alt and Ctrl check boxes, and click the Assign button. You now have the Ctrl+Alt+s hotkey for this duplication action (see Figure 16.15). Click Save and then Close to close the dialog box. Test the hotkey by making some spheres and pressing Ctrl+Alt+s when they're selected. The hotkey works on single objects or groups of objects. Figure 16.15. Creating a new hotkey in the Hotkey Editor. 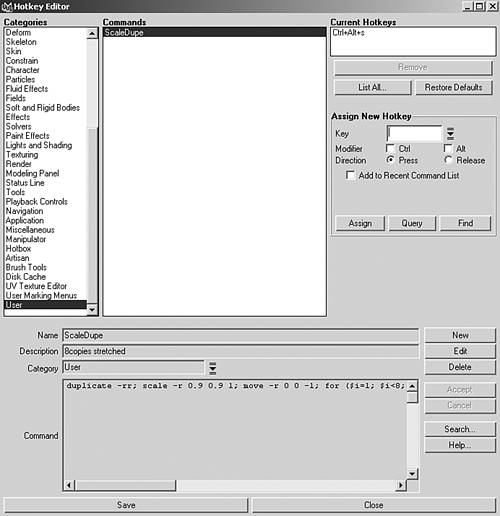
With these methods, you can automate nearly any action in Maya. As your skills progress, notice the actions you perform often and consider whether it would benefit you to have them automated. When you're confident that you've grasped the basic skills and are ready to add workflow enhancements, try creating hotkeys, Shelf items, and marking menus for the most-used functions, in a way that makes sense for the way you work. |