| 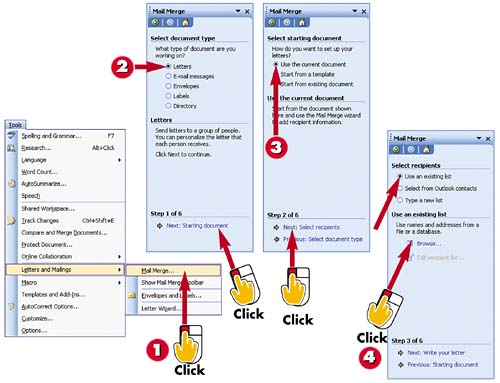
 | Open the Tools menu and select Letters and Mailings, Mail Merge to open the Mail Merge task pane. |
 | Select the type of document you want to create (in this case, Letters); then click the Next: Starting Document link. |
 | Select how you want to set up your letters (for example, Use the Current Document), and then click the Next: Select Recipients link. |
 | Select from where the recipient information should come (for example, Use an Existing List) and click Browse. |
INTRODUCTION When you perform a mail merge, you use a data source, such as your Outlook Address Book, and a main document, such as a form letter, to create a resulting merged document. Instead of creating the letter multiple times, you can create it once and merge it with the information in your address book. The objective of this task isn't to give you every possible scenario for the different types of mail merges you can perform in Word that could be a whole book on its own. Instead, you'll follow along the steps of merging a very simple letter which you'll create in Word with a data file from another application so you can begin to understand what you are being asked to provide to perform a mail merge in Word. |
TIP Mail Merge Options You have numerous options when performing a mail merge. This task shows you the procedure for creating a form letter to send to people in your electronic address book. |
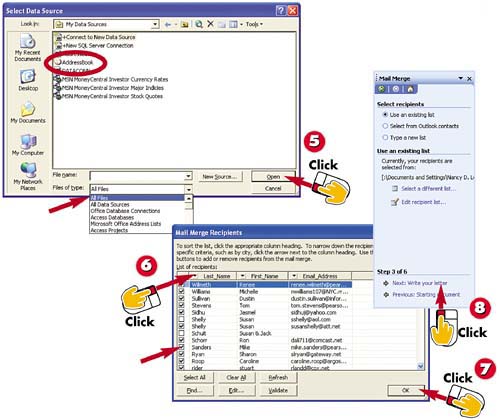
 | Select All Files from the Files of Type drop-down list and select your data source (for example, AddressBook); then click Open. |
 | Click the data field headers (in this example, Last_Name, First_Name, and Email_Address) to sort the data in the Mail Merge Recipients dialog box. |
 | Click the check boxes to select the mail merge recipients (click the Clear All button to begin; this also deselects the addresses without names). Click OK. |
 | In the Mail Merge task pane, click the Next: Write Your Letter link to begin creating the letter you want to use in your mail merge. |
TIP Selecting Outlook Recipients In the wizard screen shown in step 4, you can choose Select from Outlook Contacts and use the contacts you have listed in your Outlook Address Book. You can also select Type a New List and then click the Create button to begin entering information about individuals you want included in the mail-merge document. |
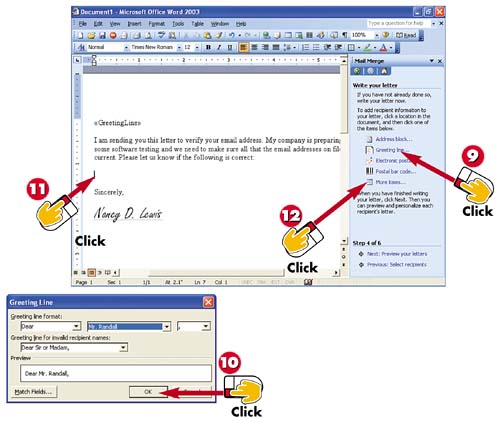
 | To insert a greeting in the letter, click the Greeting Line link in the Mail Merge task pane to open the Greeting Line dialog box. |
 | Select options from the various drop-down lists to specify how you want the greeting to appear; then click OK. (In this case, simply accept the default settings.) |
 | Type the rest of the letter, leaving blank areas for additional fields. Then, click in the document where you want to insert another merge field. |
 | To select additional fields that correspond to your data file, click the More Items link in the Mail Merge task pane to open the Insert Merge Field dialog box. |
TIP Inserting an Address Block The Address Block link in the Mail Merge task pane allows you to select formatting options for an address for example, to place it at the top of a business letter document. You can add the recipient's name, company name, and postal address and even format it according to the destination country and region. |
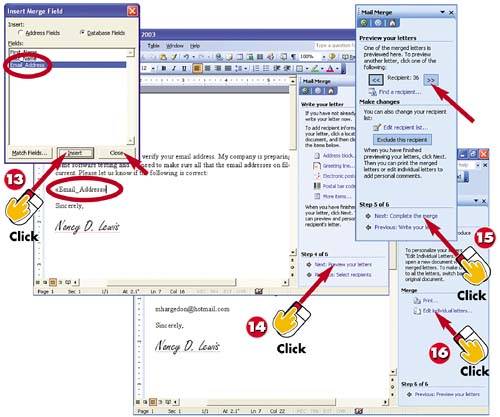
 | Select the field you want to add and click the Insert button to place the field in the letter. When you've finished inserting fields, click the Close button. |
 | Click the Next: Preview Your Letters link to print or edit your individual letters. |
 | Click the << or >> button on the Mail Merge task pane to view the letter for each recipient. Then, click the Next: Complete the Merge link. |
 | Click the Print link in the Mail Merge toolbar to send the files to the printer, or click the Edit Individual Letters link to review and edit each letter. |
TIP Previous Steps If you need to review any steps you've already performed, click the Previous link at the bottom of the Mail Merge task pane to return to previous steps. |
|