Implementing Editing Capabilities
Now that you are hooked up to your original objects, you have full access to all of the methods contained within them. That means you can implement the add and edit functionality in your details form. It also means that you can examine how to display client-side errors to the user. To start, add a hyperlink to the Employees.aspx page so that you can add a new employee and set the properties according to Table 12-5.
| Property | Value |
|---|---|
| ID | hypAdd |
| Text | Add Employee |
| NavigateUrl | EmployeeDetails.aspx?ID=0 |
Make sure to place this new hyperlink above the employee grid, not below it. The reason is that the datagrid will expand and become written underneath the link, making it sloppy. Next, you need to edit the Employee Details page so that it recognizes the fact that an ID of zero is a new employee. To do this, you just add a simple If..Then statement to enclose the body of the Page_Load method:
If Page.Request.QueryString.Item("ID") <> "0" Then . . . End If You should move the code you have previously written to the body of the If..Then statement. Now you can bring up the Employee Details page and actually add information to it. But you have a couple of things that you need to address first. One is adding a method to save the newly added employee and returning you back to the employee list page and the other is a way to trap user-centric errors.
To handle user-centric errors in an ASP.NET application (and also to reduce the server load), you are going to use some of the validators that Microsoft provides (see Table 12-6).
| Validator | Purpose |
|---|---|
| RequiredFieldValidator | This control requires that something be entered in the associated control. It does not check the value for any type of conformity. |
| CompareValidator | This control compares the entered value with the value of another field on the form. |
| RangeValidator | This control ensures that a given value falls within a specific range. |
| RegularExpressionValidator | This is probably the most powerful validation control in that it can ensure that a given value matches a particular pattern. This is important for fields such as phone number, e-mail address, or social security number. |
| CustomValidator | This control validates a given value against a custom expression. The expression takes the form of a method in the client-side code. |
| ValidationSummary | This is not really a validation control, but it does display a list of all of the error messages for all of the controls that failed validation. |
Using the Required Field Validator
This section starts with a couple of simple examples to illustrate the major points and then it explains how you should apply all of the validations. When you are done, the screen will look like Figure 12-10. First, add a Save button to the Employee Details page and change the name to btnSave and set the caption to Save. Then, add a Validation Summary control to the Employee Details page and place it at the bottom of the page (below the Country textbox). Next, add a RequiredFieldValidator control to the form and set the properties for it according to Table 12-7.
| Property | Value |
|---|---|
| ID | rfvFirstName |
| ControlToValidate | txtFirstName |
| ErrorMessage | First name cannot be null |
| Text | * |
Position the control to the right of the txtFirstName control as shown in Figure 12-11.
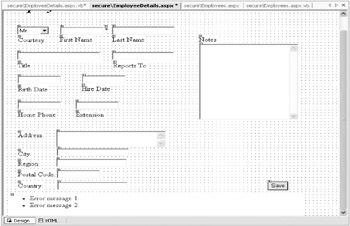
Figure 12-11: The RequiredFieldValidator and ValidatorSummary controls
Now, run the application and click Add Employee. When the Employee Details screen comes up, click the Save button. The results should look like those in Figure 12-12.
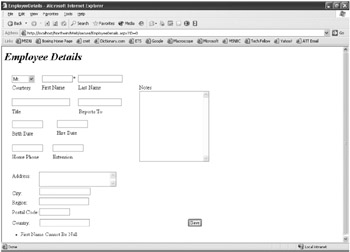
Figure 12-12: The RequiredFieldValidator and ValidationSummary Controls In Action
Add another RequiredFieldValidator for the Last Name field and set the properties as you did for the First Name field (but link them to the Last Name field, of course). These are the only two required fields.
| Tip | The ValidatorSummary control only displays when the form is submitted. In this example, if the user makes an error and tabs out of the field, the value will be checked by the field validator. However, because the ValidatorSummary control does not display until the user clicks the Save button, the only indication of an error that the user sees is the red asterisk next to the field. |
Using the Regular Expression Validator
For the Birth Date and Hire Date fields, though, you have no intrinsic Date drop-down control available, so you need to have another way to validate the date. For this you will use the RegularExpressionValidator control.
| Note | Microsoft does not include a Date/Calendar drop-down Web control, but this is not too much of a problem. Many third-party vendors already have these controls available for .NET. My favorite .NET vendor is Infragistics (which was Sheridan Software and ProtoView Development, two of the top ActiveX control creators). Its selection of .NET controls is top of the line and easy to use once you understand the framework. |
Regular expressions have been around for a long time, having come from the Unix world. If you have programmed in Perl or any similar language, you have probably used regular expressions. But what is this great and powerful tool? In its simplest form the regular expression engine matches patterns in text. You specify the pattern with a series of rather cryptic text, and the engine goes and searches for the pattern. The pattern can be almost anything and is not limited to matching only one part of the string like you can do with the substring or instring functions. If you wanted, you could match only the third character of every word in a 10,000-page document (I do not know why you would, but you could). Expanding on this concept, the regular expression engine can also perform replacements on text. If you look at the Replace dialog box in VS .NET, the last option on the left allows you to use regular expressions in a Find or Find and Replace operation. On top of all that, you can use regular expressions to parse an entire document so that you only remove the things that you want to remove. All of these capabilities make regular expressions a powerful tool.
This is a pretty simple explanation of a regular expression. For more information, refer to the e-book Regular Expressions with .NET by Dan Appleman. It is available from his Web site at http://www.desaware.com. Read this book if you want to learn more about regular expressions; it is one of the few references that I cannot do without.
Add a new RegularExpressionValidator control to the page and set the properties according to Table 12-8.
| Property | Value |
|---|---|
| ID | revBirthDate |
| ControlToValidate | txtBirthDate |
| ErrorMessage | Birth Date must be in the format xx/xx/xxxx |
| Text | * |
| ValidationExpression | \d{1,2}/\d{1,2}/\d{4} |
So what does this validation expression mean? This regular expression breaks down into the meaning shown in Table 12-9.
| Expression | Meaning |
|---|---|
| \d{1,2} | A minimum of 1 digit up to a maximum of 2 digits (\d stands for a number) |
| / | A forward slash |
| \d{1,2} | A minimum of 1 digit up to a maximum of 2 digits (\d stands for a number) |
| / | A forward slash |
| \d{4} | Four digits |
This translates into you allowing a date in any of the following formats: xx/xx/xxxx, x/xx/xxxx, x/x/xxxx, or xx/x/xxxx. Pretty nifty, huh? Try to write code to parse out the value to ensure that it is correct.
If you run the application, you do not have to enter anything in the Birth Date field, but if you do, it is checked against the regular expression.
Next, let's add a validator to ensure that the first name is not longer than 10 characters. To do this you have two choices: using a CustomValidator and writing some code, or using a RegularExpressionValidator and typing in seven characters. Which do you think is going to be easier? I will save you the suspense: The Regular-ExpressionValidator is easier.
| Caution | When you use a custom validation, you must write a script that runs on both the client and server side. The reason for this is that all rules checked on the client side are rechecked on the server side. This prevents a malicious user from bypassing the validation checks. |
Add a new RegularExpressionValidator and set the properties for it according to Table 12-10.
| Property | Value |
|---|---|
| ID | revFirstNameLength |
| ControlToValidate | txtFirstName |
| ErrorMessage | First Name cannot be more than 10 characters in length |
| Text | * |
| ValidationExpression | .{1,10} |
This regular expression breaks down into what is shown in Table 12-11.
| Expression | Meaning |
|---|---|
| . | Match any character but a newline |
| {1,10} | Match at least one time, but no more than 10 times |
Because entering 11 or more characters causes a match to be made more than 10 times, it fails the regular expression check. Wasn't that much easier than entering code? Table 12-12 summarizes all of the validators that need to be added to check all of the database constraint rules.
| Control | Validator | Expression (If Needed) | Error Message | Text |
|---|---|---|---|---|
| txtFirstName | RequiredFieldValidator | First Name cannot be null | [*] | |
| txtFirstName | RegularExpressionValidator | .{1,10} | First Name cannot be more than 10 characters in length | [*] |
| txtLastName | RequiredFieldValidator | Last Name cannot be null | [*] | |
| txtLastName | RegularExpressionValidator | .{1,20} | Last Name cannot be more than 20 characters in length | [*] |
| txtTitle | RegularExpressionValidator | .{1,30} | Title cannot be more than 30 characters in length | [*] |
| txtBirthDate | RegularExpressionValidator | \d{1,2}/\d{1,2}/\d{4} | Birth Date must be in the format: xx/xx/xxxx | [*] |
| txtHireDate | RegularExpressionValidator | \d{1,2}/\d{1,2}/\d{4} | Hire Date must be in the format: xx/xx/xxxx | [*] |
| txtHomePhone | RegularExpressionValidator* | .{1,24} | Home Phone cannot be more than 24 characters in length | [*] |
| txtExtension | RegularExpressionValidator* | .{1,4} | Extension cannot be more than 4 characters in length | [*] |
| txtAddress | RegularExpressionValidator | .{1,60} | Address cannot be more than 60 characters in length | [*] |
| txtCity | RegularExpressionValidator | .{1,15} | City cannot be more than 15 characters in length | [*] |
| txtRegion | RegularExpressionValidator | .{1,15} | Region cannot be more than 15 characters in length | [*] |
| txtPostal | RegularExpressionValidator | .{1,10} | Postal Code cannot be more than 10 characters in length | [*] |
| txtCountry | RegularExpressionValidator | .{1,15} | Country cannot be more than 15 characters in length | [*] |
|
[*]The HomePhone and Extension fields are both varchar fields in the database, which is why you are only checking for length and not format or digits only. | ||||
Once you have added all of the field validators, it is time to write the code to save the object. The code do to this is fairly simple—you just load a structure and call the Save method when the user clicks the Save button (as shown in Listing 12-15). Also, I have added the Imports statements at the top of code module, which is displayed in Listing 12-15 as well.
Listing 12-15: The Save Method, Employee Details
Imports NorthwindTraders.NorthwindShared.Errors Imports NorthwindTraders.NorthwindShared.Structures Imports NorthwindTraders.NorthwindShared.Interfaces Imports BusinessRules.Errors Private Sub btnSave_Click(ByVal sender As System.Object, _ ByVal e As System.EventArgs) Handles btnSave.Click Dim s As structEmployee Dim objEmployee As IEmployee Dim intID As Integer Dim objBusErr As BusinessErrors With s .EmployeeID = Convert.ToInt32(Page.Request.QueryString.Item("ID")) .TitleOfCourtesy = ddlCourtesy.SelectedItem.Text .FirstName = txtFirstName.Text .LastName = txtLastName.Text .Title = txtTitle.Text If txtBirthDate.Text.Length > 0 Then .BirthDate = Convert.ToDateTime(txtBirthDate.Text) End If If txtHireDate.Text.Length > 0 Then .HireDate = Convert.ToDateTime(txtHireDate.Text) End If .HomePhone = txtHomePhone.Text .Extension = txtExtension.Text .Address = txtAddress.Text .City = txtCity.Text .Region = txtRegion.Text .PostalCode = txtPostal.Text .Country = txtCountry.Text .Notes = txtNotes.Text End With objEmployee = CType(Activator.GetObject(GetType(IEmployee), _ "http://localhost:80/northwind/EmployeeDC.rem"), IEmployee) objBusErr = objEmployee.Save(s, intID) objEmployee = Nothing If objBusErr Is Nothing Then Response.Redirect("Employees.aspx") Else ShowErrors(objBusErr) End If End Sub This method simply gathers all of the values into an Employee structure, calls the Save method, and then checks to see if there were any data-centric errors. You have not written the ShowErrors method yet (see Listing 12-16). But how do you show data-centric errors to the user? There is not any way to add a validator for the errors that might occur on the data-centric side of the process because you do not know what types of errors they are. You cannot add red asterisks to the form and place them beside the controls because there are no position values in the text boxes that you can check to position the asterisks! This is indeed a puzzle—and not one that is so simple to solve. There are a couple of choices, but these may affect the layout of the form and not give you the freedom you would like to have as Web page designers.
Listing 12-16: The ShowErrors Method
Private Sub ShowErrors(ByVal objBE As BusinessErrors) Dim i As Integer For i = 0 To objBE.Count - 1 Select Case objBE.Item(i).errProperty Case "Last Name" txtLastName.BackColor = Color.LightPink txtLastName.ToolTip = objBE.Item(i).errMessage Case "First Name" txtFirstName.BackColor = Color.LightPink txtFirstName.ToolTip = objBE.Item(i).errMessage Case "Title" txtTitle.BackColor = Color.LightPink txtTitle.ToolTip = objBE.Item(i).errMessage Case "Title Of Courtesy" ddlCourtesy.BackColor = Color.LightPink ddlCourtesy.ToolTip = objBE.Item(i).errMessage Case "Birth Date" txtBirthDate.BackColor = Color.LightPink txtBirthDate.ToolTip = objBE.Item(i).errMessage Case "Hire Date" txtHireDate.BackColor = Color.LightPink txtHireDate.ToolTip = objBE.Item(i).errMessage Case "Address" txtAddress.BackColor = Color.LightPink txtAddress.ToolTip = objBE.Item(i).errMessage Case "City" txtCity.BackColor = Color.LightPink txtCity.ToolTip = objBE.Item(i).errMessage Case "Region" txtRegion.BackColor = Color.LightPink txtRegion.ToolTip = objBE.Item(i).errMessage Case "Postal Code" txtPostal.BackColor = Color.LightPink txtPostal.ToolTip = objBE.Item(i).errMessage Case "Country" txtCountry.BackColor = Color.LightPink txtCountry.ToolTip = objBE.Item(i).errMessage Case "Home Phone" txtHomePhone.BackColor = Color.LightPink txtHomePhone.ToolTip = objBE.Item(i).errMessage Case "Extension" txtExtension.BackColor = Color.LightPink txtExtension.ToolTip = objBE.Item(i).errMessage Case "Notes" txtNotes.BackColor = Color.LightPink txtNotes.ToolTip = objBE.Item(i).errMessage Case "Territories" 'Nothing yet End Select Next End Sub
The first option is to put all of your controls into a Table control and leave an empty column at the end so that you can match errors up with the controls. This of course requires that the entire form go from top to bottom. Another option is to turn the background color of the control to a different color and display a tooltip message describing the error. You could also pop up another window with a list of errors, but then the user has to tile the windows to see the entry form and the list of errors. Because your previous error-displaying scheme involved showing the errors in tooltips, you will continue with that method in this section.
| Note | There are several other ways of displaying error information to the user. Mostly it is a matter of choice and organization standards. Whatever your decision, you should make it uniformly across the organization and in line with the basic Windows and Web application standards. |
Add the code for the ShowErrors method as shown in Listing 12-16.
As you can see, this is a fairly simple and straightforward way of handling errors. At this point, your save will still not work. The reason for this is that you have not added the territories into your form to be able to select any territories. The rule that this violates is that each employee must be assigned to at least one territory. So now you have to display the territories and allow the user to assign the employee to one or more territories. Again you have a decision to make: How do you best show the list of territories and allow the user to make a selection? In this case, you will use the same method that you did in the Windows forms application. You will have two listboxes and two buttons to move items back and forth between the listboxes. Now, that brings up another question: Do you use client-side scripting or server-side code? In this case, because this is a book about .NET in particular and not Web page scripting, you will use server-side code.
Let's add two listboxes and two buttons to the form in the lower-right corner. When you are finished, the form should look like Figure 12-13.
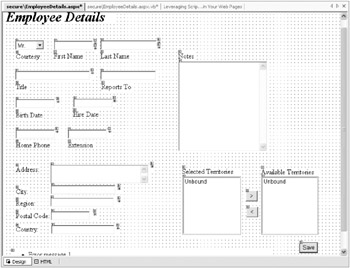
Figure 12-13: The Employee Details page with territory listboxes
Add the controls and set the properties according to Table 12-13.
| Control | Property | Value | Label Name |
|---|---|---|---|
| Listbox | ID | lstSelected | |
| Listbox | ID | lstAvailable | |
| Button | ID | btnRemove | |
| Button | ID | btnSelect | |
| Label | Text | Selected Territories | lblSelectedTerritories |
| Label | Text | Available Territories | lblAvailableTerritories |
| btnRemove | Text | > | |
| btnSelect | Text | < |
Next, you need to go back and modify the Page_Load method of the EmployeeDetails.aspx page. Add the code in Listing 12-17 to the beginning of the Page_Load method (above the QueryString check). Make sure you enclose the remaining code in the Page_Load method within the If..Then statement that you are adding here.
Listing 12-17: Modified Page_Load Method
Dim dsTerritories As DataSet Dim dRow As DataRow If Not Page.IsPostBack Then Dim objTerritories As ITerritory objTerritories = CType(Activator.GetObject(GetType(ITerritory), _ "http://localhost:80/northwind/TerritoryDC.rem"), ITerritory) dsTerritories = objTerritories.LoadProxy objTerritories = Nothing For Each dRow In dsTerritories.Tables(0).Rows Dim strDesc As String = _ Convert.ToString(dRow.Item("TerritoryDescription")) Dim strID As String = Convert.ToString(dRow.Item("TerritoryID")) Dim lst As New ListItem(strDesc) lst.Value = strID lstAvailable.Items.Add(lst) Next The only thing you haven't seen at one point or another is the Page.IsPostBack statement. This merely instructs the application not to run this routine when a postback event occurs. Otherwise, every time you clicked a button that caused a trip to the server (which you will see in a moment), this code would run all over again. This minimizes the number of trips to the database and saves you a lot of headaches later. After you get the territory dataset, you simply loop through it and add everything to the available listbox. When you run the application now, you will see that the available territories are displayed in the available listbox. Now you need to add another block of code to display the territories that an employee is already associated with (if it is an existing employee). To do this, add the code in Listing 12-18 to the bottom of the With statement in the Page_Load method.
Listing 12-18: Assigning Associated Territories
For i = 0 To .Territories.Length - 1 For Each dRow In dsTerritories.Tables(0).Rows Dim strDesc As String = _ Convert.ToString(dRow.Item("TerritoryDescription")) Dim strID As String = Convert.ToString(dRow.Item("TerritoryID")) If strID = .Territories(i) Then Dim lst As New ListItem(strDesc) lst.Value = strID lstSelected.Items.Add(lst) lstAvailable.Items.Remove(lst) Exit For End If Next Next Now you should be able to select an existing employee, and their associated territories should be populated in the Selected Territories listbox. The last thing you need to do is to be able to move the territories from selected to available and vice versa, as you did with the Windows forms application.
Add the code in Listing 12-19 to the Employee Details form. This code moves an available territory to the selected territory listbox and removes it from the available territory listbox.
Listing 12-19: btnSelect Method
Private Sub btnSelect_Click(ByVal sender As System.Object, _ ByVal e As System.EventArgs) Handles btnSelect.Click Dim lst As ListItem = lstAvailable.SelectedItem lstAvailable.Items.Remove(lst) lstSelected.Items.Add(lst) lstSelected.SelectedIndex = lstSelected.Items.Count - 1 End Sub
When you run the application after adding this code, you will find one thing that is somewhat problematic—you cannot select a territory until you have entered enough information in the other controls to avoid causing any client-side errors. This is because clicking the btnSelect button causes a postback event and triggers the client-side validators to be checked. There is really no way around this, but it is a minor price to pay.
| Note | This is a situation where client-side scripting of this type of method is really useful. |
Next, add the method in Listing 12-20 to the EmployeeDetails.aspx page.
Listing 12-20: The btnRemove_Click Method
Private Sub btnRemove_Click(ByVal sender As System.Object, _ ByVal e As System.EventArgs) Handles btnRemove.Click Dim lst As ListItem = lstSelected.SelectedItem lstSelected.Items.Remove(lst) lstAvailable.Items.Add(lst) lstAvailable.SelectedIndex = 0 End Sub
And finally, you need to assign your list of territories back to the territory array so that they can be saved with the employee. To do this add the code in Listing 12-21 to the end of the With statement in the btnSave_Click method of the Employee Details page.
Listing 12-21: The Modified btnSave_Click method
Dim i As Integer ReDim .Territories(lstSelected.Items.Count - 1) For i = 0 To lstSelected.Items.Count - 1 .Territories(i) = lstSelected.Items(i).Value Next
That is it. You should now be able to save information back to the database. Be careful when editing an existing employee record, because on an update you will delete the photo information. Adding a new employee immediately causes the new employee to be visible when the Employees.aspx page reloads.
| Caution | During the development of this code on the Beta 2 build I was getting an error message indicating that nvarchar was incompatible with type image. The error is caused because an image is not saved with the employee. For some reason .NET is converting the dbNull.value to a period (.). I have yet to see a workaround for this. The good news is that it only affects image data stored in SQL Server. |
EAN: 2147483647
Pages: 148