Updating the Employee List Web Page
After making the previous change, running the application, and following the same steps to add a new user (or using the user you created earlier) as you did in the previous section, you should see the Employees.aspx page (see Figure 12-7).
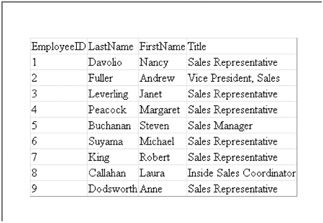
Figure 12-7: The Employees.aspx Web page
Now, this is a pretty weak page, so you need to make some changes to it—not only to make it look nicer, but you need a way to see the details for an individual employee. When you're done updating the page it will look like the page in Figure 12-8.
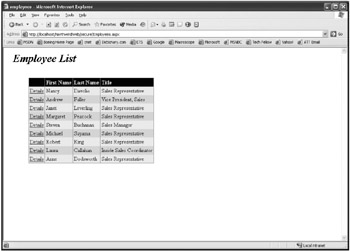
Figure 12-8: The updated Employee Details page
One of the advantages of .NET is that you can make these changes without adding a single line of code to the application. To set up the page to look like the one in Figure 12-8, take the following steps:
-
Add a label above the grid and set the caption to Employee List.
-
Set the font for this label to X-Large, Bold, and Italic.
-
Right-click the datagrid in design mode and select Auto Format.
-
Select Professional 1 for the format (or you can select one of your own choice).
-
Then, right-click the datagrid again and select Property Builder.
-
Select the Columns item from the list on the left (see Figure 12-9).

Figure 12-9: DataGrid Property Builder dialog box -
Click the HyperLink Column item from the Available Columns list and add it to the Selected Columns column.
-
Set the properties for the Hyperlink column according to Table 12-2.
Table 12-2: The HyperLink Column Properties Property
Value
Purpose
Text
Details
Text displayed in the grid
URL field
EmployeeID
Value to be used for the URL
URL format string
EmployeeDetails.aspx?ID={0}
A .NET string expression where the token ({0}) is replaced by the value in the URL Field
-
Next, add a bound column for the FirstName, LastName, and Title columns (click bound column from the list of available columns and click the right-arrow button three times).
-
For each of these fields, enter the column name in the Data Field box and enter a formatted name in the header box.
-
Lastly, make sure to uncheck the Create Columns Automatically at Runtime box and click OK.
Now, run the application and visit this page again. It should look identical to Figure 12-8 now. Notice when you hold your cursor over a Details hyperlink that the ID value corresponds to the ID of the employee that the cursor is over.
EAN: 2147483647
Pages: 148