Concepts
Cocoon is a very large system. Each concept alone is easy to deal with, but the difficulty comes in trying to understand how all the pieces fit together. So, before we dive in to the individual concepts and their implementations, let’s step back and get a sense of the big picture.
In a normal Web application, the application receives a request from some user agent, usually a Web browser. The contents of that request are passed to a CGI script or, in Java, to a servlet. The servlet is responsible for performing a computation on the request and returning a response to the user agent. This is the familiar interaction pattern for Web applications.
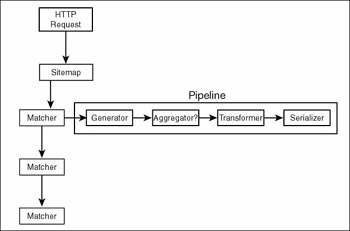
With Cocoon we have the same pattern, but you can think of Cocoon as a way of structuring the computation performed by the servlet. Cocoon processes requests using pipelines of components. Its job is to look at the request, figure out which pipeline will process it, and hand the request over to that pipeline. Cocoon needs to be able to describe how to match a request to a pipeline, and it must be able to specify the set of components that are in a pipeline and the sequence in which the requests will flow through the pipeline. Cocoon itself is implemented as a servlet that performs the processing we just described. The following figure gives a conceptual view of how Cocoon processes a request and introduces some of the terms Cocoon uses for the request-processing and pipeline-processing steps.
Sitemap
In Cocoon, an XML document called the sitemap holds descriptions of pipelines and the components in those pipelines. The sitemap also contains definitions of matchers that are used to perform pattern-matching against a request to determine whether a particular pipeline will process the request.
The pipelines are made up of components. These components are named after the functions they perform: generators, aggregators, transformers, and serializers. (More on that in a moment.)
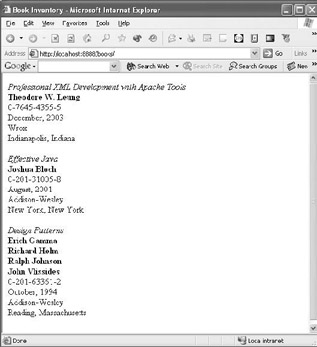
Following is a sitemap that describes a very simple site. The site takes the contents of an XML file in the filesystem, transforms it with an XSLT stylesheet, and outputs it as XHTML. The order of the sections in a sitemap is important, and the first two sections of the sitemap describe the set of <components> that are available for use in the rest of the sitemap:
1: <?xml version="1.0" encoding="UTF-8"?> 2: <map:sitemap xmlns:map="http://apache.org/cocoon/sitemap/1.0"> 3: 4: <map:components> 5: 6: <map:generators default="file"> 7: <map:generator logger="sitemap.generator.file" 8: name="file" pool-grow="4" pool-max="32" 9: pool-min="8" 10: src="/books/2/639/1/html/2/org.apache.cocoon.generation.FileGenerator"/> 11: </map:generators> 12: 13: <map:transformers default="xslt"> 14: <map:transformer 15: logger="sitemap.transformer.xslt" name="xslt" 16: pool-grow="2" pool-max="32" pool-min="8" 17: src="/books/2/639/1/html/2/org.apache.cocoon.transformation.TraxTransformer"> 18: <use-request-parameters>false</use-request-parameters> 19: <use-session-parameters>false</use-session-parameters> 20: <use-cookie-parameters>false</use-cookie-parameters> 21: <xslt-processor-role>xalan</xslt-processor-role> 22: </map:transformer> 23: </map:transformers> 24: 25: <map:serializers default="html"> 26: <map:serializer logger="sitemap.serializer.xhtml" 27: mime-type="text/html" name="xhtml" pool-grow="2" 28: pool-max="64" pool-min="2" 29: src="/books/2/639/1/html/2/org.apache.cocoon.serialization.XMLSerializer"> 30: <doctype-public> 31: -//W3C//DTD XHTML 1.0 Strict//EN 32: </doctype-public> 33: <doctype-system> 34: http://www.w3.org/TR/xhtml1/DTD/xhtml1-strict.dtd 35: </doctype-system> 36: <encoding>UTF-8</encoding> 37: </map:serializer> 38: </map:serializers> 39: 40: <map:matchers default="wildcard"> 41: <map:matcher logger="sitemap.matcher.wildcard" name="wildcard" 42: src="/books/2/639/1/html/2/org.apache.cocoon.matching.WildcardURIMatcher"/> 43: <map:matcher logger="sitemap.matcher.regexp" name="regexp" 44: src="/books/2/639/1/html/2/org.apache.cocoon.matching.RegexpURIMatcher"/> 45: </map:matchers> 46: 47: <map:selectors default="browser"> 48: <map:selector logger="sitemap.selector.exception" 49: name="exception" 50: src="/books/2/639/1/html/2/org.apache.cocoon.selection.ExceptionSelector"> 51: <exception 52: 53: name="not-found"/> 54: <exception unroll="true"/> 55: </map:selector> 56: </map:selectors> 57: 58: </map:components> 59: 60: <map:pipelines> 61: 62: <map:pipeline> 63: 64: <map:match pattern=""> 65: <map:generate src="/books/2/639/1/html/2/books.xml"/> 66: <map:transform src="/books/2/639/1/html/2/books.xslt"> 67: <map:parameter name="contextPath" 68: value="{request:contextPath}"/> 69: </map:transform> 70: <map:serialize type="xhtml"/> 71: </map:match> 72: 73: <map:match pattern="images/*.gif"> 74: <map:read mime-type="images/gif" 75: src="/books/2/639/1/html/2/resources/images/{1}.gif"/> 76: </map:match> 77: 78: <map:match pattern="styles/*.css"> 79: <map:read mime-type="text/css" 80: src="/books/2/639/1/html/2/resources/styles/{1}.css"/> 81: </map:match> 82: 83: <map:handle-errors> 84: <map:select type="exception"> 85: 86: <map:when test="not-found"> 87: <map:generate type="notifying"/> 88: <map:transform 89: src="/books/2/639/1/html/2/stylesheets/system/error2html.xslt"> 90: <map:parameter name="contextPath" 91: value="{request:contextPath}"/> 92: <map:parameter name="pageTitle" 93: value="Resource not found"/> 94: </map:transform> 95: <map:serialize status-code="404"/> 96: </map:when> 97: 98: <map:otherwise> 99: <map:generate type="notifying"/> 100: <map:transform 101: src="/books/2/639/1/html/2/stylesheets/system/error2html.xslt"> 102: <map:parameter name="contextPath" 103: value="{request:contextPath}"/> 104: </map:transform> 105: <map:serialize status-code="500"/> 106: </map:otherwise> 107: 108: </map:select> 109: </map:handle-errors> 110: 111: </map:pipeline> 112: 113: </map:pipelines> 114: 115: </map:sitemap> After the views element (which is empty in this example) is the <pipelines> element, which contains as many <pipeline> elements as needed. In this case, there is only one pipeline. Let’s look at how this pipeline is constructed and what it does.
The <components> element contains all the component declarations for the sitemap. For a single, small pipeline, such as the one shown in this example, all the declarations can seem overwhelming. But once you have multiple pipelines, each containing multiple components, you start to see the benefit of declaring all the components. Cocoon comes with a large set of prebuilt components that makes it easy for you to construct pipelines from a rich palette. Not every sitemap will use every component—hence the need to declare components.
The first child element of <components> is <generators> (lines 6-11), which contains a sequence of <generator> elements. Generators start pipelines and generate a SAX event stream that can then be processed by other components in the pipeline. The <generators> element (and all component containerelements) takes an optional default attribute whose value is the generator to use if no generator is specified in a pipeline. For the sake of simplicity, this sitemap contains a single <generator> (lines 7-10) named file. This is an instance of the Cocoon File Generator component. The File Generator reads an XML document from the local filesystem or a URL and generates a SAX event stream from it. The attributes of this generator are logger, which identifies a LogKit log target; name, which assigns a name that can be used to refer to the component; and src, which specifies the Java class that implements the functionality of the component. The attributes pool-min, pool-max, and pool-grow are parameters that tell Cocoon’s object-pooling system how to pool instances of this component. For the generator file, the pool starts at four instances and grows in four-instance increments until it reaches 32 instances.
The next component section is <transformers> (lines 13-23). Again, an optional default attribute specifies the name of a transformer to use in a pipeline if no transformers are specified. The example specifies a single transformer (lines 14-22), which uses an XSLT processor (via JAXP’s TrAX API) to transform an input SAX event stream into an output SAX event stream. There can be more than one transformer in a pipeline; in this case they are usually daisy-chained to each other, the output of one into the input of the next. The input to the first transformer in the chain is the generator for the pipeline, and the output of the last generator is a serializer. The default TrAX processor is used according to the JAXP rules. The attributes that appear here are the same attributes you saw for generator and have the same meaning, although the values are a little different. The <transformer> element also has children elements (lines 18-21) that provide additional configuration information. The first three elements—<use-request-parameters>, <use-session-parameters>, and <use-cookie-parameters>—control whether information in HTTP request parameters, servlet sessions, and HTTP cookies is available to the stylesheet. If it is, then it’s available as variables whose names are those of the parameters, sessions, or cookies.
After the <transformers> section is a <serializers> section (lines 25-38). A serializer takes a SAX event stream and turns it into a binary or character stream for final output. The serializer defined here (lines 26-37) converts a SAX event stream into an XHTML document. In addition to the component attributes, a mime-type attribute (line 27) specifies the MIME type of the output. This is important because the class being used to do the serialization is org.apache.cocoon.serialization.XMLSerializer (that isn’t a typo). The difference between XHTML mode and XML mode is in the value of the mime-type attribute. If the attribute is set to "text/html", then the output is XHTML; but if the attribute is set to "text/xml", then output is XML, which may or may not happen to be XHTML. This serializer also has some child elements (line 30-36) that are used to specify the variant of XHTML (there’s a choice of Strict XHTML, Transitional XHTML, or Frameset XHTML, and each has different public and system IDs) to produce (lines 30-35). The <encoding> element controls which character encoding is used for the XHTML document.
The <matchers> section (lines 40-45) defines the matchers available to the rest of the sitemap. When a sitemap contains more than one pipeline, as most do, the question of which pipeline to execute is answered by the matchers. This sitemap defines two matchers: one named wildcard (lines 41-42) and one named regexp. Both matchers are implemented by classes that are already part of Cocoon, and each has its own log target. The wildcard matcher matches wildcards (* and **), whereas the regexp matcher accepts a complete regular expression. Matchers can be used for other flow-of-control tasks, but their primary task is to select the pipeline that will execute.
Selectors are different from matchers. Whereas matchers pick which pipeline to execute, selectors conditionally execute parts of the same pipeline. This sitemap defines a single <selector> (lines 48-55) in its <selectors> section (lines 47-56). This selector, named exception, allows the sitemap to respond to Java exceptions that are thrown during the execution of the pipeline. The child elements of the selector are <exception> elements that map a symbolic name like not-found to a Java exception class like org.apache. cocoon.ResourceNotFoundException. When the selector is executed, these symbolic names of a thrown exception are available for the sitemap to make a decision. The second <exception> element (line 54) also has an unroll attribute whose value is true. If an exception marked as unrolled is nested as the cause of another exception, then the processing for the enclosing exception is executed, rather than the processing for the nested exception. The enclosing exception must have been declared with an <exception> element.
After all those component definitions, you’re ready to define a pipeline and get some work done. The next section of this sitemap is the <pipelines> container element, which contains all the pipelines defined for the sitemap (lines 60-113). A pipeline is defined by a <pipeline> element (line 62).
At the beginning of the pipeline is a <match> element (lines 64-71). This element determines whether the pipeline that it encloses gets executed. This particular match uses the default matcher, which is the wildcard matcher. The wildcard matcher uses wildcard characters to match against the request URI. Here the pattern being matched is "", the empty string. Let’s assume the Cocoon Servlet is mapped to the url-pattern /, that this sitemap file resides in the directory that is the root of your Web application, and that the Web application’s name is simple. The URI http://hostname:port/simple matches this pattern because by the time Cocoon gets the URI, the protocol, hostname, port, and Web application name will have been consumed by the Cocoon servlet.
The children of this <match> element are a <generate> element (line 65), a <transform> element (lines 66-69), and a <serialize> element (line 70). This is a typical minimal pipeline. The generator specified by the <generate> element generates a SAX event stream, the transformer specified by the <transform> element transforms the event stream into another event stream, and the serializer takes the resulting event stream and produces some output. In this short pipeline, the <generate> element uses the default generator, which you defined in the components section (line 6) to be the file generator. So, the SAX event stream is generated by means of the file generator reading the file books.xml (via a relative URI to the sitemap file) and parsing it using SAX. That SAX stream is the input to the transformer specified by the <transform> element, which happens to also be the default transformer (line 13). The default transformer is the XSLT transformer, so the incoming SAX stream is fed to the XSLT engine, along with the stylesheet books.xslt (again retrieved via a relative URI). In addition, the child <parameter> element passes the contextPath of the request as a parameter named contextPath. The transformed event stream is then passed to the serializer specified by <serialize>. This element doesn’t use the default serializer, but uses the type attribute to specify the serializer it wants. The value of the type attribute is the name given to the serializer (line 27) in the <components> section. The serializer is the last element in the <match>, so the XHTML output is written to the result and processing concludes. After all the definitions were out of the way, it took only eight lines in the sitemap to run XSLT over an XML file and present the output as XHTML.
You’re not done with the sitemap—you’re actually not even finished with the <pipeline> element. There are two more <match> elements to look at. The first one (lines 73-77) matches URIs that start with images/, match some number of non-path-separator characters (that’s what the * means), and end with .gif—in short, any .gif file under images. If the URI matches, then the sitemap invokes a reader using the <map:read> element. A reader is a single-unit pipeline—it combines the function of a generator, transformer, and serializer all at once. Readers are used to call out to functionality that doesn’t return XML data. The reader calls out, possibly passing some parameter values, and then returns the result. The default reader (the Resource Reader) is called here (lines 74-75). The Resource Reader is used to copy binary data to the output. By default in Cocoon, the Resource Reader is the default reader for a sitemap, (all the other default components are predefined).
The mime-type attribute tells the Resource Reader the MIME type of the data being copied to the output. The src attribute specifies how the Resource Reader gets the data it will copy. In this case, the src is relative to the URI for the sitemap. Notice that although the pattern matched is images/*.gif, the src is resources/images/{1}.gif, which demonstrates that the Resource Reader can do some dereferencing in order to get to the src data. The {1} that appears in the value of the src attribute is related to the use of wildcards by the <match>’s pattern attribute. When you use wildcards, there are three special characters:
-
* means to match any characters except a path separator.
-
** means to match any characters including a path separator.
-
\ is used as an escape character so that * and \ can appear in the pattern as literals rather than wildcards: \* matches an asterisk (*) in the URI, and \\ matches a backslash (\) in the URI.
Each use of a wildcard in the pattern is given a number. By specifying that number inside curly braces, you let the children of the <match> element access the text that was matched by the appropriately numbered wildcard. If you wrote {2} in the content of a wildcard match whose pattern was images/*/**.gif, you would get the text matched by the **, because it’s the second wildcard used. You’re trying to retrieve the correctly named GIF file from the resources/images directory and copy it to the output.
The second <match> element (lines 78-81) does essentially the same thing; the only difference is that the mime-type and wildcard pattern are different. This time, the data being copied through is CSS stylesheets, which are also not XML data.
The final element in this pipeline is a <handle-errors> element (lines 83-109). This element controls how errors are handled when they occur. We’ll see how selectors are used in the sitemap as we look at this element. The first element you encounter inside <handle-errors> is a <select> element. This is a selector, and like other components, the name of the selector being used is the value of the type attribute—in this case, exception (a selector you defined in the <selectors> section). When the sitemap executes the <handle-errors> section, the exception selector is executed. If an exception has been thrown, the selector leaves that information available to the sitemap. The sitemap can use a <when> element to test whether an exception has been thrown. This is the reason for naming the <exception> elements used in the definition of the selector. The <when> and <otherwise> elements are used to test the value produced by the selector. <when> allows you to specify a test condition and acts like an if statement. <otherwise> acts like an else statement. You can use as many <when> elements are you need.
This example has a single <when> element and an <otherwise> element. The <when> element (lines 86-96) tests to see if the value left by the selector is "not-found", which indicate that the ResourceNotFoundException was thrown. If this exception has been thrown, then the value is available, and the <when> element executes. The content of the <when> element is a pipeline. It includes a <generate>, a <transform>, and a <serialize>. The <generate> (line 87) uses a built-in generator known as the Notifying generator, whose job is to take error information and turn it into XML. Usually the error information is extracted from a Java Throwable object. The <transform> element (lines 88-94) uses an XSLT stylesheet from a site-wide stylesheet library to format the error information into a human-readable error page. It passes some parameters to the XSLT processor: the value of the contextPath (lines 90-91) and a title for the XHTML page being produced. The <serialize> element uses the default HTML serializer and uses the status-code attribute to set the HTTP status code (to 404—resource not found).
The <otherwise> element uses basically the same pipeline. The differences are that its <transform> doesn’t pass a title for the page being generated, and it sets the status code to 500 instead of 404.
That concludes our tour of a short (!) Cocoon example. We hope you have a good idea of the basic Cocoon components and how they fit together. It should be clear that pipelines are the key to doing everything in Cocoon. The last part of the sitemap, the <handle-error> section, should drive that point home.
For the sake of completeness, here is the books.xml file that served as input:
1: <?xml version="1.0" encoding="UTF-8"?> 2: <books xmlns="http://sauria.com/schemas/apache-xml-book/books" 3: xmlns:tns="http://sauria.com/schemas/apache-xml-book/books" 4: xmlns:xsi="http://www.w3.org/2001/XMLSchema-instance" 5: xsi:schemaLocation= 6: "http://sauria.com/schemas/apache-xml-book/books 7: http://www.sauria.com/schemas/apache-xml-book/books.xsd" 8: version="1.0"> 9: <book> 10: <title>Professional XML Development with Apache Tools</title> 11: <author>Theodore W. Leung</author> 12: <isbn>0-7645-4355-5</isbn> 13: <month>December</month> 14: <year>2003</year> 15: <publisher>Wrox</publisher> 16: <address>Indianapolis, Indiana</address> 17: </book> 18: <book> 19: <title>Effective Java</title> 20: <author>Joshua Bloch</author> 21: <isbn>0-201-31005-8</isbn> 22: <month>August</month> 23: <year>2001</year> 24: <publisher>Addison-Wesley</publisher> 25: <address>New York, New York</address> 26: </book> 27: <book> 28: <title>Design Patterns</title> 29: <author>Erich Gamma</author> 30: <author>Richard Helm</author> 31: <author>Ralph Johnson</author> 32: <author>John Vlissides</author> 33: <isbn>0-201-63361-2</isbn> 34: <month>October</month> 35: <year>1994</year> 36: <publisher>Addison-Wesley</publisher> 37: <address>Reading, Massachusetts</address> 38: </book> 39: </books>
This is the books.xslt stylesheet:
1: <?xml version="1.0" encoding="UTF-8"?> 2: <xsl:stylesheet version="1.0" 3: xmlns:xsl="http://www.w3.org/1999/XSL/Transform" 4: xmlns:books="http://sauria.com/schemas/apache-xml-book/books" 5: exclude-result-prefixes="books"> 6: <xsl:output method="html" version="4.0" encoding="UTF-8" 7: indent="yes" omit-xml-declaration="yes"/> 8: <xsl:template match="books:books"> 9: <html> 10: <head><title>Book Inventory</title></head> 11: <body> 12: <xsl:apply-templates/> 13: </body> 14: </html> 15: </xsl:template> 16: <xsl:template match="books:book"> 17: <xsl:apply-templates/> 18: <p /> 19: </xsl:template> 20: <xsl:template match="books:title"> 21: <em><xsl:value-of select="."/></em><br /> 22: </xsl:template> 23: <xsl:template match="books:author"> 24: <b><xsl:value-of select="."/></b><br /> 25: </xsl:template> 26: <xsl:template match="books:isbn"> 27: <xsl:value-of select="."/><br /> 28: </xsl:template> 29: <xsl:template match="books:month"> 30: <xsl:value-of select="."/>, 31: </xsl:template> 32: <xsl:template match="books:year"> 33: <xsl:value-of select="."/><br /> 34: </xsl:template> 35: <xsl:template match="books:publisher"> 36: <xsl:value-of select="."/><br /> 37: </xsl:template> 38: <xsl:template match="books:address"> 39: <xsl:value-of select="."/><br /> 40: </xsl:template> 41: </xsl:stylesheet>
The following figure shows the output of the pipeline:
Now that you have a general idea of the things that go into a sitemap, let’s explore the various component types in greater detail. As we do this, we’ll explain some of Cocoon’s many component types as well as introduce a few new component types and concepts that weren’t in the example sitemap.
Generators
As you’ve already seen, generators are used to start the processing of a Cocoon pipeline. They represent a source of data that can be represented as a stream of SAX events. Let’s say you have some data, like an event log of some kind. A generator based on the event log would conceptually operate by converting the event log into an XML document and then running that document through a SAX parser to emit a SAX event stream. The generator might not actually be implemented that way, but conceptually that’s how it works.
When you’re working with Cocoon, you need to think about where the data in your application will come from and whether one of the generators supplied with Cocoon will be able to provide it. Of course, to do that you need to have an idea of what generators are available in Cocoon and their capabilities. The list that follows is intended to give you an overview of what each of these built-in generators can do. You’ll probably want to consult the components appendix of the Cocoon user manual to learn about these generators in detail:
-
Directory generator—This generator produces an event stream that represents an XML representation of a file system directory. The document has a <directory> element as the root element, with children that are either <directory> or <file> elements. These elements contain attributes for the name, last modified time, and size of the file. The elements use the namespace URI http://apache.org/cocoon/directory/2.0 and the prefix dir. When you use this generator in the sitemap, you can control how deep the directory traversal goes, the format used for dates, the sort order, and a number of other options. This generator is in org.apache.coccon.generation.DirectoryGenerator and is named directory.
-
File generator—You’ve already seen the use of the file generator. It simply reads an XML document from a URL and produces the SAX event stream for it. The namespace URI and prefix are determined by the document that is read. This is the default generator for Cocoon. It’s in org.apache.org.cocoon.generation.FileGenerator and is named file.
-
Image directory generator—This is a subclass of the directory generator, which ensures that all the files in the directory are images. It adds attributes containing the image dimensions to the event stream and uses the same namespace URI and prefix as the directory generator. This generator is in org.apache.cocoon.generation.ImageDirectoryGenerator and is available with the name imagedirectory.
-
Linkstatus generator—The linkstatus Generator takes a URL as its src attribute and recursively traverses all the links embedded in the HTML found at that URL. The event stream contains <link> elements whose attributes contain the URL for the link, the content-type of the link (if traversal was successful), and the HTTP status code. The elements provided by the linkstatus generator use the namespace URI http://apache.org/cocoon/linkstatus/2.0 and the prefix linkstatus. This generator is useful for forcing a traversal of all pages in a Cocoon site. You can use it to preload pages into the Cocoon cache or to precompile eXstensible Server Pages (XSPs). The linkstatus generator is in org.apache.cocoon. generation.LinkStatusGenerator and is assigned the name linkstatus.
-
Notifying generator—You’ve seen the use of this generator in the <handle-errors> section of the sample sitemap. When an error occurs in the pipeline, the error (which is usually a Java Throwable object) is passed to the notifying generator. Nothing further happens until you access the notifying generator from a pipeline. When you do that, the information in the Throwable object is placed into the event stream. You get a <notify> element as the root element, and there will be a <title> element whose content gives the title of the error notification, a <source> element whose content gives the name of the class of the error object, a <message> element whose content is the result of calling getMessage on the error object, and a <description> element whose content is the result of calling toString on the error object. These elements use the namespace URI http://apache.org/cocoon/error/2.0 and the prefix error. The notifying generator is in org.apache.coccon.sitemap.NotifyingGenerator and is named notifier.
-
Request generator—This generator takes information in the HttpServletRequest and converts it to XML. The namespace URI for the elements is http://apache.org/cocoon/request/2.0. The root element is <request>, and it has four children. The <requestHeaders> element contains a sequence of <header> elements that represent the HTTP headers. Each <header> has a name attribute that contains the header name, and the content of the element is the value of the header. After that a <requestParameters> element that contains the parameters to the request. These are represented by a sequence of <parameter> elements. Again, a name attribute supplies the name of the parameter. However, because parameters can have multiple values, the content of a <parameter> element is a <value> element whose content is the parameter value. The next child element is <requestAttributes>. This element is supplied only if the sitemap parameter generate-attributes is set to true in the <generator> or <generate> element. The content of <requestAttributes> is a sequence of <attribute> elements. Each has a name attribute, and the attribute values appear as child <value> elements, just as for <requestParameters>. The last child element is <configurationParameters>, which contains a sequence of <parameter> elements, one for each parameter specified in the <generate> or <generator> element. These <parameter> elements are different from the <parameter> elements for the <requestParameter> elements. They use a name attribute for the parameter name, but the value is the content of the <parameter> element. No child <value> element is needed. The request generator is available under the name request and is in org.apache.cocoon.generation.RequestGenerator.
-
Server pages generator—The server pages generator uses an XSP page as the generator for the event stream. We’ll talk about this in more detail when we discuss XSPs. For now, you need to know that the generator is in org.apache.cocoon.generation.ServerPagesGenerator and uses the name serverpages.
-
Status generator—The status generator takes Cocoon’s internal status and renders it as a SAX event stream. It uses the namespace URI http://apache.org/cocoon/status/2.0. The root element is called <statusinfo>, and it can have two kinds of children: <group>s and <value>s. <statusinfo> has attributes that give the date and hostname of the server. A <group> can have another <group> or a <value> as a child. A <value> can have a sequence of <line>s as a child, and each line’s content is character data. Both <group> and <value> have a name attribute. This generator is in org.apche.cocoon.generation.StatusGenerator under the name status.
-
Stream generator—The stream generator generates a SAX event stream from an HttpRequest’s InputStream. It can deal with either GET or POST requests. When you use it in a pipeline, it uses the HttpRequest that caused the pipeline to execute. The stream generator is available under the name stream and is in org.apache.cocoon.generation.StreamGenerator.
-
XPath directory generator—The XPath directory generator works the like the directory generator, but it allows you to specify two additional parameters. If you specify an xmlFiles parameter with a regular expression value, then the files that match the regular expression are treated as XML files. If you specify an xpath parameter, then the XPath you provide as the parameter value is used to filter XML files (as specified by the xmlFiles parameter). Only those portions of each XML file that match the XPath expression are in the event stream. This generator is in org.apche.cocoon.generation.XPathDirectoryGenerator and is assigned the name xpathdirectory.
Transformers
Transformers are the components that get the job done. Without them, a pipeline could only generate some SAX events and serialize them back out. You’d get a little functionality, but not much. The standard Cocoon distribution includes a number of transformers; the following list gives you an overview of those that are built in. Some of these transformers are quite sophisticated, so we’ll provide a general description of how the transformers work. You’ll need to look at the components appendix of the Cocoon manual to learn about all the features of a particular transformer:
-
XSLT transformer—We’ve already looked at this transformer in the example sitemap. The transformer is in org.apache.cocoon.transformation.TraxTransformer and uses the name xslt.
-
Fragment extractor transformer—This transformer assumes that the incoming event stream represents an XML document that contains embedded SVG images. The transformer replaces those embedded images with an XLink locator that points to the image. This transformer is in org.apche.cocoon.transformation.FragmentExtractorTransfomer. It uses the name extractor.
-
I18N transformer—This transformer provides support to make it easier to internationalize your Web application. It does this by providing the ability to translate text content and attribute values into various languages. It lets you use parameters in those translations, similar to the functionality you get in a java.text.MessageFormat. Support for formatting dates, numbers, and currency is provided via the functionality provided in the java.text package.
The I18N transformer assumes there are elements and attributes from the namespace http://apache.org/cocoon/i18n/2.1. The <text> element indicates text that is supplied from a message catalog. The content of the <text> element is used as the key to the catalog—the message catalog is queried with this key, and the resulting text replaces the <text> element in the output event stream. The attr attribute contains a space-separated list of attribute names. The values of these attributes are also assumed to be keys into the message catalog and are replaced with the text obtained from the catalog. Parameter substitution is done by enclosing the <text> element in a <translate> element and using {n} notation to indicate the placeholders to be filled in. Placeholders are numbered starting at 0 and are filled in by <param> elements the follow the <text> element inside the <translate> element, one for each placeholder. The content of a <param> element is the value of the parameter. The parameters may also be translated by enclosing the content of the <param> elements in a <text> element.
You can format dates, times, or dates and times according to the current locale using the <date>, <time>, or <datetime> elements. Each of these elements takes a value attribute that contains the value to be formatted. A src-pattern attribute tells the transformer how to parse the value, and a pattern attribute tells the transformer how to format the value into the output event stream. You can also specify a locale and source-local attribute to indicate the current locale and the locale for the value. The patterns use the syntax of the java.text.SimpleDateFormat.
The <number> element is used to format numbers. To format numbers only, you can specify a pattern attribute and a value attribute. The patterns follow the syntax of java.text.DecimalFormat. You can also use <number> to format currency values or percentages by specifying a type attribute with the value "currency" or "percent" instead of pattern.
The message catalogs used by the I18n transformer are XML files whose root element is <catalogue> and whose child elements are <message> elements. The content of the <message> element is the text to be replaced. A key attribute associates a key with each <message> element. Each message catalog is given a name when the transformer is defined. This name is used as the base name for the message catalog file. The I18n transformer allows for a hierarchy of message catalogs that looks like the hierarchy allowed by java.util.ResourceBundle. The hierarchy search proceeds by trying basename.xml followed by basename_langauge.xml, followed by basename_language_country.xml, and ending with basename_language_country_variant.xml.
The message catalogs are configured in the <transformer> element. Three configuration elements appear as children of the <transformer> element. The <catalogues> element contains a sequence of <catalogue> elements, one for each catalog. Each <catalogue> has an id element for identification, a name element that provides the base name for the catalog file, and a location attribute that specifies the location of the catalog files. After the <catalogues> element, an optional <untranslated-text> element contains the text that’s returned if a key can’t be translated (by default, the key name is output instead). The optional <cache-at-startup> element contains the value "true" or "false" as its content ("false" is the default). If the value is "true", then Cocoon tries to cache the messages in that catalog when it starts up.
The I18n transformer is in org.apache.cocoon.transformation.I18nTransformer and is known by the name i18n.
-
Log transformer—The log transformer prints all the events that pass through it into a file. When you use the log transformer in a <transform> tag, you can supply two parameters: logfile, which tells the transformer which file to write the events into; and append, which tells the transformer whether it should append to the logfile or start the log over. If you don’t specify a value for logfile, the events are logged to the servlet engine’s standard output. This transformer is primarily used for debugging. It uses the name log and is available in org.apache.cocoon.transformation.LogTransformer.
-
SQL transformer—This transformer is one way of interacting with a SQL database in Cocoon. It assumes that some special XML elements in the input stream are destined for it. These elements are taken from http://apache.org/cocoon/SQL/2.0. The way it works is a little tricky. The input stream must contain a <page> element from the SQL namespace. There also must be an <execute-query> element as a child of the <page> element. Here’s the difficult part: There may be other elements from other namespaces as children of the <page> element, and the <execute-query> may be a child of one of these elements or their children. This is necessary because you want be able to position the results of the SQL query in the correct place in the document/event stream. The <execute-query> element has a single child element called <query>. The content of the <query> element is a SQL query. You can use simple SQL statements like select, insert, and update. You can also use a SQL stored procedure. If you use a stored procedure, then you must supply an isstoredprocedure attribute on <query>, and its value must be "true". The <query> element also takes a name attribute that’s used to name the result set.
After the transformer has executed, the output event stream contains a <rowset> element where the <execute-query> element was. If a name attribute was supplied for the <query> element, then the <rowset> has a name attribute with the same value. If you set the show-nr-of-rows parameter in the <transform> element, then there is an attribute named nrofrows whose value is the number of rows in the <rowset> The content of the <rowset> is a sequence of <row> elements. Each <row> element contains an element for each column in the result set, and the content of that element is the value of the column in the appropriate row.
When you specify the SQL transformer in a <transform> element, you need to supply a parameter called use-connection. The value of this parameter is the name of a datasource connection defined in the Cocoon configuration file cocoon.xconf. You can supply a parameter called show-nr-of-rows, which adds a nrofrows attribute containing the number of rows to the <rowset>. You can also supply a parameter called clob-encoding that specifies the character encoding to be used when reading data out of CLOB columns.
The SQL transformer is available under the name sql and is in the class org.apache.cocoon.transformation.SQLTransformer.
-
Filter transformer—The filter transformer allows you to reduce the number of elements in a sequence in order to avoid processing them. It assumes that the incoming event stream contains a sequence of the same element. The parameters for the transformer allow you to specify which element should be filtered (the parameter name is element-name), how many elements should be passed through (the parameter name is count), and what block number to start at (the parameter name is blocknr). When the transformer executes, it breaks the sequence into blocks whose size is determined by the count parameter. The output event stream takes the elements in the sequence and wraps them up in a <block> element. There are count elements per <block>, and each block is given an id attribute whose value starts at 1. The blocknr parameter specifies the id of the <block> that is to be filled in. That’s the only <block> that has elements from the sequence in it; all the other <block> elements are empty. This transformer is useful for producing paged output, because you can use variables to provide the values for the parameters. The name assigned to this transformer is filter, and the class is org.apache.cocoon.transformation.FilterTransformer.
-
Write DOM session transformer—This transformer converts the input event stream into a DOM tree and stores that DOM tree in the servlet session. There are two parameters to this transformer: dom-name is the name used to store the DOM tree in the servlet session, and dom-root-element allows you to specify the name of the element in the input event stream that’s used as the root of the DOM tree. You use the name writeDOMsession to use this transformer, and the class is org.apache.cocoon.transformation.WriteDOMSessionTransformer.
-
Read DOM session transformer—This transformer retrieves a DOM tree from the servlet session and converts it back into a SAX event stream. The dom-name parameter is the name of the DOM tree that’s retrieved from the session. The trigger-name parameter is the name of the element in the input event stream that triggers the transformer to start generating events. The position parameter determines how the events from the DOM tree are placed relative to the trigger element. If position is "before", then the events from the tree appear before the trigger element. If position is "in", then the transformer generates a startElement for the trigger element, generates all the events for the DOM tree, and then resumes generating events from the input event stream. If the position is "after", then the events for the DOM tree are generated right after the endElement event for the trigger element. In all cases, the events from the DOM tree are added to the stream coming from the transformer input. It’s just a question of where. This transformer is available via the name readDOMsession, and the class is org.apache.cocoon.transformation.ReadDOMSessionTransformer.
-
XInclude transformer—The XInclude transformer expects the input event stream to contain at least one XInclude element. XInclude provides a way to merge one or more XML documents into another. The transformer performs the inclusion specified by the XInclude element or elements and outputs an event stream containing the merged document. The class for the XInclude transformer is org.apache.cocoon.transformation.XIncludeTransformer, and the name is xinclude.
-
CInclude transformer—In addition to using XInclude to combine documents, Cocoon has defined its own inclusion mechanism. This is available via the CInclude transformer. It expects the input event stream to contain elements from the namespace http://apache.org/cocoon/include/1.0. The simplest form of include is an <include> element, which has a src attribute that indicates the document to include. You can also specify an element attribute that defines the name of an element used to wrap the included XML. If the wrapper element is specified, the <include> element in the input stream is replaced by the wrapper element, and the child of the wrapper element is the contents of the included document; otherwise, the <include> element is replaced by the document contents. The namespace and prefix of the wrapper element are controlled by the ns and prefix attributes of the <include> element.
The CInclude transform also allows you to include XML from an external HTTP via either the GET or POST method. The GET method is relatively simple. Instead of <include>, you use <includexml>, which has no attributes and a single child element <src>. The content of the <src> element is the URL that should be accessed using the GET method. If an error occurs, then the input event stream is lost. If you wish to proceed anyway, you can set the ignoreErrors attribute of <includexml> to "true".
To use the CInclude transform to do a POST to request a document, you again use the <includexml> element, but this time it has three child elements. In addition to the <src> element, it contains a <configuration> element that contains a <parameter> element. <parameter> elements have two children—<name> and <value>—and store the name and value as their content. To perform a POST, the <parameter> is named method and the value is POST. After the <configuration> element is a <parameters> element. This element contains a sequence of <parameter> elements (just like the one used in <configuration>), one for each parameter to the POST method.
The CInclude transformer is in org.apache.cocoon.transformation.CIncludeTransformer and is available under the name cinclude.
-
EncodeURL transformer—The EncodeURL transformer takes care of encoding URLs that appear in the input event stream. This is much easier that trying to call encodeURL at all the right points. By making the EncodeURL transformer the last transformer in your pipeline (before the serializer), you can ensure that all URLs in the output event stream are properly encoded. The transformer takes two configuration options as children of the <transformer> element where it’s defined. The <include-name> option allows you to specify a regular expression that’s used to determine which attributes are treated as URLs to be encoded. The regular expressions are of the form element-name/@attribute-name. The default value for <include-name> is ./*@href|.*/@action|frame/@src, which covers any href attribute, any action attribute, and any src attribute of a <frame> element. The <exclude-name> option allows you to exclude attributes that should not be treated as URLs. Its default value is img/@src, which means the src attributes of <img> elements won’t be encoded. This transformer is in the class org.apache.cocoon .trasnformation.EncodeURLTrasnformer and is assigned the name encodeURL.
-
Augment transformer—This transformer looks at all href attributes in the input event stream and converts any relative URLs to absolute URLs. The transformer normally makes relative URLs absolute in relation to the request URI. If you specify the mount parameter as a child of the <transform> element, then URLs are made absolute relative to the servlet context appended with the value mount. For example, if the value of mount is "resources" and the Cocoon Web application has been installed as http://localhost:8080/cocoon, then URLs are made absolute against http://localhost:8080/cocoon/resources. This means the relative URL icon.gif becomes http://localhost:8080/cocoon/resources/icon.gif. This transformer is in org.apache.cocoon .transformation.AugmentTransformer and uses the name augment.
Serializers
As you’ve already seen in the sample sitemap, serializers transform a SAX event stream into binary or character streams for output. If a pipeline contains a generator, it should also contain a serializer. We’ll take you through the set of available serializers so you’ll have an idea of the kind of functionality that’s available. You can get full details on any serializer in the components appendix of the Cocoon user manual:
-
XML serializer—This Serializer serves as the basis for a number of the other serializers. It generates an XML document from the input SAX event stream. This serializer is in the class org.apache.cocoon.serialization.XMLSerializer under the name xml. You can provide a number of configuration parameters when you use the serializer from a <serialize> tag:
-
cdata-section-elements—A whitespace-separated list of elements whose text content should be enclosed in CDATA sections for output.
-
doctype-public—The public ID to be placed in the DTD of the output document.
-
doctype-system—The system ID to be placed in the DTD of the output document.
-
encoding—The character encoding to be supplied for the encoding declaration in the output document.
-
indent—"yes" if some elements should trigger a line break, or "no" otherwise (the default value is "yes").
-
media-type—The MIME content type of the document.
-
method—The output method that should be used. The method names are the XSLT output method names.
-
omit-xml-declaration—"yes" to omit the XML declaration.
-
standalone—"yes" to output a standalone document declaration.
-
version—The version of the output method. The defaults are 1.0 for the XML output method and 4.0 for the HTML output method.
-
-
HTML serializer—The HTML serializer is the default for Cocoon pipelines. It’s in the class org.apache.cocoon.serialization.HtmlSerializer and available under the name html. This serializer accepts the same configuration parameters as the XML serializer.
-
XHTML serializer—This is a use of the XML serializer for serializing the event stream as XHTML. There are some differences. When defining the XHTML serializer, you must supply some configuration parameters. These appear as child elements of the <serializer> element. The elements are doctype-public and doctype-system. The meaning of these elements corresponds to the XML serializer configuration parameters of the same name. You should supply the public and system ID of one of the three XHTML DTDs as the values of doctype-public and doctype-system, respectively. You also need to provide a mime-type attribute on the <serializer> element. The value of the mime-type should be "text/html". The XHTML serializer uses the same class as the XML serializer, org.apache.cocoon.serialization.XMLSerializer, but is named xhtml.
-
Text serializer—The Text serializer is built on the XML serializer but in a different way than the XHTML serializer. When you define the text serializer, you need to supply a mime-type attribute on the <serializer> element. The value of this attribute should be "text/plain". After that, you’re all set. The class for the text serializer is org.apache.cocoon.serialization.TextSerializer (not XMLSerializer). The name is text.
-
WAP/WML serializer—The WML serializer is also built on the XML serializer. You need to supply the mime-type attribute on the <serializer> when you define it, and you need to provide <doctype-public> and <doctype-system> children. The mime-type attribute should be set to "text/vnd.wap.wml". The value for <doctype-public> is -//WAPFORUM//DTD WML 1.1//EN, and the value for <doctype-system> is http://www.wapforum.org/DTD/wml_1.1.xml . You should name the serializer wml and use the class org.apache.cocoon.serialization.XMLSerializer.
-
SVG/XML serializer—This is the last of the serializers based on the XML serializer. You need to set the mime-type attribute of the <serializer> element to "text/xml" when you define the serializer. You also need to set the value of the <doctype-public> child element to -//W3C//DTD SVG 1.0//EN and the value of the <doctype-system> child element to http://www.w3.org/TR/2001/REC-SVG-20010904/DTD/svg10.dtd. This serializer is named svgxml and is in org.apache.cocoon.serialization.XMLSerializer.
-
SVG/JPEG serializer—This serializer expects the event stream to contain an SVG document. It serializes that document by using Batik to convert it into a JPEG image. This serializer uses the class org.apache.cocoon.serialization.SVGSerializer and is available under the name svg2jpeg. When you define it, it needs a mime-type attribute on the <serializer> element. The value for the attribute should be "image/jpeg". This causes SVGSerializer to select the correct Batik transcoder.
You can supply some configuration parameters using <parameter> children of the <serializer> element. The SVG/JPEG serializer has its own specific parameter named quality; it’s a float that specifies the JPEG quality as a value between 0.0 and 1.0, with 1.0 being the best quality. There are also some parameters used by any serializer that uses SVGSerializer:
-
width—The width of the rasterized image. If no height is specified, the aspect ratio is preserved.
-
height—The height of the rasterized image. If no width is specified, the aspect ratio is preserved.
-
background_color—The background color. The value is of the form RRGGBB or #RRGGBB. The default background color is white.
-
language—The language to use. The default is English (en).
-
user_stylesheet_uri—The URI of a user stylesheet.
-
pixel_to_mm—The pixel to millimeter conversion factor. By default it’s 0.264583, which yields 96dpi.
-
-
SVG/PNG serializer—This serializer works just like the SVG/JPEG serializer. When you define it, you supply "image/png" as the mime-type attribute value instead of "image/jpeg". You also use the name svg2png instead of svg2jpeg. In addition to the shared parameters for SVGSerializer (see the SVG/JPEG serializer), this serializer defines two parameters useful for PNG files. The parameter force_transparent_white controls the color of fully transparent pixels. If the parameter is "true", they’re white. If it’s "false", they’re black (the default). The other parameter is named gamma and controls the gamma correction of the PNG. The default value of gamma is about 2.22.
-
SVG/TIFF serializer—This serializer is also based on SVGSerializer. Set the value of the mime-type attribute to "image/tiff". The name for this serializer is svg2tiff. It uses all the shared SVGSerializer parameters (see SVG/JPEG serializer), and it also uses the force_transparent _white parameter defined by the SVG/PNG serializer.
-
Link serializer—The link serializer is the companion to the LinkStatus generator. It’s in the class org.apache.cocoon.serialization.LinkSerializer and can be accessed via the name links. The MIME type of the output is application/x-cocoon-links. You also need a views section in your site map (we’ll talk about views later):
<map:views> <map:view from-position="last" name="links"> <map:serialize type="links" /> </map:view> <map:views>
-
Zip archive serializer—The zip archive serializer generates a zip archive as its output. It expects the input event stream to contain elements from the namespace http://apache.org/cocoon/zip-archive/1.0. The root element is an <archive> element that contains a sequence of <entry> elements. Each <entry> contains a name attribute for the entry. If the entry refers to out-of-line data, then a src attribute appears, and its value is a URL to the data to be archived. URLs can use the cocoon: protocol. Inline XML data can be archived as well. In this case, there is no src attribute, but there is a serializer attribute whose value is the name of a serializer. The XML data to be serialized appears as the child of the <entry> element. The zip archive serializer is in org.apache.cocoon.serialization.ZipArchiveSerializer and uses the name zip.
-
PDF serializer (optional)—Cocoon’s PDF serializer uses FOP to serialize XML to PDF. The code for the serializer is part of the Cocoon distribution, but you need to install the FOP fop.jar in Cocoon’s lib directory. Once you’ve done that, you can specify fo2pdf as the name of the serializer, which is in org.apache.cocoon.serialization.FOPSerializer. The PDF serializer expects the input event stream to contain an XSL FO document. You can use the FOP tools to generate a PDF with embedded fonts.
-
PS serializer (optional)—The PostScript serializer also uses FOP to do its job, so you need to do the same setup as for the PDF serializer. The serializer is in org.apache.cocoon.serialization .PSSerializer, and you can use the name fo2ps to access it. Like the PDF serializer, it expects an XSL FO document in the input event stream.
-
PCL serializer (optional)—This serializer is like the PostScript and PDF serializers. It’s in org.apache.cocoon.serialization.PCLSerializer, and the name is fo2pcl.
Matchers
Matchers are the way Cocoon assigns portions of its virtual URI space to instructions in the sitemap. The <match> element uses a matcher and a pattern to determine whether it should handle a particular request. The body of the <match> element contains the sitemap instructions that should be executed if the pattern is matched.
Cocoon uses a first-match approach when looking at the matchers. It’s not hard to come up with a set of matchers where more than one matcher will match the request. In this case, Cocoon uses the matcher that appears earliest in the sitemap. The result is that you must order your matchers from most specific to least specific. (This is similar to the way you order catch clauses in a Java try-catch block.)
When you use a wildcard or regular expression pattern, Cocoon remembers the text that was matched by the pattern. You can reference it later in the pipeline if you need it. You reference it by placing an {n} expression in the sitemap. The n refers to the number of the pattern. Patterns are numbered starting from one, and each time you use a pattern, the number is increased.
Cocoon includes quite a few built-in matchers. As with the other components, this list is designed to give you an overview of some of the more useful matchers:
-
Wildcard URI matcher—This matcher uses wildcards to match against the request URI. As a reminder, the legitimate wildcard characters are * (matches zero or more characters excluding the path separator /), ** (matches zero or more characters including the path separator), and \ (escapes the * and \ characters). This syntax is used for all wildcard matching in the Cocoon matchers. The wildcard URI matcher can be found with the name wildcard and uses the class org.apache.cocoon.matching.WildcardURIMatcher.
-
Regexp URI matcher—The Regexp URI matcher uses a regular expression to match against the request URI. The matcher is in org.apache.cocoon.matching.RegexpURIMatcher and can be found via the name regexp. The regular expression syntax used is taken from the Jakarta Regexp project (http://jakarta.apache.org/regexp/index.html). In the following descriptions, A and B stand for regular expressions. These are some of the most frequently used characters—check the Jakarta Regexp page for the full syntax:
-
Any non-special character \, [,], (,), ^, $, *, +, ? matches itself.
-
. matches any character except newline.
-
A* matches A zero or more times.
-
A+ matches A one or more times.
-
A? matches A zero or one times.
-
AB matches A followed by B.
-
A|B matches A or B.
-
^ matches the beginning of a line.
-
$ matches the end of a line.
-
[abc] matches a, b, or c (characters).
-
[a-zA-Z] matches a character in the range a-z or A-Z.
-
[^abc] matches any character but a, b, or c.
-
\b matches a word boundary.
-
\B matches a non-word boundary.
-
\w matches a word (alphanumeric plus underscore [_]) character.
-
\W matches a non-word character.
-
\s matches a whitespace character.
-
\S matches a non-whitespace character.
-
\d matches a digit character.
-
\D matches a non-digit character.
-
-
Wildcard header matcher—This matcher allows you to do a wildcard match against the HTTP request headers. To specify the header you want to match, you need to supply a <header-name> element as a child element of the <matcher> element when you define the matcher. The content of the <header-name> element should be the name of the header you want to match. Because you have to define a new matcher for each header, we suggest that you name the matcher by taking the name of the HTTP header and appending -match. So, if you’re matching the referrer header, you would name the matcher referrer-match. The wildcard header matcher is in org.apache.cocoon.matching.WildcardHeaderMatcher.
Selectors
Selectors implement basic conditional logic inside a pipeline. They can evaluate simple conditions that involve various parts of the request environment, such as the URI, the headers, the parameters, or the host name.
They are different from matchers in a number of ways. First, matchers control the execution of entire pipelines, whereas selectors control the execution of portions of pipelines. Matchers make binary decisions—either they match, or they don’t. Selectors can test values for equality, much like an if, if-else, or switch statement.
When you use a selector, you create a <select> element in the pipeline. This element has two kinds of children. The <when> element includes a test attribute that provides a value to be tested by the selector. You may have as many of these as you like. The children of a <when> element are components in the pipeline like <transform> or <serialize>. They can even be an entire pipeline. The other child of <select> is <otherwise>, which acts like an <else> clause. If none of the <when> elements has a match for its test attribute, then the children of <otherwise> are executed. <otherwise> can have the same children as <when>.
It’s important to know when the selectors are executed: They’re executed when the pipeline is set up, not during pipeline execution. This means they appear to execute before any regular components that lexically precede them in the sitemap. So, you can’t make a selector dependent on the output of a generator or transformer, because the selector executes before the generator or transformer.
Let’s look at some of the selectors that are available in Cocoon:
-
Browser selector—This selector lets you make decisions based on the HTTP User-Agent header. When you define the selector in the <selectors> section, you must define a list of agent names to be used as the values of the test attribute in the selector’s <when> statements. You do this by creating <browser> elements as children of the <selector> element you’re using to define the selector. A <browser> element has two attributes: name is the name you’re going to use in the test attributes of <when> elements, and useragent is the string that should appear somewhere in the User-Agent header. You can have multiple <browser> elements with the same name but different useragent strings. This allows you to consolidate browsers that are really the same under a single name. The browser selector is available via the class org.apache.cocoon.selection.BrowserSelector and uses the name browser.
-
Host selector—The host selector works in a similar fashion to the browser selector, but instead of testing the User-Agent header, it tests the Host header. This allows Cocoon to perform host-specific sitemap processing. The primary application is in multihomed or virtual hosted environments. Like the browser selector, the host selector requires you to add child elements to the <selector> element as you’re defining the selector. The difference is that the child elements are <host> elements. The <host> element has two attributes: name, which is the value to be tested against the value of a <when> element’s test attribute; and value, which contains the name of the host as carried by the HTTP Host header. Just as with the browser selector, you can have multiple <host> elements that have the same value for the name attribute but different values for the value attribute. The host selector is available in the class org.apache.cocoon.selection .HostSelector and is normally associated with the name host.
-
Parameter selector—This selector takes the value to be tested from a Cocoon sitemap parameter. You can set this parameter a few ways: from within a <match> element, via a <parameter> element, or by an action (more on actions in the next section). This selector can also test against a matched wildcard or regular expression value. The test that’s performed is a case-sensitive String comparison.
When you use the parameter selector, the first child element of the <select> element must be a <parameter> element whose name attribute is set to "parameter-selector-test". The value of that parameter is either the sitemap parameter "{sitemapParameterName}" or a reference to a matched wildcard or regular expression "{n}", where n is the number of the wildcard or regular expression. After that, you can supply your <when> and <otherwise> clauses. The parameter selector is in the class org.apache.cocoon.selection.ParameterSelector and uses the name parameter.
-
Request attribute selector—This selector lets you select on the value of an attribute in the servlet request. To do this, you supply a <parameter> element as the first child of the <select> element. This parameter is named attribute-name, and its value is the name of the attribute that you want to select on. The Request Attribute selector uses the name request-attribute and is in the class org.apache.cocoon.selection.RequestAttributeSelector.
-
Request parameter selector—The request parameter selector works like the Request Attribute selector, except that the name of the <parameter> element is parameter-name. This selector is available in org.apache.cocoon.selection.RequestParameterSelector and uses the name request-parameter.
Actions
Up until now, all the Cocoon components we have looked at produced some kind of display data. Serializers generate data to be displayed, and they are fed by transformers, which are fed by generators. The data that is displayed originates with the generator. Sometimes you need to adjust the pipeline while it’s running. Actions provide a way to do this without polluting the display data with information needed to control the pipeline.
An action is a Cocoon component that can both receive values from the sitemap and provide values to the Sitemap. This allows it to control the behavior of a pipeline at runtime. You should use actions to handle form processing and dynamic navigation.
When an action executes, it receives any attributes of the <act> element, as well as any parameters defined by child <parameter> objects. The action also has access to the request and application state. When the action completes, it provides a set of values that can be accessed via the {name} notation. These values are provided as a Java Map object. The action can also return null instead of returning a Map. If this happens, then any statements inside the <act> element aren’t executed.
Defining an action looks much like defining any other Cocoon component. The <actions> section goes after the <selections> section and contains a sequence of <action> elements. The <actions> element might look like this:
<map:actions> <map:action name="action" logger="logtarget" src="/books/2/639/1/html/2/classname"/> </map:actions>
The definition of an action uses an <action> element, which looks much like the other elements for defining components. There are attributes for naming the action to be defined, assigning a LogKit log target, and specifying the class that implements the functionality of the action.
When you use an action in a pipeline, you create an <act> element as a child of a <match> element. The type attribute of the <act> element is the name of the action you wish to execute. Any parameters you want to pass to the action appear as the initial children of the <act> element. After that come any statements that need to use the values passed back by the action. The values to be used are enclosed in {}. A <match> element that uses an action might look like this:
<map:match pattern="uri"> <map:act type="action-name"> <map:parameter name="parameter" value="value"/> <map:generate src="/books/2/639/1/html/2/{returnValue}"/> <map:serializer/> </map:act> </map:match> Most of the actions that are predefined in Cocoon are related to big tasks like database access or session handling. The following list makes you aware that these tasks can be accomplished using actions, and we’ll cover the actions when we talk about each of these subjects in detail:
-
Database actions—Cocoon provides two sets of actions for dealing with database access, which we’ll cover in Chapter 6, "Cocoon Development," when we talk about database access.
-
Sendmail action—The sendmail action is in the class org.apache.cocoon.acting.Sendmail and is normally given the name sendmail. This action allows your application to send e-mail. The parameters you can pass into the sendmail action via <parameter> elements are as follows:
-
smtphost—The IP address or name of the host that should deliver the mail (optional).
-
to—The destination address of the message.
-
cc—Carbon copy recipients of the message, separated by commas (optional).
-
bcc—Blind carbon copy recipients of the message, separated by commas (optional).
-
from—The address of the sender of the message.
-
subject—The subject line for the message (optional).
-
body—The text of the message body (optional).
-
charset—The character encoding of the message (optional).
-
attachment—The attachments for this message, separated by blanks (optional).
These parameters are passed back to the sitemap and are accessible via {name}:
-
status—One of three values: "success", "user-error", or "server-error". "Success" means the message was sent, "user-error" means the user-made an error (probably in addressing—to, from, cc, bcc), and "server-error" means the message couldn’t be delivered to the smtphost.
-
message—A text explanation of why the message couldn’t be delivered. This isn’t present if the message was sent successfully.
-
-
Session action—The session action allows you to create or destroy a session context. Session-handling will be covered in detail in a separate section later in this chapter.
Action Sets
You place a sequence of actions into an action set. This is a named set of actions that are executed as one action by the sitemap. The actions in the action set are executed in the order they appear. Only the last action that appears in the action set is allowed to return values to the sitemap.
Defining action sets is easy. The <action-sets> element goes right before the <pipeline> element in the sitemap. It contains a sequence of <action-set> elements. Each <action-set> has a name attribute and contains a sequence of <map:act> elements as its children.
Using an action set is also easy. You use a <map:act> element, but instead of giving a type attribute, you give a set attribute whose value is the name of the action set to execute. Everything else is done just like a regular <map:act> element.
Readers
Cocoon is an XML-centric system. All the components you have seen so far rely on getting XML as input and generate XML as output. But not everything in a Web application will be XML—there will be images, binary data from databases, and other non-XML data that you wish to incorporate into your application. This is where readers come into the picture. Readers are components that implement a self-contained pipeline—at least, that’s how you can visualize them in Cocoon terms. One way to think of them is as pass-throughs for various kinds of data. Some of the Cocoon readers are as follows:
-
Resource reader—This reader is used to copy binary data to the output of the pipeline. Any kind of binary (and text data as well) can be copied by a reader. It’s the most general of all the readers. To define the resource reader, you use the name resource and the class name org.apache.cocoon.reading.ResourceReader. To use it, you need to supply a src attribute that specifies the resources to be read (and copied to the output) and a mime-type attribute that specifies the MIME type to be passed to the result. You can also specify some optional parameters as children of the <read> element. These parameters are defined using the <parameter> tag, and work as follows:
-
expires—The time in milliseconds that the resource can be cached. (Optional.)
-
quick-modified-test—If the value is "true", only the last modified time of the current source is tested, but not if the current source is the same as the source that was just used. This defaults to "false". (Optional.)
-
byte-ranges—If the value is "true", support for byte ranges is turned on. The default is "true". (Optional.)
-
buffer-size—The size of the buffer used to read a resource. The default value is "8192". (Optional.)
-
-
Image reader—This reader is an extension of the resource reader and works the same way. It uses the same attributes and all the configuration parameters of the Resource reader. The class name for the reader is org.apache.cocoon.reading.ImageReader and the usual name for the reader is image. This reader defines some configuration parameters beyond those defined by the resource reader:
-
width—Image width in pixels. If no height is specified, the aspect ratio is preserved. (Optional.)
-
height—Image height in pixels. If no width is specified, the aspect ratio is preserved. (Optional.)
-
allow-enlarging—If the value is "yes" and the image is smaller than that specified by the width and height parameters, then the image is enlarged. If the value is "no", those images are reduced in size. This parameter defaults to "yes". (Optional.)
-
-
JSP reader—The JSP reader allows you to pass the Cocoon request to a JavaServer Page (JSP) and have the page process the request. The result of processing the page is passed to the result. To define the JSP reader, use the class org.apache.cocoon.reading.JSPReader and the name jsp. When you use the JSP reader in a <read> element, you should set the mime-type attribute to be the MIME type of the JSP result.
-
Database reader (optional)—This reader allows you to take data out of a column in a database and pass it through to the result. A common application for it is to retrieve images that are stored in BLOB columns. To define the Database reader, use the class org.apache.cocoon.reading.DatabaseReader and make the name databasereader. A few configuration options are available when you define the reader. These options are child elements of the <reader> element. The <use-connection> element takes the name of a database selector (as defined in the cocoon.xconf file) as its content. The <invalidate> element has two values for its content: "never" and "always". If the last-modified parameter (discussed in a moment) is -1, then the content of <invalidate> determines the caching behavior. Otherwise the caching behavior is defined by the last-modified time retrieved from the database.
When you use the database reader, the attributes of the <read> element have additional meaning. In particular, the value of the src attribute should be a key value from the key column in the database. You should also take care to set the mime-type attribute to the appropriate type. You also need to supply some parameters. As usual, you do so via <parameter> children of the <read> element. Here are the parameter names:
-
table—The name of the database table to be queried.
-
image—The name of the column containing the data to retrieve.
-
key—The name of the key column for the data in the image column.
-
where—A string containing a SQL WHERE expression, but without the word WHERE. (Optional.)
-
order-by—A string containing a SQL ORDER BY expression but without the words ORDER BY. (Optional.)
-
last-modified—The name of a column that must a SQL TIMESTAMP, which is interpreted as the last-modified time of the data.
-
content-type—The name of a column that contains a string. The value of this string is used to override the setting of the mime-type attribute. This allows different media types to be stored in the same column.
The Database reader combines the values of all these parameters into a SQL query that looks like this:
SELECT {image} [, last-modified] [, {order-by-column} ] FROM {table} WHERE {key} = {src} [ AND {where} ] [ORDER BY {order-by}] -
Views
Remember that one of the goals of Cocoon is to separate the various concerns: content, style, logic, and management. The view mechanism allows you to reuse the content portion of a pipeline while changing the style and presentation of it. Cocoon’s view mechanism lets you divert the content of a pipeline into a sequence of instructions that are contained in a view. You could accomplish this diversion using selectors, but the advantage of views over selectors is that a single view can be used to divert any number of pipelines.
How is this diversion accomplished? Views are attached to exit points in pipelines. At these exit points, the pipeline content is diverted into the view. Of course, you now need to ask how the exit points defined. Some of the elements in a sitemap take a label attribute. The label attribute takes a list of labels names, separated by either spaces or commas (you can mix the separators in a single attribute value). This defines an exit point that can be referred to by any of the label names. Here is the list of sitemap elements you can label: <map:generator>, <map:generate>, <map:transformer>, <map:transform>, <map:aggregate>, and <map:part>. If one of these elements possesses a label, and a view references that label, then the XML content of that element is diverted to the referencing view, and execution picks up with the instructions in that view. In the case of a <part> element, the content that’s diverted is only the content produced by that <part>.
Cocoon also defines two special view names, first and last. They are automatically defined for every pipeline. The first label defines an exit point after the first component of that pipeline (the generator); last defines an exit point after the last component in the pipeline, but before the serializer (otherwise there would be no point to the view, because the serializer is responsible for the final output and you want the view to take over that job).
You define a view by using the <views> section of the sitemap. The <views> section comes right after the <components> section. It contains a sequence of <view> elements as its content. A <view> element contains a sequence of sitemap instructions as its child content. The allowable elements are <transform>, <call>, and <serialize>. The <view> element must have a name attribute that names the view.
Views are attached to exit points using one of two attributes. The from-label attribute contains the name of a label where the view should be attached. The output of the component with that label is diverted to the instructions in the view. The from-position attribute uses the special view names. If its value is "first", then the output of the generator is sent to the view. If the value is "last", the event stream that would have been the input to the serializer is diverted to the view instead. When from-position is used, the view is defined for every pipeline in the sitemap.
Once views are set up in the sitemap, you need to access them. All processing in Cocoon is based on properties of the request, the URI, the headers, or parameters. Cocoon currently selects a view via a special URI query parameter named cocoon-view. So, to select a view named fancy-pdf, the URI should look like http://localhost:8080/cocoon/mydocument.html?cocoon-view=fancy-pdf. Cocoon uses its regular request-processing to look at this URL (without the cocoon-view parameter) and select a pipeline to execute. The fancy-pdf view is then hooked up to the exit point defined when the view was defined.
Resources
Often you’ll find that a pipeline (or pipelines) appears repeatedly throughout a sitemap. Cocoon’s resources give you a way to define a name for a pipeline so that it can be used multiple times. The <resources> section of the sitemap appears after the <views> section and before the <action-sets> section. Its content is a sequence of <resource> elements. A <resource> element has a name attribute that defines the name used to refer to the resource elsewhere in the sitemap. The children of the <resource> element are the elements that make up the pipeline. You should put the statements that appear inside a <pipeline> element inside the <resource> element. Resources can also use parameters that are passed to them via the <call> element. To use a parameter value, you use the {parameterName} notation.
<pipeline> elements
Now we’re ready for an exhaustive list of all the elements that can appear in a Cocoon pipeline. You’ve seen some of them, but a few new ones also in this section:
-
<map:match>—This element contains a sequence of pipeline elements that are executed if the matcher succeeds.
-
<map:generate>—The <map:generate> element designates the generator that provides the initial XML content for a pipeline. The particular generator is selected via the type attribute.
-
<map:transform>—This element can appear multiple times between a <map:generate> and <map:serialize> element. It’s used to select a component that transforms the XML event stream from one form to another. The transform is specified via the type attribute.
-
<map:serialize>—The <map:serialize> element specifies the serializer that takes the XML content of the pipeline and sends it to the result. The specific serializer is designated via the type attribute.
-
<map:select>—This element contains a sequence of <map:when> elements followed by an optional <map:otherwise> element. The <map:when> elements are tested against the value of a selector, and the children of the <map:when> element whose test attribute equals the selector value are executed. If no <map:when> element matches the selector value, then the children of the <map:otherwise> element are executed (if there is a <map:otherwise> element).
-
<map:act>—The <map:act> element is used to cause an action to execute. The action is specified by the value of the type attribute, and the values returned by the action are available to the elements that are the children of the <map:act> element.
-
<map:redirect-to>—The <map:redirect-to> element allows you to perform an HTTP redirect. An attribute named target specifies the destination URI for the redirect. If this URI is within Cocoon’s virtual URI space, the usual URI processing occurs, including matching and pipeline execution. There is also a session attribute that determines whether the redirect preserves the session. If your Web application uses an HTTP session, then you should set the value of the session attribute to "true".
-
<map:call>—The <map:call> element invokes a resource (a reusable pipeline). The element takes a single attribute, resource, whose value is the name of the resource to invoke. You can pass parameters to the resource by creating child <map:parameter> elements to define the parameters and their values.
-
<map:parameter>—This element appears as a child of other pipeline elements. It provides a standard way of passing parameters to pipeline components. It takes a name attribute whose value is the name of the parameter and a value parameter that contains the value of the parameter.
-
<map:handle-errors>—The <handle-errors> section of the pipeline defines what happens when an error occurs in that pipeline. The content of <handle-errors> is just a pipeline. There is one special twist, though: If you don’t define a generator, Cocoon defines one for you, based on the notifying generator. Other than that, you can use all the constructs you can use in any other pipeline. A type attribute lets you specify which HTTP error codes are handled. The default value for this attribute is "500".
-
<map:mount>—It’s not hard to imagine that the sitemap for a large site will be long, complicated, and hard to debug. Cocoon provides a way for you to modularize your sitemaps in order to keep them understandable, maintainable, and debuggable. The idea is to use sub-sitemaps that have their own sitemap file and that are responsible for a subspace of the URI space of the parent.
Let’s suppose your Web application has an administrative section that occupies the URI space under /admin. You create a sitemap for that application and have it deal with URIs that are under /admin, but the matchers should assume that the /admin has been stripped off. This way, you can move the URI space handled by the sub-sitemap with minimal effort if you decide to reorganize the site. Once you’ve defined the sub-sitemap, you use a <map:mount> element to attach the sub-sitemap to the root sitemap and notify the root sitemap that certain URIs will be handled by the sub-sitemap. Here’s the use of <map:mount>:
<map:match pattern="admin/*"> <map:mount uri-prefix="admin" check-reload="no" src="/books/2/639/1/html/2/admin/sitemap.xmap"/> </map:match>
The <map:match> element assigns the admin URI space to the sitemap, just as with any other pipeline. No new syntax is needed for this part. The <map:mount> element does all its work with three attributes. The uri-prefix attribute tells the root sitemap what to strip from the URI before handing the URI to the sub-sitemap. In this case, admin is stripped off the front of the URI. The check-reload attribute should be set to "yes" if you want the sub-sitemap to be reloaded if its sitemap file is modified (done by checking the file modification time). The src attribute tells the root sitemap where the sub-sitemap file is located. If the URI admin/editData was passed to the root sitemap, it would match this pipeline. The admin uri-prefix would be stripped, and the remaining URI, editData, would be passed to the sub-sitemap in admin/sitemap.xmap.
Any component defined in a sitemap is accessible from its sub-sitemaps. The sub-sitemap can reference components in the parent sitemap by name.
-
<map:aggregate>—You can use the <map:aggregate> element anywhere you can use the <map:generate> element. This element defines an aggregator, which allows you to combine a number of XML sources into a single source and use that as the initial XML content for the pipeline. The content of the <map:aggregate> element is a sequence of <map:part> elements. A <map:part> element has a single attribute src that’s used to specify the source of the XML data for that part. The aggregator combines the parts by wrapping them in an element. The elements from each part become the children of the wrapper element. Their order in the wrapper element is determined by the order of the parts. The <map:aggregate> element has an attribute named element that specifies the name of the wrapper element. The values that can go into the src attributes are Cocoon URIs.
Cocoon URIs
To give you flexibility in where you place resources that you might need in Cocoon, Cocoon adds some URL schemes to the commonly available ones:
-
http://hostname:port/resource—This is a standard HTTP URL. A sample URL is http://localhost:8080/myxml.xml.
-
context://servlet-context-path/resource—This scheme allows you to retrieve a resource relative to the servlet context on the current servlet engine. The URL context:///stylesheets/format.xsl refers to a resource stylesheets/format.xsl, relative to the current servlet context.
-
cocoon:/resource—This scheme allows you to refer to a resource produced by the current Cocoon sitemap. The URL cocoon:/mydata.xml passes the string mydata.xml to the current sitemap as the request URI. The current sitemap then processes that URI to obtain a resource that is returned.
-
cocoon://resource—This scheme is like the previous scheme except it uses the root sitemap for the Web application; this is indicated by two slashes (//) instead of one. For the URL cocoon://mydata.xml, Cocoon passes mydata.xml as the request URI to the root sitemap. The root sitemap processes the URI and returns a resource. Note that you can use this to access any sub-sitemaps because a sub-sitemap handles a subspace of the URI space.
-
resource://class-path-context/resource—This scheme allows you to obtain resources relative to the class loader for the current context. The class-path-context must be a path through the classpath to the data; when you’ve stored XML files side by side with the class files, this is the URI scheme you want to use. An example of this kind of URL is resource://org/apache/cocoon /components/language/markup/xsp/java/xsp.xsl.
-
jar://http://hostname:port/resource.jar!/path/in/jar—This scheme allows you to obtain resources that are contained in a Jar file. You need to specify the URI to the Jar file and the path inside the jar that leads to the resource. These two components are separated by an exclamation point (!).
-
file:///resource—This is a standard file URL. An example is file:///mydata.xml.
You can use these additional schemes anywhere a URI is called for.
XSP
Cocoon provides eXtensible Server Pages (XSPs) as a way of generating XML content for a Cocoon pipeline. At their simplest, XSPs are XML documents that allow you to include code in some programming language. When the XSP page is requested, the XSP engine executes the code and replaces the code with the result of that execution. If you’re familiar with JavaServer Pages (JSPs), you’ll have a good idea of how basic XSPs work. XSPs give you a way to bridge into a programming language to access data that would otherwise be inaccessible via the standard Cocoon generator mechanism.
All the examples in this section are based on Java as the programming language, but you should be aware that Cocoon supports a large number of programming languages for use in XSPs. This is accomplished via the Bean Scripting Framework, an Apache Jakarta project (http://jakarta.apache.org/bsf).
Simple XSPs
Let’s look at a very simple XSP page, just to get acquainted with the concepts and syntax:
1: <?xml version="1.0"?> 2: <?cocoon-process type="xsp"?> 3: 4: <xsp:page 5: language="java" 6: xmlns:xsp="http://apache.org/xsp"> 7: 8: <date> 9: <xsp:expr>new java.util.Date().toString()</xsp:expr> 10: </date> 11: </xsp:page>
This XSP is named date.xsp. As you can see from line 1, it’s an XML document. All XSP pages must include a Cocoon processing instruction that invokes the XSP processor. This appears in line 2. The root element of an XSP document is named page and is in the XSP namespace, which uses the URI http://apache.org/xsp. In lines 4-6, you see the start tag for <xsp:page>, the signal to Cocoon that the language embedded in the XSP is Java (line 5), and the declaration of the xsp namespace prefix (line 6).
When the XSP is processed, all the elements from the XSP namespace are removed by the XSP processor. In line 8, you introduce the root element of the XML to be generated by the XSP, <date>. There is only one piece of XSP code in this example, and it’s in line 9. The <xsp:expr> element allows you to specify an expression in the language defined by <xsp:page>’s language attribute. The expression provided creates a new instance of java.util.Date and then converts it to a String so that it can be output. Lines 10 and 11 close all the remaining elements.
Now that you have your XSP, you need to connect it to a pipeline in a Cocoon application. To do that, you need to add some entries to a sitemap. Here’s a simple sitemap that makes that connection:
1: <?xml version="1.0" encoding="UTF-8"?> 2: <map:sitemap xmlns:map="http://apache.org/cocoon/sitemap/1.0"> 3: 4: <map:pipelines> 5: 6: <map:pipeline> 7: 8: <map:match pattern="*.xsp"> 9: <map:generate type="serverpages" src="/books/2/639/1/html/2/{1}.xsp"/> 10: <map:transform src="/books/2/639/1/html/2/{1}.xslt"> 11: <map:parameter name="contextPath" 12: value="{request:contextPath}"/> 13: </map:transform> 14: <map:serialize type="html"/> 15: </map:match> 16: 17: </map:pipeline> 18: 19: </map:pipelines> 20: 21: </map:sitemap> This sitemap is much shorter than the initial sitemap we showed you in this chapter. In that sitemap, we were trying to introduce Cocoon concepts and show you how to define various kinds of components. This sitemap relies on the fact that Cocoon comes with a number of predefined and default components, and we’re taking advantage of that to keep the sitemap short so you can focus on the parts related to XSPs.
This pipeline is set up so that the pipeline processes all URIs that end in .xsp in lines 8-15. This is because of the <match> element in line 8. The pipeline uses the serverpages generator to process an XSP file that has the same name as the wildcarded portion of the request URI. After the appropriate XSP has been processed, its output is sent to an XSLT stylesheet that’s named to match the XSP file. The <transform> element in lines 10-13 uses Cocoon’s default transformer, which is the TrAX-based XSLT engine. The pipeline assumes that this stylesheet will convert the output of the XSP into HTML for rendering in a browser, so the HTML serializer is selected to produce the output.
The result of executing the XSP is a piece of XML that looks like this:
<date>Thu Sep 18 16:22:13 PDT 2003</date>
The stylesheet you use to convert this XML into HTML looks like this:
1: <?xml version="1.0" encoding="UTF-8"?> 2: <xsl:stylesheet version="1.0" 3: xmlns:xsl="http://www.w3.org/1999/XSL/Transform"> 4: <xsl:output method="html" version="4.0" encoding="UTF-8" 5: indent="yes" omit-xml-declaration="yes"/> 6: <xsl:template match="date"> 7: <html> 8: <head><title>Today's date</title></head> 9: <body> 10: Today is <b> <xsl:apply-templates/> </b> 11: </body> 12: </html> 13: </xsl:template> 14: </xsl:stylesheet>
It’s all pretty simple, but we wanted you to understand how the flow goes before we dive into additional features.
XSP Details
Now let’s look at how to write the same XSP using more of XSP’s features:
1: <?xml version="1.0"?> 2: <?cocoon-process type="xsp"?> 3: 4: <xsp:page 5: language="java" 6: xmlns:xsp="http://apache.org/xsp"> 7: 8: <xsp:structure> 9: <xsp:include>java.util.Date</xsp:include> 10: </xsp:structure> 11: 12: <xsp:logic> 13: String getDate() { 14: Date d = new Date(); 15: return d.toString(); 16: } 17: </xsp:logic> 18: 19: <date> 20: <xsp:expr>getDate()</xsp:expr> 21: </date> 22: </xsp:page> The big difference here has to do with handling all the Java artifacts that can appear in an XSP. In the original page, you use fully qualified classnames and don’t use any variables or functions. This page does the same thing, but in a more scalable fashion. The first change is to import the classes that are used in the page instead of using fully qualified names. To import classes, you add an <xsp:structure> element that contains a sequence of <xsp:include> elements. The content of an <xsp:include> is either a fully qualified classname (as in this example) or a wildcarded import of an entire package, something like java.util.*. That takes care of the fully qualified classname issue.
Next, you define a function that performs the date computation. To do that, you add an <xsp:logic> element. Any variables or functions defined inside this element are defined at the class level in Java. XSP pages are compiled into Java classes, and the <xsp:logic> element lets you add fields and methods to the class. Here you define a method getDate that creates the Date object and then returns its string representation.
All of these changes propagate down to the original <xsp:expr> element, which now just contains a method invocation of getDate. The page has gotten a bit longer, and for a simple page like the original page it seems a little like overkill; but for larger pages, these facilities make it much easier to write the logic and the expressions.
Now we’re ready to look at the full set of XSP <elements>, so you can get an idea of what you can do:
-
<?cocoon-process?>—This processing instruction (PI) tells Cocoon how to process this file. You may have multiple cocoon-process PIs because Cocoon can process an XSP page in two different ways. It can process the document as an XSP file, causing the language code to be executed. To indicate this style of processing, specify "xsp" as the value of the type pseudo-attribute. Cocoon can also use an XSL stylesheet to transform the document. This can occur either before or after the XSP processing. The processing order is determined by the order in which the PIs appear in the document. To use a stylesheet with an XSP document, specify "xslt" as the value of the type pseudo-attribute. If you use a stylesheet with the document, you need to supply an XML stylesheet processing instruction that tells where to find the stylesheet. (See the next item.)
-
<?xml-stylesheet?>—This PI is defined by the W3C’s Associating Style Sheets with XML Documents recommendation. Associating a stylesheet is easy; you supply two pseudo-attributes. The href pseudo-attribute contains the URI for the stylesheet, and the type pseudo-attribute contains the MIME type of the stylesheet, which should be "text/xsl" for XSLT stylesheets.
-
<xsp:page>—The root element of an XSP page is <xsp:page>. It takes a language attribute that allows you to specify the programming language being used in the XSP. You’ll probably also define some namespace prefixes on this element. The minimum would be for you to define the xsp prefix. The <xsp:page> must contain at least one user-defined element that’s used as the root element of the XSP result.
-
<xsp:structure>—This element is a container for <xsp:include> elements.
-
<xsp:include>—XSP uses the <xsp:include> element to import type definitions that are needed by the rest of the XSP. In Java, these are specified either as fully qualified classnames or in wildcarded package style, like java.util.*.
-
<xsp:logic>—The implementation of the logic of an XSP should be the content of the <xsp:logic> element. For Java-based XSPs, this includes member fields and methods.
-
<xsp:expr>—An <xsp:expr> element invokes logic in the <xsp:logic> to return a string valued expression. In Java, this is through method calls, field accesses, or string literals. Java string literals that appear as the content of an <xsp:expr> tag must be inside double quotes ("").
-
<xsp:element>—This element allows you to dynamically create an element in the output XML. The <xsp:element> element takes a name attribute whose value is the name of the element to be created. You can nest these elements to create element subtrees dynamically. You can also insert literal XML elements and character data as part of the content of this element.
-
<xsp:attribute>—The <xsp:attribute> element should appear as the child of either an <xsp:element> element or a literal XML element. It allows you to dynamically create an attribute by supplying a name attribute for the name of the new attribute. The value of the new attribute is the content of the <xsp:attribute> element.
-
<xsp:comment>—To create a comment in the XSP output, use the <xsp:comment> element and make the content of the element the text of your comment.
-
<xsp:pi>—The <xsp:pi> element allows you to create processing instructions. You supply a target attribute that defines the PI target name. If you wish to create pseudo-attributes, you do so via <xsp:expr> elements in the content of the <xsp:pi> element. So, to create a PI that looks like <?xml-stylesheet href="sheet.xsl" type="text/xsl"?>, your <xsp:pi> element would look like this:
<xsp:pi target="xml-stylesheet"> <xsp:expr>"href=\"sheet.xsl\" type=\"text/xsl\""</xsp:expr> </xsp:pi>
-
<xsp:content>—You can use the <xsp:content> element inside an <xsp:logic> element to insert the Java code for an XSP fragment at that point on the program. This is particularly useful for inserting an XSP fragment that is to be output as the body of a loop.
Logicsheets
If you’re familiar with JSP, you’re probably looking at what we’ve shown you so far with a mixture of fear and horror. That’s because a lot of programming language code is sprinkled throughout those XSPs, so XSP authors need to understand the code in order to perform certain tasks. JSP provides a solution called taglibs that allows you to define a new tag and implement the functionality of the tag in a separate Java file. This returns the JSP page to being (mostly) tags.
Cocoon solves this problem in a slightly different way. Cocoon’s solution is to use something called a logicsheet. A logicsheet is simply an XSLT stylesheet that produces an XSP page as output. So, Cocoon separates the logic from the XSP by placing all the code parts into an XSLT stylesheet. The page author writes a page that includes tags that are matched by templates in the stylesheet and replaced by the Java code that produces the results the tag calls for. This page is transformed using the logicsheet, resulting in an XSP like the ones you’ve seen, including all the Java. This is done without much extra effort on the part of the page author.
To see how this works, let’s take the previous example and turn it into a logicsheet-based example. Here’s a revised version of date.xsp that uses a logicsheet:
1: <?xml version="1.0"?> 2: <?cocoon-process type="xsp"?> 3: <?xml-logicsheet href="logicsheet.now.xsl"?> 4: 5: <xsp:page 6: language="java" 7: xmlns:xsp="http://apache.org/xsp" 8: xmlns:now="http://sauria.com/cocoon/logicsheets/now"> 9: 10: <date><now:time/></date> 11: </xsp:page>
What has changed since the previous versions? In line 3, there is now an xml-logicsheet processing instruction, which signals the XSP engine to apply the logicsheet referenced by the href pseudo-attribute. On line 8, you introducing a new namespace for the elements that are handled by the logicsheet. You’ve removed all the other XSP elements from the page. In line 10, instead of <xsp:expr>, there is a single element <now:time/> that’s drawn from the namespace handled by the logicsheet. All the code that used to be in the page has now moved to the file logicsheet.now.xsl, which is shown here:
1: <?xml version="1.0"?> 2: <xsl:stylesheet 3: xmlns:xsl="http://www.w3.org/1999/XSL/Transform" 4: xmlns:xsp="http://apache.org/xsp" 5: xmlns:now="http://sauria.com/cocoon/logicsheets/now" 6: version="1.0"> 7: 8: <xsl:template match="xsp:page"> 9: <xsl:copy> 10: <xsl:apply-templates select="@*"/> 11: 12: <xsp:structure> 13: <xsp:include>java.util.Date</xsp:include> 14: </xsp:structure> 15: 16: <xsp:logic> 17: String getDate() { 18: Date d = new Date(); 19: return d.toString(); 20: } 21: </xsp:logic> 22: 23: <xsl:apply-templates/> 24: 25: </xsl:copy> 26: </xsl:template> 27: 28: <xsl:template match="now:time"> 29: <xsp:expr>getDate()</xsp:expr> 30: </xsl:template> 31: 32: <xsl:template match="@*|node()" priority="-1"> 33: <xsl:copy> 34: <xsl:apply-templates select="@*|node()"/> 35: </xsl:copy> 36: </xsl:template> 37: 38: </xsl:stylesheet> As promised, the logicsheet is an XSLT stylesheet, so the beginning lines should look familiar: they declare all the namespaces, xsl, xsp, and now. There are three templates in the stylesheet. The first one, starting at line 8, matches the <xsp:page> element. It’s the root stylesheet; it copies the <xsp:page> element and its attributes to the output XSP page. It also inserts the <xsp:structure> and <xsp:logic> elements from the previous version of date.xsp. After it inserts them, it applies the templates to the children of <xsp:page> (line 23). The second template, starting at line 28, handles the now:time element when it appears. This template replaces <now:time/> with the <xsp:expr> element that calls the getDate method defined in the <xsp:logic> element. The final template in the logicsheet is a catch-all template rule that recursively copies elements and their attributes, unless there is a more specific template for the element. In this logicsheet, the second template, which handles <now:time>, is more specific when the <now:time/> element is encountered. For every other descendent of <xsp:page>, this stylesheet copies what’s there to the output XSP.
Applying Logicsheets to XSPs
You can use two methods to apply a logicsheet to an XSP. One is via the xml-logicsheet processing instruction you used in the previous example. The drawback to this approach is that every XSP that uses the logicsheet must include the PI. If an XSP uses more than one logicsheet, then you need two PIs. It starts to get hard to manage.
The other method of applying a logicsheet is to register it in Cocoon’s list of built-in logicsheets. You do this by adding a <builtin-logicsheet> element to the proper section of the <markup-languages> element in the Cocoon configuration file, cocoon.xconf (which is usually in the WEB-INF directory of your Web application). The declaration for your logicsheet would look like this:
1: <builtin-logicsheet> 2: <parameter name="prefix" value="now"/> 3: <parameter name="uri" 4: value=" http://sauria.com/cocoon/logicsheets/now "/> 5: <parameter name="href" 6: value="file:///logicsheets/logicsheet.now.xsl"/> 7: </builtin-logicsheet>
There are definitely some differences between the two approaches. When you register as a built-in logicsheet, you have to restart Cocoon if the contents of the logicsheet change. With the PI, Cocoon automatically notices that the logicsheet has changed and recompiles your XSPs. The other big difference is that you don’t have any control over the order in which logicsheets are applied when you register as a built-in logicsheet. If you need to control the order, then you need to use the processing instruction.
Standard Logicsheets
Cocoon includes five major built-in logicsheets. We’ll defer covering the session logicsheet until the next section on session handling, and we’ll leave the treatment of the ESQL database logicsheet until the next chapter, which has a larger section on interacting with SQL databases. That leaves us with three logicsheets to discuss: The request logicsheet, the forms logicsheet, and the sendmail logicsheet.
Request Logicsheet
The request logicsheet allows you to access various aspects of the current request. You have access to most of the data in a Java HttpServletRequest object. To use the request logicsheet, you need to define a prefix for it. The suggested prefix is xsp-request, and the namespace uri is http://apache.org/xsp/request/2.0.
Each element in the request logicsheet can return data in at least two ways. The method used is controlled by an as attribute that can be used on any element from the logicsheet. If you leave out the as attribute, the logicsheet places the result inside an <xsp:expr> element so that the result can be used in a Java expression. If you provide the value "xml" for the as attribute, then the logicsheet makes the result the content of an element from the xsp-request namespace, according to the element you used.
Elements in the request logicsheet may accept or need additional information. The logicsheet allows you to provide this information either as an attribute or a child element. This does not apply to the as attribute you just learned about.
This logicsheet has a very large number of elements, due to the amount of information in an HttpServletRequest object. Rather than list them all here, we’ll show you some of the most common ones:
-
<xsp-request:get-attribute>—Lets you get the attribute with a specific name. As we mentioned earlier, you can supply this name as a name attribute or a <name> child element.
-
<xsp-request:get-header>—Lets you get the HTTP header with a particular name. Use a name attribute or <name> element to specify the name.
-
<xsp-request:get-locale>—Gives the preferred locale being advertised by the user agent.
-
<xsp-request:get-parameter>—Lets you get named request parameters. If the parameter has more than one value, it returns only the first. If you want all the values, you need to use <xsp-request:get-parameter-values>. You specify the name via a name attribute or <name> child element.
-
<xsp-request:remove-attribute>—Lets you remove an attribute from the request. You specify the name of the attribute via a name attribute or <name> child element.
-
<xsp-request:set-attribute>—Lets you set a value for an attribute. You give the name of the attribute via a name attribute or <name> child element, and you supply the value as the content of the <xsp-request:set-attribute> element.
That should give you a flavor for the kinds of information you can get via the request logicsheet.
Forms Logicsheet
The forms logicsheet works together with the FormValidator action to let you validate the input values from an HTML form. To tell you how to use the logicsheet, we have to start with the FormValidator action.
The FormValidator action is in the class org.apache.cocoon.acting.FormValidatorAction and typically uses the name form-validator. To use this action with XSP, you need to make the XSP pipeline the child of a <map:act> element that uses the FormValidator action as its action. This ensures that the FormValidator executes and makes the results of its checking available to the XSP, and therefore the Forms logicsheet.
The FormValidator action uses a descriptor file to validate the contents of an HTML form. When you create a <map:act> element that uses the FormValidator, you also need to supply two parameters as its children. The first parameter is named descriptor, and its value is the URI of the descriptor file. The second parameter is named validate-set, and it specifies the name of the constraint set inside the descriptor file. This constraint set is used to perform the validation. Let’s assume that the HTML form you’re interested in looks like this—a form for entering the information related to a book:
1: <html> 2: <head> 3: <title>Book Input form</title> 4: </head> 5: <body> 6: <form action=""> 7: Title <input type="text" name="title" /> <br /> 8: Author <input type="text" name="author" /> <br /> 9: ISBN <input type="text" name="isbn" /> <br /> 10: Month <input type="text" name="month" /> <br /> 11: Year <input type="text" name="year" /> <br /> 12: Publisher <input type="text" name="publisher" /> <br /> 13: Address <input type="text" name="address" /> <br /> 14: <input type="submit" value="Add Book" /> <br /> 15: </form> 16: </body> 17: </html>
The descriptor file for validating that form looks something like this:
1: <?xml version="1.0"?> 2: <root> 3: <parameter name="title" type="string" nullable="no" /> 4: <parameter name="author" type="string" nullable="no" /> 5: <parameter name="isbn" type="string" nullable="no" 6: matches-regex="\d{3}-\d{10}" /> 7: <parameter name="month" type="string" nullable="no" 8: one-of="Jan|Feb|Mar|Apr|May|Jun|Jul|Aug|Sep|Oct|Nov|Dec" /> 9: <parameter name="year" type="long" nullable="no" 10: min="1900" max="2100" /> 11: <parameter name="publisher" type="string" nullable="no" /> 12: <parameter name="address" type="string" nullable="no" /> 13: 14: <constraint-set name="books"> 15: <validate name="title"/> 16: <validate name="author"/> 17: <validate name="isbn" /> 18: <validate name="month"/> 19: <validate name="year"/> 20: <validate name="publisher"/> 21: <validate name="address"/> 22: </constraint-set> 23: </root> The entire descriptor is enclosed in a <root> element, which is divided into two sections. The first section isn’t explicitly defined, but it consists of a sequence of <parameter> elements. The next section consists of one or more <constraint-set> elements.
The <parameter> elements are different from other parameter elements you’ve seen in Cocoon. These elements have a name attribute that’s used to specify the name of a form parameter and a type attribute that’s used to specify the type of data in the parameter. Acceptable values for the type attribute are "string", "long", and "double". You can also specify whether the parameter value may be null by using the nullable attribute (values are "yes" and "no"). If the value of the form parameter is null and you have provided a default attribute, then the value of that attribute becomes the value of the parameter.
In addition to controlling the type of the form parameters, you can also specify constraints on the values. You can use six constraint attributes on the values of parameters:
-
matches-regex—The value of the form parameter must match the regular expression that is the value of this attribute.
-
one-of—The value of the form parameter is one of the elements in the list of values that make up the value of this attribute. The items in the list are separated by the vertical bar (|).
-
min-len—The value of this attribute specifies the minimum length of the form parameter.
-
max-len—The value of this attribute specifies the maximum length of the form parameter.
-
min—The value of this attribute specifies the minimum value of the form parameter.
-
max—The value of this attribute specifies the maximum value of the form parameter.
Once you’ve defined all the parameters for a form, you can then create a <constraint-set> element that the FormValidator action uses to figure out which parameters to validate when it’s invoked. A <constraint-set> element has a name attribute that’s used to assign the name used by the FormValidator action. The content of a <constraint-set> is a sequence of <validate> elements. You must give a name attribute that specifies the name of a parameter to be validated. You can also specify one of the six constraint attributes. If you choose to do this, the value you supply overrides any constraint attributes specified by the <parameter> element that defined this parameter.
When the FormValidator action is executed, it returns null if the form parameters don’t match the constraints in the specified <constraint-set>. Otherwise, it makes the value of the form parameters available to the sitemap. To access a form parameter from the sitemap, you use the {parameterName} notation.
You may be wondering what any of this has to do with XSP logicsheets. The form logicsheet knows how to interact with the results provided by the FormValidator action, so that your XSPs can do something intelligent based on the results of the validation. The namespace URI for the form logicsheet is http://apache.org/xsp/form-validator/2.0, and it’s normally associated with the prefix xsp-formval.
There are varying levels at which you can use the elements from the FormValidator. If you’re only interested in the results of the validation, you can use the <xsp-formval:on-ok> element. The content of the element is copied to the output XSP page if the form validated properly. You can supply a name attribute whose value is the name of a form parameter. In this case, the content of the element is copied through if the parameter named by the name attribute validated correctly. This allows you finer-grained control over the processing.
The next level of form logicsheet support allows you to ask questions about a particular parameter. The logicsheet defines a number of elements with the form <xsp-formval:is-??>, where the ?? stands for one of the constraint attribute tests. You need to specify a name attribute on these elements to indicate which parameter should be checked. These elements can be used where ever a boolean might appear in an <xsp:logic> tag. This means they can be used as the values for the conditional part of if/then/else statements. The <xsp-formval:is-??> elements are as follows:
-
<xsp-formval:is-ok>—Return true if the parameter was validated successfully.
-
<xsp-formval:is-error>—Return true if some error occurred.
-
<xsp-formval:is-null>—Return true if the parameter was null but wasn’t allowed to be.
-
<xsp-formval:is-toosmall>—Return true if a numerical value was too small or the length of a string was too short.
-
<xsp-formval:is-toolarge>—Return true if a numerical value was too large or the length of a string was too long.
-
<xsp-formval:nomatch>—Return true if the string value didn’t match the regular expression constraint.
-
<xsp-formval:is-notpresent>—Return true if the named parameter didn’t exist in the request.
At this level, you can also gain access to the Map of values returned by the action. The element <xsp-formval:results> gives the XSP a java.util.Map with the result values in it.
There is one last level involved in using the form logicsheet. The logicsheet allows you to query the contents of the descriptor file used by the FormValidator action. Among other things, this lets you access the actual constraint values specified in the parameter file so you can tell the user what the constraints on a particular parameter are. As a result, you can give an error message like The year must be between 1900 and 2100. To query the descriptor file, you use the <xsp-formval:descriptor> element. This element takes two attributes that correspond to the parameters passed to the FormValidator action. The name attribute contains the URI of the descriptor file you want to query, whereas the constraint-set attribute specifies the constraint set you’re interested in. In the body of the <xsp-formval:descriptor> element, you can use the <xsp-formval:get-attribute> element to get any attribute of any parameter in the descriptor file. Use the parameter attribute to specify which parameter you’re interested in, and use the nameattribute to specify the attribute of that parameter. To access the one-of attribute of the month parameter in the descriptor file you saw earlier, you’d use <xsp-formval:get-attribute parameter="month" name="one-of"/>.
Sendmail Logicsheet
The sendmail logicsheet allows you to send mail from an XSP using elements. Elements from the sendmail logicsheet use the namespace URI http://apache.org/cocoon/sendmail/1.0. The usual namespace prefix used for this logicsheet is sendmail.
You use the sendmail logicsheet by wrapping a series of sendmail elements inside a <sendmail:send-mail> element. The elements that are available are as follows:
-
<sendmail:smtphost>—The host that’s delivering the mail for you.
-
<sendmail:from>—The e-mail address of the sender.
-
<sendmail:to>—The e-mail address(es) of the recipient(s). May be a comma-separated list of e-mail addresses.
-
<sendmail:cc>—The e-mail address(es) for the cc recipient(s). May be a comma-separated list of e-mail addresses.
-
<sendmail:bcc>—The e-mail address(es) of the blind cc recipient(s). May be a comma-separated list of e-mail addresses.
-
<sendmail:subject>—The subject of the message.
-
<sendmail:body>—The body of the message.
-
<sendmail:charset>—The character set for encoding the message (takes effect only if there are no attachments).
-
<sendmail:attachment>—You may have zero or more of these elements. The <sendmail:attachment> element takes three attributes: name, which is the name of the attachment; mime-type, which gives the MIME media type of the attachment; and url, which gives a reference to the attachment content.
-
<sendmail:on-success>—XML that is to be output if mail delivery is successful.
-
<sendmail:on-error>—XML that is to be output if mail delivery fails. You can use the <sendmail:error-message/> element to obtain the text of the error message.
Sessions
Session management is an important part of Web applications. Because HTTP is a stateless protocol, there needs to be a way for the application to relate accesses from a particular user agent into a session. Cocoon’s session functionality leverages the functionality of the Java Servlet API. Cocoon gives you different ways to handle session information in your Web application. In this section, we’ll show you how to deal with sessions from XSPs and actions.
Sessions in XSP
You can work with sessions in XSPs by using the session logicsheet. This logicsheet provides you with access to the servlet HttpSession in an XSP-friendly manner. The namespace URI for this logicsheet is http://apache.org/xsp/session/2.0, and the usual prefix for it is xsp-session.
A session-aware XSP should declare the prefix for the session logicsheet and should also provide the create-session attribute on the <xsp:page> element. The value of this attribute should be set to "true", meaning that either an existing session should be retrieved or a new session should be created if no session exists. In addition, you can create a session at the sitemap level by setting the session attribute of the <map:redirect-to> element to "true".
Once you have set up the logicsheet and set the create-session attribute, you can use any of the elements from the session logicsheet to query or update values in the session. You can provide parameters to these elements via either an attribute or a child element of the same name. So, a name parameter can appear as either a name attribute or as a child <name> element. Elements that retrieve data from the session can retrieve it in one of two forms. By default, it’s returned in a form suitable for embedding in an <xsp:expr> element. If you supply an as attribute whose value is set to "xml", then the data is marked up as elements from the xsp-session namespace. We refer to this as asking for XML output. Here are the elements you can use:
-
<xsp-session:get-attribute>—Return the value of a session attribute. You specify a name parameter to tell which attribute to retrieve. If you ask for XML output, you get an <xsp-session:attribute> element with the attribute value as the content.
-
<xsp-session:get-attribute-names>—Return the names of all the session attributes. If you ask for XML output, you get an <xsp-session:attribute-names> element that contains a sequence of <xsp-session:attribute-name> elements. The <xsp-session:attribute-name> elements contain a single attribute name as their content.
-
<xsp-session:set-attribute>—Set or update the value of a session attribute. You supply a name parameter and supply the value as the content of the element.
-
<xsp-session:remove-attribute>—Remove the named attribute from the session. You supply a name parameter whose value is the name of the attribute to remove.
-
<xsp-session:is-new>—Return true if the session was just created. If you ask for XML output, you get an <xsp-session:is-new> element with the value as the content.
-
<xsp-session:invalidate>—Invalidate the current session. Any data stored in the session is lost.
-
<xsp-session:get-id>—Get the ID of the session. If you ask for XML output, you get an <xsp-session:id> element with the ID as the content.
-
<xsp-session:get-creation-time>—Get the creation time of the session. If you ask for XML output, you get an <xsp-session:creation-time> element with the time as the content.
-
<xsp-session:get-last-accessed-time>—Get the last time the session was accessed. If you ask for XML output, you get an <xsp-session:last-accessed-time> element with the time as the content.
-
<xsp-session:get-max-inactive-interval>—Get the minimum time (in seconds) in between session requests before the server will cause the session object to expire. If you ask for XML output, you get an <xsp-session:max-inactive-interval> element with the time as the content.
-
<xsp-session:set-max-inactive-interval>—Set the minimum time (in seconds) between session requests before the server will cause the session object to expire. You specify the new value via an interval attribute.
-
<xsp-session:encode-url>—Encode a URL with the session ID. You supply an href attribute that contains the URL to be encoded.
As you can see, these elements allow you to manipulate most aspects of the session state.
Session Action
You can also use the session action to help manage the session state. The session action is in the class org.apache.cocoon.webapps.session.acting.SessionAction. It’s normally named session. In comparison to the session logicsheet, the session action has fairly limited functionality: It’s limited to creating and destroying sessions. To create a session, you create a <map:act type="session"/> element. That’s it. This is equivalent to creating the following <map:act> element:
1: <map:act type="session"> 2: <map:paramater name="action" value="create"/> 3: </map:act>
To destroy a session, you change the value of the action parameter (in line 2) to "terminate" (by changing the value of the value attribute. You have some additional options when destroying a session: You can choose to destroy the session immediately, which is the default, or you can choose to destroy the session only if it’s unused. This second option is selected by providing another <map:parameter> element:
1: <map:act type="session"> 2: <map:paramater name="action" value="create"/> 3: <map:parameter name="mode" value="if-unused"/> 4: </map:act>
EAN: 2147483647
Pages: 95