Development Techniques
In this section, we’ll look a ways to use the libraries and applications Batik provides. On the library side, we’ll see how to use Batik to generate an SVG document using a more graphics-minded way of thinking. We’ll also discuss how to take an SVG document and present it, both on screen and as an image file. After that we’ll look at scripting support in the Batik library components and deal with some security-related issues for Batik applications.
Once we’ve finished with the libraries, we’ll look at Batik’s stand-alone applications for rasterizing SVG files and browsing them interactively. We’ll examine the Batik SVG pretty-printer, which can be useful when you’re trying to debug a large SVG file. Finally, we’ll use the ttf2svg application to generate SVG font information from TrueType files.
SVGGraphics2D
Let’s turn our attention now to the problem of how to generate SVG documents easily. Of course, you can always start up a copy of your favorite text or XML editor and create SVG documents that way, but ideally we’d like something a little closer to the problem domain. Batik provides a class called SVGGraphics2D that is derived from the Graphics2D class in the Java2D API. This class allows you to execute Java2D drawing commands and generate an equivalent SVG document:
1: /* 2: * 3: * SVGGeneratePrint.java 4: * 5: * Example from "Professional XML Development with Apache Tools" 6: * 7: */ 8: package com.sauria.apachexml.ch4; 9: 10: import java.awt.Color; 11: import java.awt.Dimension; 12: import java.awt.Font; 13: import java.awt.Shape; 14: import java.awt.geom.Ellipse2D; 15: import java.awt.geom.Rectangle2D; 16: import java.io.FileNotFoundException; 17: import java.io.FileOutputStream; 18: import java.io.OutputStream; 19: import java.io.OutputStreamWriter; 20: import java.io.UnsupportedEncodingException; 21: import java.io.Writer; 22: 23: import org.apache.batik.dom.svg.SVGDOMImplementation; 24: import org.apache.batik.svggen.SVGGraphics2D; 25: import org.apache.batik.svggen.SVGGraphics2DIOException; 26: import org.w3c.dom.DOMImplementation; 27: import org.w3c.dom.svg.SVGDocument; 28: 29: public class SVGGeneratePrint { 30: 31: public static void main(String[] args) { 32: DOMImplementation impl = 33: SVGDOMImplementation.getDOMImplementation(); 34: String svgNS = SVGDOMImplementation.SVG_NAMESPACE_URI; 35: SVGDocument doc = 36: (SVGDocument)impl.createDocument(svgNS, "svg", null); 37: You need an instance of an SVGDocument, which is the SVG DOM’s equivalent of the Document interface from the regular DOM. You get an instance of SVGDocument by using the SVGDOMImplementation to get a DOMImplementation that understands SVG. Now you can pass the SVGDocument instance to SVGGraphics2D’s constructor (line 38). Lines 40-49 are a series of Java 2D method calls to generate the visuals you want your SVG document to reproduce:
38: SVGGraphics2D g = new SVGGraphics2D(doc); 39: 40: Shape circle = new Ellipse2D.Double(0,0,50,50); 41: g.setPaint(Color.red); 42: g.fill(circle); 43: Shape rect = new Rectangle2D.Double(60,0,40,60); 44: g.setPaint(Color.green); 45: g.fill(rect); 46: g.setPaint(Color.blue); 47: Font font = new Font("Helvetica",Font.BOLD,24); 48: g.setFont(font); 49: g.drawString("Hello World",0f,90f); In Line 50, you set the size of the SVG document to be 300x100 pixels:
50: g.setSVGCanvasSize(new Dimension(300,100));
You want to generate an SVG file as the output, so you create a FileOutputStream for the output file and then use OutputStreamWriter to obtain a writer:
51: 52: Writer out = null; 53: try { 54: OutputStream s = 55: new FileOutputStream("SVGGeneratePrint.svg"); 56: out = new OutputStreamWriter(s, "UTF-8"); Once you have the writer, you can call the stream method on SVGGraphics2D to generate the SVG document. The boolean useCSS argument determines whether SVGGraphics2D generates SVG that has individual attributes for the various SVG styling properties. Setting it to true means to use a single style attribute with CSS style properties as the contents. Setting it to false means to generate attributes:
57: } catch (UnsupportedEncodingException use) { 58: use.printStackTrace(); 59: } catch (FileNotFoundException fnfe) { 60: fnfe.printStackTrace(); 61: } 62: try { 63: boolean useCSS = true; 64: g.stream(out,useCSS); 65: } catch (SVGGraphics2DIOException sioe) { 66: sioe.printStackTrace(); 67: } 68: } 69: } The following listing, styled-boxes.svg, shows the resulting SVG file. You can see that SVGGraphics2D has generated all the style properties and their values (even when the values are the defaults:
1: <?xml version="1.0" encoding="UTF-8"?> 2: 3: <!DOCTYPE svg PUBLIC '-//W3C//DTD SVG 1.0//EN' 4: 'http://www.w3.org/TR/2001/REC-SVG-20010904/DTD/svg10.dtd'> 5: <svg style="stroke-dasharray:none; shape-rendering:auto; 6: font-family:'sansserif'; text-rendering:auto; 7: fill-opacity:1; color-rendering:auto; 8: color-interpolation:auto; font-size:12; fill:black; 9: stroke:black; image-rendering:auto; stroke-miterlimit:10; 10: stroke-linecap:square; 11: stroke-linejoin:miter; font-style:normal; stroke-width:1; 12: stroke-dashoffset:0; font-weight:normal; 13: stroke-opacity:1;" xmlns="http://www.w3.org/2000/svg" 14: width="300" contentScriptType="text/ecmascript" 15: preserveAspectRatio="xMidYMid meet" 16: xmlns:xlink="http://www.w3.org/1999/xlink" 17: zoomAndPan="magnify" version="1.0" 18: contentStyleType="text/css" height="100">
The Java2D commands mapped nicely into SVG elements. You can easily see the correspondence between the Ellipse2D, Rectangle2D, and DrawString commands in the Java program and the <circle>, <rect>, and <text> elements in the SVG:
19: <!--Generated by the Batik Graphics2D SVG Generator--> 20: <defs /> 21: <g> 22: <g style="fill:red; stroke:red;"> 23: <circle r="25" style="stroke:none;" cx="25" cy="25" /> 24: <rect x="60" y="0" width="40" 25: style="fill:lime; stroke:none;" height="60" /> 26: </g> 27: <g style="fill:blue; font-size:24; font-weight:bold; 28: stroke:blue;"> 29: <text xml:space="preserve" x="0" y="90" 30: style="stroke:none;"> 31: Hello World 32: </text> 33: </g> 34: </g> 35: </svg>
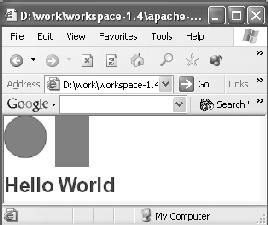
The following figure shows the result of rendering the SVG document.
Setting Options on SVGGraphics2D
Now let’s look at some options you can set on the SVGGraphics2D class. Most of these options are set via the SVGGeneratorContext class. We’ll discuss changing the default comment generated in the SVG document and customizing the way images are stored. Changing the default comment is easy; doing so requires a method call on the SVGGeneratorContext.
The image storing is a little harder to explain. First you need to know that when you call one of the drawImage methods on SVGGraphics2D, it creates an image in a raster format and writes it into a file on disk so that the generated SVG can reference the image in the file. By default, SVGGraphics2D uses a Base64 encoding of the image. You can change the format by creating an instance of ImageHandlerJPEGEncoder (to create JPEGs) or ImageHandlerPNGEncoder (to create PNGs) and passing it to the setImageHandler method on SVGGeneratorContext. Both of these classes have constructors that take two string arguments. The first argument is the directory where the image files should be written; the second is the URI prefix that should be placed in front of the image filename so the SVG document can find the images. So far so good. But what you’d really like to do is remember whether you’ve already generated an image file for an image and, if you have, use the existing image file rather than generate a new one. This process is handled by the CachedImageHandlerBase64Encoder, CachedImageHandlerJPEGEncoder, and CachedImageHandlerPNGEncoder for Base64, JPEG, and PNG, respectively.
The following example shows how to use these classes. It creates two SVG documents that both use the same image, and uses one of the CachedImageHandlers to prevent the creation of duplicate image files:
1: /* 2: * 3: * SVGGenerateCustom.java 4: * 5: * Example from "Professional XML Development with Apache Tools" 6: * 7: */ 8: package com.sauria.apachexml.ch4; 9: 10: import java.awt.Component; 11: import java.awt.Dimension; 12: import java.awt.Frame; 13: import java.awt.Graphics2D; 14: import java.awt.Image; 15: import java.awt.MediaTracker; 16: import java.awt.RenderingHints; 17: import java.awt.image.BufferedImage; 18: import java.awt.image.BufferedImageOp; 19: import java.awt.image.RescaleOp; 20: import java.io.FileNotFoundException; 21: import java.io.FileOutputStream; 22: import java.io.OutputStream; 23: import java.io.OutputStreamWriter; 24: import java.io.UnsupportedEncodingException; 25: import java.io.Writer; 26: 27: import org.apache.batik.dom.svg.SVGDOMImplementation; 28: import org.apache.batik.svggen.CachedImageHandlerJPEGEncoder; 29: import org.apache.batik.svggen.GenericImageHandler; 30: import org.apache.batik.svggen.SVGGeneratorContext; 31: import org.apache.batik.svggen.SVGGraphics2D; 32: import org.apache.batik.svggen.SVGGraphics2DIOException; 33: import org.w3c.dom.DOMImplementation; 34: import org.w3c.dom.svg.SVGDocument; 35: 36: public class SVGGenerateCustom { 37: The getImage method exists to read an image from a JPEG file and turn it into an Image you can pass to a Graphics2D (and hence SVGGraphics2D) drawImage method:
38: public static BufferedImage getImage() { 39: Component c = new Frame(); 40: Image i = c.getToolkit().getImage("one.jpg"); You get the initial Image by calling the getImage method on the toolkit of the current Component. The Frame you create is used exclusively in this function—it’s never meant to be visible.
Before you can use the image you have to wait for it to load, so you enlist the MediaTracker to slow you down until the image has loaded:
41: MediaTracker t = new MediaTracker(c); 42: t.addImage(i,0); 43: try { 44: t.waitForAll(); 45: } catch (InterruptedException ie) {} Now you can create a Java2D-compatible image and get it rendered and ready for use in the rest of the program:
46: BufferedImage bi = 47: new BufferedImage(i.getWidth(c), i.getHeight(c), 48: BufferedImage.TYPE_INT_RGB); 49: Graphics2D big = bi.createGraphics(); 50: big.drawImage(i,0,0,c); 51: return bi; 52: } 53:
The makeSVG function creates an SVG document by calling getImage. It’s passed a GenericImageHandler (the interface for the CachedImageHandlers) that it uses to handle the images, and a number that is the number of the copy of the image and resulting SVG document:
54: public static void makeSVG(GenericImageHandler ih, int n) { 55: DOMImplementation impl = 56: SVGDOMImplementation.getDOMImplementation(); 57: String svgNS = SVGDOMImplementation.SVG_NAMESPACE_URI; 58: SVGDocument doc = 59: (SVGDocument)impl.createDocument(svgNS, "svg", null); Once again, you need an SVGDocument to get started. This time, you don’t use it to create an SVGGraphics2D directly. Instead, you use it to create an SVGGeneratorContext.
Once you have the context, you can use it to perform your customizations. First you change the default comment, and then you register the GenericImageHandler that you were passed:
60: 61: SVGGeneratorContext ctx = 62: SVGGeneratorContext.createDefault(doc); 63: ctx.setComment( 64: "Generated for XML Professional Development with Apache Tools"); 65: ctx.setGenericImageHandler(ih);
The context is used to create the SVGGraphics2D:
66: 67: SVGGraphics2D g = new SVGGraphics2D(ctx, false);
In lines 69-71, you do the setup required to draw an image using Java2D:
68: 69: g.setSVGCanvasSize(new Dimension(400,750)); 70: RenderingHints rh = new RenderingHints(null); 71: BufferedImageOp bio = new RescaleOp(1f,0f, rh); 72: g.drawImage(getImage(), bio, 0,0);
The output file now has a version number appended to the end so you can tell which SVG file goes with which copy of the image. The rest of makeSVG is devoted to calling the SVGGraphics2D stream method to generate the SVG file:
73: 74: Writer out = null; 75: try { 76: OutputStream s = 77: new FileOutputStream("SVGGenerateCustom"+n+".svg"); 78: out = new OutputStreamWriter(s, "UTF-8"); 79: } catch (UnsupportedEncodingException use) { 80: use.printStackTrace(); 81: } catch (FileNotFoundException fnfe) { 82: fnfe.printStackTrace(); 83: } 84: try { 85: boolean useCSS = true; 87: g.stream(out, useCSS); 88: } catch (SVGGraphics2DIOException sioe) { 89: sioe.printStackTrace(); 90: } 91: } 92: 93: public static void main(String[] args) { 94: 95: GenericImageHandler ih = null; 96: try { 97: ih = new CachedImageHandlerJPEGEncoder("images", 98: "images"); 99: } catch (SVGGraphics2DIOException sioe) { 100: sioe.printStackTrace(); 101: } When the program runs, you create an instance of CachedImageHandlerJPEGEncoder, which causes images to be stored as JPEGs and enables the cached image handling functionality. The arguments to the CachedImageHandlerJPEGEncoder constructor are the same as for the ImageHandlerJPEGEncoder: the first String is the name of the directory where image files (JPEGs in this case) are to be stored, and the second String is the URI prefix prepended to the image file when it’s referenced in the SVG document.
You then make two calls to makeSVG, which would normally cause two image files to be generated. By passing your instance of CachedImageHandlerJPEGEncoder, Batik notices that it has seen this image before and reuses the image file it previously stored in the images directory:
102: makeSVG(ih,0); 103: makeSVG(ih,1); 104: } 105: }
One of the resulting SVG files follows. They are both identical, which is what you’d expect. If you hadn’t used image caching, they would differ in the reference to the image:
1: <?xml version="1.0" encoding="UTF-8"?> 2: 3: <!DOCTYPE svg PUBLIC '-//W3C//DTD SVG 1.0//EN' 4: 'http://www.w3.org/TR/2001/REC-SVG-20010904/DTD/svg10.dtd'> 5: <svg style="stroke-dasharray:none; shape-rendering:auto; 6: font-family:'sansserif'; 7: text-rendering:auto; fill-opacity:1; 8: color-rendering:auto; color-interpolation:auto; 9: font-size:12; fill:black; stroke:black; 10: image-rendering:auto; stroke-miterlimit:10; 11: stroke-linecap:square; stroke-linejoin:miter; 12: font-style:normal; stroke-width:1; 13: stroke-dashoffset:0; font-weight:normal; 14: stroke-opacity:1;" 15: xmlns="http://www.w3.org/2000/svg" width="400" 16: contentScriptType="text/ecmascript" 17: preserveAspectRatio="xMidYMid meet" 18: xmlns:xlink="http://www.w3.org/1999/xlink" 19: zoomAndPan="magnify" version="1.0" 20: contentStyleType="text/css" height="750"> 21: <!--Generated for Professional XML Development with Apache Tools-->
You can see that the comment has been replace with your comment.
The image tag is quite busy because of the required and default attributes. Most important for the purposes of this example is the xlink:href attribute, whose value is "images/jpegImage1.jpg". The images part of the URI comes from the images that you passed as the second argument to the CachedImageHandlerJPEGEncoder constructor:
22: <defs /> 23: <g> 24: <g> 25: <image x="0" y="0" width="400" 26: xmlns:xlink="http://www.w3.org/1999/xlink" 27: xlink:href="images/jpegImage1.jpg" 28: xlink:type="simple" xlink:actuate="onRequest" 29: height="750" 30: preserveAspectRatio="xMidYMid meet" 31: xlink:show="replace" /> 32: </g> 33: </g> 34: </svg>
Handling SVG styles
The last example of customization is a bit longer than you’ve seen so far. SVGGraphics2D allows you to change the way SVG styling is done. This is accomplished via the StyleHandler interface and the setStyleHandler method on the SVGGeneratorContext. The setStyle method on the StyleHandler interface is called for every SVG element that can be styled. So, if you want to change how style information is handled, you can provide your own implementation of StyleHandler.
Recall that SVG has two options for handling styles: creating a separate attribute for each style property or creating a CSS style attribute and filling it with CSS style properties. The most common way of dealing with CSS in HTML is to attach a class to various elements in the HTML document and then provide CSS definitions for those classes in a stylesheet, which can either be part of the same document or reside in a separate document. In this example, you’ll use the StyleHandler API to implement this variation on styling. You’ll use an embedded stylesheet (not a separate one) that contains definitions for classes attached to the SVG elements.
This implementation of StyleHandler is called StyleSheetStyleHandler. It’s responsible for building up the embedded stylesheet as it processes elements in the document. It’s also responsible for annotating elements in the document with the correct class attribute:
1: /* 2: * 3: * StyleSheetStyleHandler.java 4: * 5: * Example from "Professional XML Development with Apache Tools" 6: * 7: */ 8: package com.sauria.apachexml.ch4; 9: 10: import java.util.Iterator; 11: import java.util.Map; 12: 13: import org.apache.batik.svggen.SVGGeneratorContext; 14: import org.apache.batik.svggen.StyleHandler; 15: import org.w3c.dom.CDATASection; 16: import org.w3c.dom.Element; 17: 18: public class StyleSheetStyleHandler implements StyleHandler { 19: private CDATASection styleSheet; 20: 21: public StyleSheetStyleHandler(CDATASection styleSheet) { 22: this.styleSheet = styleSheet; 23: } The embedded stylesheet is a CDATASection that is passed to StyleSheetStyleHandler when it’s constructed.
When you encounter an element that needs styling, you generate a new ID that starts with C. This is the class identifier for this element and is used to link the element with the stylesheet definitions:
24: public void setStyle(Element element, Map styleMap, 25: SVGGeneratorContext context) { 26: 27: String id = context.getIDGenerator().generateID("C"); Once you have the ID, you can add a set of style instructions to the stylesheet for that ID (line 28):
28: styleSheet.appendData("."+id+" {"); 29: 30: for (Iterator iter = styleMap.keySet().iterator(); 31: iter.hasNext();) { 32: String key = (String) iter.next(); 33: String value = (String) styleMap.get(key); 34: styleSheet.appendData(key+":"+value+";"); 35: } The style information is passed to the setStyle method as a Map. You can build the required stylesheet instructions by iterating over all the keys in the map and creating the key/value pairs using correct CSS syntax (line 34).
Once you’ve processed all the style properties, you can close the definition for this class:
36: styleSheet.appendData("}\n"); The last thing you do is create a class attribute on the element with the current ID, thus establishing the link between the SVG element and the stylesheet definition:
37: 38: element.setAttribute("class", id); 39: } 40: } Now let's look at what’s going on in the main program that uses StyleSheetStyleHandler:
1: /* 2: * 3: * SVGStyleSheetGenerator.java 4: * 5: * Example from "Professional XML Development with Apache Tools" 6: * 7: */ 8: package com.sauria.apachexml.ch4; 9: 10: import java.awt.Color; 11: import java.awt.Dimension; 12: import java.awt.Font; 13: import java.awt.Shape; 14: import java.awt.geom.Ellipse2D; 15: import java.awt.geom.Rectangle2D; 16: import java.io.FileNotFoundException; 17: import java.io.FileOutputStream; 18: import java.io.OutputStream; 19: import java.io.OutputStreamWriter; 20: import java.io.UnsupportedEncodingException; 21: import java.io.Writer; 22: 23: import org.apache.batik.dom.svg.SVGDOMImplementation; 24: import org.apache.batik.svggen.DefaultExtensionHandler; 25: import org.apache.batik.svggen.ImageHandlerBase64Encoder; 26: import org.apache.batik.svggen.SVGGeneratorContext; 27: import org.apache.batik.svggen.SVGGraphics2D; 28: import org.apache.batik.svggen.SVGGraphics2DIOException; 29: import org.apache.batik.svggen.SVGSyntax; 30: import org.apache.batik.svggen.StyleHandler; 31: import org.w3c.dom.CDATASection; 32: import org.w3c.dom.DOMImplementation; 33: import org.w3c.dom.Element; 34: import org.w3c.dom.svg.SVGDocument; 35: 36: public class SVGStyleSheetGenerator { 37: 38: public static void main(String[] args) { 39: DOMImplementation impl = 40: SVGDOMImplementation.getDOMImplementation(); 41: String svgNS = SVGDOMImplementation.SVG_NAMESPACE_URI; 42: SVGDocument doc = 43: (SVGDocument)impl.createDocument(svgNS, "svg", null); 44: 45: SVGGeneratorContext ctx = 46: SVGGraphics2D.buildSVGGeneratorContext(doc, 47: new ImageHandlerBase64Encoder(), 48: new DefaultExtensionHandler()); You create an instance of SVGDocument and use it to create an SVGGeneratorContext, which you need in order to register the StyleHandler. You have to provide an ImageHandler and an ExtensionHandler to the context factory method.
Here you create the CDATASection that will contain the stylesheet for the document:
49: 50: CDATASection styleSheet = doc.createCDATASection(""); In lines 52-53 you create the StyleSheetStyleHandler instance, passing it the empty stylesheet. Then you register the instance as the style handler for the document in line 54. That gives you a context object with all the customizations you wanted; now you can create the SVGGraphics2D instance (line 56) and draw shapes into it (lines 58-68):
51: 52: StyleHandler styleHandler = 53: new StyleSheetStyleHandler(styleSheet); 54: ctx.setStyleHandler(styleHandler); 55: 56: SVGGraphics2D g = new SVGGraphics2D(ctx, false); 57: 58: Shape circle = new Ellipse2D.Double(0,0,50,50); 59: g.setPaint(Color.red); 60: g.fill(circle); 61: Shape rect = new Rectangle2D.Double(60,0,40,60); 62: g.setPaint(Color.green); 63: g.fill(rect); 64: g.setPaint(Color.blue); 65: Font font = new Font("Helvetica",Font.BOLD,24); 66: g.setFont(font); 67: g.drawString("Hello World",0f,90f); 68: g.setSVGCanvasSize(new Dimension(300,100)); 69: 70: 71: Element docElt = doc.getDocumentElement(); 72: Element root = g.getRoot(docElt); You call g.getRoot for a side effect here: You want the SVGGraphics to generate the SVG DOM tree for the SVGGraphics2D. You need to do a little DOM tree modification before you can write out the SVG document. At this point the SVG document contains SVG elements that have been annotated by StyleSheetStyleHandler as they’ve been created, and StyleSheetStyleHandler has finished writing all the CSS instructions into the stylesheet. But the stylesheet itself isn’t yet embedded in the SVG document. That’s the work that you have to do next.
You splice the stylesheet into the document this way:
73: 74: Element defs = 75: doc.getElementById(SVGSyntax.ID_PREFIX_GENERIC_DEFS); 76: Element style = 77: doc.createElementNS(SVGSyntax.SVG_NAMESPACE_URI, 78: SVGSyntax.SVG_STYLE_TAG); 79: style.setAttributeNS(null, SVGSyntax.SVG_TYPE_ATTRIBUTE, 80: "text/css"); 81: style.appendChild(styleSheet); 82: defs.appendChild(style);
Every SVG document that SVGGraphics2D generates contains a <defs> element with the id genericDefs. You want to attach your stylesheet as a child of this <defs> element. So, you call getElementById to find that <defs> element (line 74-75). Then you create an SVG <style> element (lines 76-78) and set its type attribute to "text/css" (lines 79-80). You make the stylesheet a child of this <style> element (line 81) and make the <style> element a child of the <defs> element (line 82). Now everything is hooked up the way it’s supposed to be, and you can write the SVG file out to a file:
83: 84: Writer out = null; 85: try { 86: OutputStream s = 87: new FileOutputStream("SVGStyleSheetGenerator.svg"); 88: out = new OutputStreamWriter(s, "UTF-8"); 89: } catch (UnsupportedEncodingException use) { 90: use.printStackTrace(); 91: } catch (FileNotFoundException fnfe) { 92: fnfe.printStackTrace(); 93: } 94: try { 95: g.stream(root, out); 96: } catch (SVGGraphics2DIOException sioe) { 97: sioe.printStackTrace(); 98: } 99: } 100: } The resulting SVG file is as follows:
1: <?xml version="1.0" encoding="UTF-8"?> 2: 3: <!DOCTYPE svg PUBLIC '-//W3C//DTD SVG 1.0//EN' 4: 'http://www.w3.org/TR/2001/REC-SVG-20010904/DTD/svg10.dtd'> 5: <svg contentScriptType="text/ecmascript" width="300" 6: xmlns:xlink="http://www.w3.org/1999/xlink" 7: zoomAndPan="magnify" 8: contentStyleType="text/css" height="100" 9: preserveAspectRatio="xMidYMid meet" 10: xmlns="http://www.w3.org/2000/svg" version="1.0">
Notice that the contents of the <svg> element’s style attribute has been reduced substantially.
Here you can see the results of your SVG DOM surgery. There’s the CSS stylesheet for the document, right where it should be. You can check to see that the various class definitions are attached to the same elements—this document should be equivalent styled-boxes.svg.
11: <!--Generated by the Batik Graphics2D SVG Generator--> 12: <defs > 13: <style type="text/css" xml:space="preserve"> 14: <![CDATA[.C1 {stroke:red;fill:red;} 15: .C2 {stroke:none;} 16: .C3 {stroke:none;fill:lime;} 17: .C4 {font-size:24;font-weight:bold;stroke:blue;fill:blue;} 18: .C5 {stroke:none;} 19: .C6 {stroke-width:1;stroke-dashoffset:0;font-size:12; 20: stroke-dasharray:none;color-rendering:auto;font-weight:normal; 21: color-interpolation:auto;stroke-linejoin:miter;fill:black; 22: image-rendering:auto;font-family:'sansserif';stroke-opacity:1; 23: stroke-miterlimit:10;stroke:black;text-rendering:auto; 24: font-style:normal;stroke-linecap:square;fill-opacity:1; 25: shape-rendering:auto;} 26: ]]> 27: </style> 28: </defs> 29: <g> 30: <g > 31: <circle r="25" cx="25" cy="25" /> 32: <rect width="40" x="60" height="60" y="0" /> 33: </g> 34: <g > 35: <text xml:space="preserve" x="0" y="90" > 36: Hello World 37: </text> 38: </g> 39: </g> 40: </svg> That completes our coverage of SVGGraphics2D. Most of the richness of this class comes from its ability to leverage the Java2D API, making it easier for you to think about doing the graphics while allowing the class to carry the burden of converting the drawing commands to SVG.
JSVGCanvas
Now that you know how to generate an SVG document using Batik, let’s look at how you can use the Batik libraries to display an SVG document on the screen. Batik provides a Swing component called JSVGCanvas that does exactly this. You create an instance of JSVGCanvas and insert it into your Swing component hierarchy. When you’re ready to display an SVG document in the canvas, you call the setURI method and pass it the URI of the SVG document you want to display. Once you do that, the canvas handles the rest. During the course of rendering and displaying the document, JSVGCanvas fires some events you may be interested in. You can register event listeners for these events on the canvas.
Let’s look at how to use JSVGCanvas to build a simple SVG browser/viewer:
1: /* 2: * 3: * SimpleBrowser.java 4: * 5: * Example from "Professional XML Development with Apache Tools" 6: * 7: */ 8: package com.sauria.apachexml.ch4; 9: 10: import java.awt.BorderLayout; 11: import java.awt.FlowLayout; 12: import java.awt.event.ActionEvent; 13: import java.awt.event.ActionListener; 14: import java.awt.event.WindowAdapter; 15: import java.awt.event.WindowEvent; 16: import java.io.File; 17: import java.io.IOException; 18: 19: import javax.swing.JComponent; 20: import javax.swing.JFileChooser; 21: import javax.swing.JFrame; 22: import javax.swing.JLabel; 23: import javax.swing.JMenu; 24: import javax.swing.JMenuBar; 25: import javax.swing.JMenuItem; 26: import javax.swing.JPanel; 27: 28: import org.apache.batik.swing.JSVGCanvas; 29: import org.apache.batik.swing.gvt.GVTTreeRendererAdapter; 30: import org.apache.batik.swing.gvt.GVTTreeRendererEvent; 31: import org.apache.batik.swing.svg.GVTTreeBuilderAdapter; 32: import org.apache.batik.swing.svg.GVTTreeBuilderEvent; 33: import org.apache.batik.swing.svg.SVGDocumentLoaderAdapter; 34: import org.apache.batik.swing.svg.SVGDocumentLoaderEvent; 35: import org.apache.batik.swing.svg.SVGLoadEventDispatcherAdapter; 36: import org.apache.batik.swing.svg.SVGLoadEventDispatcherEvent; 37: 38: public class SimpleBrowser { 39: JFrame frame; 40: JLabel label = new JLabel("Status: "); 41: JSVGCanvas canvas = new JSVGCanvas(); 42: JMenuBar menuBar; 43: 44: public SimpleBrowser(JFrame f) { 45: frame = f; 46: } 47: The simple browser class has a number of Swing components in it: a JFrame for the entire browser, a JLabel where you can display status information, a JMenuBar for controlling the browser, and, of course, an instance of JSVGCanvas that does all the real work.
The addMenuBar method sets up the menu bar for use with the rest of the applications. You set up the menu bar (lines 49-50) with a single menu, File (lines 51-52), and you create the Open… item for the menu (lines 53-54):
48: public void addMenuBar() { 49: menuBar = new JMenuBar(); 50: frame.setJMenuBar(menuBar); 51: JMenu menu = new JMenu("File"); 52: menuBar.add(menu); 53: JMenuItem item = new JMenuItem("Open..."); 54: menu.add(item); 55: Next you define the action to be taken when the item is selected. You want to use a JFileChooser to select a file from the current directory (line 58). If the use selects a file and clicks the Open button (lines 59-61), then you want to read and display the SVG file by calling the setURI method on the JSVGCanvas (line 63):
56: item.addActionListener(new ActionListener() { 57: public void actionPerformed(ActionEvent ae) { 58: JFileChooser fc = new JFileChooser("."); 59: int choice = fc.showOpenDialog(frame); 60: if (choice == JFileChooser.APPROVE_OPTION) { 61: File f = fc.getSelectedFile(); 62: try { 63: canvas.setURI(f.toURL().toString()); 64: } catch (IOException ex) { 65: ex.printStackTrace(); 66: } 67: } 68: } 69: }); After the Open… item is done, you create a Quit item, add it to the menu, and install its action:
70: item = new JMenuItem("Quit"); 71: menu.add(item); 72: item.addActionListener(new ActionListener () { 73: public void actionPerformed(ActionEvent ae) { 74: System.exit(0); 75: } 76: }); 77: } 78: createComponents sets up the layout of the components inside the JFrame content pane:
79: public JComponent createComponents() { 80: final JPanel panel = new JPanel(new BorderLayout()); 81: The labelPanel is a space for the JSVGCanvas event handlers to report their activities to the user:
82: JPanel labelPanel = 83: new JPanel(new FlowLayout(FlowLayout.LEFT)); 84: labelPanel.add(label); 85: labelPanel.add(new JLabel(" ")); The labelPanel goes in the North position, and the JSVGCanvas goes in the Center position:
86: 87: panel.add("North", labelPanel); 88: panel.add("Center", canvas); 89: 90: return panel; 91: } 92: You use addListeners to create and register event listeners for the various events that JSVGCanvas reports. Understanding the operation phases of JSVGCanvas will help you understand what the event listeners are for. When the setURI method is called, the XML/SVG document is parsed and an SVG DOM tree is constructed. The SVGDocumentLoaderListener is concerned with this phase. It can report the start and end (either successful or unsuccessful) of the phase. The SVG DOM tree is used to construct a Graphics Vector Toolkit (GVT) tree. This phase is monitored by the GVTTreeBuilderListener. Once the GVT tree is built, you can render the document. If the document is dynamic, then the code that processes the onload event is called. SVGLoadEventDispatcherListener monitors the progress of the onload dispatching code. After this, the GVT tree is used to render the document, and the rendering is monitored by GVTTreeRendererListener.
You use the addSVGDocumentLoaderListener method on the canvas to register a listener, and you use the SVGDocumentLoaderAdaptor class so that you only have to provide the event callbacks you’re interested in:
93: public void addListeners() { 94: canvas.addSVGDocumentLoaderListener( 95: new SVGDocumentLoaderAdapter() { 96: public void documentLoadingStarted( 97: SVGDocumentLoaderEvent e) { 98: label.setText("SVG Document Loading..."); 99: } 100: public void documentLoadingCompleted( 101: SVGDocumentLoaderEvent e) { 102: label.setText("SVG Document Loaded."); 103: } 104: }); 105: For the sake of space, you’re only tracking the start and completed events for the various event listeners. There are also callbacks that tell whether the phase failed or was cancelled. The code for all the listener registrations is basically the same—it’s the usual tedious Swing event-registration code:
106: canvas.addGVTTreeBuilderListener( 107: new GVTTreeBuilderAdapter() { 108: public void gvtBuildStarted( 109: GVTTreeBuilderEvent e) { 110: label.setText("GVT Build Started..."); 111: } 112: public void gvtBuildCompleted( 113: GVTTreeBuilderEvent e) { 114: label.setText("GVT Build Complete."); 115: frame.pack(); 116: } 117: }); 118: 119: canvas.addGVTTreeRendererListener( 120: new GVTTreeRendererAdapter() { 121: public void gvtRenderingPrepare( 122: GVTTreeRendererEvent e) { 123: label.setText("GVT Rendering Started..."); 124: } 125: public void gvtRenderingCompleted( 126: GVTTreeRendererEvent e) { 127: label.setText("GVT Rendering Complete."); 128: } 129: }); 130: 131: canvas.addSVGLoadEventDispatcherListener( 132: new SVGLoadEventDispatcherAdapter () { 133: public void svgLoadEventDispatchStarted( 134: SVGLoadEventDispatcherEvent e) { 135: label.setText("OnLoad Processing Started..."); 136: } 137: 138: public void svgLoadEventDispatchCompleted( 139: SVGLoadEventDispatcherEvent e) { 140: label.setText("OnLoad Processing Complete."); 141: } 142: }); 143: } 144: It all comes together in the main function. You create a JFrame (line 145) that you use to create the browser (line 146). Then you add the menu bar (line 148), the panel of components (line 149), and the event listeners (line 150):
145: public static void main(String[] args) { 146: JFrame f = new JFrame("Batik"); 147: SimpleBrowser app = new SimpleBrowser(f); 148: app.addMenuBar(); 149: f.getContentPane().add(app.createComponents()); 150: app.addListeners(); 151: You attach a window close event handler for completeness (152-156), size up the frame, and make it visible:
152: f.addWindowListener(new WindowAdapter() { 153: public void windowClosing(WindowEvent e) { 154: System.exit(0); 155: } 156: }); 157: f.setSize(400, 400); 158: f.setVisible(true); 159: } 160: } Now you’re ready to open SVG files and render them.
In addition to event handling, JSVGCanvas also has built-in interactors that provide functionality for zooming, panning, and rotating the contents of the canvas. If your application is going to use Java to manipulate the document, you’ll need to call the getSVGDocument method on JSVGCanvas in order to get it.
ImageTranscoding
Our next piece of Batik library functionality has to do with transcoding SVG files into images. These images can be written to disk, or they can be written to Java2D BufferedImage objects. Batik provides transcoders for three formats: JPEG, PNG, and TIFF. The transcoders for each format are named with the file format in their name: JPEGTranscoder, PNGTranscoder, and TIFFTranscoder.
Transcoding from an SVG File
In this example, we’ll look at how to take an area within an SVG document and transcode it to an image file. The example uses the PNGTranscoder, but the code works equally well with any of the transcoders:
1: /* 2: * 3: * TranscodeFileArea.java 4: * 5: * Example from "Professional XML Development with Apache Tools" 6: * 7: */ 8: package com.sauria.apachexml.ch4; 9: 10: import java.awt.Color; 11: import java.awt.Rectangle; 12: import java.io.FileNotFoundException; 13: import java.io.FileOutputStream; 14: import java.io.IOException; 15: import java.io.OutputStream; 16: 17: import org.apache.batik.transcoder.TranscoderException; 18: import org.apache.batik.transcoder.TranscoderInput; 19: import org.apache.batik.transcoder.TranscoderOutput; 20: import org.apache.batik.transcoder.image.ImageTranscoder; 21: import org.apache.batik.transcoder.image.PNGTranscoder; 22: 23: public class TranscodeFileArea { 24: 25: public static void main(String[] args) { 26: int width = 50; 27: int height = 50; 28: Rectangle areaRect = new Rectangle(10,10,width,height); First you set up an AWT Rectangle that specifies the area you want to transcode.
After instantiating the PNGTranscoder (line 30), you add a series of transcoding hints to the transcoder. You set the background color to white (line 32), and then you set the width (lines 33-34) and height (lines 35-36) of the output image. You also give the transcode the Rectangle with the area you want transcoded (lines 37-38):
29: 30: PNGTranscoder xcoder = new PNGTranscoder(); 31: xcoder.addTranscodingHint( 32: ImageTranscoder.KEY_BACKGROUND_COLOR, Color.white); 33: xcoder.addTranscodingHint(PNGTranscoder.KEY_WIDTH, 34: new Float(width)); 35: xcoder.addTranscodingHint(PNGTranscoder.KEY_HEIGHT, 36: new Float(height)); 37: xcoder.addTranscodingHint(PNGTranscoder.KEY_AOI, 38: areaRect);
The transcoders use a TranscoderInput to specify their input source and a TranscoderOutput to specify their output destination. The TranscoderInput constructor expects an absolute URI. Filenames hoping to pass as relative URIs are rejected:
39: 40: String uri = args[0]; 41: 42: TranscoderInput in = new TranscoderInput(uri);
You create the TranscoderOutput from a FileOutputStream (lines 44-50) and then call the transcode method on the transcoder (line 53):
43: 44: OutputStream os = null; 45: try { 46: os = new FileOutputStream(args[1]); 47: } catch (FileNotFoundException fnfe) { 48: fnfe.printStackTrace(); 49: } 50: TranscoderOutput out = new TranscoderOutput(os); 51: 52: try { 53: xcoder.transcode(in,out); 54: } catch (TranscoderException te) { 55: te.printStackTrace(); 56: } 57: try { 58: os.flush(); 59: } catch (IOException ioe) { 60: ioe.printStackTrace(); 61: } 62: } 63: }
Transcoding from an SVG DOM
The next example shows how to transcode an SVG DOM tree into an image file:
1: /* 2: * 3: * TranscodeDOM.java 4: * 5: * Example from "Professional XML Development with Apache Tools" 6: * 7: */ 8: package com.sauria.apachexml.ch4; 9: 10: import java.awt.Color; 11: import java.awt.Dimension; 12: import java.awt.Font; 13: import java.awt.Shape; 14: import java.awt.geom.Ellipse2D; 15: import java.awt.geom.Rectangle2D; 16: import java.io.FileNotFoundException; 17: import java.io.FileOutputStream; 18: import java.io.IOException; 19: import java.io.OutputStream; 20: 21: import org.apache.batik.dom.svg.SVGDOMImplementation; 22: import org.apache.batik.svggen.SVGGraphics2D; 23: import org.apache.batik.transcoder.TranscoderException; 24: import org.apache.batik.transcoder.TranscoderInput; 25: import org.apache.batik.transcoder.TranscoderOutput; 26: import org.apache.batik.transcoder.image.ImageTranscoder; 27: import org.apache.batik.transcoder.image.PNGTranscoder; 28: import org.w3c.dom.DOMImplementation; 29: import org.w3c.dom.Element; 30: import org.w3c.dom.svg.SVGDocument; 31: 32: public class TranscodeDOM { 33: 34: public static void main(String[] args) { 35: DOMImplementation impl = 36: SVGDOMImplementation.getDOMImplementation(); 37: String svgNS = SVGDOMImplementation.SVG_NAMESPACE_URI; 38: SVGDocument doc = 39: (SVGDocument)impl.createDocument(svgNS, "svg", null); 40: 41: SVGGraphics2D g = new SVGGraphics2D(doc); 42: 43: Shape circle = new Ellipse2D.Double(0,0,50,50); 44: g.setPaint(Color.red); 45: g.fill(circle); 46: Shape rect = new Rectangle2D.Double(60,0,40,60); 47: g.setPaint(Color.green); 48: g.fill(rect); 49: g.setPaint(Color.blue); 50: Font font = new Font("Helvetica",Font.BOLD,24); 51: g.setFont(font); 52: g.drawString("Hello World",0f,90f); 53: g.setSVGCanvasSize(new Dimension(300,100)); 54: The code up to this point should look familiar. You’re just creating an SVG DOM tree that you can use as input to the transcoder.
The next two lines are very important, because the SVG DOM isn’t created until these methods are called:
55: Element root = doc.getDocumentElement(); 56: g.getRoot(root); 57:
Instead of constructing the TranscoderInput from a URI, this time you construct it with an SVG DOM. Nothing could be easier:
58: PNGTranscoder xcoder = new PNGTranscoder(); 59: xcoder.addTranscodingHint( 60: ImageTranscoder.KEY_BACKGROUND_COLOR, Color.white); 61: 62: TranscoderInput in = new TranscoderInput(doc); 63: OutputStream os = null; 64: try { 65: os = new FileOutputStream("svgDOM.png"); 66: } catch (FileNotFoundException fnfe) { 67: fnfe.printStackTrace(); 68: } 69: TranscoderOutput out = new TranscoderOutput(os); 70: 71: try { 72: xcoder.transcode(in, out); 73: } catch (TranscoderException te) { 74: te.printStackTrace(); 75: } 76: try { 77: os.flush(); 78: } catch (IOException ioe) { 79: ioe.printStackTrace(); 80: } 81: 82: } 83: } If you want generate a Java2D BufferedImage, you can call the createImage method on any of the transcoders. You’ll need to pass the width and height of the image (in pixels) to this method.
SVG Scripting
As you saw in the section on imperative dynamic SVG, you can do a lot with an SVG document when you combine it with a scripting language such as ECMAScript. The SVG scripting capabilities of Batik come into play when you’re rendering an SVG document using the JSVGCanvas. The SVG DOM being manipulated by the scripting language is the SVG DOM that the JSVGCanvas generates in order to render the document.
JSVGCanvas ECMAScript API
To use scripting in JSVGCanvas, you need to know what properties and methods it supports. Here’s a brief description. All these names are available as global variable and function names because the global object in an SVG document is the window object.
The properties are as follows:
-
document—The current SVG document.
-
event (or evt)—The last event that was fired.
-
window—The current global object.
These are the methods:
-
alert(message)—Show an alert dialog containing message.
-
confirm(question)—Show a confirm dialog that presents the question and provides OK and Cancel buttons. Return true if the user clicks OK and false otherwise.
-
prompt(message [, defaultValue])—Show an input dialog box that displays a prompt message. If defaultValue is supplied, it’s displayed in the input box. Return whatever string the user types (including the defaultValue) or null.
-
setInterval(script, interval)—Schedule the script to be executed over and over with an interval (in milliseconds) between executions. The script is a string containing the script body. The current script continues to execute. Return an object that can be used as an intervalID.
-
setInterval(function, interval)—Schedule the function to be executed over and over with an interval (in milliseconds) between executions. The current script continues to execute. Return an object that can be used as an intervalID.
-
clearInterval(intervalID)—Unschedule the script or function associated with intervalID.
-
setTimeout(script, timeout)—Wait timeout milliseconds and then execute the script. The script is a string containing the script body. The current script continues to execute. Return an object that can be used as a timeoutID.
-
setTimeout(function, timeout)—Wait timeout milliseconds and then execute the function. The current script continues to execute. Return an object that can be used as a timeoutID.
-
clearTimeout(timeoutID)—Cancel the delayed execution associated with timeoutID.
-
parseXML(text, document)—Given a text string containing an XML document fragment, and also give document (a DOM document object to be used as a DOM factory object), parse the XML document fragment and return an instance of org.w3c.dom.DocumentFragment that represents the XML document fragment.
-
getURL(uri, function[, encoding])—Download some data located at uri and pass it to function. Function should take as an argument an ECMAScript object with three properties:
-
success—True if the data was retrieved, false otherwise.
-
contentType—The content type of the data.
-
content—A string representing the data.
-
If the encoding argument is specified, the data file is assumed to use that encoding; otherwise UTF-8 is assumed.
Alternate Scripting Languages
Batik allows you to use scripting languages besides ECMAScript to perform imperative dynamic SVG tasks. Let’s modify the simple browser to use Jython (a Java implementation of Python 2.1) as your scripting language. (You can get a copy of Jython via www.jython.org.) The Batik developers have provided a Batik InterpreterFactory subclass for doing this. Unfortunately, it’s still a decent amount of work. You need to register the JPythonInterpreterFactory with the InterpreterPool that’s in the BridgeContext object inside the JSVGCanvas. The only way you can get access to all the things you need is by subclassing JSVGCanvas:
1: /* 2: * 3: * JSVGJythonCanvas.java 4: * 5: * Example from "Professional XML Development with Apache Tools" 6: * 7: */ 8: package com.sauria.apachexml.ch4; 9: 10: import org.apache.batik.bridge.BridgeContext; 11: import org.apache.batik.bridge.DocumentLoader; 12: import org.apache.batik.bridge.UserAgent; 13: import org.apache.batik.script.InterpreterPool; 14: import org.apache.batik.script.jpython.JPythonInterpreterFactory; 15: import org.apache.batik.swing.JSVGCanvas; 16: 17: public class JSVGJythonCanvas extends JSVGCanvas { 18: public class JythonBridgeContext extends BridgeContext { Actually, the problem is a little worse than we told you. You need to create a subclass of the BridgeContext class. (You’ll see why in a minute.) The BridgeContext is the glue between the SVG DOM, the GVT tree used for rendering, and the drawing part of the JSVGCanvas. Fortunately, all the work can be done in the constructor of this new BridgeContext subclass. Because this context is being used only to enable Python scripting, you make it an inner class of the JSVGJythonCanvas.
After calling the parent constructor, you call setDynamic to make sure the canvas knows you’re in dynamic SVG mode and that things will be updated:
19: public JythonBridgeContext(UserAgent ua, 20: DocumentLoader loader) { 21: super(ua, loader); 22: 23: setDynamic(true); You create an empty interpreter pool (line 25). The pool isn’t really empty—it already has an interpreter for ECMAScript installed, because SVG mandates ECMAScript support for scripting. Next, you tell the interpreter pool that scripts with MIME type "text/python" will use an instance of JPythonInterpreterFactory (line 26-27). After that, you call the setInterpreterPool method on the context with your Jython-enhanced InterpreterPool, and you’re all set (line 28):
24: 25: InterpreterPool ipool = new InterpreterPool(); 26: ipool.putInterpreterFactory("text/python", 27: new JPythonInterpreterFactory()); 28: setInterpreterPool(ipool); This call to setInterpreterPool is why you needed to subclass BridgeContext—setInterpreterPool is protected. The Batik jars don’t include built versions of JythonInterpreterFactory or JythonInterpreter, so you’ll need to build them and make sure that they and a copy of jython.jar are on your classpath.
JSVGJythonCanvas’ createBridgeContext method creates a new instance of JythonBridgeContext and returns it:
29: 30: } 31: } 32: public BridgeContext createBridgeContext() { 33: BridgeContext ctx = 34: new JythonBridgeContext(userAgent, loader); 35: 36: return ctx; 37: } 38: 39: } You can modify the SimpleBrowser.java from earlier in the chapter by removing the addListeners method and the call to it. Because you’re using a subclass of JSVGCanvas, you need to tell the browser which class you’re using. Line 33 does all the work of turning your simple SVG browser into a simple browser that understands Python scripts:
1: /* 2: * 3: * JythonBrowser.java 4: * 5: * Example from "Professional XML Development with Apache Tools" 6: * 7: */ 8: package com.sauria.apachexml.ch4; 9: 10: import java.awt.BorderLayout; 11: import java.awt.FlowLayout; 12: import java.awt.event.ActionEvent; 13: import java.awt.event.ActionListener; 14: import java.awt.event.WindowAdapter; 15: import java.awt.event.WindowEvent; 16: import java.io.File; 17: import java.io.IOException; 18: 19: import javax.swing.JComponent; 20: import javax.swing.JFileChooser; 21: import javax.swing.JFrame; 22: import javax.swing.JLabel; 23: import javax.swing.JMenu; 24: import javax.swing.JMenuBar; 25: import javax.swing.JMenuItem; 26: import javax.swing.JPanel; 27: 28: import org.apache.batik.swing.JSVGCanvas; 29: 30: public class JythonBrowser { 31: JFrame frame; 32: JLabel label = new JLabel("Status: "); 33: JSVGCanvas canvas = new JSVGJythonCanvas(); 34: JMenuBar menuBar; 35: 36: public JythonBrowser(JFrame f) { 37: frame = f; 38: } 39: 40: public void addMenuBar() { 41: menuBar = new JMenuBar(); 42: frame.setJMenuBar(menuBar); 43: JMenu menu = new JMenu("File"); 44: menuBar.add(menu); 45: JMenuItem item = new JMenuItem("Open..."); 46: menu.add(item); 47: 48: item.addActionListener(new ActionListener() { 49: public void actionPerformed(ActionEvent ae) { 50: JFileChooser fc = new JFileChooser("."); 51: int choice = fc.showOpenDialog(frame); 52: if (choice == JFileChooser.APPROVE_OPTION) { 53: File f = fc.getSelectedFile(); 54: try { 55: canvas.setURI(f.toURL().toString()); 56: } catch (IOException ex) { 57: ex.printStackTrace(); 58: } 59: } 60: } 61: }); 62: item = new JMenuItem("Quit"); 63: menu.add(item); 64: item.addActionListener(new ActionListener () { 65: public void actionPerformed(ActionEvent ae) { 66: System.exit(0); 67: } 68: }); 69: } 70: 71: public JComponent createComponents() { 72: final JPanel panel = new JPanel(new BorderLayout()); 73: 74: JPanel labelPanel = 75: new JPanel(new FlowLayout(FlowLayout.LEFT)); 76: labelPanel.add(label); 77: labelPanel.add(new JLabel(" ")); 78: 79: panel.add("North", labelPanel); 80: panel.add("Center", canvas); 81: 82: return panel; 83: } 84: 85: public static void main(String[] args) { 86: JFrame f = new JFrame("Batik"); 87: JythonBrowser app = new JythonBrowser(f); 88: app.addMenuBar(); 89: f.getContentPane().add(app.createComponents()); 90: 91: f.addWindowListener(new WindowAdapter() { 92: public void windowClosing(WindowEvent e) { 93: System.exit(0); 94: } 95: }); 96: f.setSize(400, 400); 97: f.setVisible(true); 98: } 99: } The following listing shows a version of imperative-dynamic.svg that has been converted to use Python instead of ECMAScript:
1: <?xml version="1.0" standalone="no"?> 2: <!DOCTYPE svg PUBLIC "-//W3C//DTD SVG 20010904//EN" 3: "http://www.w3.org/TR/2001/REC-SVG-20010904/DTD/svg10.dtd"> 4: <svg width="300" height="150" 5: xmlns="http://www.w3.org/2000/svg" 6: xmlns:xlink="http://www.w3.org/1999/xlink" 7: contentScriptType="text/python"> 8: <script type="text/python"> 9: <![CDATA[ 10: import random 11: def randomColor(): 12: return "#"+hex(int(random.random() * 16777216))[2:] 13: ]]> 14: </script>
The big difference here is in the content of the <script> element, which now contains Python code rather than ECMAScript.
The function-calling syntaxes of Python and ECMAScript are similar enough that no change was required in the onclick event handler:
15: <rect x="10" y="10" width="100" height="100" 16: onclick="evt.target.setAttribute('fill', randomColor())"/> 17: </svg> You can use a similar technique if you want to use TCL as your scripting language. The Batik developers also provided support for using Jacl, a Java implementation of TCL.
You can also use a Java program to manipulate the contents of the SVG DOM and achieve imperative dynamic SVG effects. You can do this via regular W3C DOM API calls. There are two major areas where you may have trouble. The first is attaching event listeners written in Java to elements in the SVG document. The only good way to do this is to attach id attributes to the various elements and then supply Java EventListeners to process the various events. If you have more than a few elements and events, this can quickly add up to a lot of code. The second area where you may run into trouble is the fact that Java operations on the SVG DOM must take place in the (Swing) canvas update thread. This means you need to use org.apache.batik.bridge.UpdateManager to transfer control from your thread to the canvas update thread.
Because of these two issues, you’re much better off using a scripting language to do imperative dynamic SVG tasks. The scripting languages are pretty powerful, and unless you need some Java functionality, the scripting languages are more than up to the job. In fact, if you use Jython, it can call just about any function on any Java object; in many cases you can get the job done using Jython, which is much more convenient than trying to go the full Java bridge route. In this case, the only thing you need to watch out for is performing SVG DOM operations in the Java code you’re calling from Jython. But you should be able to keep all that code in Jython and only call out for non-DOM operations.
Security
There are two security areas you may need to be aware of when you’re using Batik: Java-level application security and controlling access to external resources.
Application Security
Batik provides org.apache.batik.util.ApplicationSecurityEnforcer, which you can use in your applications to control application security. ApplicationSecurityEnforcer lets you install a Java2 SecurityManager and a security policy. This is a helper class that makes dealing with security managers a little easier. You still have to write a Java2 security policy file that grants your application permission to perform actions and access resources.
Accessing External Resources
You’ll have to deal with this area when you use JSVGCanvas. SVG documents can reference documents anywhere on the Internet, thanks to the use of XLink linking in the specification. Depending on your application, this may not be something you wish to promote.
The JSVGCanvas class uses a UserAgent class that contains various pieces of information about the UserAgent connected to the canvas. The UserAgent interface provides two methods that work together to control access to external resources: getScriptSecurity, which controls access to scripts; and getExternalResourceSecurity, which controls access to external resources besides scripts.
Let’s look at how you can use these methods to build a restricted version of the SimpleBrowser that can only load scripts and resources from approved URIs. Once again, you must subclass JSVGCanvas. This time you need to do it so that you can override the protected createUserAgent method:
1: /* 2: * 3: * JSVGRestrictedCanvas.java 4: * 5: * Example from "Professional XML Development with Apache Tools" 6: * 7: */ 8: package com.sauria.apachexml.ch4; 9: 10: import org.apache.batik.bridge.DefaultExternalResourceSecurity; 11: import org.apache.batik.bridge.DefaultScriptSecurity; 12: import org.apache.batik.bridge.ExternalResourceSecurity; 13: import org.apache.batik.bridge.RelaxedExternalResourceSecurity; 14: import org.apache.batik.bridge.RelaxedScriptSecurity; 15: import org.apache.batik.bridge.ScriptSecurity; 16: import org.apache.batik.bridge.UserAgent; 17: import org.apache.batik.swing.JSVGCanvas; 18: import org.apache.batik.util.ParsedURL; 19: 20: public class JSVGRestrictedCanvas extends JSVGCanvas { 21: You want to supply your own implementation of UserAgent, but you don’t want to supply a full implementation of the entire interface. The UserAgent that JSVGCanvas normally uses is fine, except that you want to override getExternalResourceSecurity and getScriptSecurity. It’s fortunate, then, that you’re subclassing JSVGCanvas anyway, because the default UserAgent it uses is an inner class. So, you create an inner class in JSVGRestrictedCanvas that subclasses JSVGCanvas.CanvasUserAgent and override the methods you need.
getExternalResourceSecurity returns an implementor of ExternalResourceSecurity:
22: protected class RestrictedUserAgent 23: extends JSVGCanvas.CanvasUserAgent { 24: 25: public ExternalResourceSecurity 26: getExternalResourceSecurity( 27: ParsedURL resourceURL, 28: ParsedURL docURL) { 29: if (resourceURL.getHost().endsWith("apache.org") || 30: resourceURL.getHost().endsWith("sauria.com")) 31: return 32: new RelaxedExternalResourceSecurity( 33: resourceURL, docURL); 34: else 35: return 36: new DefaultExternalResourceSecurity( 37: resourceURL, docURL); 38: } The various security policies are implemented by classes that implement this interface. The list of available classes looks like this:
-
NoLoadExternalResourceSecurity—No external resources may be loaded.
-
EmbededExternalResourceSecurity—Only resources embedded in the current document may be loaded.
-
DefaultExternalResourceSecurity—Embedded resources and resources coming from the same location as the document referencing them (the current document) are allowed.
-
RelaxedExternalResourceSecurity—Any external resource may be loaded.
The security policy for external resources is this: If the URL is going to the apache.org or sauria.com domain, then you can load resources from there without any problem. Otherwise, the default security policy should be used. You want this general rule to apply to scripts as well.
getScriptSecurity works much the same as getExternalResourceSecurity, but the names of the security policy classes are different:
-
NoLoadScriptResourceSecurity—Don’t load any scripts.
-
EmbededScriptSecurity—Only load scripts that are embedded in the current document.
-
DefaultScriptSecurity—Load the script if it’s embedded in the current document or if it’s coming from the same location as the current document.
-
RelaxedScriptSecurity—Scripts from any location can be loaded.
39: 40: public ScriptSecurity getScriptSecurity( 41: String scriptType, 42: ParsedURL scriptURL, 43: ParsedURL docURL) { 44: if (scriptURL.getHost().endsWith("apache.org") || 45: scriptURL.getHost().endsWith("sauria.com")) 46: return 47: new RelaxedScriptSecurity(scriptType, 48: scriptURL, docURL); 49: else 50: return 51: new DefaultScriptSecurity(scriptType, 52: scriptURL, docURL); 53: }
You supply your own createUserAgent factory method that returns an instance of the custom UserAgent:
54: } 55: 56: protected UserAgent createUserAgent() { 57: return new JSVGRestrictedCanvas.RestrictedUserAgent(); 58: } 59: } Once you have the JSVGCanvas, you just need to plug it into the simple browser, and you have an access-controlled SVG browser. In line 33 you plug in the JSVGRestrictedCanvas and turn on access control:
1: /* 2: * 3: * RestrictedBrowser.java 4: * 5: * Example from "Professional XML Development with Apache Tools" 6: * 7: */ 8: package com.sauria.apachexml.ch4; 9: 10: import java.awt.BorderLayout; 11: import java.awt.FlowLayout; 12: import java.awt.event.ActionEvent; 13: import java.awt.event.ActionListener; 14: import java.awt.event.WindowAdapter; 15: import java.awt.event.WindowEvent; 16: import java.io.File; 17: import java.io.IOException; 18: 19: import javax.swing.JComponent; 20: import javax.swing.JFileChooser; 21: import javax.swing.JFrame; 22: import javax.swing.JLabel; 23: import javax.swing.JMenu; 24: import javax.swing.JMenuBar; 25: import javax.swing.JMenuItem; 26: import javax.swing.JPanel; 27: 28: import org.apache.batik.swing.JSVGCanvas; 29: 30: public class RestrictedBrowser { 31: JFrame frame; 32: JLabel label = new JLabel("Status: "); 33: JSVGCanvas canvas = new JSVGRestrictedCanvas(); 34: JMenuBar menuBar; 35: 36: public RestrictedBrowser(JFrame f) { 37: frame = f; 38: } 39: 40: public void addMenuBar() { 41: menuBar = new JMenuBar(); 42: frame.setJMenuBar(menuBar); 43: JMenu menu = new JMenu("File"); 44: menuBar.add(menu); 45: JMenuItem item = new JMenuItem("Open..."); 46: menu.add(item); 47: 48: item.addActionListener(new ActionListener() { 49: public void actionPerformed(ActionEvent ae) { 50: JFileChooser fc = new JFileChooser("."); 51: int choice = fc.showOpenDialog(frame); 52: if (choice == JFileChooser.APPROVE_OPTION) { 53: File f = fc.getSelectedFile(); 54: try { 55: canvas.setURI(f.toURL().toString()); 56: } catch (IOException ex) { 57: ex.printStackTrace(); 58: } 59: } 60: } 61: }); 62: item = new JMenuItem("Quit"); 63: menu.add(item); 64: item.addActionListener(new ActionListener () { 65: public void actionPerformed(ActionEvent ae) { 66: System.exit(0); 67: } 68: }); 69: } 70: 71: public JComponent createComponents() { 72: final JPanel panel = new JPanel(new BorderLayout()); 73: 74: JPanel labelPanel = 75: new JPanel(new FlowLayout(FlowLayout.LEFT)); 76: labelPanel.add(label); 77: labelPanel.add(new JLabel(" ")); 78: 79: panel.add("North", labelPanel); 80: panel.add("Center", canvas); 81: 82: return panel; 83: } 84: 85: public static void main(String[] args) { 86: JFrame f = new JFrame("Batik"); 87: RestrictedBrowser app = new RestrictedBrowser(f); 88: app.addMenuBar(); 89: f.getContentPane().add(app.createComponents()); 90: 91: f.addWindowListener(new WindowAdapter() { 92: public void windowClosing(WindowEvent e) { 93: System.exit(0); 94: } 95: }); 96: f.setSize(400, 400); 97: f.setVisible(true); 98: } 99: } The following listing shows an SVG file that references resources from the apache.org, sauria.com, and sun.com domains. If you open this file in the RestrictedBrowser, you’ll see that the first two images render properly and that you get a security exception instead of the third image:
1: <?xml version="1.0" encoding="UTF-8"?> 2: <!DOCTYPE svg PUBLIC "-//W3C//DTD SVG 1.0//EN" 3: "http://www.w3.org/TR/2001/REC-SVG-20010904/DTD/svg10.dtd"> 4: <svg xmlns="http://www.w3.org/2000/svg" 5: xmlns:xlink="http://www.w3.org/1999/xlink" 6: width="400" height="750"> 7: <title>one.svg</title> 8: <desc>Sample SVG File</desc> 9: <g > 10: <a xlink:href="http://xml.apache.org"> 11: <image x="10" y="10" width="220px" height="65px" 12: xlink:href="http://xml.apache.org/images/group-logo.gif"/> 13: </a> 14: <a xlink:href="http://www.sauria.com"> 15: <image x="10" y="200" width="200px" height="213" 16: xlink:href="http://www.sauria.com/images/twl4.jpg"/> 17: </a> 18: <a xlink:href="http://java.sun.com"> 19: <image x="10" y="100" width="38px" height="66px" 20: xlink:href="http://java.sun.com/images/v4_java_logo.gif"/> 21: </a> 22: </g> 23: </svg>
EAN: 2147483647
Pages: 95