5.4 Coding in VB.NET
| We're finally ready to begin writing the actual code, a task more tedious than difficult. The ISmartDocument interface is cumbersome, requiring numerous steps to set up the task pane controls. A bit of planning before beginning to actually write the code can be very beneficial. Here's what you're going to need to know:
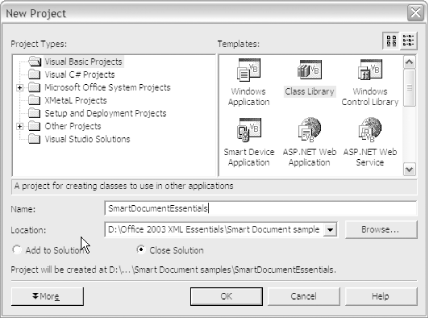
In order to write code that will integrate all of this, we'll review some of the basic features of the Word object model in conjunction with Visual Basic. Each of these specific tasks is explained in more detail below. 5.4.1 Creating a New ProjectCreating a Smart Document project in Visual Studio is a straightforward task. If you are familiar with the Microsoft Office development environment, you might anticipate being able to use Visual Studio Tools for Office to automate the process. Unfortunately, this isn't the case. Visual Studio Tools for Office (VSTO) is basically a set of wizards that facilitate the creation of managed code development projects for Word documents, templates, and Excel spreadsheets. It automatically associates the appropriate Office Primary Interop Assemblies (PIAs) with the project and uses the custom properties dataset to associate the .dll with the actual document. Instead, we'll manually create the project and reference the necessary libraries. The steps below walk you through creating a new Visual Basic project.
The next step is to include the libraries for Word, Smart Tags, and Internet Explorer Controls (the last of which is needed to enable a hypertext link, one of our requisite actions).
Your Solution Explorer pane should look like Figure 5-8. Figure 5-8. Visual Studio .NET Solution Explorer references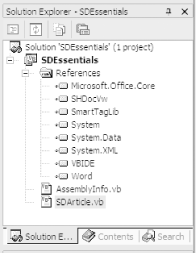 The last bit of setup will make coding a bit simpler. We need to associate the Word and Smart Tag Primary Interop Assemblies (PIAs) with our code. Insert the following two Imports statements into the code window: Imports Microsoft.Office.Interop.SmartTag Imports Word = Microsoft.office.Interop.Word And finally, declare the class for the Smart Document: Public Class ArticleSmartDocument End Class 5.4.2 Declaring ConstantsTo get started, you need to declare a few constants. The first is a constant that references the namespace of the external schema: 'Namespace constant Const cNAMESPACE As String = "http://www.office-xml.com/ns/sdarticle" You also need a constant for each of the elements within the external schema that will have a set of controls associated with it. Remember, which controls are visible is dependent upon the current cursor location. Any controls that are associated with the current element, its parent, or an ancestor will be displayed in the Document Actions task pane. By looking at the ancestry of each of the desired actions, we can determine where best to place the controls. Once again, our requisite actions are as follows:
The first action involves mixed content. It will insert the selected element at the current cursor location; therefore the action should be displayed only if such elements would be valid. Since the only two elements that allow these elements as children are Para and CodeExample, an action will need to be created for each of those two elements. The next action involves inserting block-level structures. These can be inserted at numerous points throughout the document instance; therefore it makes the most sense to place these controls on the Article element where they will always be visible. Similar to inline elements, the Item element is only allowed in one specific context as child of a list. Similarly, VariableEntry is only allowed in a variable list. Separate controls should be created for each of the three list type elements. The boilerplate Warning is another block-level structure; it already contains the actual content of the warning itself. The last two actions do not involve the creation of markup. We'll place those on the root element as well. Table 5-3 lists the actions we'll incorporate in this document.
To define the constants for the individual elements, the element identifier is preceded by a pound (#) symbol and appended to the namespace: 'Element constants Public Const cARTICLE As String = cNAMESPACE & "#Article" Public Const cPARAGRAPH As String = cNAMESPACE & "#Para" Public Const cCODE As String = cNAMESPACE & "#CodeExample" Public Const cBULLET_LIST As String = cNAMESPACE & "#BulletList" Public Const cNUMBER_LIST As String = cNAMESPACE & "#NumberList" Public Const cVARIABLE_ENTRY As String = cNAMESPACE & "#VariableEntry"
The last constant defines the number of elements in our schema that will have controls associated with them; this is simply a tally of the constants defined earlier: 'Number of types (or element constants) Const cTYPES As Integer = 6 5.4.2.1 The ISmartDocument interfaceIn order to access the ISmartDocument interface, it must first be implemented in the class: Implements ISmartDocument All members of the interface must be implemented, whether or not they will actually be used. Omission is considered a syntax error. In Visual Studio .NET 2003, merely entering the above line will automatically add each member to the code window. If you are using Visual Studio .NET 2002, you will need to manually add each member. Visual Studio .NET 2003 adds each of the requisite interfaces in alphabetical order; Table 5-4 shows them in order of completion.
5.4.2.2 SmartDoc Initialization and FoundationsThe first few members of the ISmartDocument that you'll need to deal with handle initialization and basic setup. 5.4.2.2.1 SmartDocInitializeAny actions that need to be run when a Smart Document is opened or attached, such as initializing variables, should be called here. In our sample application, we do not have any required actions on initialize other than to set a constant to the installation path of the Smart Document components. This will allow future references to file components without having to explicitly identify the absolute path: Public Sub SmartDocInitialize(ByVal ApplicationName As String, _ ByVal Document As Object, ByVal SolutionPath As String, _ ByVal SolutionRegKeyRoot As String) _ Implements Microsoft.Office.Interop.SmartTag.ISmartDocument.SmartDocInitialize ' set strPath to installation path strPath = SolutionPath & "\" End Sub Remember the long list of items to gather before you actually begin to code your Smart Document actions? Here's where they get put to good use as part of the tedious process required to set up the Smart Document task pane and tell the application when each control should be displayed. 5.4.2.2.2 SmartDocXMLTypeCountThis is the first property that must be defined. It specifies the number of elements defined in the schema that will have controls associated with them. This value is passed to SmartDocXMLTypeName. Since we created a constant earlier, we can simply return its value: Public ReadOnly Property SmartDocXmlTypeCount( ) As Integer _ Implements Microsoft.Office.Interop.SmartTag.ISmartDocument.SmartDocXmlTypeCount Get Return cTYPES End Get End Property 5.4.2.2.3 SmartDocXMLTypeNameOnce the number of control sets has been defined, each one must now be assigned a name, which will be used to reference the control set in the other properties. The names themselves are arbitrary: Public ReadOnly Property SmartDocXmlTypeName(ByVal XMLTypeID As Integer) As String_ Implements Microsoft.Office.Interop.SmartTag.ISmartDocument.SmartDocXmlTypeName Get Select Case XMLTypeID Case 1 'element Article Return cARTICLE Case 2 'element Para Return cPARAGRAPH Case 3 'element CodeExample Return cCODE_EXAMPLE Case 4 'element BulletList Return cBULLET_LIST Case 5 'element NumberList Return cNUMBER_LIST Case 6 'element VariableEntry Return cVARIABLE_ENTRY End Select End Get End Property 5.4.2.2.4 SmartDocXMLTypeCaptionWhile the name assigned in SmartDocXMLTypeName will be used by the actual code, the caption is what will be displayed in the Document Actions task pane formatted as a bold heading over the individual controls: Public ReadOnly Property SmartDocXmlTypeCaption(ByVal XMLTypeID As Integer, _ ByVal LocaleID As Integer) As String _ Implements Microsoft.Office.Interop.SmartTag.ISmartDocument.SmartDocXmlTypeCaption Get Select Case XMLTypeID Case 1 'element Article Return "Article" Case 2 'element Para Return "Character Formatting (Paragraph)" Case 3 'element CodeExample Return "Character Formatting (Code Block)" Case 4 'element BulletList Return "Bulleted List Items" Case 5 'element NumberList Return "Numbered List Items" Case 6 'element VariableEntry Return "Variable List Items" End Select End Get End Property A caption must be created for each Case defined earlier. The caption should be something that will be meaningful to your end users.
The next few members of the ISmartDocument interface are about managing GUI components, called controls. 5.4.2.2.5 ControlCountThe ControlCount property defines how many individual controls will be used in each of the defined cases. For each of the list elements only one control is needed; the appropriate option will be chosen and the action will be taken immediately. In the inline scenario (for both paragraphs and code blocks) we'll need three: a text box, a choice group, and a submit button. We'll need four for the root element: one for the block templates, one for the hypertext link, one for the logo insertion, and one for the insertion of boilerplate text. There are two additional controls that can be added to each element set: a separator and help content. While not absolutely necessary, displaying help in the Document Actions task pane will provide the end user with an easily accessible reference: Public ReadOnly Property ControlCount(ByVal XMLTypeName As String) As Integer _ Implements Microsoft.Office.Interop.SmartTag.ISmartDocument.ControlCount Get Select Case XMLTypeID Case cARTICLE Return 6 Case cPARAGRAPH Return 5 Case cCODE_EXAMPLE Return 5 Case cBULLET_LIST Return 3 Case cNUMBER_LIST Return 3 Case cVARIABLE_ENTRY Return 3 End Select End Get End Property 5.4.2.2.6 ControlIDUnique IDs must be assigned to each control in the task pane. This is important because it is common to have more than one set of controls active at any point in time. Assigning IDs is a two-step process. The first step is to associate a range of IDs with each element. The ControlIndex will always start with 1. Here we just increment each additional control set by 100: Public ReadOnly Property ControlID(ByVal XMLTypeName As String, _ ByVal ControlIndex As Integer) As Integer _ Implements Microsoft.Office.Interop.SmartTag.ISmartDocument.ControlID Get Select Case XMLTypeName Case cARTICLE Return ControlIndex Case cPARAGRAPH Return ControlIndex + 100 Case cCODE_EXAMPLE Return ControlIndex + 200 Case cBULLET_LIST Return ControlIndex + 300 Case cNUMBER_LIST Return ControlIndex + 400 Case cVARIABLE_ENTRY Return ControlIndex + 500 Case Else Return 0 End Select End Get End Property 5.4.2.2.7 ControlNameFromIDThe next step is to associate each individual control with a unique ID, based on the values declared above. We don't have to list each and every name/ID pair; this method will take care of it for us: Public ReadOnly Property ControlNameFromID(ByVal ControlID As Integer) As String _ Implements Microsoft.Office.Interop.SmartTag.ISmartDocument.ControlNameFromID Get Return cNAMESPACE & ControlID.ToString End Get End Property 5.4.2.2.8 ControlCaptionFromIDNow that each control has a unique ID, individual captions can be defined: Public ReadOnly Property ControlCaptionFromID(ByVal ControlID As Integer, _ ByVal ApplicationName As String, ByVal LocaleID As Integer, _ ByVal Text As String, ByVal Xml As String, ByVal Target As Object) As String _ Implements Microsoft.Office.Interop.SmartTag.ISmartDocument.ControlCaptionFromID Get Select Case ControlID 'element Article Case 1 Return "Insert Authoring Templates" Case 2 Return "Insert Logo" Case 3 Return "Access our Web Site" Case 4 Return "Insert Warnings" Case 5 Return "Separator" Case 6 Return "Help" 'element Para Case 101 Return "Enter word or phrase" Case 102 Return "Select formatting style" Case 103 Return "INSERT" Case 104 Return "Separator" Case 105 Return "Help" 'element CodeExample Case 201 Return "Enter word or phrase" Case 202 Return "Select formatting style" Case 203 Return "INSERT" Case 204 Return "Separator" Case 205 Return "Help" 'element BulletList Case 301 Return "INSERT" Case 302 Return "Separator" Case 303 Return "Help" 'element NumberList Case 401 Return "INSERT" Case 402 Return "Separator" Case 403 Return "Help" 'element VariableEntry Case 501 Return "INSERT" Case 502 Return "Separator" Case 503 Return "Help" End Select End Get End Property Captions on individual controls are most often displayed directly above the control, captions for text boxes are displayed to the left, and captions for buttons are displayed on the actual button. In the case of an ActiveX control, the return value would be set to the GUID (Global Unique Identifier) of the control.
5.4.2.2.9 ControlTypeFromIDThe last step in defining the controls is to identify the specific type of control to be associated with each unique ID. There are 15 control types:
This gives the developer a number of choices for designing the look and feel of the Document Actions task pane. While it is possible to use all 15 control types in a single Smart Document solution, it isn't recommended. In particular, check boxes, combo boxes, list boxes, and radio groups can all be applied to similar use cases.Choose one of these four choice types and use it consistently throughout the application. The ability to add ActiveX controls extends the possibilities available to the developer. There are hundreds of ActiveX controls available from Microsoft and third-party developers, or you can custom-build your own. Using ActiveX controls in Smart Documents can be a bit tricky, as they often do not behave as expected. If you are new to the world of Microsoft application development, you may want to stick with the other control types until you become more familiar with some of the intricacies of ActiveX objects. Public ReadOnly Property ControlTypeFromID(ByVal ControlID As Integer, _ ByVal ApplicationName As String, ByVal LocaleID As Integer) _ As Microsoft.Office.Interop.SmartTag.C_TYPE _ Implements Microsoft.Office.Interop.SmartTag.ISmartDocument.ControlTypeFromID Get Select Case ControlID 'element Article Case 1 Return C_TYPE.C_TYPE_RADIOGROUP Case 2 Return C_TYPE.C_TYPE_IMAGE Case 3 Return C_TYPE.C_TYPE_LINK Case 4 Return C_TYPE.C_TYPE_DOCUMENTFRAGMENTURL Case 5 Return C_TYPE.C_TYPE_SEPARATOR Case 6 Return C_TYPE.C_TYPE_HELPURL 'element Para Case 101 Return C_TYPE.C_TYPE_TEXTBOX Case 102 Return C_TYPE.C_TYPE_LISTBOX Case 103 Return C_TYPE.C_TYPE_BUTTON Case 104 Return C_TYPE.C_TYPE_SEPARATOR Case 105 Return C_TYPE.C_TYPE_HELPURL 'element CodeExample Case 201 Return C_TYPE.C_TYPE_TEXTBOX Case 202 Return C_TYPE.C_TYPE_COMBO Case 203 Return C_TYPE.C_TYPE_BUTTON Case 204 Return C_TYPE.C_TYPE_SEPARATOR Case 205 Return C_TYPE.C_TYPE_HELPURL 'element BulletList Case 301 Return C_TYPE.C_TYPE_CHECKBOX Case 302 Return C_TYPE.C_TYPE_SEPARATOR Case 303 Return C_TYPE.C_TYPE_HELP 'element NumberList Case 401 Return C_TYPE.C_TYPE_CHECKBOX Case 402 Return C_TYPE.C_TYPE_SEPARATOR Case 403 Return C_TYPE.C_TYPE_HELP 'element VariableEntry Case 501 Return C_TYPE.C_TYPE_CHECKBOX Case 502 Return C_TYPE.C_TYPE_SEPARATOR Case 503 Return C_TYPE.C_TYPE_HELP End Select End Get End Property 5.4.2.3 Populating controlsNow that each of the individual controls has a unique identifier, a caption, and a type, the contents of the individual controls can be populated. There are multiple methods involved, each one focused on a specific type (or types) of control. The ISmartDocProperties interface is a common set of key/value pairs that can be used to control the appearance of the Document Actions task pane. They are accessed via the Populate methods. The only method applicable to ISmartDocProperties is the write method, which is set through the use of key/value pairs: Props.Write("Expanded", "False")Table 5-5 lists the properties you can set with the write method and what they do.
5.4.2.3.1 PopulateActiveXPropsThis method allows the developer to set the display parameters for each ActiveX control used in the solution. Custom properties (that is, those other than defined for the ISmartdDocProperties interface, above) can be accessed by using the appropriate key/value combinations as defined in the control: Props.Write(Key:="Special", Value:="200") 5.4.2.3.2 PopulateCheckboxA checkbox allows the end user to select an individual control. Three controls have been defined as C_TYPE_CHECKBOX; the checked parameter indicates the initial state for the checkbox. The text that appears next to the checkbox is set in the ControlCaptionFromID method. There are no additional formatting properties associated with the checkboxes. Public Sub PopulateCheckbox(ByVal ControlID As Integer, _ ByVal ApplicationName As String, ByVal LocaleID As Integer, _ ByVal Text As String, ByVal Xml As String, ByVal Target As Object, _ ByVal Props As Microsoft.Office.Interop.SmartTag.ISmartDocProperties, _ ByRef Checked As Boolean) _ Implements Microsoft.Office.Interop.SmartTag.ISmartDocument.PopulateCheckbox Select Case ControlID Case 301 Checked = False Case 401 Checked = False Case 501 Checked = False End Select End Sub 5.4.2.3.3 PopulateDocumentFragmentA document fragment can be expressed directly in the code, or it can be incorporated via a URL reference. In most applications it is preferred to leave such fragments external to the code itself; this will allow for quick and easy modifications to the fragments that would otherwise require the code itself to be modified, recompiled, and distributed. External document fragments must contain valid WordML document instances; they can be created either by transforming existing XML instances into the necessary merged fragments or created directly in Office 2003 and saved as .xml. In an effort to optimize space in the Document Actions task pane, fragments can be displayed or collapsed. By default, fragments will be displayed. The example code below uses properties of the ISmartDocProperties interface to set the display option to false.
Public Sub PopulateDocumentFragment(ByVal ControlID As Integer, _ ByVal ApplicationName As String, ByVal LocaleID As Integer, _ ByVal Text As String, ByVal Xml As String, ByVal Target As Object, _ ByVal Props As Microsoft.Office.Interop.SmartTag.ISmartDocProperties, _ ByRef DocumentFragment As String) _ Implements _ Microsoft.Office.Interop.SmartTag.ISmartDocument.PopulateDocumentFragment Select Case ControlID Case 4 'url DocumentFragment = strPath & "warning.xml" Props.Write("Expanded", "False") End Select End Sub5.4.2.3.4 PopulateHelpContentHelp provides online documentation for the knowledge worker. It can be collapsed in order to preserve real estate, but should not be omitted. Formatting is done with XHTML and CSS. Help text can either be coded directly in your program or can be maintained in separate files and referenced via a URL. When using the C_TYPE_HELPURL, the location must be an absolute path. Similar to document fragments, by default help content is expanded in the Document Actions Task Pane. It can be collapsed by setting the property key ExpandHelp to False.
Public Sub PopulateHelpContent(ByVal ControlID As Integer, _ ByVal ApplicationName As String, ByVal LocaleID As Integer, _ ByVal Text As String, ByVal Xml As String, ByVal Target As Object, _ ByVal Props As Microsoft.Office.Interop.SmartTag.ISmartDocProperties, _ ByRef Content As String) _ Implements Microsoft.Office.Interop.SmartTag.ISmartDocument.PopulateHelpContent Select Case ControlID Case 6 'url Content = strPath & "article.htm" Props.Write("ExpandHelp", "False") Case 105 'url Content = strPath & "para.htm" Props.Write("ExpandHelp", "False") Case 205 'url Content = strPath & "code.htm" Props.Write("ExpandHelp", "False") Case 303 'inline Content = "<html><body><p>Click in the box to add a new" & _ "item to the list.</p></body></html>" Case 403 'inline Content = "<html><body><p>Click in the box to add a new" & _ "item to the list.</p></body></html>" Case 503 'inline Content = "<html><body><p>Click in the box to add a new" & _ "item to the list.</p></body></html>" End Select End Sub5.4.2.3.5 PopulateImageImages can be displayed in the task pane and either incorporated into the document instance or used to activate a control. Similar to help and document fragments, the path given must be an absolute path. Public Sub PopulateImage(ByVal ControlID As Integer, _ ByVal ApplicationName As String, ByVal LocaleID As Integer, _ ByVal Text As String, ByVal Xml As String, ByVal Target As Object, _ ByVal Props As Microsoft.Office.Interop.SmartTag.ISmartDocProperties, _ ByRef ImageSrc As String) _ Implements Microsoft.Office.Interop.SmartTag.ISmartDocument.PopulateImage Select Case ControlID Case 2 ImageSrc = strPath & "cover.jpg" End Select End Sub 5.4.2.3.6 PopulateListOrComboContentFor each control defined as either a list box (displayed as a box showing each selection on an individual line) or combo box (displayed as a drop-down list), the number of items must be declared along with the text to be associated with each item. Setting the InitialSelected property to -1 ensures that no action will be selected by default. Public Sub PopulateListOrComboContent(ByVal ControlID As Integer, _ ByVal ApplicationName As String, ByVal LocaleID As Integer, _ ByVal Text As String, ByVal Xml As String, ByVal Target As Object, _ ByVal Props As Microsoft.Office.Interop.SmartTag.ISmartDocProperties, _ ByRef List As System.Array, ByRef Count As Integer, _ ByRef InitialSelected As Integer) _ Implements _ Microsoft.Office.Interop.SmartTag.ISmartDocument.PopulateListOrComboContent Select Case ControlID Case 102 'listbox Count = 5 List(1) = "Bold" List(2) = "Italic" List(3) = "Underscore" List(4) = "Superscript" List(5) = "Subscript" InitialSelected = -1 Case 202 'combo box Count = 5 List(1) = "Bold" List(2) = "Italic" List(3) = "Underscore" List(4) = "Superscript" List(5) = "Subscript" InitialSelected = -1 End Select End Sub 5.4.2.3.7 PopulateOtherWhile the separator and label controls don't really do anything, they provide visual clues to the end user. A liberal sprinkling throughout is highly recommended. PopulateOther allows display options to be set for each of the control types that do not have their own Populate method buttons, labels, links, and separators. Public Sub PopulateOther(ByVal ControlID As Integer, _ ByVal ApplicationName As String, ByVal LocaleID As Integer, _ ByVal Text As String, ByVal Xml As String, ByVal Target As Object, _ ByVal Props As Microsoft.Office.Interop.SmartTag.ISmartDocProperties) _ Implements Microsoft.Office.Interop.SmartTag.ISmartDocument.PopulateOther Select Case ControlID Case 3 'link Case 5 'separator Case 104 'separator Case 204 'separator Case 302 'separator Case 402 'separator Case 502 'separator Case 103 'button Case 203 'button End Select End Sub 5.4.2.3.8 PopulateRadioGroupAnother method for presenting a choice list to the end user is via a radio group. The user selects the specific option by clicking on the appropriate radio button. Again, InitialSelected is set to -1 to ensure that the list will not have any option set by default. Public Sub PopulateRadioGroup(ByVal ControlID As Integer, _ ByVal ApplicationName As String, ByVal LocaleID As Integer, _ ByVal Text As String, ByVal Xml As String, ByVal Target As Object, _ ByVal Props As Microsoft.Office.Interop.SmartTag.ISmartDocProperties, _ ByRef List As System.Array, ByRef Count As Integer, _ ByRef InitialSelected As Integer) _ Implements Microsoft.Office.Interop.SmartTag.ISmartDocument.PopulateRadioGroup Select Case ControlID Case 1 Count = 7 List(1) = "Paragraph" List(2) = "Code Block" List(3) = "Numbered List" List(4) = "Bulleted List" List(5) = "Variable List" List(6) = "Warning" List(7) = "Note" InitialSelected = -1 End Select End Sub 5.4.2.3.9 PopulateTextboxContentText boxes allow the end user to enter text that is then returned to the Smart Document application for further processing. In the sample application, text boxes are used to input inline content that is to have special markup associated with it, such as emphasis, superscript, or subscript. PopulateTextboxContent will automatically supply default information in the text box, such as a formatting template for a telephone number or date. 5.4.2.4 Defining document actionsWe have finally reached the point in the process where we begin to actually do something, or at least write the code that will allow the end user to cause an event to fire through the Document Actions task pane. Here's where the Word Object Model will be put to use. Once each of the controls has been defined and populated, the actions can be programmed. While it would have been more intuitive to have each method align with its populate counterpart, the developer is left to reconcile the differences. For practical purposes, some methods are often intentionally left blank. Refer to Figure 5-4 for a glimpse at the Document Actions task pane. 5.4.2.4.1 Adding a graphic: the ImageClick methodThe ImageClick method is used to define the action to be taken when the user selects an image displayed in the task pane. The code below will insert the image into the document itself. Since there are no positioning parameters specified, it will automatically be placed according to the AutoShapeDefaults parameters as defined in the template. The single line of code that does all of the work uses the Word Object Model to add a picture to the shapes collection of the active document. Public Sub ImageClick(ByVal ControlID As Integer, _ ByVal ApplicationName As String, ByVal Target As Object, _ ByVal Text As String, ByVal Xml As String, ByVal LocaleID As Integer, _ ByVal XCoordinate As Integer, ByVal YCoordinate As Integer) _ Implements Microsoft.Office.Interop.SmartTag.ISmartDocument.ImageClick Dim strImage As String Select Case ControlID Case 2 strImage = strPath & "cover.jpg" Target.Application.ActiveDocument.Shapes.AddPicture(strImage) End Select End Sub Figure 5-9 shows the result of clicking on the image in the Document Actions task pane. It has been positioned according to the parameters defined for image placement. Figure 5-9. Document Template after the image has been inserted The next item on our list of actions is to apply markup and style to inline components (superscript, subscript, bold, italic, underscore, and code). This requires three separate actions: capturing the contents of the text box, capturing the specific type of formatting selected through either the list or combo box, and inserting the appropriate markup, text, and style information when the user clicks on the Insert button. 5.4.2.4.2 OnTextboxContentChangeWhenever a user enters content into the textbox, this method will be activated. We need to capture any content entered into textbox into a variable so we can insert it into the document later. There are two textboxes defined one used to insert inline elements in paragraphs, and a second used to insert inline elements in code blocks. First, two variables must be defined: Dim varCodeText As String Dim varParaText As String Now the contents of the text box can be stored for later use by using those variable names. Of course, you could just insert it into the document instance at this point, or use the results to trigger some other action. Public Sub OnTextboxContentChange(ByVal ControlID As Integer, _ ByVal Target As Object, ByVal Value As String) _ Implements Microsoft.Office.Interop.SmartTag.ISmartDocument.OnTextboxContentChange Select Case ControlID Case 101 'para inlines varParaText = Value Case 201 'code inlines varCodeText = Value End Select End Sub 5.4.2.4.3 OnListOrComboSelectChangeThe next piece in our three-piece control is the results of the choice list presented to the end user. After entering text, the user must choose one of the several possible inline types to be applied to the text. Selecting one of the options will cause this event to fire. We'll need another variable: Dim varSelect As String For each possible choice, we need to set the varSelect variable to a value that we can test on in our final step: Public Sub OnListOrComboSelectChange(ByVal ControlID As Integer, _ ByVal Target As Object, ByVal Selected As Integer, ByVal Value As String) _ Implements _ Microsoft.Office.Interop.SmartTag.ISmartDocument.OnListOrComboSelectChange Select Case ControlID Case 102 'format options If Value = "Bold" Then varSelect = "bold" ElseIf Value = "Italic" Then varSelect = "italic" ElseIf Value = "Underscore" Then varSelect = "underscore" ElseIf Value = "Superscript" Then varSelect = "superscript" ElseIf Value = "Subscript" Then varSelect = "subscript" End If Case 202 'format options If Value = "Bold" Then varSelect = "bold" ElseIf Value = "Italic" Then varSelect = "italic" ElseIf Value = "Underscore" Then varSelect = "underscore" ElseIf Value = "Superscript" Then varSelect = "superscript" ElseIf Value = "Subscript" Then varSelect = "subscript" End If End Select End Sub 5.4.2.4.4 InvokeControlThe InvokeControl method applies to buttons, hyperlinks, and document fragments. There are two buttons, one hyperlink, and one fragment that must be defined. The buttons used in combination with text boxes and choice lists are the third piece to the inlines puzzle. The only action taken in the first two steps was to capture the values into variables. Again, we will need some new variables, this time defined as XML nodes in the Word object model: Dim oBoldNode As Word.XMLNode Dim oItalicNode As Word.XMLNode Dim oUnderscoreNode As Word.XMLNode Dim oSubscriptNode As Word.XMLNode Dim oSuperscriptNode As Word.XMLNode First, we have to define the current cursor location as a selection. The next step is to test for the value of the variable associated with the choice list. Once a match is found, the Add method is used to insert the appropriate element name. The element node is then defined as a range (which includes both the start and end tags and any content), and the text that was originally entered in the text box is inserted. The last step is to apply the appropriate character style to the content.
Note that bold, italic, and underscore all resolve to a single element, emphasis. Rather than having three distinct elements, the role attribute is used instead. It has three possible values defined: bold, italic, and underscore. By selecting the Attributes property of the XMLNode, attribute values can be populated without additional user intervention. Case 103 'para Dim oWordRange As Word.Range = CType(Target, Word.Range) Dim localRange As Word.Range = CType(Target, Word.Range) Dim selection As Word.Selection = _ localRange.Application.ActiveWindow.Selection If varSelect = "bold" Then oBoldNode = selection.XMLNodes.Add("Emphasis", cNAMESPACE) oWordRange = oBoldNode.Range oBoldNode.Range.Text = varParaText oBoldNode.Attributes.Add("role", "") oBoldNode.SelectSingleNode("@role", "").NodeValue = "bold" oBoldNode.Range.Style = "Bold" ElseIf varSelect = "italic" Then oItalicNode = selection.XMLNodes.Add("Emphasis", cNAMESPACE) oWordRange = oItalicNode.Range oItalicNode.Range.Text = varParaText oItalicNode.Attributes.Add("role", "") oItalicNode.SelectSingleNode("@role", "").NodeValue = "italic" oItalicNode.Range.Style = "Italic" ElseIf varSelect = "underscore" Then oUnderscoreNode = selection.XMLNodes.Add("Emphasis", cNAMESPACE) oWordRange = oUnderscoreNode.Range oUnderscoreNode.Range.Text = varParaText oUnderscoreNode.Attributes.Add("role", "") oUnderscoreNode.SelectSingleNode("@role", "").NodeValue = "underscore" oUnderscoreNode.Range.Style = "Underscore" ElseIf varSelect = "superscript" Then oSuperscriptNode = selection.XMLNodes.Add("Superscript", cNAMESPACE) oWordRange = oSuperscriptNode.Range oSuperscriptNode.Range.Text = varParaText oSuperscriptNode.Range.Style = "Superscript" ElseIf varSelect = "subscript" Then oSubscriptNode = selection.XMLNodes.Add("Subscript", cNAMESPACE) oWordRange = oSubscriptNode.Range oSubscriptNode.Range.Text = varParaText oSubscriptNode.Range.Style = "Subscript" End If Case 203 'code Dim oWordRange As Word.Range = CType(Target, Word.Range) Dim localRange As Word.Range = CType(Target, Word.Range) Dim selection As Word.Selection = _ localRange.Application.ActiveWindow.Selection If varSelect = "bold" Then oBoldNode = selection.XMLNodes.Add("Emphasis", cNAMESPACE) oWordRange = oBoldNode.Range oBoldNode.Range.Text = varCodeText oBoldNode.Attributes.Add("role", "") oBoldNode.SelectSingleNode("@role", "").NodeValue = "bold" oBoldNode.Range.Style = "Bold" ElseIf varSelect = "italic" Then oItalicNode = selection.XMLNodes.Add("Emphasis", cNAMESPACE) oWordRange = oItalicNode.Range oItalicNode.Range.Text = varCodeText oItalicNode.Attributes.Add("role", "") oItalicNode.SelectSingleNode("@role", "").NodeValue = "italic" oItalicNode.Range.Style = "Italic" ElseIf varSelect = "underscore" Then oUnderscoreNode = selection.XMLNodes.Add("Emphasis", cNAMESPACE) oWordRange = oUnderscoreNode.Range oUnderscoreNode.Range.Text = varCodeText oUnderscoreNode.Attributes.Add("role", "") oUnderscoreNode.SelectSingleNode("@role", "").NodeValue = "underscore" oUnderscoreNode.Range.Style = "Underscore" ElseIf varSelect = "superscript" Then oSuperscriptNode = selection.XMLNodes.Add("Superscript", cNAMESPACE) oWordRange = oSuperscriptNode.Range oSuperscriptNode.Range.Text = varCodeText oSuperscriptNode.Range.Style = "Superscript" ElseIf varSelect = "subscript" Then oSubscriptNode = selection.XMLNodes.Add("Subscript", cNAMESPACE) oWordRange = oSubscriptNode.Range oSubscriptNode.Range.Text = varCodeText oSubscriptNode.Range.Style = "Subscript" End IfThe end result of all of this code is shown in Figure 5-10. Here the user has entered the word "new" in the textbox, and selected the style "Italic" from the list displayed. Figure 5-11 shows the results of clicking the INSERT button. The text has been inserted in the paragraph, the attribute value has been set, and the appropriate style has been applied. Figure 5-10. Document Actions with content and formatting selected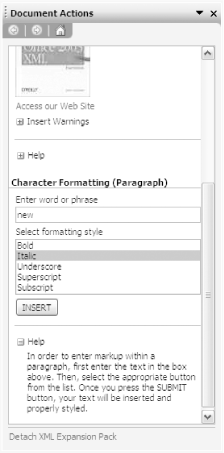 Figure 5-11. Document template with new content added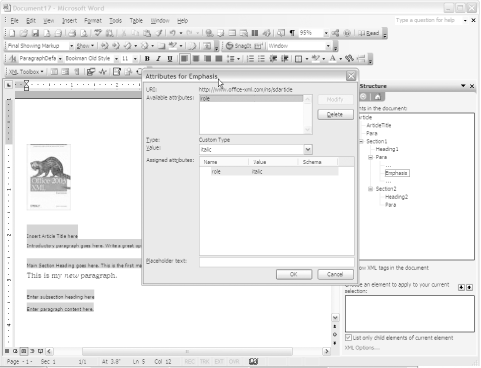 The actions associated with the hyperlink and document fragment are to be executed upon selection. Let's start with the hyperlink. While it looks like a hyperlink in the task pane, it isn't really. At least not yet. We need some code that will do the navigating when the "link" is clicked. The following code implements the Internet Explorer Navigate method to open a browser window and load the O'Reilly home page: Public Sub InvokeControl(ByVal ControlID As Integer, _ ByVal ApplicationName As String, ByVal Target As Object, _ ByVal Text As String, ByVal Xml As String, ByVal LocaleID As Integer) _ Implements Microsoft.Office.Interop.SmartTag.ISmartDocument.InvokeControl Dim objNav As SHDocVw.InternetExplorer Select Case ControlID Case 3 objNav = New SHDocVw.InternetExplorer objNav.Navigate("http://www.oreilly.com") objNav.Visible = True 'more to follow here End Select End SubThe last piece of our InvokeControl routine is to insert a selected document fragment. Word will display the first page of any document fragment in the task pane. An alternative approach is to specify one file to use in the task pane display, and another for the actual fragment to be inserted. Note in Figure 5-12 that the style associated with the Warning is indented; the task pane also displays this style, making it a bit difficult to read without having to adjust the horizontal positioning of the task pane. An alternate view could be created that does not reference the indented style, making it easier for the end user to read. Figure 5-12. Document template with warning boilerplate inserted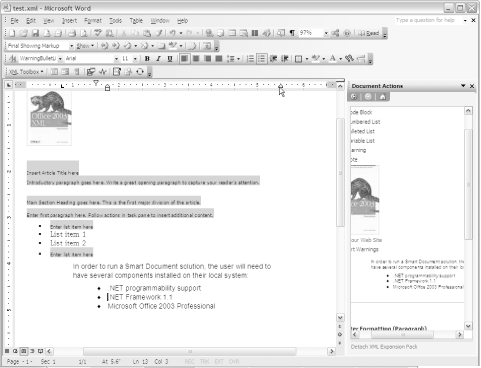 5.4.2.4.5 OnCheckboxChangeWhenever a user clicks on a checkbox, it will activate the OnCheckboxChange method. Our sample application uses a checkbox to indicate when the user would like to insert a new item into an existing list. Since there are three types of lists (BulletList, NumberList, and VariableList) and we want to limit when the control is displayed on the task pane, they have each been defined separately and will display only when the cursor is currently located within one of these three elements. For both BulletList and NumberList, we need to add an Item element along with a child Para element. Variable lists have a VariableEntry child, which in turn contains a Term and Definition pair. The definition element requires at least one Para. There is also paragraph-level formatting that must be applied to ensure that the new content is displayed properly. BulletListItem, NumberListItem, and VariableListEntry are defined in the template for this purpose. The following routine begins by setting the variable node to the element of the current cursor location. The XMLParentNode is a bit deceiving; we're really looking for the name of the current element, but that's the way it works. Once we have the XMLNode selected, we then test where we are, move up the tree if required, and finally arrive at the BulletList element. The range is then collapsed back to a single cursor location and the Item element is added. Before moving on, we insert a paragraph marker. This will move the new list entry onto a new line. We don't have to set the style since it will automatically carry over the style from the previous paragraph. The range is again collapsed and the Para element is inserted. The last step is to add placeholder text for the end user: Public Sub OnCheckboxChange(ByVal ControlID As Integer, _ ByVal Target As Object, ByVal Checked As Boolean) _ Implements Microsoft.Office.Interop.SmartTag.ISmartDocument.OnCheckboxChange Select Case ControlID Case 301 'bullet list Dim range As Word.Range = CType(Target, Word.Range) Dim selection As Word.Selection = _ range.Application.ActiveWindow.Selection Dim node As Word.XMLNode = selection.XMLParentNode If node.BaseName = "Para" Then node = node.ParentNode End If If node.BaseName = "Item" Then node = node.ParentNode End If If node.BaseName = "BulletList" Then range.SetRange(node.Range.End, node.Range.End) node = range.XMLNodes.Add("Item", cNAMESPACE) range.InsertParagraphBefore( ) range.SetRange(node.Range.End, node.Range.End) node = range.XMLNodes.Add("Para", cNAMESPACE) node.PlaceholderText = "Enter list item here" End If End Select End SubThe results will look like Figure 5-13. Figure 5-13. Template with bulleted list inserted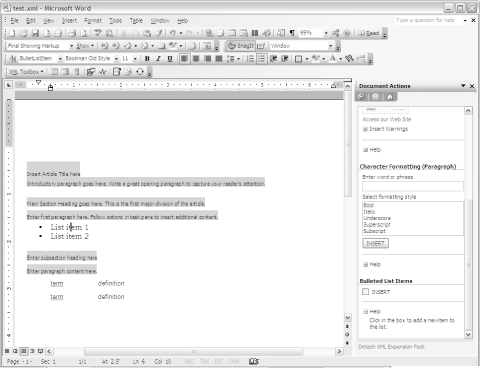 The routine for numbered lists is basically the same and is not listed here (but is included in the sample code available for download). The variable list entry, however, has an extra step or two. First, there are more elements in the tree to test and ascend. Next, there are two child elements of VariableEntry: Term and Definition. Definition contains a required child Para element. And both Term and Para should have placeholder text added: Select Case ControlID Case 501 'variable list Dim range As Word.Range = CType(Target, Word.Range) Dim selection As Word.Selection = _ range.Application.ActiveWindow.Selection Dim node As Word.XMLNode = selection.XMLParentNode Dim Nnode As Word.XMLNode = selection.XMLParentNode If node.BaseName = "Para" Then node = node.ParentNode End If If node.BaseName = "Definition" Then node = node.ParentNode End If If node.BaseName = "Term" Then node = node.ParentNode End If If node.BaseName = "VariableEntry" Then node = node.ParentNode End If If node.BaseName = "VariableList" Then range.SetRange(node.Range.End, node.Range.End) node = range.XMLNodes.Add("VariableEntry", cNAMESPACE) range.InsertParagraphBefore( ) range.SetRange(node.Range.End, node.Range.End) Nnode = range.XMLNodes.Add("Term", cNAMESPACE) Nnode.PlaceholderText = "Enter term here" range.SetRange(node.Range.End, node.Range.End) node = range.XMLNodes.Add("Definition", cNAMESPACE) range.SetRange(node.Range.End, node.Range.End) node = range.XMLNodes.Add("Para", cNAMESPACE) node.PlaceholderText = "Enter definition here" End If End Select End SubThis code will produce results like those shown in Figure 5-14. Figure 5-14. Template with an additional variable list entry inserted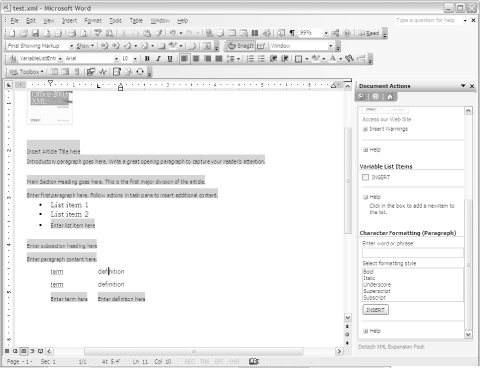 5.4.2.4.6 OnRadioGroupSelectChangeOur authoring templates for block-level items are associated with radio buttons. Whenever a user clicks on a radio button, it will become selected and the OnRadioGroupSelectChange method will be activated. As with the list or combo box, the appropriate selection must be identified from the set of options presented to the end user. The code necessary to accomplish the set of tasks defined in the radio group control is more complex than the previous examples. In order to code for these tasks, a combination of methods will need to be employed, including the possible use of XPath, testing for valid children, and an additional validation pass before committing the results back to the end user. Alternatively, the conditions could be narrowed, resulting in an easier coding implementation. However, that would most likely result in severely hampering the Document Actions task pane with numerous controls and excessive refreshes. The code below uses XPath to locate a particular element and then insert the markup as the last node of that element. It also demonstrates how to apply styles. Note that the lists, and particularly the variable list, have numerous children that also need to be inserted. Another approach would be to insert just the first node, and then apply a transform that would supply the remaining children. This method would give you more control over the exact placement of formatting. Public Sub OnRadioGroupSelectChange(ByVal ControlID As Integer, _ ByVal Target As Object, ByVal Selected As Integer, ByVal Value As String) _ Implements _ Microsoft.Office.Interop.SmartTag.ISmartDocument.OnRadioGroupSelectChange Dim range As Word.Range = CType(Target, Word.Range) Dim selection As Word.Selection = range.Application.ActiveWindow.Selection Dim node As Word.XMLNode = range.Document.SelectSingleNode("//ns:Section1", _ "xmlns:ns='" & cNAMESPACE & "'") Select Case ControlID Case 1 'authoring templates If Value = "Paragraph" Then range.SetRange(node.Range.End, node.Range.End) node = range.XMLNodes.Add("Para", cNAMESPACE) range.InsertParagraphBefore( ) node.PlaceholderText = "Enter paragraph here" node.Range.Style = "ParagraphDefault" ElseIf Value = "Code Block" Then range.SetRange(node.Range.End, node.Range.End) node = range.XMLNodes.Add("CodeExample", cNAMESPACE) range.InsertParagraphBefore( ) node.PlaceholderText = "Enter code sample here" node.Range.Style = "CodeBlock" ElseIf Value = "Numbered List" Then range.SetRange(node.Range.End, node.Range.End) node = range.XMLNodes.Add("NumberList", cNAMESPACE) range.InsertParagraphBefore( ) range.SetRange(node.Range.End, node.Range.End) node = range.XMLNodes.Add("Item", cNAMESPACE) range.SetRange(node.Range.End, node.Range.End) node = range.XMLNodes.Add("Para", cNAMESPACE) node.PlaceholderText = "Enter list item here" node.Range.Style = "NumberListItem" ElseIf Value = "Bulleted List" Then range.SetRange(node.Range.End, node.Range.End) node = range.XMLNodes.Add("BulletList", cNAMESPACE) range.InsertParagraphBefore( ) range.SetRange(node.Range.End, node.Range.End) node = range.XMLNodes.Add("Item", cNAMESPACE) range.SetRange(node.Range.End, node.Range.End) node = range.XMLNodes.Add("Para", cNAMESPACE) node.PlaceholderText = "Enter list item here" node.Range.Style = "BulletListItem" ElseIf Value = "Variable List" Then Dim Nnode As Word.XMLNode = selection.XMLParentNode range.SetRange(node.Range.End, node.Range.End) node = range.XMLNodes.Add("VariableList", cNAMESPACE) range.InsertParagraphBefore( ) range.SetRange(node.Range.End, node.Range.End) node = range.XMLNodes.Add("VariableEntry", cNAMESPACE) node.Range.Style = "VariableListEntry" range.SetRange(node.Range.End, node.Range.End) Nnode = range.XMLNodes.Add("Term", cNAMESPACE) Nnode.PlaceholderText = "Enter term here" range.SetRange(node.Range.End, node.Range.End) node = range.XMLNodes.Add("Definition", cNAMESPACE) range.SetRange(node.Range.End, node.Range.End) node = range.XMLNodes.Add("Para", cNAMESPACE) node.PlaceholderText = "Enter definition here" ElseIf Value = "Warning" Then range.SetRange(node.Range.End, node.Range.End) node = range.XMLNodes.Add("Warning", cNAMESPACE) range.InsertParagraphBefore( ) range.SetRange(node.Range.End, node.Range.End) node = range.XMLNodes.Add("Para", cNAMESPACE) node.PlaceholderText = "Enter warning here here" node.Range.Style = "Warning" ElseIf Value = "Note" Then range.SetRange(node.Range.End, node.Range.End) node = range.XMLNodes.Add("Note", cNAMESPACE) range.InsertParagraphBefore( ) range.SetRange(node.Range.End, node.Range.End) node = range.XMLNodes.Add("Para", cNAMESPACE) node.PlaceholderText = "Enter note here" node.Range.Style = "Note" End If End Select End SubThe result of this code is shown in Figures Figure 5-15 and Figure 5-16 Figure 5-15. Document with authoring templates inserted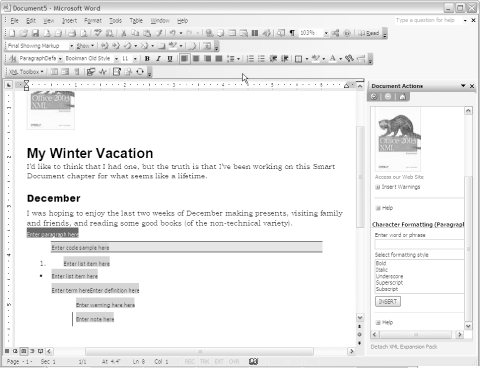 Figure 5-16. Document with authoring templates inserted (tags on)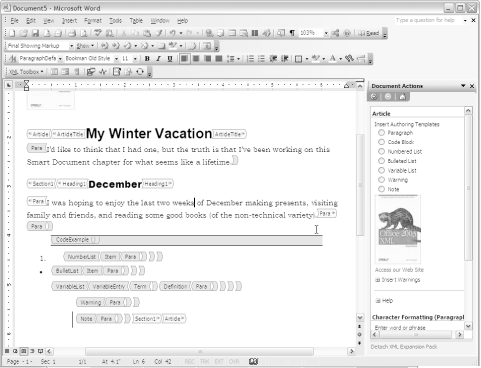 This fairly simple example works well in our sample since we're beginning with a template and then creating a new document. However, if we were editing an existing document, we would most likely want to place the block-level elements at the next valid location in relation to the cursor position. This requires significantly more coding. 5.4.2.4.7 OnPaneUpdateCompleteOur sample did not need to use the OnPaneUpdateComplete method, which is triggered on two separate events: when a document is first opened and the expansion pack loaded, and each time the cursor is placed within a different element. Both of these events cause the task pane to be redrawn; once rendering is complete this method is activated.
5.4.2.5 Associating control types and methodsIn summary, Table 5-6 lists each of the fifteen control types, the method used to populate their contents in the task pane, and the method associated with selection of a specific control.
|

EAN: 2147483647
Pages: 135