| Now you can try a simple example with two HTML pages on your local disk. You'll need your text editor and your web browser for this exercise. Because both the pages you'll work with are on your local disk, you don't need to be connected to the Internet. (Be patient; you'll get to do network stuff in the next section.) Create two HTML pages and save them in separate files. Here's the code for the two HTML files I created for this section, which I called menu.html and claudius.html. What your two pages look like or what they're called really doesn't matter. However, make sure that you insert your own filenames if you're following along with this example. The following is the first file, called menu.html: <!DOCTYPE html PUBLIC "-//W3C//DTD XHTML 1.0 Transitional//EN" "http://www.w3.org/TR/xhtml1/DTD/transitional.dtd"> <html> <head> <title>The Twelve Caesars</title> </head> <body> <h1>"The Twelve Caesars" by Suetonius</h1> <p>Seutonius (or Gaius Suetonius Tranquillus) was born circa A.D. 70 and died sometime after A.D. 130. He composed a history of the twelve Caesars from Julius to Domitian (died A.D. 96). His work was a significant contribution to the best-selling novel and television series "I, Claudius." Suetonius' work includes biographies of the following Roman emperors:</p> <ul> <li>Julius Caesar</li> <li>Augustus</li> <li>Tiberius</li> <li>Gaius (Caligula)</li> <li>Claudius</li> <li>Nero</li> <li>Galba</li> <li>Otho</li> <li>Vitellius</li> <li>Vespasian</li> <li>Titus</li> <li>Domitian</li> </ul> </body> </html>
The list of menu items (Julius Caesar, Augustus, and so on) will be links to other pages. For now, just type them as regular text; you'll turn them into links later. The following is the second file, claudius.html: <!DOCTYPE html PUBLIC "-//W3C//DTD XHTML 1.0 Transitional//EN" "http://www.w3.org/TR/xhtml1/DTD/transitional.dtd"> <html> <head> <title>The Twelve Caesars: Claudius</title> </head> <body> <h2>Claudius Becomes Emperor</h2> <p>Claudius became Emperor at the age of 50. Fearing the attack of Caligula's assassins, Claudius hid behind some curtains. After a guardsman discovered him, Claudius dropped to the floor, and then found himself declared Emperor.</p> <h2>Claudius is Poisoned</h2> <p>Most people think that Claudius was poisoned. Some think his wife Agrippina poisoned a dish of mushrooms (his favorite food). His death was revealed after arrangements had been made for her son, Nero, to succeed as Emperor.</p> <p>Go back to Main Menu</p> </body> </html>
Make sure that both of your files are in the same directory or folder. If you haven't called them menu.html and claudius.html, make sure that you take note of the names because you'll need them later. Create a link from the menu file to the feeding file. Edit the menu.html file, and put the cursor at the following line: <li>Claudius</li>
Link tags don't define the format of the text itself, so leave in the list item tags and just add the link inside the item. First, put in the link tags themselves (the <a> and </a> tags) around the text that you want to use as the link: <li><a>Claudius</a></li>
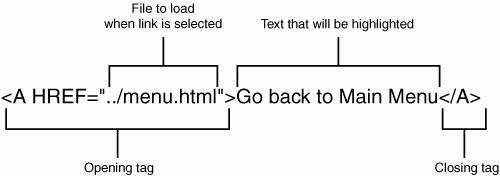
Now add the name of the file that you want to link to as the HRef part of the opening link tag. Enclose the name of the file in quotation marks (straight quotes ["], not curly or typesetter's quotes ["]), with an equal sign between HRef and the name. Filenames in links are case sensitive, so make sure that the filename in the link is identical to the name of the file you created. (Claudius.html is not the same file as claudius.html; it has to be exactly the same case.) Here I've used claudius.html; if you used different files, use those filenames. <li><a href="claudius.html">Claudius</a></li>
Now, start your browser, select Open File (or its equivalent in your browser), and open the menu.html file. The paragraph you used as your link should now show up as a link that is in a different color, underlined, or otherwise highlighted. Figure 5.3 shows how it looked when I opened it. Figure 5.3. The menu.html file with link. 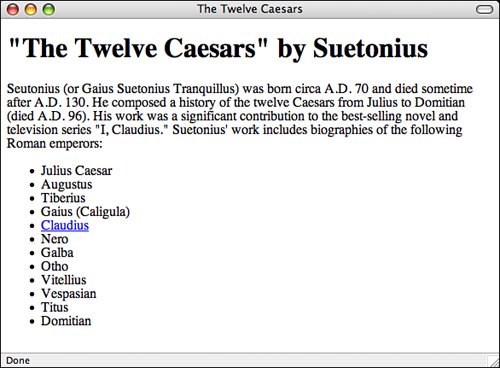
Now, when you click the link, your browser should load and display the claudius.html page, as shown in Figure 5.4. Figure 5.4. The claudius.html page. 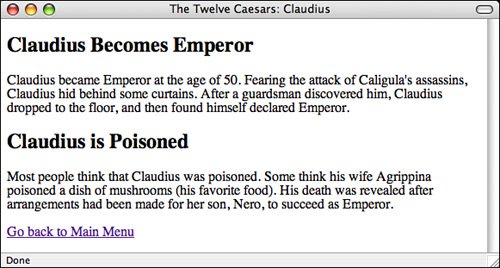
If your browser can't find the file when you click on the link, make sure that the name of the file in the href part of the link tag is the same as the name of the file on the disk, uppercase and lowercase match, and both files are in the same directory. Remember to close your link, using the </a> tag, at the end of the text that serves as the link. Also, make sure that you have quotation marks at the end of the filename (sometimes you can easily forget) and both quotation marks are ordinary straight quotes. All these things can confuse the browser and prevent it from finding the file or displaying the link properly. Caution Don't be confused by this issue of case sensitivity. Tags in HTML aren't case sensitive (although XHTML 1.0 requires that tags be lowercase). However, filenames refer to files on a web server somewhere, and because web servers often run on operating systems in which filenames are case sensitive (such as UNIX), you should make sure that the case of letters in your links' filenames is correct.
Now you can create a link from the feeding page back to the menu page. A paragraph at the end of the claudius.html page is intended for just this purpose: <p>Go back to Main Menu</p>
Add the link tag with the appropriate href to that line, such as the following in which menu.html is the original menu file: <p><a href="menu.html">Go back to Main Menu</a></p>
Nesting Tags Properly When you include tags inside other tags, make sure that the closing tag closes the tag that you most recently opened. That is, enter <p> <a> .. </a> </p>
rather than <p> <a> .. </p> </a>
Some browsers can become confused if you overlap tags in this way, so always make sure that you close the most recently opened tag first. |
Now when you reload the Claudius file, the link will be active, and you can jump between the menu and the detail page by selecting those links. |