Using the Document Object Model
| When you think of a web page, you probably think of the document that's produced when it's displayed in the browser, or the HTML codes that you see when you use your browser's View Source functionality. However, there are other ways that the same data can be represented. Modern web browsers create a representation of a page that can be accessed via scripts in a standardized fashion. This representation is called the Document Object Model, or DOM. Under the DOM, the page content is treated as a tree of objects. I'm using the word objects the way a software developer would. In that parlance, an object is a component that generally has different properties, methods, and event handlers. A property is data that somehow describes the object. A method is a function you can call to make the object do something or to manipulate the object itself. An event handler is a hook you can use to enable the object to respond to an action (generally an action performed by the user). If you were speaking grammatically, you'd say that properties are an object's nouns and methods are its verbs. Note Fully realizing the capabilities of the DOM requires a depth of knowledge beyond the scope of this book. But, as with other webrelated code, you can learn a lot by cutting and pasting scripts and taking the time to study their results. DOM Data TypesWhen a DOM representation of a web page is created, all of the objects that are used to construct the page are assigned to various categories, which are called interfaces in the world of object-oriented programming. If an object has a certain interface then it has the properties and methods associated with that interface. For example, all of the tags on a page have the element interface, which means that they support methods such as getAttribute and setAttribute. The generic data types that make up the DOM are listed in Table 15.1.
Objects in the DOMThe base of the DOM tree is the document object. The document object should look familiar to you from the examples in Lesson 13. You can call methods of the document object directly, such as document.write() to add content to the page, or you can reference children of the document object, using methods such as getElementById() or getElementsByTagName(). Even if you don't explicitly use the document object, you're still accessing the DOM any time you reference objects on the page. For example, in the form validation example in Lesson 13, I passed the form object to the validation function using the onsubmit handler and this. In that case, this referred to the form being validated. Had the form not been passed to the function using an argument, it could have been referenced by name or count using the document object. Another object that you'll deal with frequently is window. The window object (unlike document) is not formally part of the DOM, but browsers include it in order to provide an interface to the browser itself. For example, the height and width of the browser window are properties of the window object rather than the document object. Each element on the page is also an object unto itself and is accessible using the document object. Using generic methods, you can get to all the children of the document object, but a number of convenience methods are included to give you shortcuts to things such as the forms, images, and links on a page. Before going further, let's look at an example.
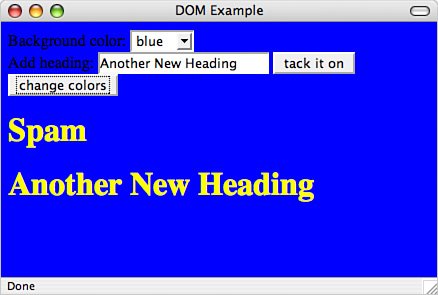
Using the DOMYou should be thankful that I'm not going to discuss the DOM in detail because it would be incredibly dry and boring, and chances are whatever I put in this book would be at least somewhat out of date not a year after it is published. For reference materials on the specific properties, methods, and event handlers for each object in the DOM, you should rely on the vendor references. Generally speaking, web programmers use the DOM in a few specific ways. I'll go over those. In this example, we're going to create a web page that enables us to manipulate elements on a page in various ways using the DOM. This example will work in any modern browser that supports the DOM. First, let's get the code listing out of the way: Input <html> <head> <title>DOM Example</title> <script language="JavaScript"> function changeBgColor(newColor) { if (document.body) { eval('document.body.bgColor="' + newColor + '"'); } } function tackOn(headingText) { if (document.body) { if (headingText) { var newHeading = document.createElement("h1"); someText = document.createTextNode(headingText); newHeading.appendChild(someText); document.body.appendChild(newHeading); } } } function setHeadingColors() { var headings = document.getElementsByTagName("h1"); for (var i = 0; i < headings.length; i++) { headings.item(i).style.color = "yellow"; } } </script> </head> <body> <form> Background color: <select onchange="changeBgColor(this.options[this.selectedIndex].value);"> <option value="white">white</option> <option value="red">red</option> <option value="blue">blue</option> </select><br /> Add heading: <input type="text" value="Spam" /> <input type="button" value="tack it on" onclick="tackOn(document.getElementById('newHeading').value);" /> <br /> <input type="button" value="change colors" onclick="setHeadingColors();" /> </form> </body> </html> Let me describe quickly how the page works. The form on the page enables you to change the page's background color, add new headings to the page, and set the color of all the headings currently on the page to yellow. We accomplish this using three JavaScript functions and five form fields. A screenshot of the page after I've manipulated it a bit appears in Figure 15.1. Output Figure 15.1. A page that demonstrates how the DOM is used. I use the DOM in both the event handlers called within the form as well as within the actual JavaScript on the page. The first form field is the select list that's used to change the page's background color. To accomplish this, we use the onchange handler for this field. When the value of the field is changed, the changeBgColor() function defined on the page is called, and the new background color is passed in as a parameter. We obtain this value by retrieving the value of the currently selected option using this reference: this.options[this.selectedIndex].value this refers to the select field. The options method retrieves a nodeList of options associated with the field. We can obtain the currently selected index of the field using the selectedIndex property of the select list, and use it as the index for the nodeList. Based on the DOM specification, I know that we could just as easily obtain the currently selected index using options.item(this.selectedIndex). Both approaches are valid. Finally, the value property of the currently selected option is what's actually passed in to the function. Now let's look at the changeBgColor() function. This function is quite short. First, it performs a simple test to verify that the document.body property even exists. If the function can't get a reference to the body element in this way, there's no sense in going on. Once it has it, it uses the eval function to create and run a bit of JavaScript that sets the bgColor property of the body element to the value that was passed in. bgColor is a property that's specific to the document body; it's not available for all elements. Next, I enable the user to add <h1> elements to the page. This bit of manipulation is accomplished using only methods and properties that are part of the core DOM, except for document.body. This is intended to demonstrate how elements on a page can be treated in a generic fashion. This part of the form uses two form fields; the first is a text field that provides the value of the text to be added. The second part is a button that calls the function that appends the new heading to the page. The only notable thing about the text field is that we've assigned it an ID, "newHeading". The button uses an onclick handler to call the tackOn() function. As its parameter, it passes in the value of newHeading. As you can see, it references newHeading using the getElementById method of the document object, and then referencing the value property of that element. I included a default value in the form field so that the user doesn't have to type in something every time. As you saw back in Lesson 9, "Creating Layouts with CSS," the id attribute can be used to assign an identifier to an element so that you can apply styles to it individually. As you can see from this example, you can also access items with an id through the DOM using the getElementById() function. This one capability alone makes the entire DOM worthwhilebefore the getElementById() function was supported by browsers, referencing a specific object on a page was tedious and difficult. Now all you have to do is assign an identifier to it. The only catch is that you have to make sure not to use the same identifier more than once on the same page. Now let's look at the tackOn() function. Before we do anything else, we make sure that document.body is supported and that a value was actually passed in. There's no need to go further if we're not able to add on the heading or there's no heading to add. Once we've done that, we use the document.createElement() method to create a reference to a brand new <h1> element. Then we use document.createTextNode() to create a text node containing the header text. To associate the text node with the heading, we use appendChild() to indicate that the new text node is a child of the heading. This is how you build onto your document structure using the DOM. You generate new elements, and then add them onto existing elements as children. We could also modify any properties of the heading that we wanted at this point. Once we have a reference to an <h1> element with some text as its child, we use appendChild() again to append the new heading onto the document body. At this point, the new heading should appear at the bottom of the page. When thinking of parent-child relationships in the DOM, just remember that, in HTML, if one object is a child of another, it just means that it's inside it. For example, take a look at this HTML: <p>The quick brown fox <em>jumped over</em> the lazy dog.</p> The quick brown fox is a child of the paragraph tag. So is the <em> tag. The text jumped over is a child of the <em> tag, and the lazy dog is the third child of the <p> tag. That's how the DOM tree works. To construct this text using JavaScript, you could use the following code: var newParagraph = document.createElement("p"); someText = document.createTextNode("The quick brown fox "); newParagraph.appendChild(someText); var newElement = document.createElement("em"); someText = document.createTextNode("jumped over"); newElement.appendChild(someText); newParagraph.appendChild(newElement); someText = document.createTextNode(" the lazy dog."); newParagraph.appendChild(someText); document.body.appendChild(newParagraph);Yes, it really is easier to just write the HTML. In any case, let's move on to the next part of the example. The last method of modifying the page is with a button labeled Change Colors. It uses the onclick handler to call the setHeadingColors() function. This function uses the document.getElementsByTagName() to retrieve all instances of the <h1> tag on the page. We then use a loop to iterate over the individual elements (which are stored in a nodeList), and set their color to yellow. It's worth looking at this a bit more closely. This example demonstrated how to modify the style sheet for a page from JavaScript using the DOM. The style property provides access to all the properties associated with the element it is associated with. In this case, we use style.color to change the color to yellow. By the same token, we could use style.backgroundColor to change the background color. When you transform property names in CSS to attributes in the DOM, the hyphens are removed and the words that follow hyphens are capitalized. |
EAN: 2147483647
Pages: 305