Mobile Web Forms
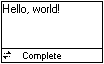
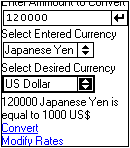
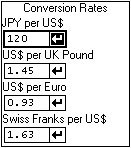
| Mobile Web Forms differ from the standard Web Forms mainly in their implementation. The usage is very similar. The main difference is in the capability to render the controls differently when devices with different capabilities access the forms. In this section, you will learn the basics of creating a mobile Web page. Note Standard Web Forms are covered in this book in Chapter 11, "WebForms," and in Chapter 12, "Web Form Data Validation." Simple FormThe best place to start is with a simple Hello World page. Listing 20.1 shows what a minimal mobile Web page looks like. Listing 20.1 A Mobile Device Hello World Page<%@ Register TagPrefix="Mobile" Namespace="System.Web.UI.MobileControls" Assembly="System.Web.Mobile"%> <%@ Page Inherits="System.Web.UI.MobileControls.MobilePage" Language="CS" %> <mobile:Form id="Form1" runat="server"> <mobile:Label id="Label1" runat="server"> Hello, world! </mobile:Label> </mobile:Form> Note several things in the preceding code. First, every page needs to register the mobile controls assembly. This is done with the following line of code: <%@ Register TagPrefix="Mobile" Namespace="System.Web.UI.MobileControls" Assembly="System.Web.Mobile"%> Note To access the mobile controls from a code-behind file, you will need to declare the System.Web.UI.MobileControls namespace at the beginning of your source file. This is done with the using statement in C# or with the Imports statement in Visual Basic .NET. If you use Visual Studio, this will be done automatically. Second, every mobile Web page must inherit from the System.Web.UI.MobileControls.MobilePage class or from a class derived from this class. Third, every mobile page requires at least one form. If a page does not contain a form, a runtime error is generated. This form is defined as follows : <mobile:Form id="Form1" runat="server"> </mobile:Form> Additionally, all mobile controls or other text or HTML elements must be inside the form elements. Fourth, all mobile controls, such as <mobile:Form> , are server controls and must contain the runat="server" attribute. Finally, in general, HTML and WML tags should be avoided and mobile controls used instead. Although formatting tags can work in some cases, HTML and WML are not compatible, and incompatible tags can cause errors on different browsers or handsets. If you do use some HTML formatting codes, such as the <p></p> codes, they must be formatted for XML because WML is an XML-based markup language. This means that the tags must be in lowercase and you must always include the ending tag. If you use too much markup code directly, you should consider writing a custom control that can output specialized code depending upon the device. Tip When doing development with Visual Studio .NET, it is useful to change the autoformatting options for capitalization for HTML/XML editors so that your tags are not automatically capitalized. To do this, bring up the Options dialog box by selecting the Tools, Options menu. Then under the Text Editor folder in the option tree, open the folder for HTML/XML and select the Format item. You then can change the capitalization to lowercase for both tags and attributes. Figure 20.1 shows the output of the Hello World page on Microsoft's Mobile Explorer emulator set to a small device. Figure 20.1. Hello World output. The mobile controls examine the device's capabilities and output different markup depending on the device. Listings 20.2 through 20.4 show the actual markup generated for different devices. Listing 20.2 shows the standard HTML output for Microsoft's Internet Explorer. Listing 20.2 HTML Source Code <html><body> <form id="Form1" name="Form1" method="post" action="HelloWorld.aspx?__ufps=631388332224862576"> <input type="hidden" name="__EVENTTARGET" value=""> <input type="hidden" name="__EVENTARGUMENT" value=""> <script language=javascript><! function __doPostBack(target, argument){ var theform = document.Form1 theform.__EVENTTARGET.value = target theform.__EVENTARGUMENT.value = argument theform.submit() } // > </script> <span>Hello, world!</span><br> </form></body></html> You can easily see how different WML is from HTML when you look at the source code generated for a WML device. Listing 20.3 shows the WML output for the Nokia Mobile Browser. Listing 20.3 WML Source Code<?xml version="1.0"?> <!DOCTYPE wml PUBLIC "-//WAPFORUM//DTD WML 1.1//EN" "http://www.wapforum.org/DTD/wml_1.1.xml"> <wml> <template> <do type="prev" label="back"> <prev/> </do> </template> <card id="frstcard"> <p id="Form1"> <br/> Hello, world! <br/> <br/> </p> </card> </wml> Listing 20.4 shows the cHTML output for an NTT DoCoMo iMode-enabled mobile phone. Listing 20.4 cHTML Source Code<html><body> <form id="Form1" name="Form1" method="post" action="HelloWorld.aspx?__ufps=631388375571291680"> <span>Hello, world!</span><br> </form> </body></html> Handling EventsEvent handling with mobile Web Forms is done with a PostBack to the server like with standard Web forms. To show how this is done, let's revisit the temperature converter sample used in Chapter 11. This sample was rewritten with the Mobile Internet Toolkit. The ASPX source code appears in Listing 20.5. Listing 20.5 The ASPX Code for a Temperature Converter<%@ Page language="c#" Codebehind="Event.aspx.cs" Inherits="Chapter20.Event" AutoEventWireup="false" %> <%@ Register TagPrefix="mobile" Namespace="System.Web.UI.MobileControls" Assembly="System.Web.Mobile" %> <mobile:form id="Form1" runat="server"> <mobile:label id="Label1" runat="server" alignment="Center"> The Temperature Converter</mobile:label> <mobile:label id="Label3" runat="server"> Temperature:</mobile:label> <mobile:label id="Label5" runat="server"> </mobile:label> <mobile:label id="Label6" runat="server"> </mobile:label> <mobile:label id="Label7" runat="server"> </mobile:label> <mobile:textbox id="TextBox1" runat="server" size="4" maxlength="5"> </mobile:textbox> <mobile:label id="Label4" runat="server"> In which scale is the temperature that you entered?</mobile:label> <mobile:selectionlist id="SelectionList1" runat="server"> <item text="Fahrenheit" value="F" /> <item text="Celsius" value="C" /> <item text="Kelvin" value="K" /> </mobile:selectionlist> <mobile:command id="Command1" runat="server" alignment="Center"> Convert</mobile:command> </mobile:form> Listing 20.6 shows the event handler code rewritten to C#. Listing 20.6 The C# Event Handler Code to Convert Temperatures private void Command1_Click(object sender, System.EventArgs e) { double dValue; dValue = Convert.ToDouble(TextBox1.Text); double dFahrenheit; double dCelsius; double dKelvin; if(SelectionList1.Selection.Value=="F") { dCelsius = ((dValue - 32) * 5) / 9; dKelvin = dCelsius + 273; Label5.Text = dValue.ToString() + " degrees Fahrenheit = "; Label6.Text = dCelsius.ToString() + " degrees Celsius, "; Label7.Text = dKelvin.ToString() + " degrees Kelvin"; } else if(SelectionList1.Selection.Value=="C") { dFahrenheit = ((9 * dValue) / 5) + 32; dKelvin = dValue + 273; Label5.Text = dValue.ToString() + " degrees Celsius = "; Label6.Text = dFahrenheit.ToString() + " degrees Fahrenheit, "; Label7.Text = dKelvin.ToString() + " degrees Kelvin"; } else { dCelsius = dValue - 273; dFahrenheit = ((9 * dCelsius) / 5) + 32; Label5.Text = dValue.ToString() + " degrees Kelvin = "; Label6.Text = dFahrenheit.ToString() + " degrees Fahrenheit, "; Label7.Text = dCelsius.ToString() + " degrees Celsius"; } } As you can see, there is very little difference between using a Web Form and using a mobile form. You can continue to use much of the code you used to develop a HTML application when you rewrite your pages for mobile devices. The output of a temperature conversion on Microsoft's Mobile Explorer emulator is shown in Figure 20.2. Figure 20.2. The output of the temperature. Multiple Forms per PageIn mobile Web forms, the <mobile:Form> tag is not really the same as the <asp:Form> tag. Multiple forms can be placed on a single page, but only one form is visible at a time. These forms act like separate pages to the user ; at the same time, they are logically grouped together for the server-side code. This enables you to break up long HTML forms into individually accessible segments with little change to the server-side code. To show how multiple forms are used, I wrote a currency conversion application. Listing 20.7 shows the ASPX code for the currency converter. Listing 20.7 The ASPX Code for Currency Conversion<%@ Register TagPrefix="mobile" Namespace="System.Web.UI.MobileControls" Assembly="System.Web.Mobile" %> <%@ Page language="c#" Codebehind="Converter.aspx.cs" Inherits="Chapter20.Converter" AutoEventWireup="false" %> <%@ Register TagPrefix="uc1" TagName="Rates" src="Rates.ascx" %> <body xmlns:mobile="Mobile Web Form Controls"> <mobile:form id="Form1" runat="server"> <mobile:Label id="Label1" runat="server" Alignment="Center" ForeColor="Red">Currency Converter</mobile:Label> <mobile:Label id="Label2" runat="server"> Enter Amount to Convert</mobile:Label> <mobile:TextBox id="InputBox" runat="server"></mobile:TextBox> <mobile:Label id="Label3" runat="server"> Select Entered Currency</mobile:Label> <mobile:SelectionList id="CurrencyListIN" runat="server"> <item text="US Dollar" value="USD" /> <item text="Euro" value="EUR" /> <item text="Japanese Yen" value="JPY" /> <item text="British Pound" value="GBP" /> <item text="Swiss Frank" value="CHF" /> </mobile:SelectionList> <mobile:Label id="Label9" runat="server"> Select Desired Currency</mobile:Label> <mobile:SelectionList id="CurrencyListOUT" runat="server"> <item text="US Dollar" value="USD" /> <item text="Euro" value="EUR" /> <item text="Japanese Yen" value="JPY" /> <item text="British Pound" value="GBP" /> <item text="Japanese Yen" value="JPY" /> <item text="Swiss Frank" value="CHF" /> </mobile:SelectionList> <mobile:Label id="OutputLabel" runat="server"></mobile:Label> <mobile:Command id="ConvertButton" runat="server">Convert </mobile:Command> <mobile:Link id="ModifyLink" runat="server" NavigateURL="#Form2"> Modify Rates</mobile:Link> </mobile:form> <mobile:Form id="Form2" runat="server" Alignment="Left"> <mobile:Label id="Label4" runat="server" Alignment="Center" ForeColor="Red">Conversion Rates</mobile:Label> <mobile:Label id="Label5" runat="server">JPY per US$</mobile:Label> <mobile:TextBox id="JPYUSD" runat="server" Size="5">120 </mobile:TextBox> <mobile:Label id="Label6" runat="server">US$ per UK Pound </mobile:Label> <mobile:TextBox id="USDGBP" runat="server" Size="5">1.45 </mobile:TextBox> <mobile:Label id="Label7" runat="server">US$ per Euro</mobile:Label> <mobile:TextBox id="USDEUR" runat="server" Size="5">0.93 </mobile:TextBox> <mobile:Label id="Label8" runat="server">Swiss Franks per US$ </mobile:Label> <mobile:TextBox id="CHFUSD" runat="server" Size="5">1.63 </mobile:TextBox> <mobile:Link id="ReturnLink" runat="server" NavigateURL="#Form1"> Return</mobile:Link> </mobile:Form> </body> This page has two forms. One form is used to enter the amount to convert and the currencies to convert between, and the other form is used to set the conversion rates. On WML devices, the entire page is sent to the device, and the device controls the switching between forms. On other devices this is simulated with postbacks to the server. Because forms can all be transmitted together to WML devices, you should be careful about the number of forms on a single page. The WML standard limits the total number of bytes in a compiled WML page. You can easily exceed this limit by placing too many forms together. Because of the extra overhead involved in rendering and transmitting, forms that are not often used should be separated out to a different page. Forms are considered totally separate entities and are never combined into a single display, even if the device has room to display multiple forms. Note The <mobile:Link> control is used to navigate between forms and between different pages. The first form is always displayed when the page loads. It is not possible to navigate to any other form than the first form when navigating from a different page. In Listing 20.8, you can see the event handler that does the actual currency conversion. Listing 20.8 The C# Source for Currency Conversion private void ConvertButton_Click(object sender, System.EventArgs e) { string sInputCurrency; string sOutputCurrency; string sInputTypeStr=""; string sOutputTypeStr=""; double nInputAmount; double nOutputAmount; double nConversionRate=0; nInputAmount=Convert.ToDouble(InputBox.Text); sInputCurrency=CurrencyListIN.Selection.Value; sOutputCurrency=CurrencyListOUT.Selection.Value; // Calculate input conversion rate to USD. switch(sInputCurrency) { case "USD" : nConversionRate=1; sInputTypeStr="US$"; break; case "JPY" : nConversionRate=1.0/Convert.ToDouble(JPYUSD.Text); sInputTypeStr="Japanese Yen"; break; case "GBP" : nConversionRate=Convert.ToDouble(USDGBP.Text); sInputTypeStr="British Pounds"; break; case "EUR" : nConversionRate=Convert.ToDouble(USDEUR.Text); sInputTypeStr="Euros"; break; case "CHF" : nConversionRate=1.0/Convert.ToDouble(CHFUSD.Text); sInputTypeStr="Swiss Franks"; break; } // Calculate USD to output currency conversion rate. switch(sOutputCurrency) { case "USD" : // Conversion rate is already set. sOutputTypeStr="US$"; break; case "JPY" : nConversionRate*=Convert.ToDouble(JPYUSD.Text); sOutputTypeStr="Japanese Yen"; break; case "GBP" : nConversionRate*=1.0/Convert.ToDouble(USDGBP.Text); sOutputTypeStr="British Pounds"; break; case "EUR" : nConversionRate*=1.0/Convert.ToDouble(USDEUR.Text); sOutputTypeStr="Euros"; break; case "CHF" : nConversionRate*=Convert.ToDouble(CHFUSD.Text); sOutputTypeStr="Swiss Franks"; break; } nOutputAmount=nInputAmount*nConversionRate; OutputLabel.Text=nInputAmount.ToString()+" "+sInputTypeStr +" is equal to "+nOutputAmount.ToString()+" "+sOutputTypeStr; } The C# code does a conversion between any two of the listed currencies. The value to be converted is first converted to U.S. dollars and then converted to the desired end currency. Figure 20.3 shows the first form, and Figure 20.4 shows the second form on a device emulator. Figure 20.3. First form of currency converter. Figure 20.4. Second form of currency. Device-Specific RenderingOne of the most powerful features of using mobile Web Forms is the capability to render things differently with different devices. Because capability varies widely between different devices, this is very important. Unlike computers, where screen sizes are fairly large and virtually all of them support color to some extent, mobile device screen sizes vary from four lines of text on some cell phones to more than nine on others. Most have only two colors. Handheld organizers and computers can have better capabilities, but even they are small, with limited screen size, so the capability to send different images or data based on the device is important. To use device-specific rendering, first set up a filter in the web.config file. This filter is used to determine the capabilities of a device. A sample filter looks like this: <filter name="isCHTML10" compare="preferredRenderingType" argument="chtml10" /> The filter has three attributes: name , compare , and argument . The name attribute is what you use in the ASPX code to access the filter. The compare attribute is the name of the device capability that you want to compare to the argument attribute. The argument attribute is the value that is compared to the capability value of each device. Each filter evaluates to either a logical true or false. The device filter entry should be placed in the deviceFilters section of the web.config file. This is shown in the following general filter syntax: <system.web> <deviceFilters> <filter name="capability" compare="capabilityName" argument="argument" /> <filter name="capability" type="className" method="methodName" /> </deviceFilters> </system.web> Note that there are two types of filter definitions. The first type, as previously described, enables you to compare a capability to a given value. The second type enables you to specify a class and a method name to do the comparison rather than use the built-in system. This allows flexibility because you can use virtually any calculation that evaluates to a Boolean value. Note Visual Studio enters several device filters into the web.config file it creates when it creates a new mobile Web project. These filters are there for your convenience; the mobile controls don't use them. If you don't do any device-specific rendering, they can be ignored or deleted. After a filter has been defined, you can use it in your ASP.NET code. Here is an example of how device-specific rendering is used: <mobile:Image runat=server ImageURL="bw.gif"> <DeviceSpecific> <Choice Filter="isColor" ImageURL="colorImg.gif" AlternateText="This device cannot display the requested image." /> <Choice Filter="IsWML" ImageURL="myImage.bmp"/> <Choice ImageURL="monoImage.gif"/> </DeviceSpecific> </mobile:Image> The <DeviceSpecific> tags are used inside the control tags. Each control can have only one <DeviceSpecific> tag. Inside each <DeviceSpecific> tag are <Choice> tags. There can be as many <Choice> tags as necessary. The <Choice> tags are evaluated in the order in which they appear in the code. All the <Choice> tags are evaluated. |

EAN: 2147483647
Pages: 233