Accepting User Uploads in ASP.NET
| Once upon a time, your Web site needed third-party components to allow users to upload files. Now, you can do it all in ASP.NET, without any third-party add-ons. Here's how. Following are the bare-bones steps to accept user uploads:
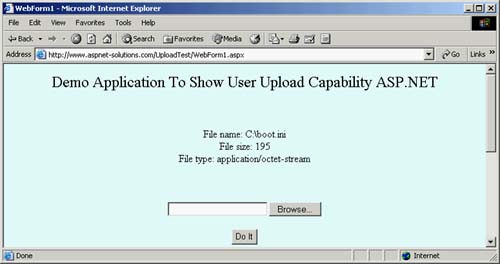
CAUTION: Make sure that your Web application directory doesn't give full access to the Everyone group. You need to make sure that the hard drive of your server is protected. This section describes a demo application that accepts user uploads. Figure 17.6 shows the application. You can test the demo application at http://www.aspnet-solutions.com/UploadTest/WebForm1.aspx. Figure 17.6. This Application Takes a User-Specified File and Shows Information about It.
Listings 17.7 and 17.8 show the code that places the file information into the user interface. Listing 17.7 shows the C# code; Listing 17.8 shows the VB code. Listing 17.7 Placing the File Information into a User Interface Label Object (C#) private void DoIt_Click(object sender, System.EventArgs e) { FileInfo.Text = "File name: " + Filename.PostedFile.FileName + "<br>\r\n" + "File size: " + Filename.PostedFile.ContentLength + "<br>\r\n" + "File type: " + Filename.PostedFile.ContentType; } Listing 17.8 Placing the File Information into a User Interface Label Object (VB)Private Sub DoIt_Click(ByVal sender As System.Object, _ ByVal e As System.EventArgs) Handles DoIt.Click FileInfo.Text = _ "File name: " + Filename.PostedFile.FileName + "<br>" + vbCrLf + _ "File size: " + Filename.PostedFile.ContentLength + "<br>" + _ vbCrLf + _ "File type: " + Filename.PostedFile.ContentType End Sub As you can see, accepting user uploads from ASP.NET applications is very easy. And you can do it without any third-party add-ons. |
EAN: N/A
Pages: 175