Adding and Removing Data
| for RuBoard |
At this point, the schema of the DataSet is entered and you're ready to add some data. Recall that the column collection of the DataTable defines the schema, and the rows collection of the DataTable defines the data. In other words, to add data to our DataTable , all we need to do is add some rows to our DataTable : dtEmployees.
DataRow s Contain Data
Adding rows to the dtEmployees DataTable is easy to do. First, you need to use the NewRow() method of the dtEmployees object. NewRow() returns a reference to a new row for your DataTable . Next , you must specify values for the columns in the newly created row. Lastly, you must add the row to the DataTable . Listings 2.3 and 2.4 demonstrate this by adding a few rows to our existing DataTable , dtEmployees.
Listing 2.3 Adding Rows to the dtEmployees DataTable in Visual Basic.NET
'Create new row Dim workRow as DataRow = dtEmployees.NewRow() workRow("FirstName") = "John" workRow("LastName") = "Fruscella" 'Create another row Dim workRow1 as DataRow = dtEmployees.NewRow() workRow1("FirstName") = "Leigh" workRow1("LastName") = "Chase" 'Add new rows to the DataTable dtEmployees.Rows.Add(workRow) dtEmployees.Rows.Add(workRow1) Listing 2.4 Adding Rows to the dtEmployees DataTable in C#
//Create new row DataRow workRow = dtEmployees.NewRow(); workRow["FirstName"] = "John"; workRow["LastName"] = "Fruscella"; //Create another row DataRow workRow1 = dtEmployees.NewRow(); workRow1["FirstName"] = "Leigh"; workRow1["LastName"] = "Chase"; //Add new rows to the DataTable dtEmployees.Rows.Add(workRow); dtEmployees.Rows.Add(workRow1);
Creating and Configuring a New ASP.NET Test Web
Until now, you've probably taken it for granted that the code in this hour works. However, with just a few minutes of effort, you can verify that it works. By itself, ADO.NET code is not specific to Web forms or Windows forms. In fact, either can be used to test the code in this chapter. If you are handy with Windows forms using Visual Studio .NET or the tools inside the Microsoft .NET Framework SDK, feel free to plug the code in Listings 2.3 or 2.4 into a Windows form application.
The next section walks you through the process of setting up a new virtual directory in Windows 2000 and adding a Web form that can be used to test your code. Web forms were chosen because they are compiled automatically when they are first requested by a Web browser, thus saving you from having to manually compile a Windows form each time you need to test some code. When you save the file, ASP.NET knows to recompile the Web form the next time the file is requested.
Creating the Web Site
Installing a new Web site on a Windows 2000 machine is a straightforward process:
-
Make sure you are logged in as a user with administrative rights.
-
Locate (or create) a directory on your computer where you will place the files to be served by Internet Information Server (IIS, Microsoft's Web server that comes built into Windows 2000).
-
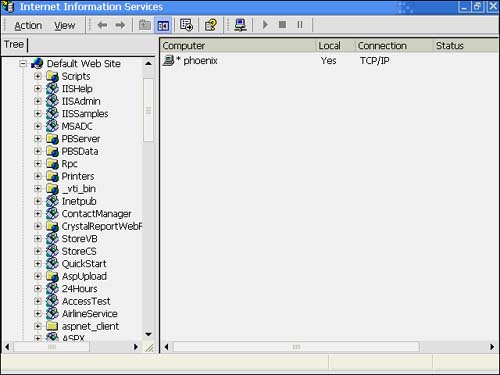
In the Administrative Tools program group , load the Internet Services Manager. Expand the entry for your computer. You should now see a screen much like Figure 2.2. If you do not have an entry for the Internet Services Manager, you probably do not have IIS installed. You can use the Add/Remove Programs entry in the Control Panel to add the Windows 2000 IIS components . Please refer to your operating system manual for more details.
Figure 2.2. Use the IIS administrative console to create new virtual directories and manage the Web sites on your machine.
-
Expand the Default Web Site entry (which is installed by default). You should see a number of subentries.
-
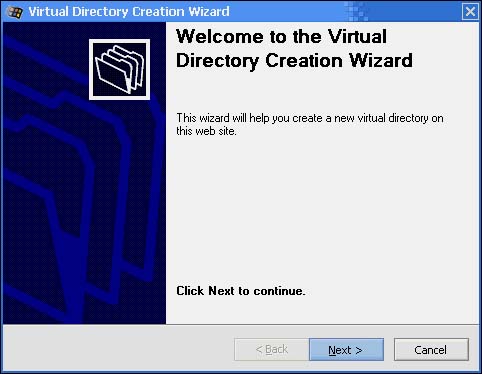
Right-click on Default Web Site and select New Virtual Directory. The Virtual Directory Creation Wizard appears (see Figure 2.3). Click Next.
Figure 2.3. The Virtual Directory Wizard prompts you for an alias.
-
The wizard prompts you for an alias. Enter 24Hours and click Next.
-
In the next screen, either type or browse to the directory you created in step 1 and click Next.
-
On the Access Permissions screen, leave Read and Run scripts checked and also check Browse. Click Next.
-
You have successfully added a new virtual directory to your Web site!
Configuring the Web Site
If you are concerned about security, you should change the default security settings for the new virtual directory.
-
Right-click on the 24Hours virtual directory under the Default Web Site.
-
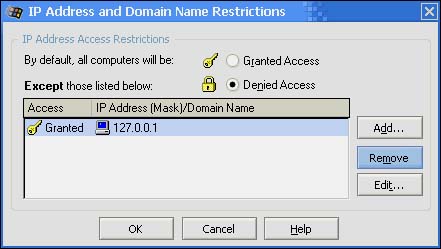
Click on the Directory Security tab. Select the Edit button in the IP Address and Domain Name Restrictions dialog box as shown in Figure 2.4.
Figure 2.4. The IP Address and Domain Name Restrictions dialog box showing the virtual directory's properties.
-
Select the bottom bullet labeled Denied Access. Then click the Add button, enter 127.0.0.1, and click the OK button. The 24Hours site can now only be loaded from the computer it is loaded on.
The site is now only available to users of your computer. If someone tries to access the site from a remote machine, they will be denied access. The site can be accessed by using either http://localhost/24Hours or http://127.0.0.1/24Hours. The site is currently empty, but you will be able to browse to the folders and files of the site after we add some Web forms.
Task: Creating a Test Harness for ADO.NET Code
Before you can test the code in this chapter, you must create a few pages that will contain the code. One page is needed for the Visual Basic .NET examples and another is needed for the C# examples.
-
Create two new files in the 24Hours directory named _24HoursVB.aspx and _24HoursCS.aspx. These files will be used as templates.
-
Place the code from Listing 2.5 into _24HoursVB.aspx and save the file.
-
Place the code from Listing 2.6 into _24HoursCS.aspx and save the file.
-
Create a copy of the _24HoursVB.aspx file and name it chapter2VB.aspx.
-
Create a copy of the _24HoursCS.aspx file and name it chapter2CS.aspx.
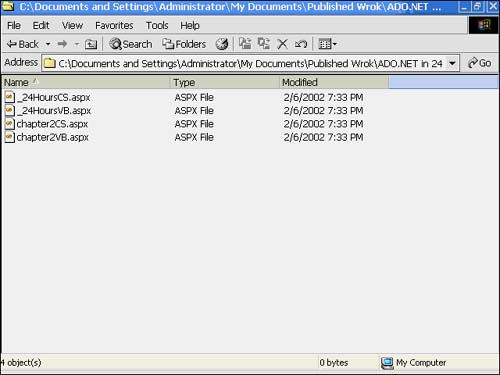
By repeating steps 4 and 5 of the previous task, you can use the _24Hours*.aspx files as templates for the examples in this book, unless otherwise noted. When you are done configuring these files, your directory will look like the one in Figure 2.5.
Figure 2.5. Setting up the example templates.
Listing 2.5 VB.NET Code Test Harness
<% @Page Language="VB" Debug="true" %> <%@ Import Namespace="System.Data" %> <%@ Import Namespace="System.Data.SqlClient" %> <HTML> <HEAD> <LINK rel="stylesheet" type="text/css" href="24Hours.css"> <!-- End Style Sheet --> <script language="VB" runat="server" > Sub Page_Load(Source as Object, E as EventArgs) 'Place VB.NET ADO.NET Code here End Sub </script> </HEAD> <BODY> <h1>ADO.NET In 24 Hours Examples</h1> <hr> <form runat="server" id=form1 name=form1> <asp:Label id="msg" runat="server"></asp:Label> <asp:DataGrid id="myDataGrid" runat="server"></asp:DataGrid> </form> <hr> </BODY> </HTML>
Listing 2.6 C# Code Test Harness
<% @Page Language="C#" Debug=true%> <%@ Import Namespace="System.Data" %> <%@ Import Namespace="System.Data.SqlClient" %> <HTML> <HEAD> <LINK rel="stylesheet" type="text/css" href="24Hours.css"> <!-- End Style Sheet --> <script language="C#" runat="server" > void Page_Load(Object Source, EventArgs E) { //Place C# ADO.NET example code here } </script> </HEAD> <BODY> <h1>ADO.NET In 24 Hours Examples</h1> <hr> <form runat="server" id=form1 name=form1> <asp:Label id="msg" runat="server"></asp:Label> <asp:DataGrid id="myDataGrid" runat="server"></asp:DataGrid> </form> <hr> </BODY> </HTML> The Web forms in Listings 2.5 and 2.6 contain:
-
A label Web control that will be used to display text messages
-
A DataGrid Web control that will be used to display the contents of your DataSet s
To test this hour's code, just place the code from Listing 2.3 into the VB.NET test harness in Listing 2.5 where it says "Place VB.NET ADO.NET Code here." All that remains is to connect the DataGrid to the DataSet . That can be achieved with two lines of code:
myDataGrid.DataSource = dtEmployees myDataGrid.DataBind()
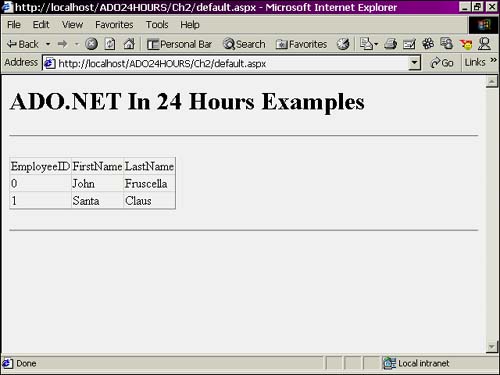
This instructs the DataGrid to use the dtEmployees DataSet as its data source and display it on the page when the page loads. Listing 2.7 contains the entire example in VB.NET. When you load the page, your results should look similar to those in Figure 2.6. For more information on the DataGrid Web control, please see Hour 11, "Using the Built-In ASP.NET List Controls."
Figure 2.6. The appearance of our test harness when loaded with the code from this chapter.
Listing 2.7 The Complete VB.NET Web Form Example
<% @Page Language="VB" Debug="true" %> <%@ Import Namespace="System.Data" %> <%@ Import Namespace="System.Data.SqlClient" %> <HTML> <HEAD> <LINK rel="stylesheet" type="text/css" href="24Hours.css"> <!-- End Style Sheet --> <script language="VB" runat="server" > Sub Page_Load(Source as Object, E as EventArgs) 'Create Principle Objects dim dsCompany as new DataSet() dim dtEmployees as DataTable = dsCompany.Tables.Add("Employees") 'Create Columns dtEmployees.Columns.Add("EmployeeID", Type.GetType("System.Int32")) dtEmployees.Columns.Add("FirstName", Type.GetType("System.String")) dtEmployees.Columns.Add("LastName", Type.GetType("System.String")) 'Create new row Dim workRow as DataRow = dtEmployees.NewRow() workRow("FirstName") = "John" workRow("LastName") = "Fruscella" 'Create another row Dim workRow1 as DataRow = dtEmployees.NewRow() workRow1("FirstName") = "Santa" workRow1("LastName") = "Claus" 'Add new rows to the DataTable dtEmployees.Rows.Add(workRow) dtEmployees.Rows.Add(workRow1) employees.DataSource = dtEmployees employees.DataBind() End Sub </script> </HEAD> <BODY> <h1>ADO.NET In 24 Hours Examples</h1> <hr> <form runat="server"> <asp:Label id="lblMessage" runat="server"></asp:Label> <asp:DataGrid id="employees" runat="server"></asp:DataGrid> </form> <hr> </BODY> </HTML> The code in Listing 2.7 may appear a bit daunting at first. However, it's easier to understand the code if you analyze it in logical sections. The code in Lines 13 sets some global properties for the Web form. Specifically, Line 1 sets the language of the Web form to Visual Basic .NET and turns on debugging. Lines 23 load the System.Data and System.Data.SqlClient namespaces. This enables you to access objects such as the DataSet and DataRow in the server-side code.
Lines 1039 in Listing 2.7 are a block of script that executes on the server. The code consists of a single method: The Page_Load() event is automatically run whenever the page loads. Inside the Page_Load() event, lines 1314 create new DataSet and DataTable objects. Lines 1619 add some columns directly to the DataTable . These columns define the appearance of the data that is added next.
Lines 2133 use the previously defined columns of the DataTable to add a few rows of data. Specifically, two new rows are created, configured, and then finally added to the DataTable object in Lines 3133. Finally, the DataTable is bound to the DataGrid Web control, created on line 49. For now, don't worry about the details of databinding; the DataGrid just knows how to automatically loop through all the rows in the DataTable and display them on the page as in Figure 2.6.
| for RuBoard |
EAN: 2147483647
Pages: 237