5.7. Group Users into Roles
Note: Simplify user management by using roles to group users by function.
Besides restricting access to individual users, it is sometimes much easier to restrict access based on the groups, or roles, to which users belong. You can use the ASP.NET Web Site Administration Tool (WAT) to classify users into roles and determine their access rights based on the function of each role. For example, users who administer the site might be grouped under an Admin role that you define. This roleand, by implication, the users assigned to itcan then be given permission via the Web.config file to access certain parts of the web site that are off-limits to others. 5.7.1. How do I do that? In this lab, you will learn how to create roles for your web site through the use of the ASP.NET WAT. You will create a new role called Admin and then assign a newly created user, Administrator, to this role. After that, you will see how you can limit access to folders in your application based on the role of the user. Open the project used in the last lab (C:\ASPNET20\chap-5-SecurityControls). Invoke the ASP.NET WAT in Visual Studio 2005 (Website ASP.NET Configuration). ASP.NET Configuration). Click on the Security tab, where you'll find the tools you need to set up roles for your site (see Figure 5-29). Figure 5-29. The Security tab in the ASP.NET Web Site Administration Tool 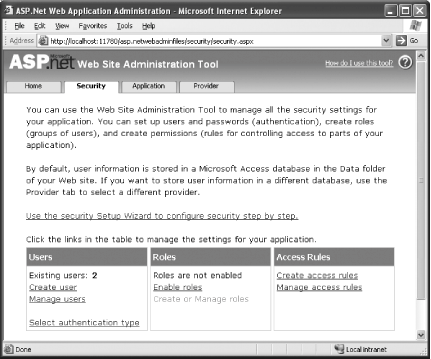
Let's start by creating a special account for administrators of your site. Click the Create User link to add a new user account. Name the new user account Administrator. Under the Roles section, click "Enable roles" to enable you to add roles in your web site. This step enables the "Create or Manage roles" link. Click on the "Create or Manage roles" link to create a new role. Enter a name for the new role you are creating: Admin. Click Add Role (see Figure 5-30). The role will now be created and displayed in the same page. Figure 5-30. Naming a new role 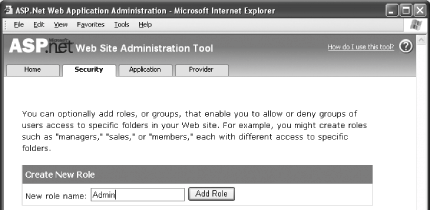
To add/remove users from a role, click on the Manage link (see Figure 5-31). Figure 5-31. Managing a role 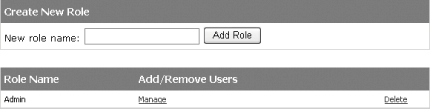
You will be able to search for users to be added into this role. Click on the All link to view all the users. Select the "User Is In Role" checkbox for the Administrator account. This will assign the Admin role to the Administrator account (see Figure 5-32). Figure 5-32. Assigning users to a role 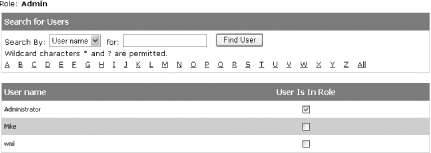
Now Administrator is a member of the Admin role. Add the following lines to the Web.config file located within the /Members folder: <authorization> <allow roles="Admin" /> <deny users="*" /> </authorization>
Only users belonging to the Admin role can now access the pages in the /Members folder (others are denied access). To test the new Admin role, select the MemberDefault.aspx page in Solution Explorer and then press F5. You will be redirected to the login page, as pages in this folder can be viewed only by users in the Admin role. Log in using the wml account created in the lab Section 5.2. You will notice that you will be prompted to log in again. This is because wml does not belong to the Admin role. Try the Administrator account. This time, the MembersDefault.aspx page will be loaded.
5.7.2. What about... ...programmatically creating roles and assigning users to roles? Besides using the ASP.NET Web Site Administration Tool (WAT) to create roles and then assigning users to a role, you can programmatically create and manipulate role information via the Roles class. Let's see how this is done. To illustrate how to use the Roles class, add a new Web Form to the Members folder (right-click the Members folder in Solution Explorer and then select Add New Item...; select Web Form). Name the Web Form Roles.aspx. Populate the Roles.aspx Web Form with the controls shown in Figure 5-33. It will list the various roles defined in the web application as well as the users assigned to a particular role. Figure 5-33. The various controls to display roles and users 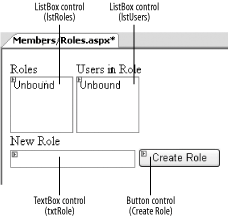
In the ListBox Tasks menu of the lstRoles control, check the Enable AutoPostBack checkbox (see Figure 5-34). This will cause a postback to occur whenever a role is selected in the listbox, so that all users in that selected role can be retrieved and displayed in the second listbox. Figure 5-34. Setting the AutoPostBack property of the lstRoles control 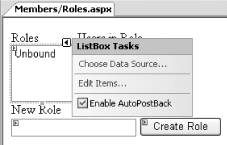
Double-click the Web Form to switch to the code-behind. Code the following in the Form_Load event. You use the GetAllRoles( ) method from the Roles class to retrieve all the roles defined in the web application when the page is loaded for the first time. When a role is selected, you retrieve all the users in that role using the GetUsersInRole( ) method. Protected Sub Page_Load(ByVal sender As Object, _ ByVal e As System.EventArgs) _ Handles Me.Load '---display roles when the page is first loaded If Not IsPostBack Then Dim allRoles( ) As String allRoles = Roles.GetAllRoles( ) lstRoles.Items.Clear( ) For i As Integer = 0 To allRoles.Length - 1 lstRoles.Items.Add(allRoles(i).ToString) Next End If '---displays users in selected role lstUsers.Items.Clear( ) If lstRoles.SelectedItem IsNot Nothing Then Dim allUsersInRole( ) As String = _ Roles.GetUsersInRole(lstRoles.SelectedItem.ToString) For i As Integer = 0 To allUsersInRole.Length - 1 lstUsers.Items.Add(allUsersInRole(i).ToString) Next End If End Sub
To create a new role, use the CreateRole( ) method. Code the Create Role Button control as follows: Protected Sub btnCreateRole_Click(ByVal sender As Object, _ ByVal e As System.EventArgs) _ Handles btnCreateRole.Click Roles.CreateRole(txtRole.Text) lstRoles.Items.Add(txtRole.Text) End Sub
Press F5 to test the application. When the page is loaded, you will be prompted to log in (use the Administrator account created in the previous lab). Once authenticated, you should be able to see the Admin role. Click on the Admin role, and the user(s) in the role will be displayed (see Figure 5-35). Figure 5-35. Displaying roles and users 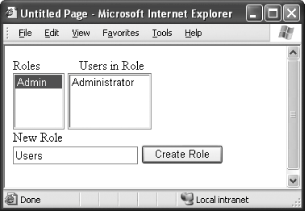
You can also enter the name of a new role and then click on the Create Role button to create a new role. The Roles class also supports other methods, including: Roles.GetRolesForUser Roles.GetUsersInRole Roles.GetUsersInRole Roles.IsUserInRole Roles.RemoveUserFromRole Roles.RemoveUserFromRoles Roles.RemoveUsersFromRole Roles.RemoveUsersFromRoles Roles.RoleExists Roles.FindUsersInRole Roles.AddUsersToRole Roles.AddUsersToRoles Roles.AddUserToRole Roles.AddUserToRoles
5.7.3. Where can I learn more? To understand how ASP.NET 2.0 stores role information through the role provider, check out the MSDN Help topic "ASP.NET Role Management Providers." The MSDN Help topic "Implementing a Role Provider" also discusses how you can implement your own role provider. To learn more about the various methods in the Roles class, check out the MSDN Help topic on "Roles Methods." |