2.6. Populate a TreeView Control Programmatically
Note: Instead of statically binding the TreeView control to a site map or XML file, gain flexibility by creating it dynamically during runtime.
In other labs in this chapter, you have seen how the TreeView control can be bound to site map files as well as XML documents at design time. However, you can also build your TreeView control dynamically, one node at a time. For example, you might want to display a particular disk directory using the TreeView control, or you may have a site that is changing frequently and hence it is much more efficient to build the tree dynamically. In this lab, you will use the TreeView control to display the current application path and its subdirectories. 2.6.1. How do I do that? In this lab, you will learn how to customize the TreeView control and dynamically populate it with items. Specifically, you will display the current application path and all its subdirectories in the TreeView control. Launch Visual Studio 2005 and create a new ASP.NET 2.0 web application. Name the project C:\ASPNET20\chap02-DynamicTreeView. Drag and drop a TreeView control onto the default Web Form. In Solution Explorer, right-click the project name and select Add New Folder Regular Folder. Name the folder Images, since you'll use this folder to store your image files. Regular Folder. Name the folder Images, since you'll use this folder to store your image files. Add the images shown in Figure 2-36 to the C:\ASPNET20\chap02-DynamicTreeView\Images folder.
Tip: The images can be downloaded from this book's support site at http://www.oreilly.com/catalog/aspnetadn/.
Figure 2-36. The images in the Images folder 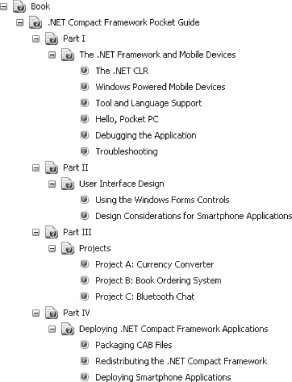
In the TreeView Tasks window, check the Show Lines checkbox and then click the Customize Line Images... link (see Figure 2-37). Figure 2-37. Customizing the TreeView control 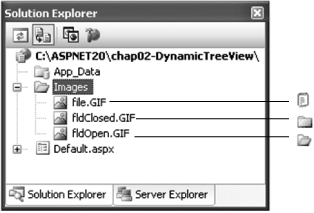
In the ASP.NET TreeView Line Image Generator dialog box, set the following properties (see Figure 2-38): Figure 2-38. Setting the properties of the TreeView control 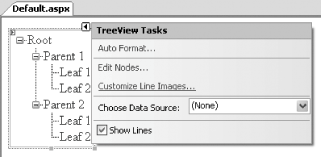
Click OK. When you are prompted to create a new folder called TreeLineImages, click Yes. TreeLineImages contains a series of images used for displaying the TreeView control. When a TreeView node is expanded, it will display the fldOpen.gif image, and when a node is collapsed, the fldClosed.gif image. Double-click on the default Web Form to switch to the code-behind. Code the getSubDirectories( ) method as shown in Example 2-8. This method recursively gets all subdirectories under the current directory and adds the directories as nodes in the TreeView control. Example 2-8. getSubDirectories( ) method Public Sub getSubDirectories(ByVal path As String, _ ByVal node As TreeNode) '---get sub directories under the current one Dim dirs As String( ) = Directory.GetDirectories(path) '---no subdirectories If dirs.Length = 0 Then Exit Sub Else '---for each subdirectory, add to TreeView and ' recursively call itself again Dim dir As String For Each dir In dirs '---Add the relatve path to the TreeView control Dim newNode As New TreeNode( _ dir.Substring(dir.LastIndexOf("\") + 1)) newNode.ToolTip = dir node.ChildNodes.Add(newNode) '---Find its subdirectories getSubDirectories(dir, newNode) '---Find files under itself getFiles(dir, newNode) '---close the current node newNode.CollapseAll( ) Next End If End Sub
Code the getFiles( ) method as shown in Example 2-9. getFiles( ) lists all the files under the current directory and then adds the files as nodes in the TreeView control. Example 2-9. getFiles( ) method Public Sub getFiles(ByVal path As String, ByVal node As TreeNode) Dim files As String( ) = Directory.GetFiles(path) Dim file As String '---no files in directory and no subdirectory If files.Length = 0 And node.ChildNodes.Count = 0 Then Dim newNode As New TreeNode("Directory is empty") node.ChildNodes.Add(newNode) Exit Sub End If For Each file In files '---Add the file to the TreeView control Dim newNode As New TreeNode(file.Substring(path.Length + 1)) newNode.ToolTip = file newNode.ImageUrl = "Images\file.gif" node.ChildNodes.Add(newNode) Next End Sub
Tip: You can specify the image to use for a node with the ImageUrl property.
Finally, add the following code to the Page_Load event so that the TreeView control is populated when the page is loading up: Protected Sub Page_Load(ByVal sender As Object, _ ByVal e As System.EventArgs) _ Handles Me.Load If Not IsPostBack Then TreeView1.Nodes.Add(New _ TreeNode(Request.PhysicalApplicationPath)) getSubDirectories(Request.PhysicalApplicationPath, _ TreeView1.Nodes(0)) End If End Sub
To test the application, press F5. You should see a page like the one shown in Figure 2-39.
Figure 2-39. Viewing the dynamically generated TreeView control 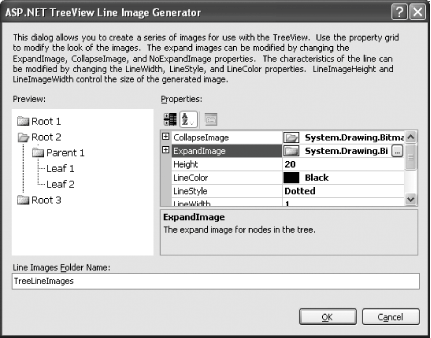
2.6.2. What about... ...programmatically manipulating the TreeView control? To programmatically expand or collapse all the nodes, you can use the ExpandAll( ) and CollapseAll( ) methods, like this: TreeView1.CollapseAll( ) TreeView1.ExpandAll( )
...customizing the behavior of the individual items in the TreeView control? There are a few behaviors that you can set for each item in the TreeView control, some of which are demonstrated in the Source View of a TreeView control in Example 2-10. Example 2-10. Setting properties of a TreeView control <asp:TreeView runat="server"> <Nodes> <asp:TreeNode SelectAction="Expand" Value="Windows" Text="Windows"> <asp:TreeNode SelectAction="SelectExpand" Value="Windows XP" Text="Windows XP"> <asp:TreeNode ShowCheckBox="True" Value="Home Edition" Checked="True" NavigateUrl="xphome.aspx" Text="Home Edition"> </asp:TreeNode> <asp:TreeNode ShowCheckBox="True" Value="Professional" NavigateUrl="xpProfessional.aspx" Text="Professional"> </asp:TreeNode> </asp:TreeNode> <asp:TreeNode Value="Windows 2003 Server" NavigateUrl="win2003.aspx" Text="Windows Server 2003"> </asp:TreeNode> </asp:TreeNode> </Nodes> </asp:TreeView>
When displayed in IE, this TreeView control will look like Figure 2-40. Figure 2-40. The customized TreeView control 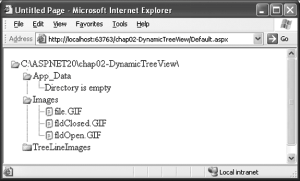
If you're able to compare the behavior of the TreeView control with the attributes assigned to its elements in Example 2-10, you should observe the following: Clicking on the Windows item will either expand or collapse the tree (SelectAction="Expand"). A postback does not occur. Clicking on the Windows XP item will expand and show the items underneath it (if it is collapsed) and a postback will occur (SelectAction="SelectExpand"). You can get the information of the item selected in the Page_Load event via the SelectedNode property of the TreeView control. The Home Edition item has a checkbox (ShowCheckBox="True") displayed next to it (Checked="True"). Clicking on the item will cause the xmhome.aspx page to be loaded (NavigateUrl="xphome.aspx"). The Professional item also has a checkbox displayed next to it (ShowCheckBox="True"). Clicking on the item will cause the xpProfessional.aspx page to be loaded (NavigateUrl="xpProfessional.aspx"). Clicking on the Windows Server 2003 item will cause the win2003.aspx page to be loaded.
Tip: The default SelectionAction for all TreeView items is Select. To display the target page in a new window, set the Target property.
2.6.3. Where can I learn more? Check out the MSDN Help topic for the TreeView control for details on all the properties and methods exposed by this versatile control. |