Basic Graphics and Animation
| [ LiB ] |
Basic Graphics and Animation
You have already seen examples of how JavaScript can be used to control animation and graphics in a browser. The next three examples further demonstrate ways in which you can use JavaScript to manipulate graphics and animation on your Web pages.
The first example shows how to use JavaScript to create animated effects. The second example demonstrates how you can provide the user with control over a document's background color . The final example sets up an online photo album so that you can share your favorite pictures with the world.
The Blinking Eye
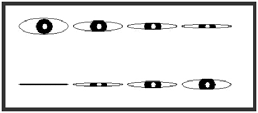
Using JavaScript and a series of like- sized images, you can create basic graphic animations. The next example displays a blinking eye that opens and closes as it stares at your visitors . The actual effect is very simple: First, you need to create a collection of image files that have the same physical dimensions and that are slightly different from each other, as shown in Figure 4.23.
Figure 4.23. The eight images that make up the blinking eye animation example
In the following example, I will demonstrate how to create a simple graphic animation using JavaScript. In this example the script will use a series of eight slightly different images to produce the illusion of a blinking eye.
<HTML> <HEAD> <TITLE>Script 4.18 - Blinking eye example</TITLE> <SCRIPT LANGUAGE="JavaScript" TYPE="Text/JavaScript"> <!-- Start hiding JavaScript statements current_img = 0; function BlinkEye() { current_img++; if (current_img > images.length - 1) { current_img=0; } document.myEye.src = images[current_img]; setTimeout('BlinkEye()',100); } image1 = new Image; image1.src = "eye1.jpg"; image2 = new Image; image2.src = "eye2.jpg"; image3 = new Image; image3.src = "eye3.jpg"; image4 = new Image; image4.src = "eye4.jpg"; image5 = new Image; image5.src = "eye5.jpg"; image6 = new Image; image6.src = "eye6.jpg"; image7 = new Image; image7.src = "eye7.jpg"; image8 = new Image; image8.src = "eye8.jpg"; images= new Array(8); images[0] = image1.src; images[1] = image2.src; images[2] = image3.src; images[3] = image4.src; images[4] = image5.src; images[5] = image6.src; images[6] = image7.src; images[7] = image8.src; // End hiding JavaScript statements --> </SCRIPT> </HEAD> <BODY> <IMG SRC="images[0]" WIDTH="100" HEIGHT="100" BORDER="0" NAME="myEye"> <SCRIPT LANGUAGE="JavaScript" TYPE="Text/JavaScript"> <!-- Start hiding JavaScript statements BlinkEye(); // End hiding JavaScript statements --> </SCRIPT> </BODY> </HTML> The first thing the script does is define a variable that tracks the current image:
currentImg = 0;
Next the script defines a function named BlinkEye() that, when called, increases the current image by 1. The function then sets document . myEye.src equal to the current image (as specified by the array position images[current_img]) ; this statement has the effect of changing the image displayed in the <IMG> tag named myEye in the body section of the page. The function then sets itself up to execute again in .1 second with the statement setTimeout('BlinkEye()',100) .
function BlinkEye() { current_img++; if (current_img > images.length - 1) { current_img=0; } document.myEye.src = images[current_img]; setTimeout('BlinkEye()',100); } To ensure that the graphics load quickly, you should preload them into cache on the visitor's computer. As the following line demonstrates, the script defines an image object for each graphic and then associates it with a graphic. The end result is that all the images are downloaded and placed into the user's cache before the effect begins to execute.
image1 = new Image; image1.src = "eye1.jpg";
Of course, for the BlinkEye() function to cycle through the images, the images must be loaded into an array:
images= new Array(8); images[0] = image1.src; images[1] = image2.src; images[2] = image3.src; images[3] = image4.src; images[4] = image5.src; images[5] = image6.src; images[6] = image7.src; images[7] = image8.src;
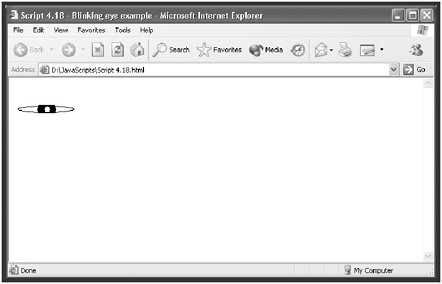
The <IMG> tag in the body section defines the initial graphic that is displayed when the page first loads, as well as its physical dimensions and characteristics. The BlinkEye() statement starts the whole animation process in motion. Figure 4.24 demonstrates the effect of the animation as the eye is beginning to close.
Figure 4.24. Using JavaScript to produce simple animated graphics
The Background Changer
This next example demonstrates how to enable the user to control the document's background color. By adapting this example, you can enable your visitors to customize their views of your pages. If you then combine this approach with the use of cookie technology, you can store this information and retrieve it every time that user visits your Web pages.
This example provides the user with two options for setting background color. The first method is to choose from a list of predefined options, and the second method is to type a color preference.
<HTML> <HEAD> <TITLE>Script 4.19 - Background animation example</TITLE> </HEAD> <BODY> <SCRIPT LANGUAGE="JavaScript" TYPE="Text/JavaScript"> <!-- Start hiding JavaScript statements function ChangeBackground(color_num) { document.bgColor = color_num; } // End hiding JavaScript statements --> </SCRIPT> <H3>Select your background preference:</H3> <FORM NAME="myForm"> <SELECT NAME="myList" onChange="ChangeBackground( document.myForm.myList.options[ document.myForm.myList.selectedIndex].value)"> <OPTION VALUE="red"> Red <OPTION VALUE="green"> Green <OPTION VALUE="yellow"> Yellow <OPTION VALUE="blue"> Blue <OPTION VALUE="pink"> Pink <OPTION VALUE="purple"> Purple <OPTION VALUE="orange"> Orange <OPTION VALUE="brown"> Brown <OPTION VALUE="white"> White </SELECT> <H3>Or type your own color here:</H3> <INPUT NAME="myText" TYPE="text" SIZE="10" MAXLENGTH="15" VALUE=""> <INPUT NAME="myButton1" TYPE="button" VALUE="Change" onClick="ChangeBackground(document.myForm.myText. value)"> </FORM> </BODY> </HTML/> This example defines a function named ChangeBackground() that changes the documents bgColor property to match the argument that it receives:
function ChangeBackground(color_num) { document.bgColor = color_num; } The script defines a drop-down list of color options that the visitor can select from and uses the <SELECT> tag's onChange event to call the ChangeBackground() function if the user selects one of the options:
onChange="ChangeBackground( document.myForm.myList.options[ document.myForm.myList.selectedIndex].value)"
The final portion of the script enables your more discerning visitors to specify their own preferred background color by first defining a text field in which the user can type his color choice and a button that, when clicked, executes the ChangeBackground() function and passes the color the user specified (for example, document.myForm.myText.value ).
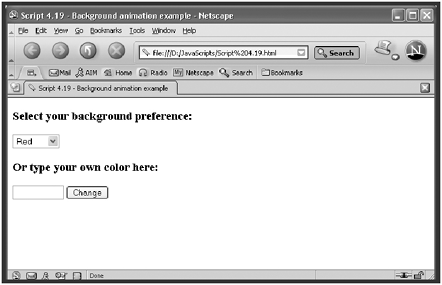
Figure 4.25 shows how this example looks when first loaded into the browser.
Figure 4.25. An example of a script that enables your visitors to set a background color preference
The Picture Viewer
This final graphic example uses a combination of frames and JavaScript to deliver an impressive but simple online picture viewer. As the following example shows, the JavaScript located in the head section defines and loads all the images into cache on the visitor's computer.
<HTML> <HEAD> <TITLE>Script 4.20 - Example of a picture viewer</TITLE> <SCRIPT LANGUAGE="JavaScript" TYPE="Text/JavaScript"> <!-- Start hiding JavaScript statements birthday = new Image(); birthday.src = "birthday.jpg"; puppydog = new Image(); puppydog.src = "puppydog.jpg"; stuffed = new Image(); stuffed.src = "stuffed.jpg"; // End hiding JavaScript statements --> </SCRIPT> </HEAD> <BODY> <CENTER> <TABLE BORDER="10"> <TR> <TD> <H3>Hello and welcome to my personal photo album!</H3> </TD> </TR> <TR> <TD> <FORM NAME = myForm> <B>Choose a picture:</B> <INPUT NAME="myButton1" TYPE="button" VALUE="birthday" onClick = "document.myImage.src = birthday.src"> <INPUT NAME="myButton2" TYPE="button" VALUE="puppydog" onClick = "document.myImage.src = puppydog.src"> <INPUT NAME="myButton3" TYPE="button" VALUE="stuffed" onClick = "document.myImage.src = stuffed.src"> </FORM> </TD> </TR> <TR> <TD> <IMG NAME="myImage" SRC="welcome.jpg" WIDTH="440" HEIGHT="292"> </TD> <TR> </TABLE> </CENTER> </BODY> </HTML>
In the body section, a TABLE of one column and three rows is defined. The first row contains a welcome message formatted with the level 3 HTML header <H3> . The second row contains a form with three buttons , each of which has an onClick event handler that changes the src property of the image to a different picture.
<INPUT NAME="myButton1" TYPE="button" VALUE="birthday" onClick = "document.myImage.src = birthday.src"> <INPUT NAME="myButton2" TYPE="button" VALUE="puppydog" onClick = "document.myImage.src = puppydog.src"> <INPUT NAME="myButton3" TYPE="button" VALUE="stuffed" onClick = "document.myImage.src = stuffed.src">
The last row in the table contains a simple <IMG> tag that loads an initial image and defines the display's physical dimensions. Figure 4.26 shows what this example looks like when it is first loaded.
Figure 4.26. By combining JavaScript and frames, you can create very powerful presentations.

| [ LiB ] |
EAN: 2147483647
Pages: 84