Under the Hood
In Chapter 1, we talked about the fact that the report definitions are stored using the Report Definition Language (RDL). RDL was created by Microsoft specifically for Reporting Services. Two things set this file structure apart from other Microsoft file structures, such as a Word document or an Excel spreadsheet. First, RDL is a published standard. Second, RDL is an Extensible Markup Language (XML) document.
Microsoft has gone public with the specifications for RDL. Third parties can create their own authoring environments for creating report definitions. If the RDL from these third-party tools conforms to the RDL standard, the reports created by these tools can be managed and distributed by Reporting Services.
Because RDL is an XML document, you can look at a report definition in its raw form. If you try that with a Word document or an Excel spreadsheet, you will see nothing but gibberish. If you were so inclined, you could use Notepad to open an RDL file and look at its contents. In fact, you don’t even need Notepad. You can look at the contents of an RDL file right in the Report Designer.
Viewing the RDL
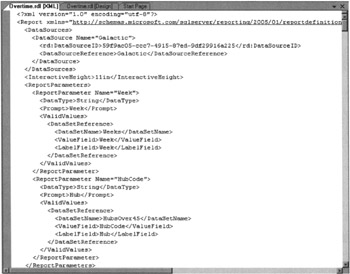
Right-click the entry for Overtime.rdl in the Solution Explorer, and then select View Code from the Context menu. You see a new tab in the layout area called Overtime.rdl [XML]. This tab contains the actual RDL of the report, as shown in Figure 7–19.

Figure 7–19: The RDL for the Overtime Report
XML Structure
Because the RDL is an XML document, it is made up of pairs of tags. A begin tag is at the beginning of an item and an end tag at the end of the item. A begin tag is simply a string of text, the tag name, with < at the front and > at the back. An end tag is the same string of text with </ at the front and > at the back. This pair of tags creates an XML element. The information in between the two tags is the value for that element. In the following example, the Height element has a value of 0.625in:
<Height>0.625in</Height>
There can never be a begin tag without an end tag, and vice versa. In fact, it can be said that XML is the Noah's Ark of data structures, because everything must go two by two.
In addition to simple strings of text, XML elements can contain other elements. In fact, a number of elements can nest one inside the other to form complex structures. Here’s an example:
<Textbox> <Style> <Color>DarkBlue</Color> </Style> </Textbox>
In some cases, begin tags contain additional information as attributes. An attribute comes in the form of an attribute name, immediately following the tag name, followed by an equal sign (=) and the value of the attribute. In this example, the Textbox element has an attribute called Name with a value of “tmpl_Name”:
<Textbox Name=" tmpl_Name" >...</Textbox>
The RDL contains several sections: the page header, the body, the data sources, the datasets, the embedded images, the page footer, and the report parameters. Each section starts with a begin tag and is terminated by an end tag. For example, the page header section of the RDL starts with <PageHeader> and is terminated by </PageHeader>.
In Figure 7–19, you can see the entire XML structure for the Week report parameter. The begin tag of the report parameter includes a Name attribute. This corresponds to the Name property of the report parameter. In between the begin and end tags of the report parameter element are additional elements, such as DataType, Prompt, and ValidValues. These elements correspond to the other properties of this report parameter. Only those properties that have been changed from their default values are stored in the RDL.
Editing the RDL
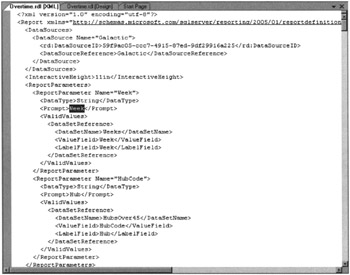
One other interesting thing about viewing the RDL in the Report Designer is you can make changes to the RDL and have them affect the report design. Find the Prompt element within the Week report parameter element, as shown in Figure 7–20.

Figure 7–20: The Prompt element of the Week report parameter
Replace Week with Work Week and click Save All in the toolbar. Right-click the entry for Overtime.rdl in the Solution Explorer, and then select View Designer from the Context menu. Select the Preview tab. You notice the prompt has been changed to Work Week.
If you do find a reason to make modifications directly to the RDL, do so with care. If you break up a begin/end pair or enter an invalid value for a property element (such as puce for a color), you can end up with a report that will not load in the Report Designer. Save your work immediately before making changes directly to the RDL. In just about every case, however, the designer works better for making changes to a report layout, so do your editing there.
EAN: 2147483647
Pages: 115