Never Having to Say Im Sorry
Never Having to Say “I’m Sorry”
Users can be particular about the way their reports are laid out. In many cases, you will be creating new reports to replace existing ones. It may be that the user was getting a report from a legacy system, from an Access report or a spreadsheet, or from a ledger book. Whatever the case, the user is used to seeing the data presented in a certain way with everything arranged just so.
Now you come along with Microsoft SQL Server 2005 Reporting Services, telling the user that the new reporting system is infinitely better than the old way—more efficient, more timely, with more delivery options. That is all well and good with the user but, invariably, the question will arise, “Can you make the report look the same as what I have now?” No matter how antiquated or inefficient the current reporting system might be, it is familiar, perhaps even comforting, to your users. Change is difficult. The irony of the human race is this: on a large scale we like change, but on an individual level, we mainly want things to stay the same.
Even if Reporting Services is well established and you are not converting reports from an existing system, users still have preconceived notions. They have a vision for the way a new report should be laid out. These visions need to be respected. After all, the report developer is not the one who has to look at the report every day, week, or month—the user is! The user is the one who probably knows how to best turn the data into something useful.
What the users don’t want to hear is, “I’m sorry, but we can’t do it that way in Reporting Services.” You will be miles ahead if you spend your time fulfilling your users’ vision, rather than trying to convince them that Reporting Services is a great tool, despite the fact that it cannot do what they want it to do. The techniques in this section, and also in parts of Chapter 8, can help you to make Reporting Services reports do exactly what your users want them to do. After all, if your users ain’t happy, ain’t nobody happy!
Successful report development means never having to say, “I’m sorry.”
The Report Template
Features Highlighted
-
Creating a reusable template for reports
-
Using values from the Globals collection
Business Need Galactic Delivery Services is looking to increase the efficiency of its report developers. GDS would like a template that can be used for each new report created. The report template is to include the GDS logo and the company name in a header across the top of each page. The template is also to include a footer across the bottom of each page showing the date and time the report was printed, who printed the report, the current page number, and the total number of pages in the report.
Task Overview
-
Create the Template Project and the Template Report with a Page Header
-
Create the Page Footer on the Template Report
-
Copy the Template to the Report Project Directory
Report Template, Task 1: Create the Template Project and the Template Report with a Page Header
-
Create a new Reporting Services project called Template in the MSSQLRS folder. (If you need help with this task, see the section “The Transport List Report” in Chapter 5.)
-
Add a blank report called GDSReport to the Template project. (Do not use the Report Wizard.)
-
Select the Layout tab.
-
From the Main menu, select Report | Page Header. A space for the page header layout appears above the layout area for the body of the report. (If Report is not showing on the Main menu, click anywhere on the report layout. The Format and Report menu choices appear.) Drag the gray bar separating the page header and the body down, so the page header area is larger.
-
From the Toolbox, place an image item in the layout area for the page header. The Image Wizard appears.
-
Click Next.
-
The Embedded choice should be selected. Click Next.
-
Click New Image. Browse to the GDS.gif image file and select it. Click Open.
-
Click Next.
-
Click Finish to exit the Image Wizard. The image is placed in the page header.
-
Modify the following properties of the image:
Property
Value
Location: Left
0in
Location: Top
0in
Name
tmpl_Logo
Size: Width
0.75in
Size: Height
0.625in
-
Place a text box in the layout area for the page header. Modify the following properties of the text box:
Property
Value
Color
DarkBlue
Font: FontSize
30pt
Font: FontWeight
Bold
Location: Left
0.75in
Location: Top
0in
Name
tmpl_Name
Size: Width
5.75in
Size: Height
0.625in
Value
Galactic Delivery Services
VerticalAlign
Middle
-
Click in the page header layout area outside the text box and image. Page Header is selected in the drop-down list at the top of the Properties window.
-
Modify the following property for the page header:
Property
Value
Size: Height
0.75in
Task Notes Reporting Services reports have a page header layout area that can be used to create a page heading for the report. The page header has properties, so it can be turned off on the first page or the last page of the report. Aside from these options, if the page header is turned on in the Report menu, it appears on each report page.
The page header can be populated with images, text boxes, lines, and rectangles. You cannot, however, place any data regions, tables, matrixes, lists, or charts in a page header. In fact, you cannot directly reference fields from a dataset in the page header.
Each report item placed in the report layout is given a name. Up to this point, we have been letting the Report Designer provide a default name for each item (textbox1, image2, and so on). In most cases, these default names will work just fine. The only time you need to provide a more meaningful name is when you need to reference one report item from another, such as when one item toggles the visibility of another, or when you are creating a template.
The reason we need to provide nondefault names for our report template is to avoid any naming collisions when we create reports using our template. When you add the first text box to a report created with our template, it is automatically called textbox1. This causes a problem if we already have a text box called textbox1 that came from our template.
To avoid these naming collisions, we need to provide names for the report items in our template that are unlikely to be duplicated in a report. For this reason, we put the prefix tmpl_ in front of the name of each item. These names should be unique enough to prevent naming collisions when we put our template to use.
In the previous task, you chose to make the logo image in the report header an embedded image. This was done for reasons of convenience for these exercises. In an actual template created for your company, retrieving images from the Internet is probably a good idea. As discussed previously, this allows for the image to be used in a multitude of reports while being stored in a single location. This also makes it easy to update the image the next time the marketing department gives it a makeover.
Report Template, Task 2: Create the Page Footer on the Template Report
-
Click in the report layout area.
-
From the Main menu, select Report | Page Footer. A space for the page footer layout appears below the layout area for the body of the report.
-
Page Footer is selected in the Properties window. Modify the following property for the page footer:
Property
Value
Size: Height
0.375in
-
Place a text box in the layout area for the page footer. Modify the following properties of the text box:
Property
Value
Font: FontSize
8pt
Location: Left
0in
Location: Top
0.125in
Name
tmpl_ReportName
Size: Width
2.25in
Size: Height
0.25in
-
Right-click the text box and select Expression from the Context menu, or select <Expression…> from the drop-down list for the Value property in the Property window. The Edit Expression dialog box appears.
-
Select Globals.
-
Double-click ReportName. The expression to return ReportName from the Globals collection is placed in the Expression area.
-
Click OK to exit the Edit Expression dialog box.
-
Place a second text box in the layout area for the page footer. Modify the following properties of the text box:
Property
Value
Font: FontSize
8pt
Location: Left
2.75in
Location: Top
0.125in
Property
Value
Name
tmpl_PageNumber
Size: Width
1in
Size: Height
0.25in
-
Right-click this text box and select Expression from the Context menu. The Edit Expression dialog box appears.
-
Type the following in the Expression area after the equals (=) sign:
"Page" &
A space should be typed both before and after the ampersand character (&).
-
Select Globals.
-
Double-click PageNumber to append it. The expression to return PageNumber from the Globals collection is added to the Expression area.
-
After the PageNumber expression, type the following:
& "of" &
A space should be typed both before and after each ampersand.
-
Double-click TotalPages. The expression to return TotalPages from the Globals collection is added to the Expression area.
-
Click OK to exit the Edit Expression dialog box.
-
Place a third text box in the layout area for the page footer. Modify the following properties of the text box:
Property
Value
Font: FontSize
8pt
Location: Left
4.25in
Location: Top
0.125in
Name
tmpl_DateTime
Size: Width
2.25in
Size: Height
0.25in
TextAlign
Right
-
Right-click this text box and select Expression from the Context menu. The Edit Expression dialog box appears.
-
Select Globals.
-
Double-click ExecutionTime. The expression to return ExecutionTime from the Globals collection is added to the Expression area.
-
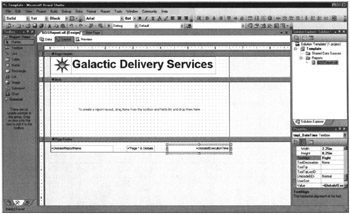
Click OK to exit the Edit Expression dialog box. Your report layout should appear similar to Figure 7–1.

Figure 7–1: The report template layout -
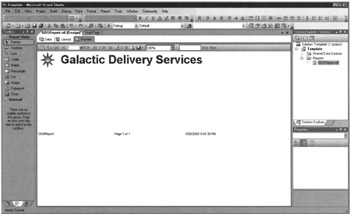
Select the Preview tab. Your report should appear similar to Figure 7–2.

Figure 7–2: The report template on the Preview tab -
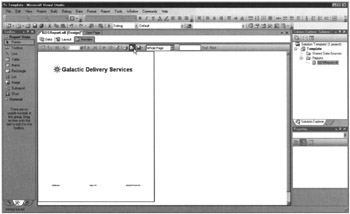
For a better look at what the header and footer will look like on a printed report, click the Print Layout button, as shown in Figure 7–3.

Figure 7–3: The report template in Print Preview mode -
Let’s put the page header closer to the top of the page and the page footer closer to the bottom of the page. Select the Layout tab.
-
In the Main menu, select Report | Report Properties. The Report Properties dialog box appears.
-
Select the Layout tab.
-
Modify the following values:
Property
Value
Top margin
0.5in
Bottom margin
0.5in
-
Click OK.
-
Select the Preview tab.
-
Click the Print Layout button to exit the print preview.
-
Click Save All in the toolbar.
Task Notes Reporting Services provides a number of global values you can use in your reports, including the following:
| ExecutionTime | The date and time the report was executed. (This is not the time it takes for the report to run but, rather, the time at which the report was run.) |
| Language | The language the report is output in. |
| PageNumber | The current page number within the report. |
| ReportFolder | The report server folder the report resides in. Report Folder is blank in the development environment. |
| ReportName | The name of the report. |
| ReportServerUrl | The URL of the Internet server hosting the report. |
| TotalPages | The total number of pages in the report. |
| UserID | The network user name of the person executing the report. |
These global values are commonly used in the page header and page footer areas of the report. It is possible, however, to use them anywhere in the report.
The report has its own properties that can be modified. You are most likely to use the Report Properties dialog box to modify the page width, the page height, and the margins. In Chapter 8, however, we explore some of the other properties available in this dialog box.
Report Template, Task 3: Copy the Template to the Report Project Directory
-
From the Main menu, select File | Close Property to close the solution.
-
Open Windows Explorer and navigate to the folder you created for the Template project. From the My Documents folder, the path should be the following:
Visual Studio 2005\Projects\MSSQLRS\Template
-
In the Template folder, highlight the file GDSReport.rdl. This is the template report we just created.
-
Press CTRL-C to copy this file.
-
Navigate to the directory where the Report Designer stores its templates. In a default installation this is
C:\Program Files\Microsoft Visual Studio 8\Common7\IDE\ PrivateAssemblies\ProjectItems\ReportProject
-
Select the ReportProject folder.
-
Press CTRL-V to paste the copied file in this directory.
-
Close Windows Explorer.
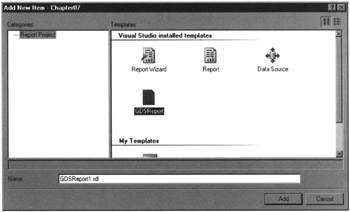
Task Notes When we add a new item to a report project, the Report Designer looks in the ProjectItems\ReportProjects folder. Any report files (.rdl) it finds in this folder are included in the Templates area of the Add New Item dialog box. This is shown in Figure 7–4.

Figure 7–4: The Add New Item dialog box with a custom template
In the remainder of this chapter, we use our new template to create reports.
EAN: 2147483647
Pages: 115