| If you're running a server installation of WordPress, you can configure it to accept and publish posts submitted via e-mail. This makes it possible to post entries to your blog without using a Web browser. Here's how it works. Begin by creating a unique e-mail address. The new address will be used only for receiving blog posts and should not be revealed to anyone not authorized to post to the blog. Next, configure the Writing by e-mail options in the Writing Options administration panel (Figure 70) to provide settings for this new e-mail address. Then use your e-mail client software to compose a message containing the text of a post you want to publish and send it to the e-mail address you specified. Finally, tell WordPress to check for new postsor set it up to check automatically. The message is imported into your blog as a post. Figure 70. To post by e-mail, you must set Writing by e-mail options in the Writing Options administration panel. 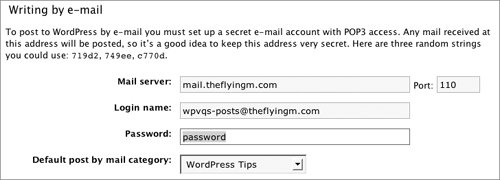
In this part of the chapter, we explain how to compose an e-mail message to be posted to your blog and how to tell WordPress to check for new posts by e-mail. Tips  | This feature is not available for WordPress.com blogs. If you need help setting up an e-mail address, consult your ISP or system administrator. We explain how to configure Writing Options to use this feature in Chapter 2. This step must be completed once before sending posts by e-mail. The e-mail address you set up for posting by e-mail must be unique and used only for posting to your blog. Keep it secretanyone who has this address will be able to post to your blog!
|
To submit a post by e-mail 1. | Launch your e-mail client software.
| 2. | In the To field of a new message form, enter the e-mail address you specified in the Writing Options administration panel (Figure 70).
| 3. | In the Subject field, enter the text you want to appear as the title for the post.
| 4. | In the body of the message, enter the text you want to appear in the post. Figure 71 shows an example of a completed post.
Figure 71. Here's an example of a blog post in an e-mail message. 
| 5. | Use the Send button or command to send the message.
|
Tips | You can include HTML tags in the body of the message for formatting, links, and other post content. Do not use rich text formatting features offered by your e-mail client software. Doing so may render the message unreadable by WordPress.
|
To import e-mailed posts 1. | If WordPress is installed in its own folder in your Web site's root directory, use your Web browser to open www.example.com/wordpress/wp-mail.php.
or
If the individual WordPress files are installed in your Web site's root directory, use your browser to open www.example.com/wp-mail.php.
| 2. | Wait while WordPress checks for the message and loads it. When it's finished, you should see something like what's shown in Figure 72.
Figure 72. WordPress shows the text it imported with the text it posted. They should be the same. 
| 3. | Use your Web browser to view your blog. The message should appear as a post (Figure 73).
Figure 73. Here's how the post might appear in your blog. 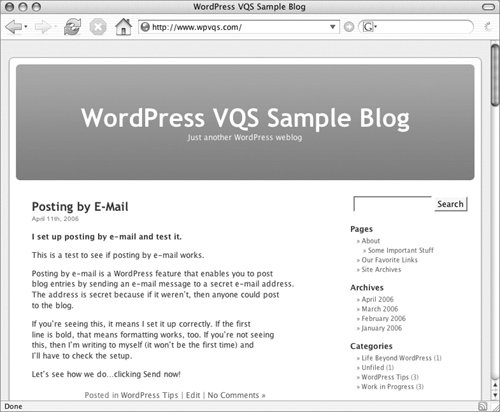
|
Tips | You may see the following error message in step 2: Oops POP3: premature NOOP OK, NOT an RFC 1939 Compliant server. If so, you'll need to use a text editor to modify the contents of the class-pop3.php file in your wp-includes folder for a quick fix. Search the file for if($this->RFC1939) { and replace it with if(!$this->RFC1939) { (note the exclamation point). Save the file and repeat these steps. It should work without errors from that point on. You can automate this process by installing and activating the WP-Cron and WP-Cron-Mail plugins. You can learn more about these plugins at www.skippy.net/blog/category/wordpress/plugins/wp-cron/. We tell you about plugins in Chapter 7.
|
|