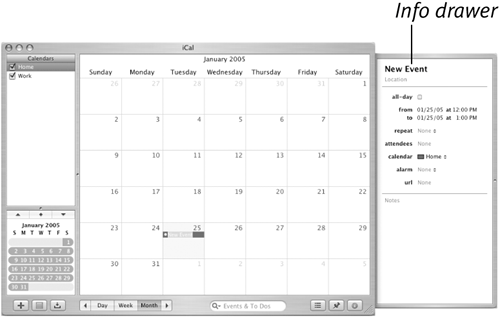
| iCal is a personal calendar application that enables you to keep track of appointments and other events. With iCal, you can: - Create multiple color-coded calendars for different categories of eventsfor example, home, business, or school. You can view your calendars individually or together.
- View calendars by day, week, or month.
- Share calendars on the Web with family, friends, and business associates.
- Send e-mail invitations for events to people in your Mac OS X Address Book.
- Get notification of upcoming events on screen or by e-mail.
- Create and manage a priorities-based to-do list.
This part of the chapter provides basic instructions for setting up and using iCal.  Tip Tip
To launch iCal Double-click the iCal icon in the Applications folder (Figure 1). Or Click the iCal icon in the Dock (Figure 2). Or 1. | Click the iCal icon in the Applications folder (Figure 1) to select it.
| 2. | Choose File > Open, or press  . .
|
iCal's main window appears (Figure 62). Figure 62. iCal's main window, showing a week at a glance view. 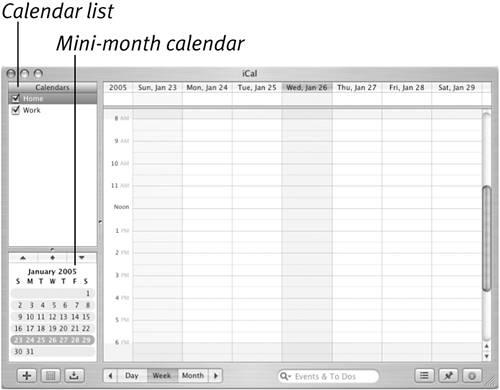
To change the calendar view Click one of the view buttons at the bottom of the calendar window (Figure 63). Day shows a day at a glance (Figure 64). Figure 64. Day view shows one day at a time. 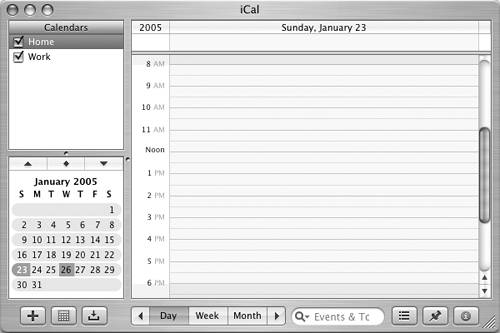
Week shows a week at a glance (Figure 62). Month shows a month at a glance (Figure 65). Figure 65. Month view shows a month at a time. 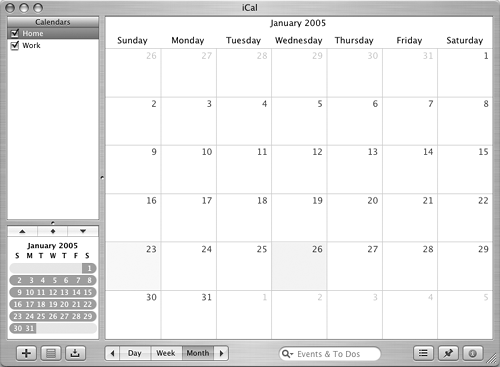
Figure 63. Use these buttons to switch between Day, Week, and Month view or to go back or forward in the calendar. 
To view a specific day, week, or month 1. | Follow the instructions in the previous section to change the view.
| 2. | Click the Next or Previous button (Figure 66) above the mini-month calendar until the date's month appears as one of the mini-month calendars. For example, to view June 30, 2005, you'd click the Next or Previous button until June 2005 appeared.
Figure 66. The navigation buttons above the mini-month calendar. 
| 3. | In the mini-month calendar, click the day, week, or month you want to view. It appears in the main calendar window.
|
Or 1. | Choose View > Go to Date (Figure 67) or press  . .
Figure 67. iCal's View menu. 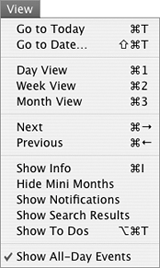
| 2. | Enter the date you want to go to in the tiny dialog sheet that appears (Figure 68).
Figure 68. Enter the date you want to view in this dialog. 
| 3. | Click Show.
|
 Tip Tip
To view today's date, click the Today button above the mini-month calendar, choose View > Go to Today (Figure 67), or press  . .
To create an event by dragging 1. | In the Calendar list on the upper-left corner of the calendar window, click the name of the calendar you want to add the event to.
| 2. | In Day or Week view, drag from the event's start time to end time (Figure 69). When you release the mouse button, a box for the event appears in the calendar window with its default name (New Event) selected (Figure 70).
Figure 69. Drag from the event's start time to end time. 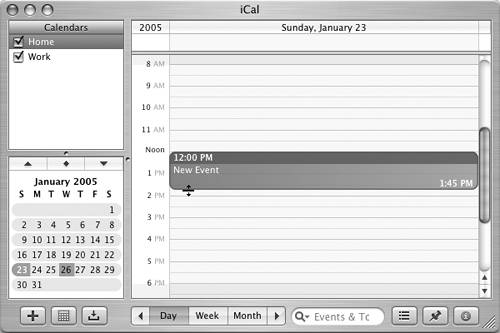
Figure 70. When you release the mouse button, the event box appears with its default name selected. 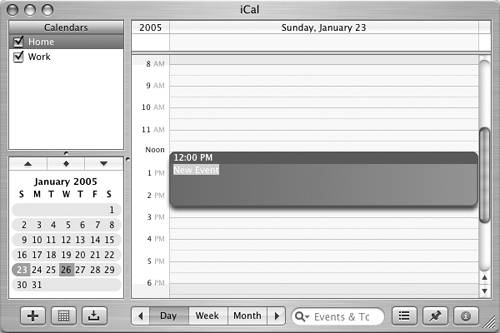
| 3. | Enter a new name for the event, and press  . .
|
 Tip Tip
To create an event with the New Event command 1. | In any calendar view window, select the day you want to add the event to.
| 2. | Choose File > New Event (Figure 71), or press  . A box for the event appears in the calendar window with its default name (New Event) selected (Figure 72). . A box for the event appears in the calendar window with its default name (New Event) selected (Figure 72).
Figure 71. iCal's File menu. 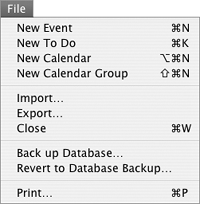
| 3. | Enter a new name for the event and press  . .
|
 Tip Tip
To set event details 1. | In the calendar window, select the event you want to modify.
| 2. | If necessary, click the Show Info button in the lower-right corner of the window, choose View > Show Info (Figure 67), or press  to display the Info drawer. to display the Info drawer.
| 3. | To enter an event name and location, click in the appropriate field at the top of the Info drawer and type what you want to appear (Figure 73).
Figure 73. To enter an event name or location, click the field and enter the information you want to appear. 
| 4. | To indicate that the event lasts all day (or more than one day), turn on the all-day check box. You can then enter an ending date in the to date area (Figure 74).
Figure 74. When you turn on the all-day check box, you can enter starting and ending dates. 
or
To specify starting and ending times for the event, make sure the all-day check box is turned off and then enter the starting and ending times in the two time areas (Figure 75).
Figure 75. With the all-day check box turned off, you can enter starting and ending times. 
| 5. | To set the event to repeat on a regular basis, choose an option from the repeat pop-up menu (Figure 76). If none of the standard options apply, you can choose Custom and use the dialog that appears (Figure 77) to set a custom repeating schedule. Then, if necessary, set an ending option in the end field that appears (Figure 78).
Figure 76. Use the repeat pop-up menu to set an event to repeat regularly. 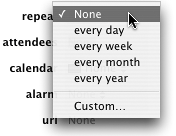
Figure 77. Choosing Custom from the repeat pop-up menu displays this dialog. 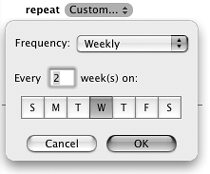
Figure 78. An example of a custom repeating option with an end date. 
| 6. | To identify one or more people involved with the event, enter each person's name in the Attendees field. As you type, iCal attempts to match names to those in your Address Book database (Figure 79), but you can enter any name.
Figure 79. As you enter a name in the attendees field, iCal attempts to match it to an Address Book entry. 
| 7. | To specify a calendar to add the event to, choose a calendar from the calendar pop-up menu (Figure 80). The menu lists all calendars you have created.
Figure 80. You can add an event to any calendar. 
| 8. | To be reminded about the event, choose an option from the Alarm pop-up menu (Figure 81). Then set other alarm options as necessary (Figure 82).
Figure 81. Choosing an option from the alarm pop-up menu sets a reminder for the event. 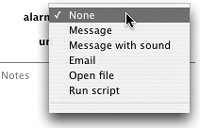
Figure 82. If you choose an alarm, you must set how far in advance it should activate. 
| 9. | To associate a Web page with the event, enter a URL in the url field (Figure 83).
Figure 83. You can associate a Web page's URL with an event. 
| 10. | To add notes about the event, click the Notes field and type what you want to appear (Figure 84).
Figure 84. Enter notes about the event in the notes field. 
|
Figure 85 shows an example of an event with detailed information in the Info drawer. Figure 85. Here's an example of a completed event with its details in Week view. 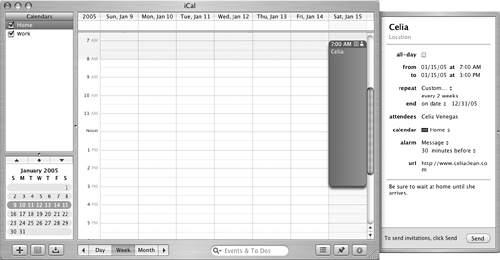
 Tips Tips
You can use these steps to add settings for a new event or make changes to an existing event. The all-day event check box is handy for entering information about vacations and other events that span multiple days. In step 4, the ending date must be after the starting date. It may be necessary to change AM to PM before entering the second time. A quick way to change an event's date is to drag its event box from one date to another in the main calendar window. This automatically changes the date info in the Info drawer for the event. A quick way to change an event's time is to drag its top or bottom border in Day or Week view of the main calendar window. This automatically changes the time info in the Info drawer for the event. If an event has attendees, you can click an attendee's name to access a menu of options for that attendee. Figure 86 shows an example for an attendee from my Address Book database; note that iCal has automatically looked up the person's e-mail address. Figure 86. When you click an attendee's name, iCal displays a menu of options for working with that attendee. 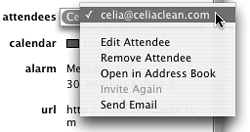
If you set an event to repeat, any time you change that event's details, a dialog like the one in Figure 87 appears. Click the appropriate button for the change. Figure 87. A dialog like this appears when you make a change to a repeating event. 
Icons for some settings appear in the upper-right corner of the event box when viewed in Day or Week view (Figure 85). I tell you more about individual calendars later in this section.
To delete an event 1. | In the calendar window, select the event you want to delete.
| 2. | Press  . The event disappears. . The event disappears.
|
To create a To Do item 1. | Choose File > New To Do (Figure 71), or press  . If the To Do items list was not already showing, it appears. An untitled To Do item appears in the list with its default name (New To Do) selected (Figure 88). . If the To Do items list was not already showing, it appears. An untitled To Do item appears in the list with its default name (New To Do) selected (Figure 88).
Figure 88. The To Do items list with a new To Do item added. 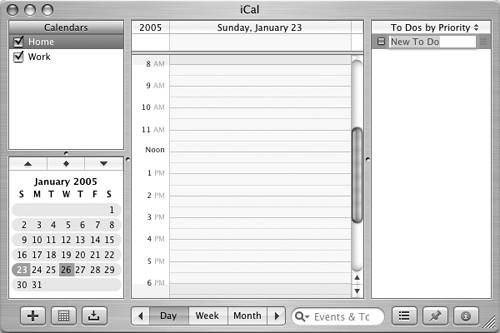
| 2. | Enter a name for the To Do item and press  . .
|
To set To Do item details 1. | If necessary, click the Show To Do list button in the lower-right corner of the window or press  to display the To Do items list. to display the To Do items list.
| 2. | In the To Do items list, select the item you want to modify.
| 3. | If necessary, click the Show Info button in the lower-right corner of the window or press  to display the Info drawer (Figure 89). to display the Info drawer (Figure 89).
Figure 89. You can use the Info drawer to set options for a To Do item. 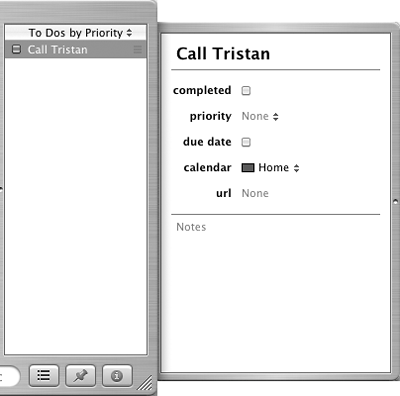
| 4. | To enter an item name, click in the field at the top of the Info drawer and type what you want to appear.
| 5. | To mark the item as completed, turn on the completed check box.
| 6. | To set a priority for the item, choose an option from the priority pop-up menu (Figure 90).
Figure 90. Use the priority pop-up menu to prioritize To Do items. 
| 7. | To set a due date for the item, turn on the due date check box and enter a date in the field beside it (Figure 91). You can then use the Alarm pop-up menu (Figure 81) and associated options (Figure 92) to set a reminder for the item.
Figure 91. When you turn on the due date check box, you can enter a deadline for the item. 
Figure 92. There are more alarm options for to do items than calendar events. 
| 8. | To specify a calendar to add the item to, choose a calendar from the calendar pop-up menu (Figure 80). The menu lists all calendars you have created.
| 9. | To associate a Web page with the item, enter a URL in the url field (Figure 83).
| 10. | To add notes about the item, click the Notes field and type what you want to appear (Figure 84).
|
Figure 93 shows an example of a To Do item with several options set. Figure 93. A To Do item with all information entered. 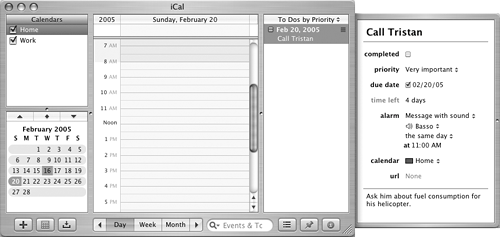
 Tips Tips
You can mark a To Do item as complete by clicking its check box in the To Do items list (Figure 93). The stack of lines on the button to the left of a To Do item's name in the To Do items list (Figure 93) indicates its priority: the more lines, the more important the item is. You can click this button to change the priority (Figure 94). Figure 94. Click the priority button to change an item's priority. 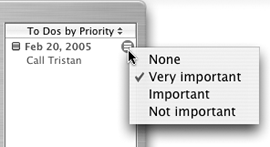
You can change the sort order of To Do items by clicking the arrows at the top of the To Do list to display a menu (Figure 95) and choosing a different option. Figure 95. Use this menu to change the sort order of To Do items. 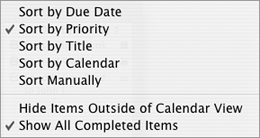
To delete a To Do item 1. | If necessary, click the Show To Do list button in the lower-right corner of the window or press  to display the To Do items list. to display the To Do items list.
| 2. | In the To Do items list, select the item you want to delete.
| 3. | Press  . The item disappears. . The item disappears.
|
To create a calendar 1. | Choose File > New Calendar (Figure 71) or press  . An untitled calendar appears in the Calendars list with its default name selected (Figure 96). . An untitled calendar appears in the Calendars list with its default name selected (Figure 96).
Figure 96. A new calendar in the Calendars list. 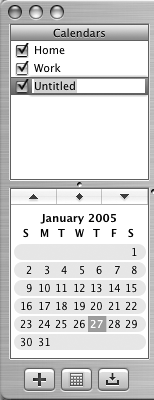
| 2. | Enter a name for the Calendar and press  . .
|
To set calendar options 1. | In the Calendars list, select the calendar you want to set options for.
| 2. | If necessary, click the Show Info button in the lower-right corner of the window or press  to display the Info drawer (Figure 97). to display the Info drawer (Figure 97).
Figure 97. Use the Info drawer for a calendar to change its name, add a description, or set its color. 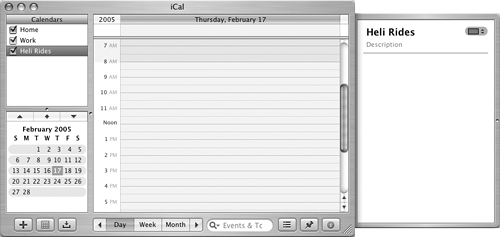
| 3. | Click the Name or Description field or use the color pop-up menu (Figure 98) to modify calendar settings.
Figure 98. You can change the color assigned to a calendar. 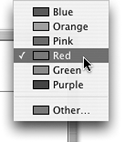
|
 Tips Tips
Choosing Custom from the colors pop-up menu (Figure 98) displays the Colors palette, which you can use to select a custom color. I tell you how to use the Colors palette in Chapter 11. To display events from only certain calendars, in the Calendars list, turn off the check boxes for the calendars you don't want to view.
To delete a calendar 1. | In the Calendars list, select the calendar you want to delete.
| 2. | Press  . .
| 3. | If a confirmation dialog like the one in Figure 99 appears, click Delete. The calendar and all of its events are removed.
Figure 99. A dialog like this confirms that you really do want to delete a calendar and all of its events. 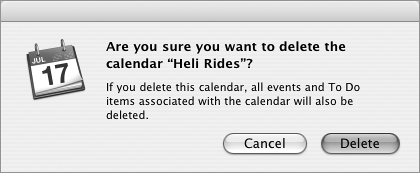
|
To publish a calendar 1. | In the Calendars list, select the calendar you want to publish.
| 2. | Choose Calendar > Publish (Figure 100).
Figure 100. The Calendar menu before a selected calendar has been published. 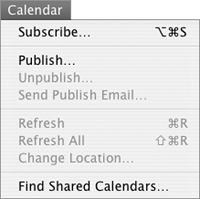
| 3. | A dialog sheet like the one in Figure 101 appears. Set options as desired:
Publish calendar as is the name of the calendar as it will be published. Publish on enables you to specify whether the calendar should be published on your .Mac account or on a private server. If you choose a Private Server, the dialog expands to offer more options (Figure 102). Figure 102. The dialog expands to offer additional options when you indicate that you want to publish on a private server. 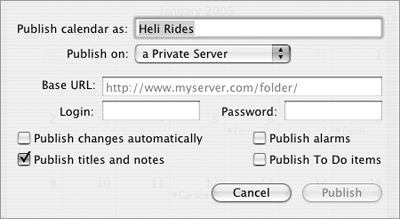
Base URL is the Web address for accessing your calendar. This option only appears if you are publishing to a private server. Login and Password is your login information for the server you are publishing on. These options only appears if you are publishing to a private server. Publish changes automatically updates the calendar online whenever you make changes to it in iCal. Publish titles and notes includes event or item names and notes in the published calendar. Publish alarms includes event or item alarms in the published calendar. Publish To Do items includes To Do items in the published calendar.
Figure 101. Use this dialog to set options for publishing a calendar. 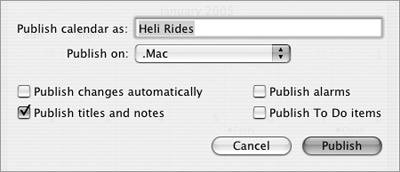
| 4. | Click Publish.
| 5. | Wait while your computer connects to the Internet and uploads the calendar.
| 6. | When the upload is complete, a dialog like the one in Figure 103 appears. You have three options:
Visit Page launches your Web browser, connects to the Internet, and displays the calendar page (Figure 104). Figure 104. Here's a calendar published on .Mac. 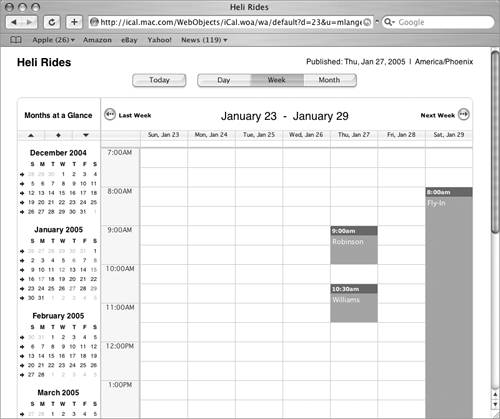
Send Mail launches your e-mail application and creates a message with the calendar's access information (Figure 105). You can address the message and send it to people you want to inform about the calendar. Figure 105. If you click the Send Mail button, an e-mail message with access information is prepared automatically. 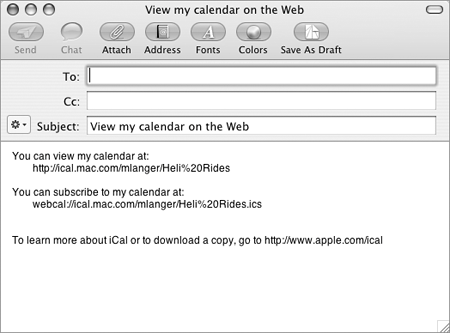
OK simply dismisses the dialog.
Figure 103. A dialog like this confirms that the calendar has been published and provides information about accessing it. 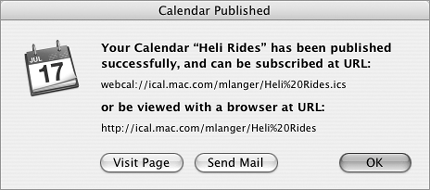
|
 Tips Tips
You must have a connection to the Internet to publish a calendar. You must have a .Mac account to publish a calendar on .Mac. I tell you more about .Mac in Chapter 14. In step 3, if you choose not to automatically update the calendar, you can do so manually. Select the calendar in the Calendars list and choose Calendar > Refresh (Figure 106) or press  . . Figure 106. When you select a calendar that has been published, the Calendar menu changes to offer additional options. 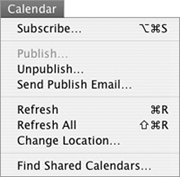
To create a new e-mail message with information about accessing a calendar (Figure 105), select the calendar in the Calendars list and choose Calendar > Send Publish Email (Figure 106). In the Calendars list, a curves icon appears beside the name of a calendar that has been published (Figure 109). Figure 109. This example shows four calendars, including one that is published (Heli Rides) and one that is subscribed to (Sunrise & Sunset). 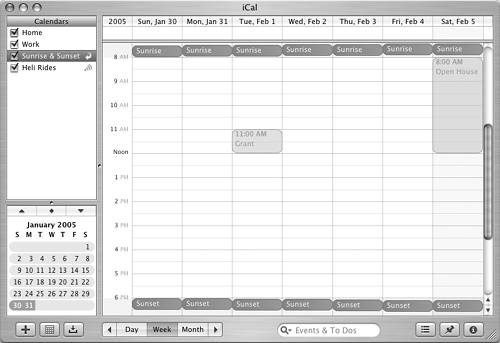
To unpublish a calendar 1. | In the Calendars list, select the calendar you want to remove from the Web.
| 2. | Choose Calendar > Unpublish (Figure 106).
| 3. | In the confirmation dialog that appears, click Unpublish.
|
To subscribe to a calendar 1. | Choose Calendar > Subscribe (Figure 101 or 106).
| 2. | A dialog sheet like the one in Figure 107 appears. Enter the URL for the calendar you want to subscribe to and click Subscribe.
Figure 107. Use this dialog to enter the URL for a calendar on the Web. 
| 3. | After a moment, iCal displays a dialog like the one in Figure 108. Set options as desired:
Title is the name of the calendar as it should appear in your Calendar list. Refresh instructs iCal to refresh the calendar periodically. Turn on this check box and select an option from the pop-up menu. You might want to use this option if you expect the calendar to change often. Remove alarms disables any alarms that have been set for and published with the calendar. Remove To Do items removes any To Do items that may have been published with the calendar.
Figure 108. Set options for a calendar you are subscribing to in this dialog. 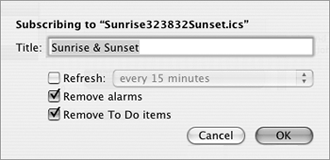
| 4. | Click OK.
| The calendar's events appear in the calendar window (Figure 109).
|
 Tips Tips
In the Calendars list, an arrow icon appears beside the name of a calendar that has been subscribed to (Figure 109). You cannot add, modify, or delete events on a calendar that you subscribe to. To update the contents of a calendar you have subscribed to, select the name of the calendar in the Calendars list and choose Calendar > Refresh (Figure 106) or press  . . To unsubscribe from a calendar, delete it from the Calendars list. I explain how to delete calendars earlier in this chapter. To find more calendars you can subscribe to, choose Calendar > Find Shared Calendars (Figure 106) or check out www.apple.com/ical/library. You can find everything from Apple Store events to professional sports game dates.
|


 Tip
Tip


