Using COM Objects from .NET Clients
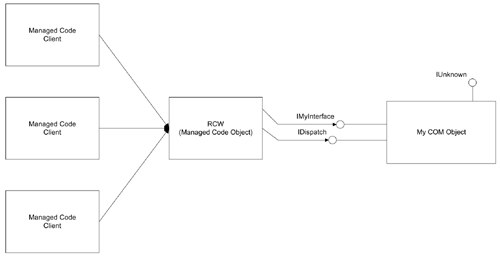
Using COM Objects from .NET Clients Using COM objects from .NET clients is sure to be the most widely used COM Interop scenario. In this section, I discuss the infrastructure and tools that the .NET Framework provides to make it easy for you to use COM object from within managed code clients. The two important pieces are the RCW that sits between the managed code client and the COM object and performs all the magic required to make the COM object appear to be just another managed code object and the Type Library Importer ( tlbimp.exe ) that allows you to generate .NET metadata from a COM type library. I'll conclude this section by building a simple example application that uses a COM object through Interop. RCWThe CLR automatically creates a RCW for you whenever you instantiate a COM object from a managed code application. There is one RCW for each COM object regardless of how many managed code clients the object has. The RCW holds all the COM interface pointers that the managed code client is using as shown in Figure 6-3. Figure 6-3. The relationship between a RCW, a COM object, and managed code clients. The RCW holds all outstanding interface pointers on the COM object. Managed code clients call methods on the RCW and the RCW forwards those method calls to the COM object through the interface pointers it holds on the COM object. The RCW handles marshaling of parameters and return values between the managed code client and the COM object. The RCW also handles life cycle management for the COM object, and consumes all of the system-level interfaces that the COM object exposes to support rich error handling (ISupportsErrorInfo), connection point events (IConnectionPointContainer and IConnectionPoint), and late binding and metadata inspection (IDispatch and ITypeInfo). The RCW converts COM error objects into exceptions that can be caught using the try/catch statements in managed code. The RCW presents connection point events to managed code clients using the standard delegate-based event-handling mechanism supported by the CLR. Late binding is handled using the CreateInstance method on the System.Activator class and the InvokeMember function on the System.Type class. Metadata inspection is handled using the standard Reflection mechanisms in .NET, which use the methods in the System.Type class and the types in the System.Reflection namespace, especially the Assembly class. The RCW is a managed code object, so it is garbage-collected just like any other managed code object. When the RCW is garbage-collected , it will release all of the interface pointers that it is holding on the COM object and the COM object will delete itself. This does mean that the life cycle semantics of a COM object are different when it is called from a managed code client. Typically, when you use a COM object, you will delete it by calling Release on the interface pointer as soon as you are done with it. When you are calling a COM object from a managed code client, the RCW will not call Release on the interface pointers it is holding until the garbage collector runs, which may not be until the application shuts down. In many cases this change in the life cycle semantics of a COM object won't make a difference, but, if this distinction is important, you can call the System.Runtime.InteropServices.Marshal.ReleaseComObject method from your managed code to release a COM object immediately as shown here: private void cmdCalcPayment_Click(object sender, System.EventArgs e) { double pmt; financialdotnet.CFinancial objFinancial; try { objFinancial=new financialdotnet.CFinancial(); pmt=objFinancial.MonthlyPayment(short.Parse(txtNumMonths.Text), double.Parse(txtAPR.Text), double.Parse(txtLoanAmt.Text)); txtPmtResult.Text=String.Format("{0:C}",pmt); System.Runtime.InteropServices. Marshal.ReleaseComObject(objFinancial); } catch (Exception ex) { MessageBox.Show(ex.Message); } } I talk about the ReleaseComObject method more when I discuss advanced aspects of COM Interop in the next two chapters. One of the most important things that the RCW does is marshaling. The RCW implements a default mapping between COM types and .NET types. For instance, a managed code client can simply pass an instance of the System.String class to a COM object method that expects a BSTR (a typical COM representation of a string). The RCW will automatically handle all the steps required to marshal a System.String object into a BSTR. Note There is a performance penalty to pay with COM Interop. The overhead of marshaling managed types into unmanaged types and vice versa is a big part of that penalty. Table 6-1 shows the default mapping between COM types and CTS and C# types, that is, how COM types are marshaled to managed types and vice versa. This is only the default mapping; I will show that you can change this mapping in the next chapter. Table 6-1. Mapping COM types to .NET types
When using COM Interop, you can choose either to use early binding or late binding. The late-bound approach is similar to using the IDispatch interface in COM. To use the late-bound approach, first call either the GetTypeFromProgID or the GetTypeFromCLSID methods on the System.Type class to obtain a System.Type. You pass a string that contains the ProgID of the COM object to the GetTypeFromProgID method, and you pass an instance of the System.Guid class to the GetTypeFromCLSID method. Both of these methods have an overload that allows you to pass the name of a server on which to instantiate a remote object. After you have a System.Type object, you can call the CreateInstance method on the System.Activator class to create an instance of your COM object. To call a method on the object, you call the InvokeMember method on the System.Type class. This is actually harder than it sounds because InvokeMember is the managed code equivalent of the Invoke method in IDispatch. To call this method, you pass the name and type (Method, Property, and so forth) of the member that you are trying to call. You then declare an array of System.Objects that will hold the parameters for the method and then populate this array in the same order that they appear in the method that you are calling, that is, the item at the zero index in the object array should correspond to the first parameter in the method that you are trying to call. The following code shows how you would call a COM object from a managed code client using late binding: 1. private void cmdGetLoanAmt_Click(object sender, 2. System.EventArgs e) 3. { 4. System.Type typFinancial; 5. System.Object objFinancial; 6. Object[] objParams=new Object[3]; 7. Object objResult; 8. string strTypeName; 9. try 10. { 11. typFinancial= 12. System.Type.GetTypeFromProgID 13. ("Financialcomponent.CFinancial"); 14. objFinancial= 15. Activator.CreateInstance(typFinancial); 16. objParams[0]=float.Parse(txtMonths.Text); 17. objParams[1]= 18. float.Parse(txtInterestRate.Text); 19. objParams[2]= 20. float.Parse(txtMonthlyPmt.Text); 21. objResult= 22. typFinancial.InvokeMember("LoanAmount", 23. System.Reflection.BindingFlags.InvokeMethod, 24. null,objFinancial,objParams); 25. lblLoanAmt.Text= 26. String.Format("{0:C}",objResult); 27. } 28. catch(System.Exception ex) 29. { 30. MessageBox.Show(ex.Message); 31. } 32. } The code here is using a simple COM object that performs time value of money calculations (that is, given an amortized loan amount, a specified term , and an interest rate, calculate the corresponding monthly payment or given the monthly payment calculate the loan amount). The COM object implements an interface called ITimeValue that has two methods.
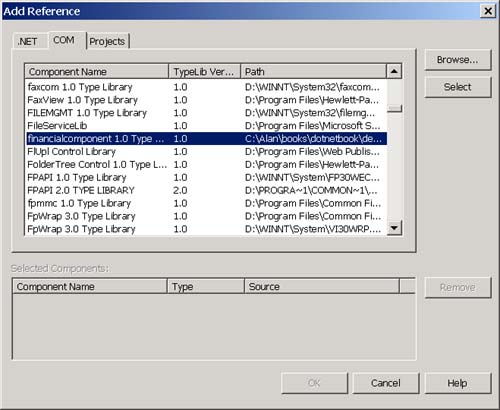
Note The LoanAmount and MonthlyPayment methods are accurate. The formulas were taken from Engineering Economy by DeGarmo et al., MacMillan 1984, which was the textbook for an economics class that I took while I was a student at UCLA. The code for this COM object is available on the Web site for this book. For detailed instructions on how to build the object, see Chapter 7 of my first book, The COM and COM+ Programming Primer , Prentice Hall 1999. On line 12 of the example code, I call the GetTypeFromProgID method on System.Type to get a System.Type object that I can use to instantiate a late-bound object. On lines 14 and 15, I call the CreateInstance method on the System.Activator class to create an instance of the COM object using the System.Type object that we obtained on line 12. The CreateInstance method returns an instance of an undocumented class called System.__ComObject . On lines 16 through 20, I populate the parameters array with the data the user entered on the UI. On lines 21 through 24, I call the InvokeMember method on the System.Type object. Notice that I pass to InvokeMember the name of the method on the object that I want to call (LoanAmount), a flag that indicates that the member I am calling is a method (as opposed to a property), the null third parameter is an optional System.Binder object that you can use to specify custom type conversions, the fourth parameter is the object instance on which I am invoking the method, and the fifth parameter is the array of arguments for the method. Lines 25 and 26 display the result on the UI. In addition to being somewhat complex, late binding to a COM object is slow (because all parameter validation must be done at runtime) and error-prone because you give up the compiler's ability to perform type-checking on parameters and return values. You also do not get the advantage of Visual Studio's Intellisense feature when you use late binding. It is much nicer when working with any object to have a strongly typed interface and to early bind to your COM object. To get a strongly typed interface, you will need metadata. You can generate .NET metadata for your COM objects using the Type Library Importer. The Type Library Importer (tlbimp)The closest thing to .NET metadata in the COM world is a type library. The .NET Framework SDK includes a tool called the Type Library Importer ( tlbimp.exe ) that converts the type information found in a COM type library into a .NET assembly that contains equivalent metadata as shown in Figure 6-4. Figure 6-4. The Type Library Importer. The assembly that the Type Library Importer generates is called an Interop assembly. Interop assemblies contain strongly typed classes that sit on top of the RCW and provide a strongly typed interface to the RCW's underlying COM object. You can generate an Interop assembly by entering the following command at a Visual Studio .NET command prompt: tlbimp typelibraryfile [options] You can either specify a type library file (with a .tlb) extension or the name of a DLL or executable that has an embedded type library for the type-libraryfile parameter. Table 6-2 lists the command-line options for tlbimp. To use tlbimp.exe to generate an Interop assembly for the financial COM component, perform the following steps:
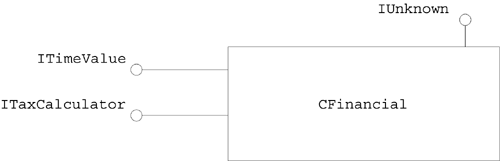
The following code shows the type library for the TimeValue COM object that I used in the previous code example: [ uuid(EB47FA01-22EE-11D3-998A-E0EC08C10000), version(1.0) ] library FINANCIALCOMPONENTLib { importlib("stdole2.tlb"); interface ITimeValue; interface ITaxCalculator; [ odl, uuid(EB47FA0D-22EE-11D3-998A-E0EC08C10000), dual, oleautomation ] interface ITimeValue : IDispatch { [id(0x00000001)] HRESULT MonthlyPayment([in] short numMonths, [in] double interestRate, [in] double loanAmt, [out, retval] double* result); [id(0x00000002)] HRESULT LoanAmount([in] short numMonths, [in] double interestRate, [in] double monthlyPmt, [out, retval] double* result); }; [ odl, uuid(1C208680-22F2-11D3-998A-E0EC08C10000), dual, oleautomation ] interface ITaxCalculator : IDispatch { [id(0x00000001)] HRESULT CalculateTax([in] double earnings, [out, retval] double* tax); }; [ uuid(EB47FA0E-22EE-11D3-998A-E0EC08C10000) ] coclass CFinancial { [default] interface ITimeValue; interface ITaxCalculator; }; }; For those who are more visually oriented, a COM diagram of this component will look as shown in Figure 6-5. Figure 6-5. The financial COM component. The type library importer will generate a .NET assembly from the contents of this type library. By default, the types in this assembly will reside in a namespace that has the same name as the type library (FinancialComponentLib in this case). A general mapping between types in a COM type library and types in a generated Interop assembly is shown in Table 6-3. Table 6-3. Mapping between entities in the COM type library and the Interop assembly
Notice that most of the .NET types that are generated are marked with the GUID and TypeLibType attributes. The GUID attribute stores the GUID of the COM type that the equivalent .NET type was generated from. The TypeLibType attribute records that the .NET type originated from the transformation of a COM type library. In the case of the financial component, the Interop assembly will contain the types shown in Table 6-4. Table 6-4. The types in the Interop assembly for the financial COM component
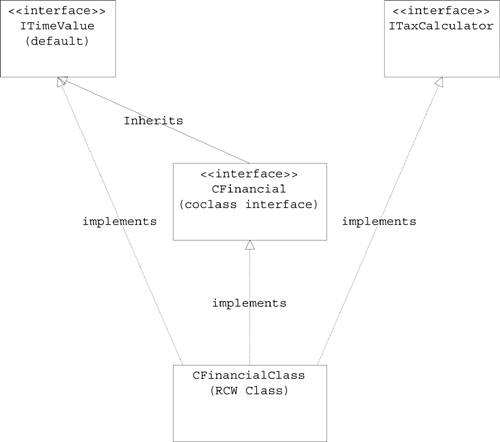
A UML class diagram of these types is shown in Figure 6-6. Figure 6-6. A Unified Model Language (UML) diagram of the Interop assembly for the financial component. Certain aspects of the COM-to-.NET transformation may seem counterintuitive. For instance, why would a COM coclass map to both a CoClass interface and an RCW class? The reason has to do with VB and the way that it attempts to hide the COM interface-based programming style. C++ programmers who use COM are used to using a COM object through interface pointers. Most programmers who program with other languages like VB or other object-based systems like Java are used to instantiating an object and then calling methods on the object directly. I have found from my teaching experience that VB programmers in particular seem to have a great deal of trouble with interface-based programming. Perhaps because of this, VB attempts to hide the presence of interfaces in COM by mapping each VB class to both a COM coclass and a default interface that has the same name as the class with an underscore prepended to the name. You create instances of the class and call methods on it, and the VB runtime uses the default interface behind the scenes. Therefore, if you created a VB class called CFinancial, you would see in the COM type library a coclass called CFinancial with a default interface called _CFinancial. When you call methods on an instance of the CFinancial class, the VB runtime knows to call the corresponding method on the default interface of the CFinancial class (_CFinancial). Tlbimp tries to duplicate this functionality. For instance, in the case of the Financial COM component, tlbimp will generate a class called CFinancialClass ; this is the RCW class shown in Table 6-3. The RCW class implements all of the interfaces supported by the COM class (ITimeValue and ITaxCalculator in this case). Tlbimp will also generate an interface called CFinancial (this is the coclass interface shown in Table 6-3) that inherits from the default interface of the COM class. The CLR will create an instance of the RCW class (CFinancialClass) automatically when you attempt to create an instance of the coclass interface (CFinancial). The end result of these transformations is that, from your .NET client, you can create an object reference using the same type name as the COM class ( CFinancial ) and call all the methods supported by its default interface. If you want to call methods in the nondefault interfaces, you must instantiate an instance of the RCW class directly (CFinancialClass in this case). For example, you can use the following code to call any of the methods in the ITimeValue interface: Double dblResult; CFinancial objFinancial=new CFinancial(); dblResult=objFinancial.LoanAmount(360,6.75,2000.0); CFinancial is an interface, and, normally, you cannot instantiate interfaces this way. However, the C# compiler looks at the coclass attribute on the CFinancial interface and instantiates the class identified in the coclass attribute instead ( CFinancialClass in this case). Hence the code shown previously is equivalent to the following code, and you can write the code either way. Double dblResult; CFinancial objFinancial=new CFinancialClass(); dblResult=objFinancial.LoanAmount(360,6.75,2000.0); Regardless of how you write this code, you can only call methods in the default interface as it is currently written. The following code will not compile: Double dblResult, dblTaxes; CFinancial objFinancial=new CFinancialClass(); dblResult=objFinancial.LoanAmount(360,6.75,2000.0); dblTaxes=objFinancial.CalculateTax(70000.0); // error!!! The CalculateTax method is in the ITaxCalculator interface, which is a non-default interface on the Cfinancial coclass. To call the CalculateTax method, you should write the following code: Double dblResult, dblTaxes; CFinancial objFinancial=new CFinancialClass(); dblResult=objFinancial.LoanAmount(360,6.75,2000.0); ITaxCalculator objTaxes=(ITaxCalculator)objFinancial; dblTaxes=objTaxes.CalculateTax(70000); Notice that, in this case, I cast the object reference to an ITaxCalculator interface reference before I can call the CalculateTax method. Another way to access the CalculateTax method is to type the original object reference as a CFinancialClass, which contains all the methods supported by the COM class. Double dblResult, dblTaxes; CFinancialClass objFinancial=new CFinancialClass(); dblResult=objFinancial.LoanAmount(360,6.75,2000.0); dblTaxes=objFinancial.CalculateTax(70000.0); After you have generated the Interop assembly, you can reference and use it from a client the same way that you would any other .NET assembly. You can compile a C# client that uses the Interop assembly for the financial component using the following command line: csc /out:interoptest1.exe /r:financial.dll form1.cs assemblyinfo.cs Notice that I reference the Interop assembly ( financial.dll ) using the /r argument to the compiler. The following listing shows client-side code that uses the Interop assembly: using FINANCIALCOMPONENTLib; private void cmdGetLoanAmt_Click(object sender, System.EventArgs e) { short shtNumMonths; Double dblInterestRate, dblMonthlyPmt, dblResult; try { TimeValue objFinancial=new TimeValue(); shtNumMonths=short.Parse(txtMonths.Text); dblInterestRate= Double.Parse(txtInterestRate.Text); dblMonthlyPmt=Double.Parse(txtMonthlyPmt.Text); dblResult=objFinancial.LoanAmount(shtNumMonths, dblInterestRate,dblMonthlyPmt); lblLoanAmt.Text=String.Format("{0:C}",dblResult); } catch(System.Exception ex) { MessageBox.Show(ex.Message); } } Notice that the code here is much simpler than the late-bound client code that I showed you before. Instead of instantiating an object using the CreateInstance method on the System.Activator class and then calling the InvokeMember method on the System.Type class, I simply create an instance of the TimeValue class and call the LoanAmount method. I will also get a compiler error, instead of a runtime error, if I pass the wrong parameters to the method or attempt to assign the return value to something other than a double. If you are using Visual Studio .NET, it's even easier to generate an Interop assembly for a COM object. To generate an Interop assembly in Visual Studio .NET, perform the following steps:
Visual Studio .NET will create an assembly with the following name: Interop.[typelibraryname].dll This assembly will reside in your build directory. For a Windows application project, the build directory is [project rootdir]\bin\debug . For an ASP.NET project, the build directory is [virtualdirpath]\bin where virtualdirpath is the physical directory underlying the virtual directory for the project. The Interop assembly that Visual Studio .NET generated for the financial component is called Interop.FinancialComponentLib.dll . The generated namespace is called FinancialComponentLib. So far, we have looked at only the most basic elements of using a COM object from a managed code client. There are a number of issues that make using COM object from .NET a little more difficult than what you see here. One of the issues is that not all types that you can represent in COM are representable in .NET. There is also the issue of Apartments, advanced marshaling support, events, and exceptions. I discuss all of these issues in greater depth when I discuss advanced aspects of Interop in Chapters 7 and 8. |


| | |
| Team-Fly |
| Top |
EAN: 2147483647
Pages: 119
- Getting Stored Procedure Parameter Information at Runtime
- Nesting Manual Transactions with the SQL Server .NET Data Provider
- Avoiding Referential Integrity Problems When Updating the Data Source
- Implementing Pessimistic Concurrency Without Using Database Locks
- A.5. Class, Structure, and Interface Members