Section 5.2. Transfers by Network
Here's one of the best features of Mac OS X: It can "see" shared disks and folders on Windows PCs that are on the same network. Seated at the Mac, you can open or copy files from a PC. In fact, you can go in the other direction, too: Your old PC can see shared folders on your Mac.
This isn't a networking book, but there's enough room here for a crash course.
5.2.1. Ethernet Networks
Most people connect their personal computers using either of two connection systems: Ethernet or Wi-Fi (that is, 802.11 networking or, in Apple's terminology, AirPort).
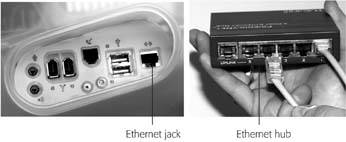
If you connect all of the Macs, PCs, and Ethernet printers in your small office to a central Ethernet hub a compact $25 box with jacks for five, ten, or even more computers and printersyou've got yourself a very fast, very reliable network. Most people wind up trying to hide the Ethernet hub in the closet, and running the wiring either along the edges of the room or inside the walls.
You can buy Ethernet cables, plus the Ethernet hub, in any computer store or, less expensively, from an Internet-based mail-order house. Hubs aren't platform-specific. (And a word of advice: All recent Macs offer built-in 100BaseT and some offer Gigabit Ethernet cards, so don't hobble your network speed by buying a slower, 10baseT hub.)
Tip: If you want to connect only two machinesyour PC and your Mac, for exampleyou don't need an Ethernet hub at all. Instead, you can connect a standard Ethernet cable directly from your Mac to your PC's Ethernet adapter. This is a sensational system that places no limits on the amount of data that you can transferand it's fast .That's if your Mac was made in 2002 or later. If you have an older model (Power Mac or PowerBook G3, colored iMac or iBook, 15-inch flat-panel iMac, and so on), you have to use an Ethernet crossover cable rather than a regular Ethernet cableabout $8 from a computer store or online mail-order supplier. Run it directly between the Ethernet jacks of the two computers.
|
Ethernet is the best networking system for many offices. It's fast, easy, and cheap.
5.2.2. Wireless Networks
By buying a $70 Wi-Fi (802.11) base station for your office, you catapult yourself into the most modern home-networking arrangement: wireless networking. Once you've installed a corresponding wireless card into both the Mac and the PC, they can then communicate without a cable in sight, as long as the machines are within 150 feet (as the termite burrows) from the base station. This system is a lot like a cordless phone; the computers are the "handsets."
Apple, having recognized that both "Wi-Fi" and "802.11" are extremely geeky names , made up its own term for this kind of networking: AirPort. For example, the card that you buy for your Mac is called an AirPort card, and Apple's version of the base station is called an AirPort base station. (Macs almost always require Apple's wireless cards, but they can connect to any brand of base station.)
Note: Technically, there are two Mac-compatible wireless standards: 802.11b ("AirPort") and 802.11g ("AirPort Extreme"). The AirPort Extreme standard is about five times faster than regular AirPort (54 MB/second versus 11 MB/second), but in order to take advantage of the increased speed, both of the computers and the base station have to offer it. If any of the three components operates at the slower AirPort speed, all three will revert to the slower modethe case, for example, when you're using a Mac released before 2003.
After wiring your network (or unwiring it, as the case may be), your network is ready. Your Mac should "see" any Ethernet or shared USB printers, in readiness to print. You can now play network games or use a network calendar. And you can now turn on file sharing , one of the most useful and sophisticated features of the Mac OS.
5.2.3. Seated at the Mac: Seeing the PC
Suppose you have a Windows machine on the network. Thanks to Mac OS X's networking smarts, you can bring selected folder icons from the PC onto your Mac's screen, and manipulate their contents just as though they were sitting on your Mac's own hard drive.
Before the Mac and PC can begin chatting, though, Windows must be made ready to share its foldersand that entails installing a special software blob called File and Printer Sharing for Microsoft Networks. Do you have it? Here's how to tell:
-
Windows XP, Windows Me, Windows 2000 . You have this software already. Skip ahead to step 1.
-
Windows 95, 98, or NT . If your PC has never been part of an office network, then it probably doesn't have the necessary software installed.
To install it, choose Start
 Control Panel; in the Control Panel window, open Network. If you dont see "File and printer sharing for Microsoft Networks," click the Add button, double-click Service, select "File and printer sharing for Microsoft Networks," click OK, and insert the Windows installation CD when you're asked for it. See Windows Help for details.
In any case, you should now be ready to commence the cross-platform network hookup, like this:
-
On your Windows PC, share a folder .
You have to specify which folders you want to make available on the network. In Windows XP, for example, you right-click a folder, choose Properties from the shortcut menu, click the Sharing tab, and turn on "Share this folder on the network" (Figure 5-3, top). In the "Share name" box, type a name for the folder as it will appear on the network (no spaces are allowed).
Note: If you've never shared a folder on this PC before, you may not see the "Share this folder" option. In its place, you'll see a link that runs the Network Setup Wizard. Go ahead and run that, supplying a computer and workgroup name when prompted, and then restart the PC to turn on sharing. Then start over with step 1.
Repeat for any other folders you want to make available to your Mac.
-
On the Mac, in any desktop window's Sidebar, click the Network icon .
Any PCs on your network should show up automatically in the list at right (Figure 5-3, bottom), although it may take a minute or so for your Mac to "notice" your PCs.
They may appear as individual computer names, orif you've used Microsoft's Network Setup Assistantyou may see only the icon of their workgroup (network cluster). Unless you (or a network administrator) changed it, the workgroup name is probably MSHOME or WORKGROUP.
Tip: If you don't see any sign of your PCs, read the troubleshooting box on Section 5.2.4.
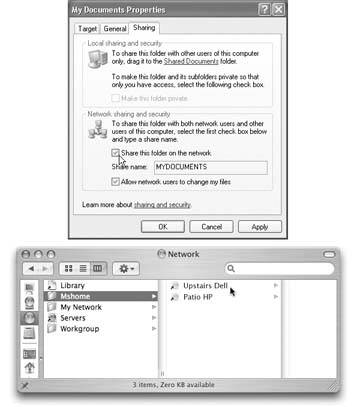
Figure 5-3. Top: To share a folder in Windows, right-click it, choose Properties, and turn on "Share this folder on the network."
Bottom: Back in the safety of Mac OS X, open the Network window. What you see here depends on the complexity and structure of your network. You may see individual computers listed, network "clusters" as shown here, or a mix of the two.
Tip: While you're learning how to share files on the network, you might as well take note of the My Network icon shown here. That's how you connect to other Macs on your network. They'll all appear in this "folder," provided you've turned on the Personal File Sharing checkbox for each one. (You'll find this box on the Sharing panel of System Preferences.)
-
Click the Windows workgroup name, if necessary .
Now the names of the individual PCs on the network appear on the right side of the window (Figure 5-3, bottom).
-
Double-click the name of the computer you want .
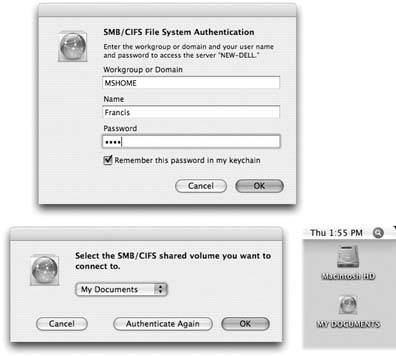
The Authentication dialog box appears, as shown at top in Figure 5-3.
-
Type your name and password, if necessary, and then click OK .
If you have an account on the Windows PC, greatuse that name and password. If the PC isn't in a corporation where somebody administers access to each machine, though, you may be able to leave the password blank.
Tip: If you do have to enter a password, consider turning on "Remember password in keychain." That way, you won't need to type the password again.
The SMB Mount dialog box now appears (Figure 5-4, lower left). Its pop-up menu lists the shares (that is, shared folders and disks) on the selected PC.
-
From the pop-up menu, choose the name of the shared folder that you want to bring to your Mac desktop (Figure 5-4, bottom left). Click OK .
At long last, the shared folder on the Windows machine appears on your desktop with a network-drive icon (Figure 5-4, lower right). From here, it's a simple matter to drag files from one machine's icon to another, to open Word documents that live on the PC using Word for the Mac, and so on.
|
5.2.4. Seated at the PC: Seeing the Mac
Not only can your Mac see other PCs on the network, but they can see the Mac, too. Here's how you prepare the Mac for visitation from a PC, if that idea appeals to you.
-
On the Mac, open System Preferences. Click the Sharing icon, and then click the Services tab .
Now you see a list of the different ways your Mac can share its goodies with the outside world via network.
-
Turn on Windows Sharing (Figure 5-5, top) .
If there are other Macs on the network, you may want to turn on Personal File Sharing, too. Now your Mac will be available for visitation by all kinds of computers.
-
Click Enable Accounts .
The small box shown in the middle of Figure 5-5 appears, listing all of the accounts (Chapter 12) on your Mac.
TROUBLESHOOTING MOMENT
When Your Mac Can't See the PCFor most people, the magic of Mac OS X's "Macs and PCs can see each other on the network" feature works automatically, the first time, every time.
But if Network window doesn't show the PCs on the network, it may be that you need to introduce your Mac to the Windows workgroup.
Open the Directory Access program in your Applications
Utilities folder. Click the padlock, sign in as an administrator, and then doubleclick the SMB/CIFS item in the list. When you get the dialog box shown here, type (or choose) the precise name of the Windows workgroup you'd like your Mac to "belong" to, and then click OK. Quit Directory Access and choose Go
Network once again. This time, your Mac should see the PCs. Finally, note that the PC won't show up in the Network window if it's not on the same network segment as your Maca possibility if you work in a big corporation. In that case, ask your network administrator what the PC's IP address is (its numerical network address).
Once you know that key piece of information, you can bring that PC to your Mac desktop by choosing Go
Connect to Server, typing smb://111.222.33.4444 into the text box at the top of the dialog box (substitute the real IP address, of course), and clicking Connect. 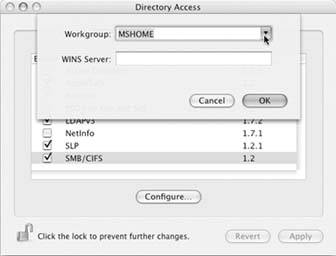
-
Turn on the "On" checkbox for the accounts that you want to show up on the screen of your Windows PC. Click Done .
You return to the Sharing dialog box.
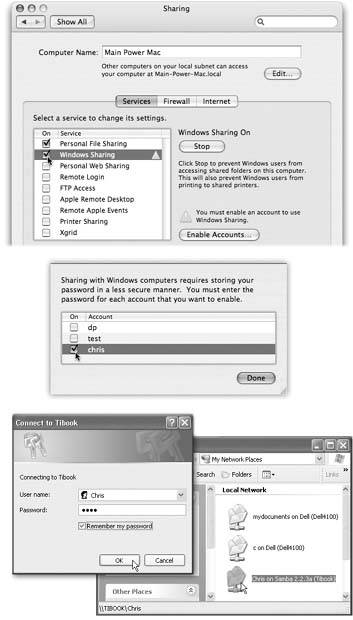
Figure 5-5. Top: The system-wide On switch for invasion from Windows is right here. Next, click Enable Accounts.
Middle: Now, you're supposed to turn on the individual accounts whose icons you'll want to show up on the PC. Click Done when you're done.
Lower left: Sign in, using theaccount you specified in System Preferences.
Lower right: Here's your Mac's iconin Windows! Open it up to find your Home folder, complete with all your stuff.
-
On the Windows machine, open the My Network Places or Network Neighborhood icon .
Your Mac's icon should appear here, bearing a name like "Samba 2.2.3a (Robinscomputer)." No, Microsoft isn't trying to give you dance lessons. Samba is the Mac's version of the SMB file-sharing protocol that Windows uses.
-
Double-click the icon's name, sign in (Figure 5-5, bottom), and then go to town .
In the final window, you see your Mac's actual Home folderon a Windows PC. You're ready to open its files, copy them back and forth, or whatever.
EAN: N/A
Pages: 371