Section 2.3. Icon View
Chapter 1 provides a guided tour of the various gizmos around the edges of a window (the Close button, Resize box, and so on)but what about what's inside a window?
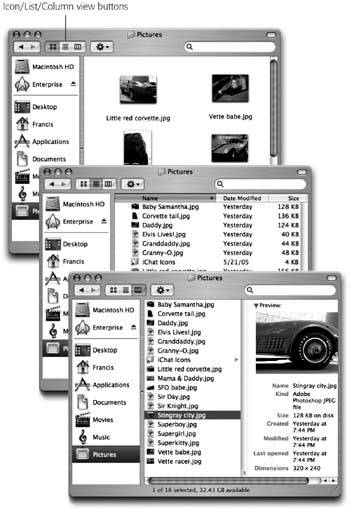
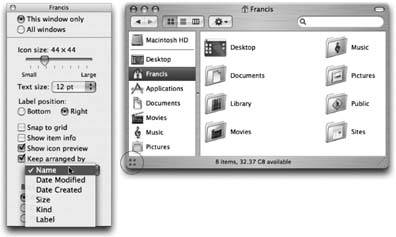
As it turns out, you can view the files and folders in a desktop window in any of three ways: as icons, as a single list, or in a series of neat columns (see Figure 2-3). To switch a window from one view to another, just click one of the three corresponding icons in the window's toolbar, as shown in Figure 2-3, or choose View  as Icons (or View as Columns, or View as List). The keystrokes -1,
 ![]() -2, and
-2, and ![]() -3 achieve the same results, but save you time since you don't have to use the mouse.
-3 achieve the same results, but save you time since you don't have to use the mouse.
|
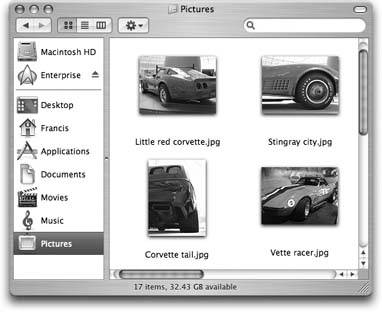
In icon view, each file, folder, and disk is represented by a small picturean icon . This humble image, a visual representation of electronic bits and bytes, is the cornerstone of the entire Macintosh religion. (Maybe that's why it's called an icon.)
If you then choose View Show View Options (or press -J), you'll discover a wealth of interesting display options for this view.
2.3.1. Icon Sizes
Mac OS X can scale your icons to almost any size without losing any quality or smoothness. In the View Show View Options window (Figure 2-4), click one of the buttons at the top of the windoweither "This window only or "All windows " to indicate whether you want to change the icon sizes in just the frontmost window or everywhere on the Mac. Then drag the Icon Size slider back and forth until you find an icon size you like. (For added fun, make little cartoon sounds with your mouth.)
|
2.3.2. Text Size
You can control the type size of icon names on the Mac. In fact, if you choose "This window only" at the top of the dialog box, you can actually specify a different type size for each window on your machine. You might want smaller type to fit more into a crammed-full icon view without scrolling, and larger type in less densely populated windows.
Note: Your choices range from 10 to 16 points, but, unfortunately , you can't choose a different font.
2.3.3. Windows XPstyle Labeling
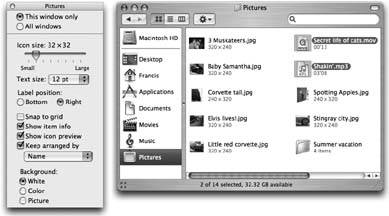
This feature lets you create, in effect, a multiple-column list view in a single window (see Figure 2-5).
|
2.3.4. "Show icon preview"
This option pertains primarily to graphics, which Mac OS X often displays only with a generic icon (stamped JPEG or TIFF or PDF). But if you turn on "Show icon preview," Mac OS X turns each icon into a miniature display of the image itself, as shown in Figure 2-5.
2.3.5. "Show item info"
While you've got the View Options dialog box open , try turning on "Show item info." Suddenly you get a new line of information about any disk or folder icon in the window, in tiny blue type. For example:
-
Folders . The info line lets you know how many icons are inside each folder without having to open it up.
-
TIFF, JPEG, GIF, PDF files . Certain graphics files may show a helpful info line, toofor example, graphics files display their dimensions, in pixels.
-
Sounds and QuickTime movies . The light-blue bonus line tells you how long the sound or movie takes to play. For example, "02'9" means two minutes, 49 seconds.
You can see these effects illustrated in Figure 2-5.
2.3.6. Window Backgrounds
Here's another Mac OS X luxury: You can fill the background of any icon-view window on your Mac with a certain coloror even a photo.
Color-coordinating or "wallpapering" certain windows is more than just a cute gimmick; it can actually serve as a timesaving psychological cue. Once you've gotten used to the fact that your main Documents folder has a sky-blue background, you can pick it out like a sharpshooter from a screen filled with open windows. Color -coded Finder windows are also especially easy to distinguish at a glance when you've minimized them to the Dock.
Note: Background colors and pictures disappear in list or column view, and in windows that "belong" to Mac OS X itself, such as the hard drive window and the Users folder.
|
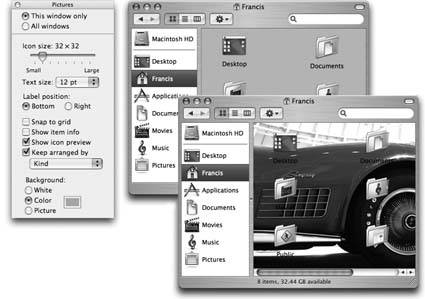
The bottom of the View Options dialog box (Figure 2-6) offers three choices:
-
White . This is the standard option.
-
Color . When you click this button, you see a small rectangular button beside the word Color. Click it to open the Color Picker dialog box, which you can use to choose a new background color for the window. (Unless it's April Fool's day, pick a light color. If you choose a dark onelike blackyou won't be able to make out the lettering of the icons' names.)
-
Picture . If you choose this option, a Select button appears. Click it to open the Select a Picture dialog box, already open to your Library
Desktop Pictures folder. Choose a graphics file (one of Applesin the Desktop Pictures folderor one of your own). When you click Select, you'll see that Mac OS X has superimposed the window's icons on the photo. As you can see in Figure 2-6, low-contrast or light-background photos work best for legibility.
Tip: The Mac has no idea what sizes and shapes your window may assume in its lifetime. Therefore, Mac OS X makes no attempt to scale down a selected photo to fit neatly into the window. If you have a high-res digital camera (a three- or four-megapixel model or higher), you may see only the upper-left corner of a photo as the window background. Use a graphics program like iPhoto (Section 14.14) to scale the picture down to something smaller than your screen resolution for better results.
2.3.7. Keeping Icons Neat and Sorted
It's easy enough to request a visit from an electronic housekeeper who tidies up your icons, aligning them neatly to an invisible grid. For example:
-
Aligning individual icons to the grid . Press the
 key while dragging an icon or several highlighted icons. (Don't push down the key until after you begin to drag.) When you release the mouse, the icons you've moved all jump into neatly aligned positions .
 -
Aligning all icons to the grid . Choose View
Clean Up (if nothing is selected) or View Clean Up Selection (if some icons are highlighted). Now all icons in the window (or those you've selected) jump to the closest positions on the invisible underlying grid. This is a temporary status, however. As soon as you drag icons around, or add more icons to the window, the newly moved icons wind up just as sloppily positioned as before you used the command.
If you'd rather have icons snap to the nearest underlying grid positions whenever you move them, choose View
Show View Options. In the resulting dialog box, turn on "Snap to grid." Make sure the button you want is selected at the top of the window ("This window only or "All windows"), and then close the window.
Note: You can override the grid setting by pressing the key when you drag. In other words, when grid-snapping is turned off , makes your icons snap into position; when grid-snapping is turned on , lets you drag an icon freely .
Note, by the way, that neither of these grid-snapping commandsView
Clean Up and the "Snap to grid optionmoves icons into the most compact possible arrangement. If one or two icons have wandered off from the herd to a far corner of the window, they've merely been nudged to the grid points nearest their present locations. They aren't moved all the way back to the group of icons elsewhere in the window. To make them jump back to the primary cluster, read on.
-
Sorting all icons for the moment . If you choose View
Arrange By Name , all icons in the window snap to the invisible grid and sort themselves alphabetically . Use this method to place the icons as close as possible to each other within the window, rounding up any strays. The other subcommands in the View "Arrange By menu, such as Size, Date Modified, and so on, work similarly, but sort the icons according to different criteria. As with the Clean Up command, View
Arrange only reorganizes the icons in the window at this moment. Moving or adding icons in the window means youll wind up with icons out of order. If you'd rather have all icons remain sorted and clustered, try this: -
Sorting all icons permanently . This arrangement is the ideal solution for neat freaks who can't stand seeing icons out of place. It maintains sorting and alignment of all icons in the window, present and future, so if you add more icons to the window, they jump into correct alphabetical position. If you remove icons, the remaining ones slide over to fill in the resulting gap.
To make it happen, choose View
Show View Options. In the resulting dialog box, turn on the "Keep arranged by checkbox. From the pop-up menu, specify what order you want your icons to snap into. Close the window. As shown at right in Figure 2-7, your icons are now locked into sorted position, with no strays around the edges.
|
You can also apply any of the commands described in this sectionClean Up, Arrange, Keep Arranged, and so onto icons lying loose on your desktop . Even though they don't seem to be in any window at all, you can specify small or large icons, automatic alphabetical arrangement, and so on. Just click the desktop before using the commands in the View menu.
EAN: N/A
Pages: 371