Section 14.12. iMovie HD
14.12. iMovie HDIf you have a digital camcorder (MiniDV, Digital8, or high-definition format) and a few hours of free timeall right, a few weekends of itiMovie helps you make astonishingly high-quality , fully edited movies. Digital video is great; you can transfer the footage back and forth between the Mac and the camcorder a hundred times, but you'll never see any deterioration in quality. 14.12.1. Phase 1: Set Up iMovieThe first time you run iMovie, it asks you whether you want to open an existing iMovie file (called a project ) or start a new one. After that, each time you launch iMovie, it automatically opens up the movie you most recently worked on. If you click Create Project, you're asked to select a name and location for the movie you're about to make. (You can ignore the "Video format" pop-up menu; iMovie autodetects what kind of camcorder you have once you begin importing footage.)
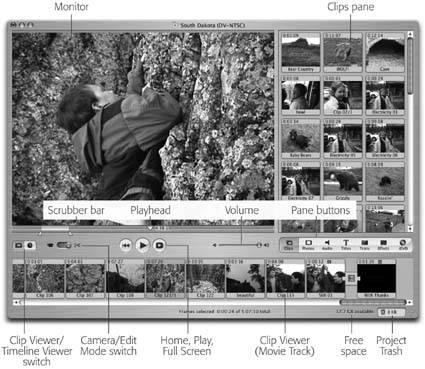
Once you've saved your project, you finally arrive at the main iMovie window (Figure 14-15). 14.12.2. Phase 2: Import Camcorder FootageAfter you've shot some footage, connect the camcorder to the Mac using a FireWire cable. If you have the proper cable, one end (the six-pin connector) fits your Mac, and the much smaller end (the four-pin connector) goes into the FireWire connector on your camcorder, which, depending on the brand, may be labeled FireWire, i.Link, DV In/Out, or IEEE 1394. Put the camcorder into VTR mode (also known as VCR or Playback mode). If necessary, click iMovie's Camera button, identified in Figure 14-15. The Monitor window says, "Camera Connected." Now you can click the Play, Rewind, Fast Forward, and other buttons on the screen to control the camcorder. Scan your tape to find the sections that you'll want to include in your edited movie. Every time you click the Import buttonor tap the Space bariMovie imports the footage you're watching, saving it as a series of digital-video movie files on the Mac's hard drive. For each scene, iMovie creates what looks like a slide in the Clips pane, as shown in Figure 14-15. That's a clip a single piece of footage that makes up one of the building blocks of an iMovie movie. Its icon is a picture of the first frame. On the clip's upper-left corner, you can see the length of the clip expressed as "seconds: frames" (there are approximately 30 frames per second in North American video or HDTV; 25 in the European format). 14.12.3. Phase 3: Arrange the ClipsAs you're building your movie, you can store your clips in either of two places: the Clips pane or the storyboard stripthe Movie Track , for want of an official nameat the bottom of the window (Figure 14-15). You put clips on the Clips pane before deciding what to do with them, and drag them down to the Movie Track area once you've decided where they fit into your movie. The Movie Track can appear in either of two ways, depending on which tab you click (the film strip or the clock, respectively):
You can do several things to a clip, whether it's in the Clips pane or the Movie Track. For example:
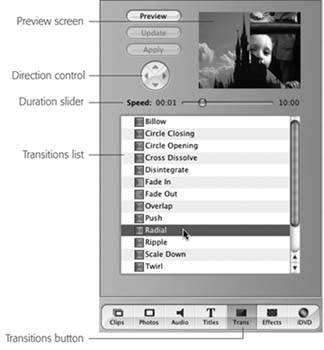
14.12.4. Phase 4: Assemble the MovieDrag the edited clips out of the Clips pane and into the correct order on the Movie Track, exactly as though you're building a storyboard or timeline. (To magnify the Timeline Viewer for a better look, drag the slider at the lower-left corner of the window. It adjusts the relative sizes of the bars that represent your clips.) As you work, you'll want to play back your movie to check its flow. You may discover that, in the context of the whole movie, some clips are too long, too short, in the wrong order, and so on. To play back your entire Movie Track, press the Home key, which means Rewind. When you tap the Space bar, iMovie plays your movie from the beginning, one clip after another, seamlessly. Or just click the Play Full Screen button (the darkened triangle to the right of the round Play button). It makes the playbackeven if it's already underwayfill the entire computer screen. To interrupt the movie showing, press Escape. 14.12.5. Phase 5: Transitions, Effects, Titles, Audio, and PhotosProfessional film and video editors have at their disposal a wide range of transitions special effects that smooth the juncture between one clip and the next. For example, apart from a simple cut , the world's most popular transition is the crossfade or dissolve , in which the end of one clip gradually fades away as the next one fades in. iMovie offers a long list of transitions, of which crossfades are only the beginning. To see them, click the Trans button (Figure 14-16).
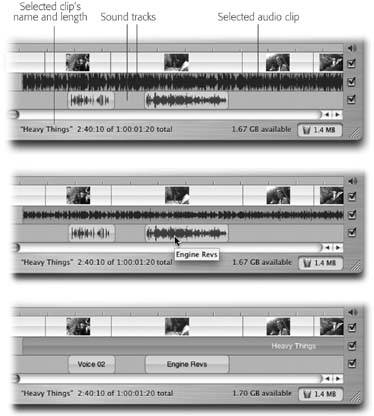
When you drag a transition into your Movie Track, the Mac now creates the crossfade renders itby superimposing the end of one clip with the beginning of the next. When the red progress bar is finished, click in your timeline just before the transition, press the Space bar to play, and marvel in your new ability to make home movies look pro. Tip: You can continue working on other parts of your movie, or even switch into another Mac OS X program, while the rendering is going on. To delete a transition, click its icon in the timeline and then press Delete. To edit it (by changing its length, for example), click its icon, return to the Transitions palette, make the adjustment, and then click Update. 14.12.5.1. EffectsThe Effects button summons a pane full of additional visual effects. Most are designed to create actual special effects that simulate fog, rain, earthquakes, lightning, flashbulbs, and bad LSD. (Most are weird and distracting. Use sparingly.) To apply an effect, first specify which lucky region of footage you want to be affected. (iMovie can apply effects only to entire clips, so it may have to split your clip at the endpoints of the selection, and then apply the effect to the central clip.) Then, on the Effects pane, specify when the effect should begin and end (use the Effect In and Effect Out sliders), its intensity, and so on. Finally, click Apply. As usual, the rendering telegraphs its progress with a miniature red progress bar on the selected clip. If you click a clip and then press the Delete key, you're saying: "Throw away the effect. Bring back my original, unmodified clip." To adjust the start time, stop time, or other parameters of a special effect, you must first delete the effect altogether, and then reapply it using new settings. 14.12.5.2. Titles and creditsTo add rolling credits, opening titles, subtitles , or MTV-style music video credits to your masterpiece, start by clicking the Titles button. A list of title animation styles pops up. In the tiny text box underneath the list, type the text you want to appear. (Some of the effects, like Rolling Credits, offer pairs of text blobs; see Figure 14-17.) If you want to insert this title at the end of a clip, so that the text appears on a black background, turn on the Over Black checkbox. If you'd rather have the text appear on top of the video, leave that box unchecked. (Superimposing a title usually breaks the clip in halfthe part with the title superimposed is now one clip, and the unaffected part is separate.) Click the Preview button to see what the title will look like. Adjust the timing slider above the list, and then drag the name of the title type (such as Centered Title) into the Movie Track. To eliminate a title, click its icon in the timeline and then press Delete. To edit, click its icon, make changes in the Titles palette, and then click Update. 14.12.5.3. AudioThe top horizontal band of the Timeline Viewer displays the video component of your movie. For the most part, you won't do much with this strip when you're editing audio; its primary purpose is to show where you are in the movie. The two skinnier horizontal strips underneath it are your playground for audio clips (Figure 14-18). Both audio tracks play in tandem. Each can hold sound from any of these sources:
Tip: You can use the three checkboxes at the right end of these tracks to control which ones play back. When you want to watch or listen to only one track, turn off the other two checkboxes.
Fortunately, you can do more with your audio clips than just insert them into the Timeline Viewer:
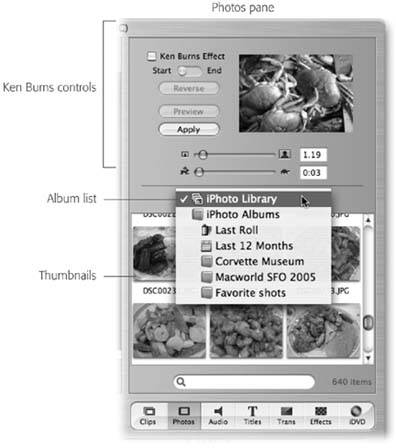
Note: When Show Clip Volume Levels is turned on, you can't drag clips' edges to shorten or lengthen them in the Timeline Viewer. 14.12.5.4. PhotosYou might want to import a graphics file into iMovie for any number of reasonsto use as a less distracting still image behind your titles and credits, for example, or to create a video photo album. If you keep your pictures in iPhoto, a great feature awaits.
When you click the Photos button (Figure 14-19), you're shown the contents of your entire iPhoto Library. Using the pop-up menu, you can even limit your view to the contents of one iPhoto album or another. Once you've pinpointed the picture you want, use the controls at the top of the Photos palette to specify the amount of time the photo will remain on the screen, and whether or not you want the Ken Burns effect , where the "movie camera" pans and zooms smoothly across photos, in essence animating them and directing the viewer's attention. (Ken Burns is the creator of PBS documentaries like The Civil War and Baseball , which use this effect in abundance .) Finally, drag the photo out of the thumbnail palette and into the Movie Track. The other clips scoot out of the way to make room, and the photo becomes, in effect, a new silent video clip with the duration you specified. (If you turned on the Ken Burns effect, iMovie takes a few moments to render the animation. The familiar red progress bar inches across the face of the clip.) Note: If you don't routinely keep your photos in iPhoto, you can also import a graphics file, or even a QuickTime movie, right from your hard drive by choosing File  Import. Import. Share, pick how youd like to export the movie (back to your video camera, say, or as a QuickTime movie that you can send by email or play off your hard drive), set any options, and click Share. Then wait while iMovie does its business. It could take hours, depending on the length of your movie and the export format you chose. |

EAN: N/A
Pages: 371