Section 8.5. Fontsand Font Book
8.5. Fontsand Font BookMac OS X type always looks smooth onscreen, no matter what the point size , and always looks smooth in printouts, no matter what kind of printer you use. (That's because Mac OS X accepts only always-smooth type formats like TrueType, PostScript Type 1, and OpenType.) To help you keep its fonts organized, Mac OS X comes with a program that's just for installing, removing, inspecting, and organizing fonts. It's called Font Book (Figure 8-9), and it's waiting in your Applications folder. 8.5.1. Where Fonts LiveIf you're used to Windows, one of the most confusing changes is that there is no longer one single Fonts folder for your computer. There are now five Fonts folders. The fonts you actually see listed in the Font menus and panels of your programs are combinations of these Fonts folders' contents. They include:
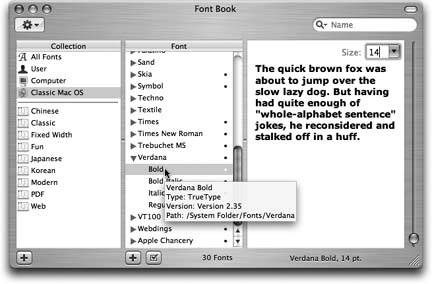
With the exception of essential system fonts, you'll find an icon representing each of these locations in your Font Book program, described next . 8.5.2. Font Book: Installing and Managing FontsOne of the biggest perks of Mac OS X is its preinstalled collection of over 50 great-looking fonts"over $1,000 worth," according to Apple, which licensed them from type companies. Font Book is your ticket to making the most of them. 8.5.2.1. Looking over your fontsRight off the bat, Font Book is great for one enjoyable pursuit: looking at samples of each typeface. Click Computer, for example; click the first font name , and then press the down-arrow key. As you walk down the list, the rightmost pane shows you a sample of each font (Figure 8-9). You can also open any font family's flippy triangle (or highlight its name and then press the right arrow) to see the font variations it includes: Italic, Bold, and so on. Tip: Don't miss the Preview menu, which lets you substitute a full display of every character in the rightmost pane (choose Repertoire)or, if you choose Custom, substitute your own text. 8.5.2.2. Eliminating duplicatesSince your Mac accesses up to five folders containing fonts, you might wonder what happens in the case of conflicts . For example, suppose you have two slightly different fonts, both called Optima, which came from different type companies, and are housed in different Fonts folders on your system. Which font do you actually get when you use it in your documents? The scheme is actually fairly simple: Mac OS X proceeds down the list of Fonts folders in the order described on the facing page, beginning with your own home Fonts folder. It only acknowledges the existence of the first instance of the font it finds. Tip: If you'd rather have more control, open Font Book. A bullet () next to a font's name is Font Book's charming way of telling you that you've got copies of the same font in more than one place. Click the one that you want to keep and then choose Edit  Resolve Duplicates. Resolve Duplicates. [your hard drive] Windows (or WINNT) Fonts folder. Windows 95, 98 . Choose Start Copy the font files, using any of the techniques described in Chapter 5, onto your Mac. Then, when you double-click a font's file in the Finder, Font Book opens and presents the typeface for your inspecting pleasure . If you like it, click Install font. You've just installed it into your account's Fonts folder, so that it appears in the Font menus and panels of all your programs. 8.5.2.4. Removing and hiding fontsRemoving a font from your machine is easy: Highlight it in Font Book and then press the Delete key. (You're asked to confirm the decision.) Before taking such a drastic step, however, consider this: When you disable a font, you simply hide it from your programs. You might want to disable a font so that you can use a different version of it (a copy from a different company, for example), or to make your Font menus shorter, or to make a program like Microsoft Word start up faster. To disable a font, just click it and then click the checkbox button beneath the list (or press Shift- The font's name now appears gray, and the word Off appears next to it, making it absolutely clear what you've just done. (To turn the font on again, highlight its name and then click the now-empty checkbox button, or press Shift- Note: When you install, remove, disable, or enable a font using Font Book, you see the changes in the Font panels of your Cocoa programs (Section 4.8) immediately. You won't see the changes in open Carbon programs, however, until you quit and reopen them. |
EAN: N/A
Pages: 371