15.2. Making a Program In this section, you'll create a simple program to speak text out loud. In doing so, you'll learn how to design a program's look in Interface Builder and how to write the associated AppleScript commands in Xcode. Once you're done, you'll have a fully functioning Mac OS X application, ready to email to your friends or post online. Before you can do any of this, however, you have to install the Xcode Tools. Luckily, if you don't have them, you can get them for free. Page Section 14.5.1 has the details.  | If you're not sure whether you've installed the Xcode Tools already, double-click your hard drive in the Finder. If you have a Developer folder, you're good to go. Otherwise, you have to install the tools. |
|
15.2.1. Creating a Project Once you've installed the Xcode Tools, it's pretty easy to create a new, basic AppleScript Studio program. Here's how: Open your Developer  Applications folder, and double-click Xcode. Applications folder, and double-click Xcode. This program is where you'll write your AppleScript code (Section 14.5.2). Since Xcode is such an essential program, power users often keep a copy in their Dock for easy access. Choose File New Project (Shift- -N). -N). Xcode presents a list of new-program templates, ranging from Tools (Unix programs) to Address Book plug-ins. Select AppleScript Application and click Next. You've just selected the simplest template for an AppleScript Studio program. If you wanted to write a more complicated program, you could choose AppleScript Droplet (for making a program that can open files) or AppleScript Document-based Application (for making a program that can open and save files). For writing a plain old program that doesn't deal with files, however, AppleScript Application fits the bill nicely. Enter a name for your new program in the Project Name field. Not only will this be the name of your project (the Xcode folder than contains your program's code), it'll also be the name of your AppleScript Studio program. You can name the project whatever you want, but SpeakToMe would be as good a name as any. Click Choose to tell Xcode where to save your project. Alternatively, type the Mac OS X-style folder path in the Project Directory field (Figure 15-1). 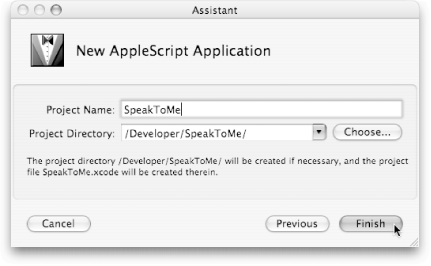 | Figure 15-1. Xcode makes you give your project a name before you can start writing a line of code. For the Project Directory (where Mac OS X saves your project), you can either navigate to a folder with the Choose button or type a folder path yourself. |
|
Click Finish. After a few seconds, Xcode opens the project window for your new AppleScript Studio application.
At this point, your project has everything it needs to work. To prove it, choose Build Build and Run (-R), and wait for Xcode to assemble your program. After a short wait, your program opens, displaying a simple window and menu bar (Figure 15-2). Not bad for not writing a single line of code! When you're done being impressed with your bare-bones program, choose SpeakToMe Quit. You return to Xcode, where you can start building a program that actually does something. 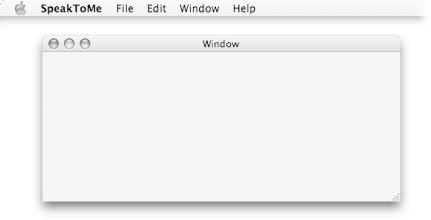 | Figure 15-2. Your program's generic interface. You get a plain old window and a plain old menu bar. As an added convenience, many of the menu items work automatically: Quit, Close, and Minimize, for example. |
|
15.2.2. Designing the Interface Before you start writing any code, you must first design your program's interface. (OK, technically your program already has an interfacea blank windowbut it's hardly something to email home about.) What you really need are interface elements. To edit your program's interface, you use Interface Builder, a program included with the Xcode Tools. Rather than double-click Interface Builder in the Finder, however, it's much easier to simply double-click MainMenu.nib in Xcode. (MainMenu.nib is the file in charge of your program's interface.) Frequently Asked Question
Interfacing Like a Pro | I don't know a thing about graphic design or user interaction. How am I supposed to design a decent interface for my programs? To a typical Mac user, the idea of creating a program's interface conjures up thoughts of geeks working at graphics workstations late into the night. As it turns out, though, it's remarkably easy to create a good interface, provided you follow a few simple guidelinesthe Apple Human Interface Guidelines, to be exact. The Apple Human Interface Guidelines (or HIG, as they're known by geeks) are put together in an online book, available from: - http://developer.apple.com/documentation/UserExperience/Conceptual/OSXHIGuidelines/OSXHIGuidelines.pdf.
Divided into 11 separate chapters, the Human Interface Guidelines detail everything from how far apart your buttons should be to which fonts you should use in dialog boxes. Still, you don't have to follow the HIG to the letter. As long as you stick to its basic usability suggestionslike making sure your program has a Quit item in its File menuyour interfaces should come out fine. And don't lose too much sleep about interface designeven Apple doesn't follow its own guidelines all the time. |
Once you do that, Interface Builder pops open, displaying four different windows (Figure 15-3). Before you jump headlong into building your interface, however, you should have some idea of what your program should look like. Since you want to be able to enter text and have your program speak it out loud, your interface should probably have: 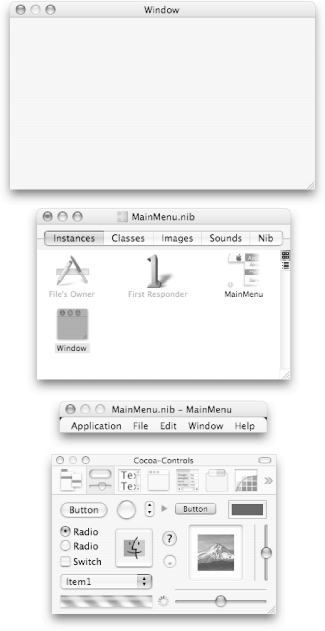 | Figure 15-3. The many windows of Interface Builder. Top: The window for your running program. Whatever interface elements you place here will also appear when your program is running.Second from top: Interface Builder's master switchboard. To edit your menu bar, double-click MainMenu here. Or, if you want to edit your program's window (top), just double-click the Window icon here.Second from bottom: Your program's menu bar. To edit the menus that will appear while your program is running, double-click the corresponding menus in this window. Bottom: The Palettes window. This is where you can browse predesigned interface elements like buttons, tables, and text boxes. The toolbar at the top of this window lets you switch between sets of interface elements: menu-related, text-related, and window-related, for example. |
|
A text field, where you'll enter what you want the program to speak. A pop-up menu, to choose the voice you want to hear. A button, to trigger your program to start speaking.
Now that you know what interface elements you need, you can put your window together. Here's how: Switch to the Cocoa-Text pane of the Palette window (Figure 15-4, top). To do so, click the third toolbar button from the left. Drag the text field from the upper-left corner of the Palette window into the upper-left corner of your main program window (Figure 15-4, bottom). If you drag the button into just the right spot, you'll see blue dashed lines. That's Interface Builder's way of telling you, "let go of the text field here, and I'll automatically snap it 20 pixels from both sides of the window." | If you'd rather the text field not snap like this, hold down before you let go of the text field. |
|
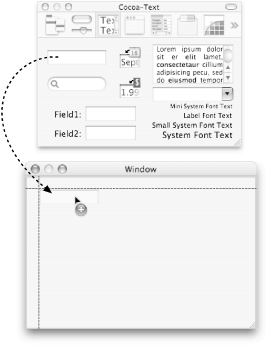 | Figure 15-4. Top: The Cocoa-Text pane, a list of every text-related interface item known to humanity. Bottom: Drag the text field near the corner of the window, and Interface Builder will display its "drop-to-snap" dashed lines. Or, if you're a nonconformist, drag the text field somewhere else in the window. |
|
Drag the right-edge dot of the text field until it snaps near the right edge of the window. Once you release the mouse, your text field will be centered at the top of the window. Switch to the Cocoa-Controls pane of the Palette window (Figure 15-5, top). That's the second toolbar button from the left. Drag the pop-up menu (labeled "Item1") from the Palette window to the left edge of your program window, below the text field (Figure 15-5, bottom). Again, blue dashed lines indicate that the pop-up menu will snap 20 pixels from the left edge of the window when you release the mouse. 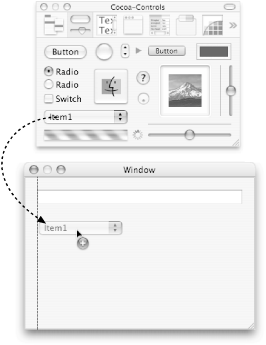 | Figure 15-5. Top: The Cocoa-Controls pane, listing buttons, sliders, progress indicators, and other interface mainstays. Bottom: Place the pop-up menu underneath your existing text field. This pop-up menu will let you pick the voice you want Mac OS X to read your text in. |
|
Drag the upper-left button from the Palette window to your program window. If you place the button just right (as shown in Figure 15-6), it snaps away from the right side of the window, and it snaps horizontally even with the pop-up menu. Give the button a name (besides "Button") by double-clicking it and typing your new name. Since you'll click this button to make your program talk out loud, you could name it Speak, for example. To set up the pop-up menu with a list of possible voices, double-click it. Then, for each item in the menu, double-click it and enter an appropriate name (Figure 15-7 has a list of names). By default, the pop-up menu contains only three items. To add additional itemsso you can include all possible voices in the menuselect Edit Duplicate (-D) for each new menu item you want to create. 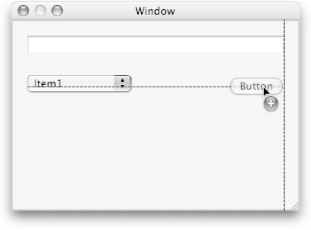 | Figure 15-6. If you drag the button in line with the pop-up menu, Interface Builder shows you they're on the same latitude with a dashed horizontal line. |
|
Resize your program window as shown in Figure 15-8. If you drag the lower-right corner of the window just right, you can get it to snap 20 pixels away from the pop-up menu. If all your interface elements are 20 pixels from the edge of the window, your window conforms to Apple's official Human Interface Guidelines (see Interfacing Like a Pro, Sidebar 15.1). Feel free to brag to your friends about itbut don't be surprised if they look at you quizzically. 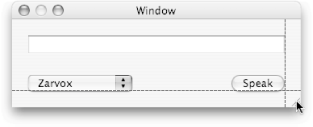 | Figure 15-8. Your window in its final shape and size. Feel free to resize the pop-up menu and button, though; as of right now, they're pretty far apart. |
|
Open Interface Builder's Inspector window by choosing Tools Show Info (or by pressing Shift--I). The Inspector lets you fine-tune the settings for your interface elements. The Inspector also lets you give your interface elements AppleScript names, so you can refer to them from your scripts. With the Inspector open, click the background of your program window. Figure 15-9 details the changes you should make to the Inspector settings. In the pop-up menu at the top of the Inspector, choose AppleScript (-7). The Inspector AppleScript pane lets you give your interface elements AppleScript namesa requirement if you want to be able to control these interface elements from your code. This pane also lets you associate interface elements with different scripts in your project, so that clicking a particular button runs a particular script, for example. Type main in the Name field. That tells Interface Builder that you'll refer to this window as window "main" in your scripts. Select the text field, and type textToSpeak in the Inspector's Name field. You'll refer to this text field as text field "textToSpeak" in your scripts. Select the pop-up menu and name it voiceMenu. As you could probably guess, you'll refer to this as popup button "voiceMenu" in your scripts. Select the button and give it the AppleScript name speakButton. Although you won't refer to this button in your scripts, it's always a good idea to give each interface element an AppleScript name. That way, if you decide to refer to the element later onby sending it an AppleScript commandyou won't have to come back to Interface Builder just to give the element an AppleScript name. Under Event Handlers, turn on the "clicked" checkbox. That's the equivalent of telling Interface Builder, "When I click the Speak button, I want you to run a script." Turn on the single checkbox under "Script" at the bottom of the Inspector (Figure 15-10). Now you're telling Interface Builder, "When I click the Speak button, I want you to run this particular script." 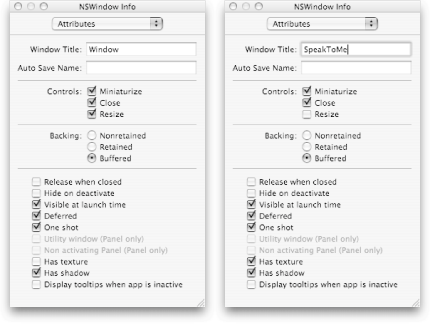 | Figure 15-9. Left: The window's Inspector, at first. Right: The window's Inspector, after tweaking a few settings. First, give the window a title, so the window's title bar doesn't say "Window." Next, turn off the Resize checkbox, so you can't resize the window while your program's running. Finally, turn on the "Has texture" checkbox to give your window the cool, brushed-metal look from iTunes and iMovie. |
|
Finally, click Edit Script. Xcode comes forward, displaying a bare-bones script (Figure 15-11). The clicked handler in this script will run whenever you click the Speak button in your program.
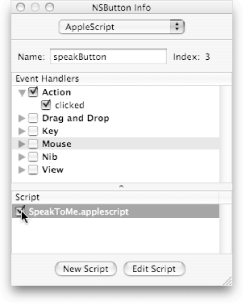 | Figure 15-10. With these checkboxes turned on, your program automatically runs SpeakToMe.applescript when you click the Speak button. |
|
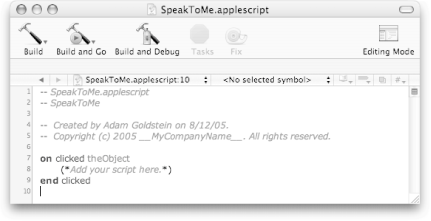 | Figure 15-11. Your script in Xcode. Feel free to insert your own comments at the top of the scriptto remind you, for example, that you haven't actually written any code yet. |
|
That's all there is to laying out an interface: dragging elements where you want them, tweaking settings in the Inspector, and linking interface elements to scripts. Now, when you run your program, everything will look exactly as you designed in Interface Builder. 15.2.3. Writing the Code Before your program will actually do anything, you have to write the appropriate AppleScript commands. Luckily, it's not much harder to write a program-controlling script in Xcode than it is to write one in Script Editor. The only difference, of course, is that this time the program you're controlling is yours, and not some third-party program like TextEdit or FileMaker Pro. To make your program work, fill in the code window from Figure 15-11 with the following commands (shown in bold): --Part 1: on clicked theObject --Part 2: tell window "main" --Part 3: set theText to (the content of text field "textToSpeak") as string --Part 4: set theVoice to (the title of popup button "voiceMenu") as string end tell --Part 5: say theText using theVoice end clicked
Here's how the script works: Part 1and the on clicked part in particularindicates that this script should run when you click a button in your program. Of course, Xcode has no way of knowing which button should run this scriptthat's what Interface Builder is for. Part 2 lets AppleScript know that you're about to send commands to your interface's main window (the window with the text field, pop-up menu, and button). Part 3 puts the text that you entered in your program's text field into the theText variable. Later in your script, you'll have your Mac speak this text.
| If you wanted to change what's in your program's text fieldsay, so you could update the text field with the word "talking" while your program is speakingyou'd use the set command instead of accessing the content of your text field. |
|
| The as string bit in parts 3 and 4 ensures that your say command (in part 5) will work properly. That's because say requires you to provide a string to speak out loud. |
|
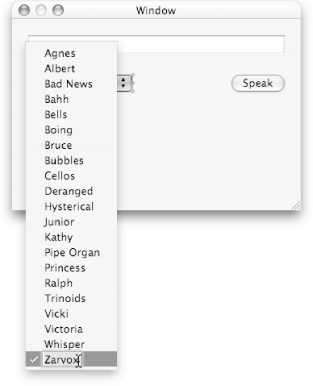
15.2.4. Running the Program Now that you've typed your commands, you can actually run your program. Simply choose Build Build and Run (-R). If Xcode asks to save your files, click Save All. After a few moments, Xcode assembles your program and launches it. If you're not convinced that the Build command worked, just look in the Dock; you should see a new, generic icon to represent your program. Soon after, you'll see your program's main window appear onscreen (Figure 15-12). Feel free to experiment by picking different voices, typing unusual sentences, and clicking Speak to hear them pronounced. When you've had enough of Apple's utterly synthesized voices, choose SpeakToMe Quit Application (-Q).  | Figure 15-12. Your very own AppleScript Studio application. For extra fun, choose a weird voice like Zarvox or Pipe Organ. |
|
That's it! You now have a complete, self-contained AppleScript Studio application, ready to run whenever you are. To learn more about AppleScript Studio, check out Apple's special Web site for it: www.apple.com/applescript/studio/. In particular, look at the online documentation (for help with more advanced AppleScript Studio techniques) and the downloadable example projects. Power Users' Clinic
Polishing Up an AppleScript Studio App | Although your AppleScript Studio program is a huge improvement on the ugliness that marks most plain AppleScripts, your program is still not up to the quality of, say, TextEdit. Little interface inconsistencies spring up all over the place: the About box has inaccurate information, the Help menu doesn't do anything, and so on. Although these interface quirks have no effect on how your program runs, they do have an effect on how your program looksand in the era of Mac OS X, that's just as important. Here's how to inject your program's interface with some virtual Botox: Clean up your menu bar. Although Interface Builder gives you a standard set of menus whenever you create a new project, the menus aren't customized to your program's features. To fix the problem, open your program's interface in Interface Builder, double-click the menu items you want to modify (they're in the "MainMenu.nib - MainMenu" window), and type new names for the menu items. At minimum, you should replace the word "Application" in the Application and Help menus with the actual name of your program (in this case, SpeakToMe). Put correct information in the About box. When you create a new project in Xcode, Mac OS X assumes that you don't care what your About box displays. That's why, right now, your About box says "Copyright 2005 __MyCompanyName_ _" or some similar nonsense. To fix the problem, open your project in Xcode and double-click InfoPlist.strings. You'll see a color-coded text file appear, filled with geeky names (CFBundleShortVersionString, for example). To change what appears in your About box, simply edit the string to the right of NSHumanReadableCopyright. Make sure your program displays accurate information in the Finder's Info window. By default, when you select your program in the Finder and choose File Get Info, you'll see a bunch of useless informationincluding Copyright 2005 __MyCompanyName_ _. If that text looks familiar, you shouldn't be surprised: it's the same information your program displayed in its About box before you fixed it as described above. To fix the information in the Finder's Info window, you follow a similar procedure: open InfoPlist.strings in Xcode, and edit the string next to CFBundleGetInfoString. Give your program a real icon. No professional-quality program comes with a generic icon nowadays. If you want your program to compete with the big boysFileMaker Pro, Microsoft Word, and iTunes, for exampleyou'll need a memorable icon. Luckily, you can attach one quite simply: copy the image you want to use from a program like Photoshop, select your program's existing icon in the Finder, choose File Get Info, and paste the new image on top of the old icon in the upper-left corner of the window. Touch-up complete!
Now that you have a pro-quality program, you can post it for the world to see. If you'd like to reach the widest audience, post your program on a Web site like www.versiontracker.com or www.macupdate.com (both free)they're gathering places for interested Mac fans. |
|