10.4. Scripting FileMaker Pro Although AppleScript databases are convenient for managing small batches of related information, they have some serious limitations. For one thing, any time you want to change an AppleScript database, you have to do so in codea big annoyance for anyone used to the graphical comfort of Mac OS X. For another thing, you can't very easily display an AppleScript database in a dialog box; you have to settle for displaying individual properties from the database. Finally, AppleScript databases become unwieldy when they hold more than a few hundred items, since AppleScript was never really meant to do super-fast data processing. The solution to these annoyances, of course, is to use a graphical database program. That way, you won't have to deal with convoluted AppleScript commands just to hold your information (although you're free to use AppleScripts to filter database information once it's already entered). And when it comes time to display your information, you won't have resort to AppleScript hackery to see your database onscreen. If you feel the tug of the graphical database program, FileMaker Pro is your best choice for Mac OS X. It's easy to useat least, as far as database programs are concernedand full of helpful features, including powerful searching and predesigned databases for common tasks, such as cataloging a movie collection. But best of all, FileMaker Pro has a comprehensive AppleScript dictionary for automatically entering, filtering, and sorting your database entries.  | If you don't feel like spending $300 on a full version of FileMaker Pro, you can download a free, fully functioning 30-day trial from https://www.filemaker.com/downloads/trial_download.html. |
|
10.4.1. Creating a New FileMaker Database People use databases for an enormous number of things, but one fairly common use is storing employee information. Rather than keeping physical files on each employee, for example, a FileMaker Pro database lets you store all that information on your computerwhich is easier to search, email to hiring managers, or destroy if the government comes after you. This section, therefore, helps you create such a database, and then shows you how to write the scripts you'll need to automate sorting the database's information. In FileMaker Pro, you create a new database by choosing the File  New Database command. At that point, you see a dialog box where you can pick one of the predesigned databases layouts (Product Catalog, Movie Library, To Do List, and so on). However, since you're going to build a customized database, you'd be better off starting from scratch, so just select "Create a new empty file." Once you've turned that option on, click OK to jump to the next dialog box, where you can specify the location to save the database on your hard drive. (You can save the database in your Documents folder, or anywhere else that it's convenient.) New Database command. At that point, you see a dialog box where you can pick one of the predesigned databases layouts (Product Catalog, Movie Library, To Do List, and so on). However, since you're going to build a customized database, you'd be better off starting from scratch, so just select "Create a new empty file." Once you've turned that option on, click OK to jump to the next dialog box, where you can specify the location to save the database on your hard drive. (You can save the database in your Documents folder, or anywhere else that it's convenient.) Now, after you click Save in the dialog box, you see yet another dialog box (Figure 10-3). This is where you specify the individual fields to appear in your database entries: an employee's name, tenure, and résumé, for example. 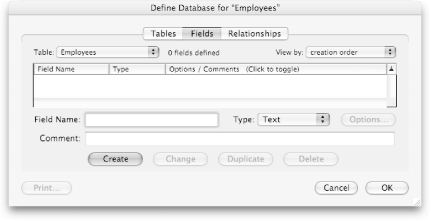 | Figure 10-3. This complicated dialog box is what lets you name the individual fields for your database. In essence, it lets you take care of all the database setup before you start entering information. If, at some later point, you want to change your database's fields, simply choose View  Layout Mode and add or delete fields as you please. Layout Mode and add or delete fields as you please. |
|
Here's the procedure for setting up the dialog box with the necessary field information: Enter "First Name" for the Field Name; in the Type pop-up menu, make sure Text is selected, and click Create. You just added a First Name field to your employee database. Repeat step 1, but add a new text field named Last Name. The reason for using two separate fields is that, later on, you can sort by either first name or last name. If you only had a single Name field (containing both first and last names), you wouldn't have the option of sorting them separately. For the Field Name, type Tenure; from the Type pop-up menu, select Number ( -N); then click Create. -N); then click Create. You've just created a third field in your database. This one lets you specify how many years you've employed someone. Add another field to your database, naming it Picture, and choosing Container ( -R) for its Type. -R) for its Type. This field lets you store a headshot, mug shot, or other embarrassing photograph of each employee. (Make sure you've clicked Create to add the field to your database before proceeding.) For your last field's Name, type Résumé; for the Type, select Container; then click Create.  | To create the accented é character, type Option-E, release both keys, and then press E again. |
|
This field allows you to include your employees' résumés right inside your database, making it easy to check up on their college degrees when you feel the need. Click OK to exit the dialog box. You now see a single record in your new database, just waiting for you to fill out (Figure 10-4).
If you'd like to see the record in a more compact way, choose View  View as Table. View as Table. 10.4.2. Entering Information into a FileMaker Database Now that you've got a database with all the fields you want, it's time to enter your employees' actual information. FileMaker Pro allows you to do this in two different ways: by typing the information yourself or by having AppleScript enter it for you. 10.4.2.1 Enter your information manually This is the approach most people use when they fill out a database: type the current employee's information in, insert the images and files you want, and move on to the next employee. (You create a new, blank employee record by choosing Records  New Record, or by pressing New Record, or by pressing  -N.) -N.) Needless to say, this method is slow, tedious, and error-prone. Use it only if you're retiredor an insomniac. 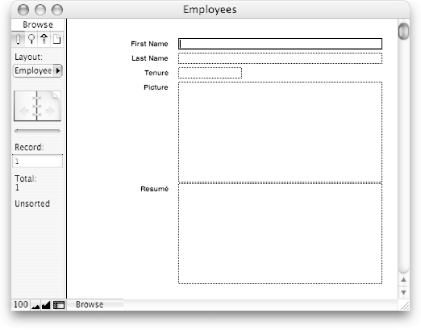 | Figure 10-4. You can type an employee's information straight into the First Name, Last Name, and Tenure fields. For the Picture field, however, Control-click the box, choose Insert Picture from the shortcut menu, and choose the image that you want to appear in the database. Similarly, for the Résumé field, Control-click the box next to it, choose Insert File, and navigate to the résumé file you want to add to your database. |
|
10.4.2.2 Use an AppleScript to enter your information If you're short on time, AppleScript can help you copy your employees' information out of your Address Book (Section 9.3) and into your new FileMaker database. Not only does this method take only a fraction of the work, it also cuts down on any typos that might occur if you tried to transfer the information by hand. The following script shows you how to integrate your Address Book with FileMaker Pro, illustrating a wide variety of powerful commands. By the time the script is finished, your database will contain the names of your employees (picked out of your Address Book), their tenures (which you enter in a dialog box), their pictures (copied from Photoshop), and their résumés (chosen from within FileMaker). This script truly illustrates AppleScript's power at controlling different programs:  | If you have more than one copy of FileMaker Pro on your computersay, an old version for Mac OS 9 and a new version for Mac OS Xyou have to change the phrase "FileMaker Pro" to include the newest version's full namefor instance, "FileMaker Pro 7." |
|
--Part 1: tell application "Address Book" activate set myCompany to the text returned of (display dialog ¬ "Enter your company's name:" default answer "") --Part 2: set theEmployees to every person whose organization is myCompany end tell --Part 3: repeat with currentEmployee in theEmployees --Part 4: tell application "Address Book" set employeeFirstName to the first name of currentEmployee set employeeLastName to the last name of currentEmployee end tell --Part 5: tell application "FileMaker Pro" activate set employeeTenure to the text returned of (display dialog ¬ "How many years has " & employeeFirstName & space & ¬ employeeLastName & " been working for you?" default answer 2) --Part 6: set employeePicture to (choose file with prompt ¬ "Choose " & employeeFirstName & "'s picture:") --Part 7: create new record at the end go to the last record --Part 8: set the contents of field "First Name" of the current record ¬ to employeeFirstName set the contents of field "Last Name" of the current record ¬ to employeeLastName set the contents of field "Tenure" of the current record to ¬ employeeTenure end tell --Part 9: tell application "Adobe Photoshop CS" activate open employeePicture --Part 10: tell the front document select all copy close end tell end tell --Part 11: tell application "FileMaker Pro" activate go to field "Picture" of the current record paste --Part 12: go to field "Resumé" of the current record do menu (menu item "File..." of menu "Insert") end tell end repeat
 | You enter the ... character on the third-to-last line by pressing Option-; (not by pressing the period key three times). |
|
Here's how this mega-script works: 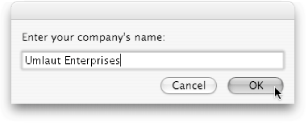 | Figure 10-5. Enter your company's name, and your script automatically finds all your employees in Address Book. |
|
Part 2 gets every contact in your Address Book whose organization property matches your company. In other words, this part puts a list of your employees into the variable theEmployees. Part 3 starts a loop to go through each of your employees. Each time the repeat statement runs, it sets currentEmployee to the next employee in the list. Part 4 sets employeeFirstName and employeeLastName to the current employee's first and last names, respectively, from Address Book. Later, your script inserts this information into the appropriate fields in your database. Part 5 brings FileMaker Pro forward and asks you how long the current employee has served for (Figure 10-6). Later in the script, this information also gets inserted into the appropriate database field. Part 6 asks you to select the current employee's picture on your hard drive and then puts the file you choose into the employeePicture variable.
 | FileMaker Pro can accept most standard graphics formats for pictures (TIFF, GIF, JPEG, and so on). |
|
Part 7 creates a new record in your FileMaker database to store the current employee. Then, since FileMaker Pro automatically creates new records at the end of the current records, this part navigates to the last record in your database before proceeding.
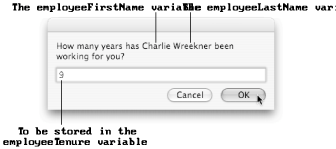 | Figure 10-6. Your script doesn't specify what period of time this tenure measures. That means you could be talking about 9 years, 9 months, or (if you have a very high turnover rate) 9 days. For the sake of consistency, though, it's best if you enter all the tenures of your employees in years, and then use decimal numbers (like 0.5) to measure fractions of a year. |
|
Part 8 enters the current employee's first name, last name, and tenure into the new recordwith no human intervention. Part 9 opens the picture from part 6 in Photoshop.
 | Since FileMaker Pro can't open images on its own (it can only accept them when pasted from other programs or chosen from a dialog box), you have to open the image in another program first, and then copy it into FileMaker. You could use a different graphics program if you wanted, but Photoshop is as good as any. |
|
Part 10 takes the frontmost window in Photoshop (the one you opened in the previous step), selects the image inside, copies it, and closes the window. Your Clipboard now holds the current employee's picture.
 | Photoshop won't let you copy images (using the copy command) unless Photoshop is the frontmost program at the time. In this script, that's accomplished with the activate command in part 9. |
|
Part 11 takes you back to FileMaker Pro, where the script selects the Picture field and pastes your employee's picture. At this point, four out of five of your record's fields are filled in. Part 12 selects the Résumé field. Then, using FileMaker's special do menu command, the script runs the Insert  File command from FileMaker's menu bar. This is what lets you pick a résumé to insert into the current employee's record. File command from FileMaker's menu bar. This is what lets you pick a résumé to insert into the current employee's record. Figure 10-7 shows what a single record might look like after part 12 is done. Then, once you've finished inputting one record, the script jumps back to part 3 to deal with your next employee.
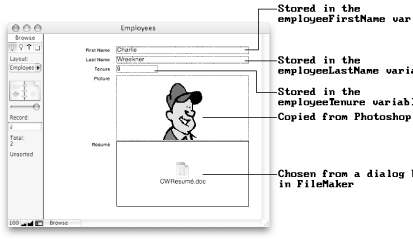 | Figure 10-7. A completed employee record in FileMaker Pro. If you want to change the information in the First Name, Last Name, or Tenure field later, just click inside the field and type your new text. If you want to change the picture, Control-click its box and choose Insert Picture from the shortcut menu. Similarly, if you want to change the Résumé box, Control-click it and choose Insert File. |
|
Congratulations! Once you run the script, all your employees from Address Book will sit happily in FileMaker Pro. 10.4.3. Sorting FileMaker Records You've got several dozen employees entered in FileMaker Pro, all with pictures and résumés. But what if you want to sort your employeessay, by last name, or from newest to oldest? As with most things in FileMaker Pro, you can sort your database's records by using FileMaker's graphical interface or by commanding the program with AppleScript. The advantage of sorting graphically (by choosing Records  Sort Records, and then selecting the criteria to sort by) is that you have greater control. For example, you can sort by last name, and then sort people who have the same last name by their first name. This kind of multilayered sort lets you break a "tie" between employees who would otherwise be sorted the same way. Sort Records, and then selecting the criteria to sort by) is that you have greater control. For example, you can sort by last name, and then sort people who have the same last name by their first name. This kind of multilayered sort lets you break a "tie" between employees who would otherwise be sorted the same way. On the other hand, using AppleScript to sort your records has advantages of its own. For one thing, it's faster; once you have a script that sorts the way you want, you never have to re-enter your sort again (as you would if you used the Records  Sort Records dialog box). For another thing, an AppleScript can incorporate commands beyond sorting (so that, after sorting, you can jump to the first or last record in your database, for example). Finally, you can save an AppleScript as an application, so you can run it from the menu bar or Dock whenever you want (Section 2.2.2). Sort Records dialog box). For another thing, an AppleScript can incorporate commands beyond sorting (so that, after sorting, you can jump to the first or last record in your database, for example). Finally, you can save an AppleScript as an application, so you can run it from the menu bar or Dock whenever you want (Section 2.2.2). Here's a script to sort your database by employee tenure, for instance: tell application "FileMaker Pro" tell the front layout sort by field "Tenure" in order descending end tell end tell
Frequently Asked Question
Scripts Inside FileMaker | I was poking around in FileMaker's menus, and I noticed this thing called ScriptMaker. What's it for, and how's it different from AppleScript? You've just stumbled upon FileMaker Pro's personal script bakery. When you choose Scripts  ScriptMaker, you see a dialog box, where you can create special, FileMaker-only scripts without writing a line of code yourself. ScriptMaker, you see a dialog box, where you can create special, FileMaker-only scripts without writing a line of code yourself. Unfortunately, the scripts you create in ScriptMaker are not AppleScripts. They're stored in a special FileMaker-specific format, which means you can't open them in Script Editor, save them in the Dock, nor perform any of the other cool tricks described in Chapter 2 with them. That's not to say that ScriptMaker isn't useful, however. It has a number of advantages over AppleScript, despite the fact that ScriptMaker works only within FileMaker Pro: With ScriptMaker, you don't have to type any commands yourself.Of course, it can be quicker to type commands than to navigate a series of ScriptMaker dialog boxes in FileMaker Pro. Still, it's easier to use the dialog box approach, because you don't have to look commands up in FileMaker Pro's AppleScript dictionary. ScriptMaker gives you a choice of more commands than AppleScript does. For instance, you can perform automatic database spell checking with ScriptMaker's Correct Word command, even though there's no command to do this with AppleScript. Any scripts you create with ScriptMaker are automatically listed in FileMaker's Scripts menu.ScriptMaker scripts are also given keyboard shortcuts automatically -1 for the first script, -1 for the first script,  -2 for the second, and so on. That makes ScriptMaker scripts a lot easier to run than AppleScripts, which you have to either put in the global Script Menu or the Dock (neither of which uses keyboard shortcuts for its items). -2 for the second, and so on. That makes ScriptMaker scripts a lot easier to run than AppleScripts, which you have to either put in the global Script Menu or the Dock (neither of which uses keyboard shortcuts for its items). ScriptMaker works on both Macs and Windows PCs.That's different from AppleScript commands, which only work on the Mac version of FileMaker Pro.
To construct a script with ScriptMaker, click New in the Define Script dialog box. Then choose the commands you want to use from the pane on the left, and click Move to add the commands to your script's list (the pane on the right). If there's a command that has extra optionssay, Perform Find/Replace, for changing occurrences of certain text in your databasea Specify button appears at the bottom of the window to let you fine-tune the command. If you absolutely must control other programs from your ScriptMaker scripts, you can do itbut you have to be sneaky. Scroll all the way down to the bottom of the Edit Script dialog box, and double-click Perform AppleScript. When you click the Specify button, FileMaker Pro lets you paste in AppleScript code from Script Editoreven if that code controls other programs. (Similarly, you can run ScriptMaker scripts from AppleScript using FileMaker Pro's do script command. That way, you can access the internal features available to ScriptMaker from a hand-coded AppleScript.) Finally, once you're done inputting ScriptMaker commands, click OK to save your script for future use. Note, however, that your ScriptMaker scripts will work only within the current database. |
It might seem strange to tell a layout to sort itself, but in fact, that's how you have to command FileMaker Pro. That's because, in theory, you could have multiple layouts for a databaseeach sorted independentlyand you have to tell FileMaker which one to perform the sort on. Just sorting your records, however, isn't going to win any programming awards. That's why the following script not only sorts your employees by last name, but also brings FileMaker Pro forward and jumps to the first record alphabetically: tell application "FileMaker Pro" activate --Bring FileMaker Pro forward tell the front layout sort by field "Last Name" in order ascending go to the first record --Jump to the first person, alphabetically end tell end tell
As you can see, a few simple commands in AppleScript can make it much easier to navigate your records in FileMaker Pro. Note, however, that you can only sort your records by text fields (First Name, Last Name, or Tenure); the ability to sort your employees in order of their pictures' attractiveness isn't expected until FileMaker 9. |

 New Database command. At that point, you see a dialog box where you can pick one of the predesigned databases layouts (Product Catalog, Movie Library, To Do List, and so on). However, since you're going to build a


