2.1. The Script Editor Look As you can see from Figure 2-1, Script Editor's window is fairly basic, especially when compared to something like Photoshop or Microsoft Word. Along the top of the window, you'll see a toolbar with four simple buttons (Record, Stop, Run, and Compile), with an area beneath for you to type in your script. 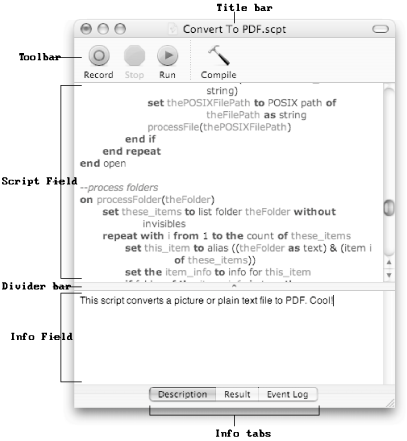 | Figure 2-1. Script Editor windows have several important sections. The toolbar at the top lets you test your script out or stop it when it's running. The upper text box is where you enter your commands, while the lower text box lets you add comments that describe what the script does. |
|
Unfortunately, Apple gave many of Script Editor's tools nerdy, programmer-y names (Event Log, anyone?). This section of the book, therefore, is meant to clear up what all the buttons and doodads in Script Editor's interface do. 2.1.1. The Toolbar The four buttons you see at the top of your window make up the toolbar. They're all modeled after the buttons on an old audiocassette recorder (alright, all of them except Compile, which actually comes from Xcode, one of Apple's programmer tools [Section 14.5]).  | You can run the same toolbar actions by using the commands or keyboard shortcuts in Script Editor's Script menu. |
|
2.1.1.1 Record Strange as it may sound, you don't need to write AppleScript commands yourself to get a working script. If you simply click the Record button, Script Editor tries its best to write out the appropriate AppleScript commands for you, based on what you're doing with your Mac. That's a much easier arrangement than, for example, hand-typing a series of complicated commands yourself. | Unfortunately, using this recording trick is rarely the best way to create AppleScripts. That's because recording is based on what's currently happening on screen, so you can't make "general scenario" scripts that perform different tasks depending on what's happening at the moment. |
|
Say you have a daily routine: you open a Finder window, navigate to the Applications folder, and turn on Column View. This is a perfect task to automate with AppleScript. All you'd need to do is click the Record button in Script Editor, go about your routine, and then click the Stop button in Script Editor when you're done. You'd end up with a script that looks something like this, without even having to write a single line of code yourself: tell application "Finder" activate make new Finder window to startup disk set target of Finder window 1 to folder "Applications" of startup disk set current view of Finder window 1 to column view end tell
| You can download this script, and all the other examples in this book, from the Missing Manual Web site. See the AppleScript Examples CD sidebar on the next page for instructions. |
|
Since this is a full-fledged script, you can run it again and again without having to perform all the tasks manually. You could then save this script in your Script Menu (Section 1.1.16.1), and you'd be able to easily run the script from any program. | Unfortunately, most programs (TextEdit, Photoshop, iTunes, and so on) don't support AppleScript recording. If you spend a lot of time in programs that do, however (BBEdit, QuickTime, and the Finder, for example), you'll be glad that you can create scripts without writing the code yourself. |
|
2.1.1.2 Stop As its name implies, this toolbar button halts whatever's in progress inside Script Editor's brain. If you've finished recording a series of Finder actions, for example, this is the button to click to let AppleScript know you're done. Or, if you've got a script that just won't seem to finish, this button lets you cut it off midstream. 2.1.1.3 Run When you click this button, Script Editor first makes sure your commands are all valid. If they are, Script Editor then runs every command in your script, one at a time, until it reaches the end. | If something goes wrong while your script is running (say, you realize it's deleting your entire Home folder), simply click the Stop button. Next time you click Run, the script starts from the very beginning againnot from the point where it stopped last time. |
|
2.1.1.4 Compile In programming lingo, compiling a file just means turning it into something you can run. For example, when you compile a script, Script Editor goes line by line through the code to make sure every AppleScript command is spelled and used correctly. | If AppleScript finds an error while compiling your script, Script Editor will likely display a cryptic error message. See Table 14-1 for an explanation of what these messages mean. |
|
Up to Speed
AppleScript Examples CD | A few examples make any learning process easier-and this book is no exception. Throughout these pages, you'll find references to AppleScript files on something called the AppleScript Examples CD. You can download these files right now. First, visit www.missingmanuals.com. At the top of the page, click the Missing CD button. You arrive at a page listing the downloadable files for the entire Missing Manual Series. Under the AppleScript heading, click to download the "AppleScript examples CD" disk image. It contains all the sample scripts you'll work with in this book. When the download is complete, you'll find on your desktop a file called AppleScript Examples.dmg. That's the disk image file, shown here at lower left. When you double-click it, you'll find a second icon on your Desktop, resembling a hard drive icon, shown here at lower right. (If Safari is your Web browser, just relax and wait as the icon opens automatically.) This is the actual "CD" icon. If you open it up, you'll find all the files for this book. You can copy them to a folder on your hard drive, if you like. 
If you're in a hurry, or using a slow Internet connection, you can also download the various tutorial pieces one at a time. You'll find them listed under the appropriate chapter headings on the Web site. |
Even though clicking the Run button automatically compiles a script for you, it's still a good idea to click the Compile button yourself first to catch all the errors. That way, when you finally do click the Run button, you can be sure that your script will runso you can walk away from your Mac and make a cup of coffee, for example. | If you're a speed freak, using the mouse to click the Compile button is a big waste of time. Instead, just press  -K; it accomplishes the same thing, but you don't have to move your hand off the keyboard. -K; it accomplishes the same thing, but you don't have to move your hand off the keyboard. True power users, on the other hand, use the secret keystroke: Enter. Rather than inserting a new line (as it does in, say, TextEdit), pressing Enter in Script Editor simply compiles the script for you. As you write your own scripts, get into the habit of hitting Enter before you click Run to save time. (Something to remember if you come from Windows: the Enter key on a Mac is not the same as Return.) |
|
2.1.1.5 Customizing the toolbar What's on the toolbar now is greatif you're happy to accept what Apple gives you right out of the box. However, if you're the sort of person who paints your car seven different colors, you'll be happy to know that Script Editor lets you customize its toolbar to the hilt. For starters, you can move around the icons that are already there by -dragging them. If you'd like to completely get rid of a toolbar icon, -drag it off the toolbarthe icon disappears in an animated poof of smoke. Just as easily, you can add new icons. Simply choose View  Customize Toolbar (or Option--click the pill button in the upper-right corner of a Script Editor window), and drag any icons you want right into the toolbar. When you're finished, click Done to make the customization sheet disappear. Customize Toolbar (or Option--click the pill button in the upper-right corner of a Script Editor window), and drag any icons you want right into the toolbar. When you're finished, click Done to make the customization sheet disappear. | If you're interested in searching your scripts, drag the Find box from this customization sheet into Script Editor's toolbar. From then on, simply enter your search criteria into the Find box and press Return to search the script. (If you keep pressing Return, you'll continue jumping to the next occurrence of whatever it was you searched for.) This trick saves you a few seconds over mousing up to Edit Find. |
|
Gem in the Rough
The Divider Bar | The humble divider bar lies in between your Script Field and Info Field, as shown in Figure 2-2. Of course, you probably know that you can drag the divider bar up or down to change the sizes of the two fields that border it. However, there are two tricks that make the divider bar an even more useful tool: Double-click it to send it all the way to the bottom of the window. That way, you'll see just your Script Fieldperfect if you have a small screen and need to enter a lot of commands. Option-double-click it to send it all the way to the top of the window. That's a handy arrangement if you need to enter a lot of comments in the Info Field, for example.
No matter which trick you use, you can bring the divider bar back to the middle of the window by double-clicking it again. |
If you're tight on screen space, you're probably annoyed at how big the toolbar is, not which icons are on it. Luckily, Script Editor gives you a choice of six toolbar sizes, from the slimmest bar of text (perfect for small-screened iBooks) up to the large icon-and-text display you see now (perfect for, say, that new 30-inch screen you just bought). Figure 2-2 has the details. 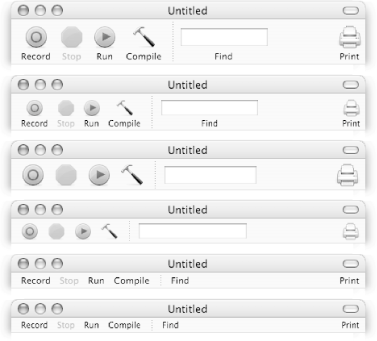 | Figure 2-2. The many looks of Script Editor's toolbar. -click the pill-shaped button to switch between: big icons and text, small icons and text, big icons, small icons, big text, and small text. Note that if you're using a text-only setting, the Find button brings up the Find dialog box. |
|
If you're really squeezed for screen real estate, you can completely hide the toolbar: simply choose View Hide Toolbar, or click the pill-shaped button in the upper-right corner of the window. (You can bring the toolbar back by choosing View Show Toolbar or by clicking that pill-shaped button again.) 2.1.2. The Script Field The Script Field, located right beneath the toolbar, is where your AppleScript commands go. You enter them, one command per line, and click Compile when you're done. That's when the fun begins. For starters, the Script Field uses colored text. When you type commands in at first, they're purple. As soon as you click Compile or Run, though, the text turns blue, black, and grayassuming your script compiled correctly (Section 2.1.1.4). Here's what the colors mean: Blue text is what Script Editor uses to indicate AppleScript commands. Keep an eye out especially for blue bold text, which indicates special AppleScript keywords like of, to, and set.
| If you're just getting started with AppleScript, examine existing scripts' blue text for examples of commands you can use in your own scripts. |
|
Black text is what Script Editor uses for specific AppleScript valuesnumbers, for example, or the text between quotation marks. Gray text is reserved for AppleScript commentspieces of English narration that let you describe what's going on in a certain section of your script (Sidebar 3.1).
This colorizing feature is a great way to tell whether a script has any typos, for example. Since a script won't compile at all if it has any typos, a colorized Script Field indicates that your script has passed the compiler's inspection (Figure 2-3). 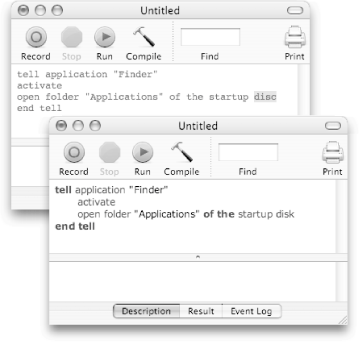 | Figure 2-3. The even-width Courier font (top) indicates that a script hasn't been compiled successfully. In this case, the word "disk" was misspelled, so the compiler selects it. Once the typo is fixed and the script is compiled again (bottom), the script changes color and uses the Verdana font. (You can customize the font, size, and color settings as described on Section 2.3.3.) |
|
The Script Field also supports the full range of text operations that TextEdit does. You can drag text around within the Script Field, for instance, or drag a particularly long URL out of your Web browser and into the Script Field. You can easily find pieces of text in your script using the Edit Find menu, too. And you can even spell check your script by choosing Edit Spelling Check Spelling. Power Users' Clinic
Mega Shortcut Menu | The Script Field has one of the most complete shortcut menus available in any program, ever. Simply Control-click inside the Script Field. (Alternatively, summon the commands from the Script Editor Scripts submenu of the Script Field.) Each command in the menu's lower portion automatically writes out a section of code for you: About These Scripts presents a simple dialog box explaining, very roughly, how the scripts work. The information it shows mostly applies to running these scripts from the Script Menu (Section 1.1), however. Comment Tags (Sidebar 3.1) surround the selected text in parentheses and asterisks, indicating to AppleScript that the text should be ignored. Action Clauses let your script ignore errors produced by other programs or wait a period of time before proceeding. Conditionals let your script run commands when certain criteria are met. For example, if you wanted to display a dialog box only when TextEdit is open, you would use a conditional statement to enclose your commands. Dialogs inserts commands used for presenting dialog boxes. You can have up to three buttons in a dialog box, with or without a place to enter text (Sidebar 4.2). Error Handlers let your script deal with problems that arise while it's running (Section 14.4.2). If there's a possibility that the Finder might quit in the middle of your script, for instance, you'd use an error handler to make sure your script doesn't quit too. Folder Actions Handlers are preassembled chunks of text for writing folder actionsscripts that are triggered automatically by the Finder (Chapter 11). Image Manipulation lets you create scripts that automatically resize, zoom, and rotate images. Page Section 7.3 shows you how to get started writing graphics scripts. If you want your script to go through each item in a folder, Iterate Items and Repeat Routines can help. A batch-renaming script would use an iterating or repeat command so the script could rename every file as it went through a folder (Section 6.4.1). String Comparison checks whether two pieces of text are equal, optionally ignoring capitalization, etc. Tell Blocks let you address commands at a certain program, rather than at Mac OS X itself.

When you're first learning AppleScript, Script Editor's shortcut menu is invaluable. You can use the menu to drop in pieces of AppleScript code that you're unfamiliar with, as a way of learning new commands. As you become more experienced with AppleScript, you might use the shortcut menu to enter complicated commands you already know, just to save time. Even better, you can add your own items to the shortcut menu by dragging them to your Library Scripts Script Editor Scripts folderor edit the scripts that are already there. |
2.1.3. The Info Field The Info Field lies at the bottom of your window, and it's one of the least-used pieces of Script Editor's interface. That's because it's a passive displayyou rarely click it, and it mostly displays tangential information on the status of your script. Right beneath the Info Field, there are three tabbed buttons (Description, Result, and Event Log), which let you switch between the Info Field's three modes. To change modes, simply click one of those tabs, or press -1, -2, and -3, respectively. 2.1.3.1 Description The Description tab lets you enter a short comment about what your script does. If you're planning to distribute your script over the Internet, for example, you might enter copyright information here, too. The reason most people don't use the Description tab, though, is that they can enter comments right inside a script (Sidebar 3.1). If you wrote a particularly complicated math operation, for example, you'd probably rather mention how it works right next to each command, rather than refer to the code from the Description tab. | The Description tab does have one advantage over the Script Field, though: you can drag files into it. When it comes time to save your script, just choose Script Bundle as the format (Sidebar 2.5), and you can distribute your script with all the attached files intact. (To open one of the attached files later, just drag it out of the Info Field and into the Finder.) You might find this trick useful if you ever want to attach your photo to a scriptor, even weirder, you could attach an audio file you've recorded, so other people can hear your comments rather than read them. |
|
2.1.3.2 Result When a script has finished running, it might be left with a piece of informationthe value from a math operation, for instance, or the button someone clicked in a dialog box. The Result field is where Script Editor dumps that leftover information, waiting for you to read at your leisure. If you're writing your own scripts, though, you probably want that leftover information brought to you, so you don't have to switch into Script Editor and look at the Result field to find it. Figure 2-4 shows the difference. 2.1.3.3 Event Log If you're testing out a complicated script, the Event Log keeps track of important things that happen while the script is running. For example, if your script batch-renames files in the Finder (Section 6.4.1), the Event Log keeps track of every file that was renamed. | In order to make the Event Log display such events, you must switch to it before your script starts running. |
|
On its own, the Event Log would be a great tool for checking how your scripts run. However, Script Editor includes a far more advanced toolthe Event Log Historythat lets you see the Event Logs of previous scripts and what time they ran (Section 14.2.2). Because of thatand because the Event Log History is quite easy to browse throughmost self-respecting AppleScript programmers use the Event Log History instead of the puny, underpowered Event Log at the bottom of a script window. 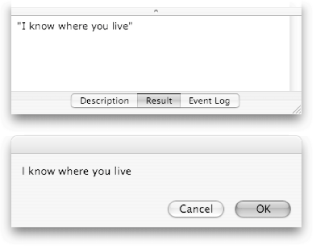 | Figure 2-4. Two approaches to displaying the result of a script. Top: Leave the information loose at the end of your script, and it'll be shown in the Results field. If you use this approach, you won't know when your script is done, and you'll have to switch into Script Editor to see the result. Bottom: Use the display dialog command (Section 3.1.1) to display the result, and you'll know exactly when your script is done. |
|
|