| Each version of Adobe Illustrator brings new features and tools to the hands of designers. Some are cool effects, and some add useful functionality. And every once in a while, a feature is introduced that is so unique and powerful, that it changes everything. The brushes feature in Illustrator is such a feature. The concept is simple: instead of drawing a predictable and boring line using the Pencil tool, the Paintbrush tool can create flourishes, lines with tapered ends, and artsy elements that mimic the strokes you can create with Speedball or calligraphic pens. More powerful than you might think, brushes support pressure-sensitive tablets and can even distribute art and patterns along a drawn path. By using brushes, you can streamline your work by creating complex artwork with just a few paths. Brushes are also easy to modify.  | Stop! Before you start a new file or project, take a few moments to think about the art you will use and how you plan on creating the file. A few minutes of careful planning allow you to understand the kinds of features you need to use, and this planning can save you a significant amount time should you need to make changes to the file at a later date. |
Under the hood, the Paintbrush tool functions exactly like the Pencil tool and allows you to click and drag to create a vector path. The difference is in the appearance of the path that it creates. The Paintbrush tool applies predefined vector artwork to the paths that you draw. When using a pressure-sensitive tablet, you can also control how the artwork is applied to the vector paths. Illustrator's Brush Quartet Illustrator has four different kinds of brushes; each offers a different kind of behavior in which art is applied to a path: Calligraphic brush. The Calligraphic brush allows you to define a nib, or tip, of a pen. The art that is drawn with a Calligraphic brush takes into account the angle and shape of the nib, resulting in natural thick and thins and variable thickness (Figure 5.1). Figure 5.1. With the help of a pressure-sensitive tablet, the Calligraphic brush can create strokes with natural thicks and thins to achieve a hand-drawn look and feel. 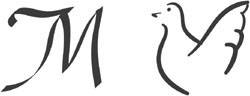
Scatter brush. The Scatter brush allows you to define any vector art as a brush (except the ones listed in the sidebar "What's in a Brush?"). The art that is drawn with a Scatter brush is made up of copies of the art, scattered across the vector path. You can control the way that art is scattered in each brush's settings (Figure 5.2). Figure 5.2. You can use a Scatter brush to create consistent borders or to quickly fill a page with what appears to be random art. 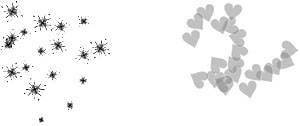
Art brush. The Art brush allows you to define any vector art as a brush (except the ones listed in the sidebar "What's in a Brush?"). The art that is drawn with an Art brush is stretched across the entire length of the path, resulting in the controlled distortion of art along a vector path (Figure 5.3). Figure 5.3. You can use an Art brush to apply artistic brush strokes or to create interesting variations of art. 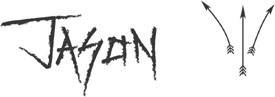
Pattern brush. The Pattern brush allows you to specify up to five already-defined patterns as a brush. The art that is drawn with a Pattern brush is distributed along a vector path based on the brush's settings, resulting in perfect corners and art that is contoured to the vector path (Figure 5.4, next page). Figure 5.4. A Pattern brush can bend art to match the curve of a path and can also contain a variety of settings that change based on the makeup of the path. 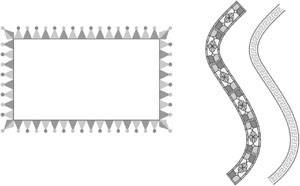
What's in a Brush? When you're creating artwork that will be used to define a brush, be aware that brushes cannot understand all kinds of vector objects. Brushes cannot contain gradients, blends, other brush strokes, mesh objects, bitmap images, graphs, placed files, or masks. For Art and Pattern brushes specifically, the artwork also cannot contain editable type objects. If you want to include these kinds of objects, you either need to expand them or convert them to outlines first. |
Applying Brush Strokes To paint with a brush, choose the Paintbrush tool from the Toolbox and then choose a brush from the Brushes palette. You create brush strokes the same way you create paths with the Pencil tool, so once you've selected a brush to use, click and drag on the artboard to define a path. When you release the mouse, Illustrator applies the brush stroke to the newly created vector path (Figure 5.5). Illustrator also indicates the applied brush stroke in the Appearance palette, making it easy to identify when a particular brush as been used (Figure 5.6). Figure 5.5. When you create a brush stroke, a single vector path is defined, and the appearance of that path displays the brush. 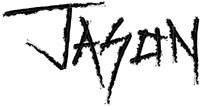
Figure 5.6. By identifying the brush applied to a path, the Appearance palette gives yet another reason for why it should always be opened on your screen. 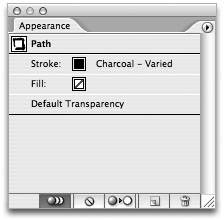
You don't have to use the Paintbrush tool to apply a brush stroke to a vector path. Simply selecting a vector path and clicking a brush in the Brushes palette applies the brush to the selected path. The only benefit you gain by using the Paintbrush tool is the ability to define a brush shape using a pressure-sensitive tablet (see the Sidebar, "Can You Handle the Pressure?").  | If you double-click the Paintbrush tool, you'll find that the preferences are identical to those of the Pencil tool. |
Can You Handle the Pressure? Illustrator has full support for pressure-sensitive pen tablets like the line of Wacom tablets. You can set Calligraphic or Scatter brushes to use variable settings based on pressure, thus enabling you to easily draw lines of varying thickness or to apply different scatter settings. The natural lines you can achieve with a Calligraphic brush and a Wacom tablet are perfect for sketching or drawing in Illustrator. It would seem that the next logical step after creating a sketch with the Paintbrush tool is to convert the art to a Live Paint group to quickly colorize the art. Unfortunately, the Live Paint feature doesn't support brushes and converting a brushed path to a Live Paint group results in the loss of the appearance of the brush. Hopefully, future versions of Illustrator will address this. When using either the Calligraphic or Scatter brushes, Illustrator CS2 also supports Wacom's new 6D pen. You can find a library of these brushes that is already filled with 18 Calligraphic and 6 Scatter brushes in the Illustrator CS2 Goodies folder on the application installation CD. If you purchased Illustrator as a component of the Creative Suite, you'll find this library on the CS2 Standard Content CD. |
Defining a Calligraphic Brush To define a new Calligraphic brush, click the New Brush icon in the Brushes palette or select New Brush from the Brushes palette menu. Choose New Calligraphic Brush from the New Brush dialog and click OK to open the Calligraphic Brush Options dialog (Figure 5.7). Figure 5.7. The Calligraphic Brush Options dialog allows you to click and drag on the nib shape in the preview area to define its settings. 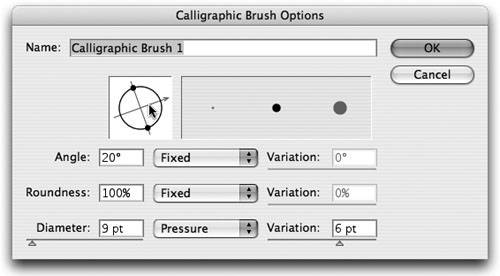
The Calligraphic Brush Options dialog allows you to specify the shape and behavior of the nib using three different settings: Angle. The angle of a Calligraphic brush can be set to a fixed angle or to a random number. When the roundness setting is at 100%, the angle setting does not produce any noticeable change in the shape of the brush. With pressure-sensitive tablets, you can set the angle to change based on pressure, stylus wheel, tilt, bearing, or rotation. When you're not using the fixed option, the Variation slider allows you to specify a range that the angle can change, which you can also see in the preview area of the dialog. Roundness. The roundness of a calligraphic brush can be set to a fixed or a random number. When the roundness is set closer to 100%, the tip of the nib becomes circular in shape (like a traditional ink pen). When the roundness is set closer to 0%, the tip of the nib becomes flat (like a traditional calligraphy pen). With pressure-sensitive tablets, you can set the roundness to change based on pressure, stylus wheel, tilt, bearing, or rotation. When you're not using the fixed option, the Variation slider allows you to specify a range that the roundness can change, which you can also see in the preview area of the dialog. Diameter. You can set the diameter, or size, of a Calligraphic brush to a fixed or a random number. With pressure-sensitive tablets, you can set the diameter to change based on pressure, stylus wheel, tilt, bearing, or rotation. When you're not using the fixed option, the Variation slider allows you to specify a range that the diameter can change, which you can also see in the preview area of the dialog.
| When you're using a pressure-sensitive tablet, giving the diameter setting a variation based on pressure enables you to create strokes that appear thicker as you press harder. If you have Wacom's 6D Art Pen, it makes sense to set the angle to the pen's rotation attribute. |
Defining a Scatter Brush To define a new Scatter brush, start by creating the art for the brush on the artboard. Once it is complete, drag the artwork directly into the Brushes palette. Alternatively, you can select the art and click the New Brush icon in the Brushes palette or select New Brush from the Brushes palette menu. Choose New Scatter Brush from the New Brush dialog and click OK to open the Scatter Brush Options dialog (Figure 5.8). Figure 5.8. The Scatter Brush Options dialog presents a plethora of settings that you can use to create a wide variety of results. 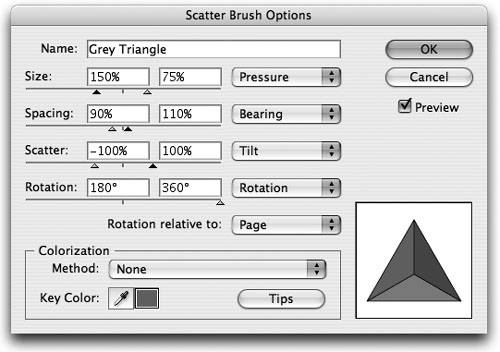
Size. The Size setting can be a fixed or random number; this setting determines how big or small the art is drawn on the path, relative to the actual size of the art that was used to define the brush. For example, if you create a design that is 1 inch tall and use it to define a Scatter brush, a size setting of 50% result in a Scatter brush that creates designs that are .5 inches tall. With pressure-sensitive tablets, you can set the size to change based on pressure, stylus wheel, tilt, bearing, or rotation. When you are not using the fixed option, the two values determine the range that the size can change. Spacing. The Spacing setting can be a fixed or random number and determines the amount of space that appears between each instance of art that is drawn on the path. Higher values add more space between each copy of the art, and lower values make the copies of art appear closer together. With pressure-sensitive tablets, you can set the spacing to change based on pressure, stylus wheel, tilt, bearing, or rotation. When you're not using the fixed option, the two values determine the range that the spacing can change. Scatter. The Scatter setting can be a fixed or random number and determines how far away each instance of art that is drawn deviates from the path. Negative values shift art lower and to the left of the path; positive values shift art higher and to the right of the path. With pressure-sensitive tablets, you can set the scatter to change based on pressure, stylus wheel, tilt, bearing, or rotation. When you're not using the fixed option, the two values determine the range that the scatter can change. Rotation. The Rotation setting can be a fixed or random number and determines the angle that each instance of art is drawn on the path. With pressure-sensitive tablets, you can set the rotation to change based on pressure, stylus wheel, tilt, bearing, or rotation. When you're not using the fixed option, the two values determine the range that the rotation can change. Rotation relative to. You can set the rotation so that it is relative to the page, in which case all instances of the art appear consistent, or to the path, in which case all instances of the art rotate in accordance with the direction of the path (Figure 5.9). Figure 5.9. Depending on your desired result, you can specify art to rotate in relation to the page, where all of the triangles are rotated in the same way (left) or to the path, where all of the triangles are rotated to match the curved path (right). 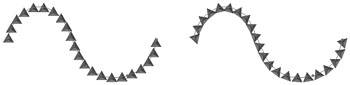
Colorization. The Colorization option lets you choose from one of four different settings. If you choose the None setting, the Scatter brush creates art in the same color that is used to define it. If you choose the Tints setting, the Scatter brush creates art in varying tints of the current stroke color. If you choose the Tints and Shades setting, the Scatter brush creates art in varying tints of the current stroke color while preserving black colored objects. If you choose the Hue Shift setting, the Scatter brush creates art and changes the key color of the art to the current stroke color. To define a key color, click the Eyedropper icon in the dialog and click on a part of the art in the preview area.
Defining an Art Brush To define a new Art brush, start by creating the art for the brush on the artboard. Once it's complete, drag the artwork directly into the Brushes palette. Alternatively, you can select the art and click the New Brush icon in the Brushes palette or select New Brush from the Brushes palette menu. Choose New Art Brush from the New Brush dialog and click OK to open the Art Brush Options dialog (Figure 5.10). Figure 5.10. The Art Brush Options dialog gives you a visual preview of the direction that the art will appear in relation to the path. 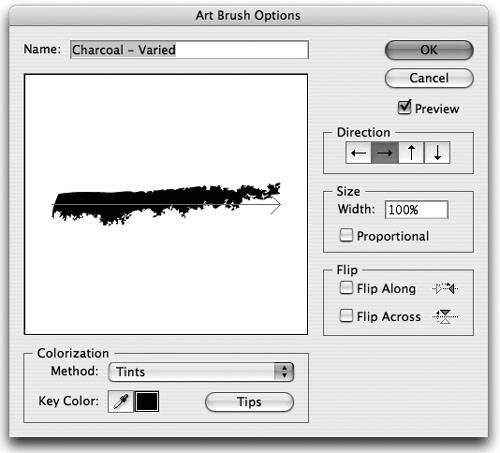
Direction. The Direction setting determines the orientation of the art with respect to the path to which the brush is applied. A blue arrow appears in the preview area allowing you to visually understand how the art will be drawn on a path. Size. The Size setting determines how big or small the art is drawn on the path relative to the actual size of the art that was used to define the brush. For example, if you create a design that is 1 inch tall and use it to define an art brush, a size setting of 50% results in an art brush that creates designs that are .5 inches tall. When specifying width values, you can also choose to keep the artwork scaled in proportion. Flip. The Flip Along and Flip Across settings enable you to reflect the artwork on both the horizontal and vertical axis. Colorization. The Colorization option lets you choose from one of four different settings. When you choose the None setting, the art brush creates art in the same color that is used to define it. If you choose the Tints setting, the Art brush creates art in varying tints of the current stroke color. If you choose the Tints and Shades setting, the Art brush creates art in varying tints of the current stroke color while preserving black colored objects. If you choose the Hue Shift setting, the Art brush creates art and changes the key color of the art to the current stroke color. To define a key color, click the Eyedropper icon in the dialog and click a part of the art in the preview area.
Defining a Pattern Brush To define a new Pattern brush, you must first define the pattern swatches that will be used in the brush, using the methods you learned in Chapter 2, Vectors 101. A Pattern brush can contain up to five different pattern tiles, used for different parts of a path (see the Pattern Tiles bullet below). Once you've defined the necessary pattern swatches, click the New Brush icon in the Brushes palette or select New Brush from the Brushes palette menu. Choose New Pattern Brush from the New Brush dialog and click OK to open the Pattern Brush Options dialog (Figure 5.11). Figure 5.11. Though it might appear complicated at first, the Pattern Brush Options dialog makes it easy to define powerful Pattern brushes. 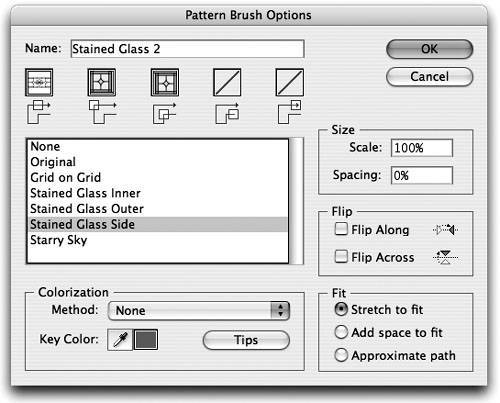
Pattern Tiles. A Pattern brush can use up to five different pattern tiles for the different parts of a drawn path. The side tile is used along the middle of the path, the outer and inner corner tiles are used whenever the path encounters a corner anchor point at 90 degrees, and the start and end tiles are used at the beginning and end of an open path (Figure 5.12). To set a tile, click the preview box above each tile and choose from the list of defined pattern swatches. Only pattern swatches from the current document appear in the list. It is not necessary to assign a pattern swatch to every tile in order to define a Pattern brush. For example, some Pattern brushes do not have start or end tiles defined. Figure 5.12. A Pattern brush can contain up to five different pattern tiles, which apply to side, outer and inner, and start and end points of a path. 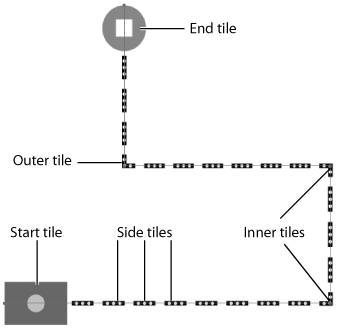
Scale. The Scale setting determines how big or small the pattern swatch is drawn on the path, relative to the actual size of the art that was used to define the pattern (by default, a Pattern brush applies art at the size the art was originally created). For example, if you create art that is 1 inch tall and use it to define a pattern swatch, a size setting of 50% results in a Pattern brush that creates tiles that are .5 inches tall. Spacing. The Spacing setting determines the amount of space that appears between each pattern tile that is drawn on the path. By default, all pattern tiles touch each other, and specifying higher values adds more space between them. | To create a dashed line on a rectangle that will always have perfect corners, create two pattern swatches, one for a dash and one for a corner. Then create a pattern brush that uses the dash pattern as a side and the corner pattern as an outer corner tile and choose the Add space to fit option. |
Flip. The Flip Along and Flip Across settings enable you to reflect the pattern tiles on both the horizontal and vertical axis. Fit. The Fit setting, arguably one of most powerful settings among all of the brushes, allows you to specify how pattern tiles are drawn on a path. The Stretch to fit option modifies the brush's Scale setting to ensure a perfect fit across the entire path, with no spaces between tiles. The Add space to fit option modifies the brush's spacing setting to ensure the tiles fit evenly across an entire path. The Approximate path option actually changes the size of the path so that it fits to the size of the pattern tiles. Colorization. The Colorization option lets you choose from one of four different settings. When you choose the None setting, the Pattern brush creates tiles in the exact same color that it is used when the pattern swatches are defined. If you choose the Tints setting, the Pattern brush creates tiles in varying tints of the current stroke color. If you choose the Tints and Shades setting, the Pattern brush creates tiles in varying tints of the current stroke color while preserving black colored objects. When you choose the Hue Shift setting, the Pattern brush creates tiles and changes the key color of the tiles to the current stroke color. To define a key color, click the Eyedropper icon in the dialog and click a part of the tile in the preview area (which is extremely difficult considering how small the previews for each tile are). | Be sure to check out Bert Monroy's Pattern brush example in the color insert. |
Modifying Brush Strokes Double-click any brush in the Brushes palette to specify or change its settings. Alternatively, you can hold the Option (Alt) key while dragging vector art from the artboard onto an existing Art or Scatter brush to modify or replace the brush. When you do, a thick black line appears around the brush icon indicating that you are about to modify it. When you're about to modify a brush, Illustrator checks to see if the existing brush has already been applied to objects in your document. If it finds such objects, Illustrator asks if you want the existing paths to now take on the appearance of the modified brush, or if you want to leave them intact. If you want to leave them intact, Illustrator makes a copy of the modified brush rather than replace the existing one (Figure 5.13). Figure 5.13. Always watching what you're doing, Illustrator alerts you if your edits will affect objects that have already been drawn. 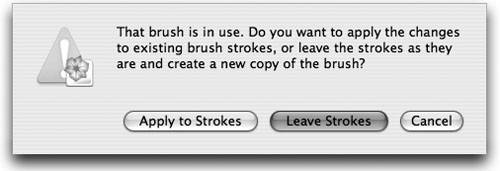
You can delete brushes from a document by dragging them to the trash icon in the Brushes palette. If you try deleting a brush that is already applied to an object in your file, Illustrator prompts you asking if you want to either expand the path, remove the brush appearance from the path altogether, or cancel. Expanding Brush Art When you apply a brush stroke to a path, only the vector path itself is editable. The art that makes up the brush stroke cannot be edited or otherwise tinkered with. However, you can easily reduce any brush stroke to editable vector art by choosing Object > Expand Appearance. Doing so removes the link to the brush and the path no longer updates if the brush swatch is updated. | Like swatches, brushes travel with a file, so you don't need to expand a brush just because you're sending the file to someone else. When you define and use brushes, those brushes are saved in the file and are there until you manually delete them. |
Additionally, you can always access the original art that was used to create an Art, Scatter, or Pattern brush by dragging the brush out of the Brushes palette and onto a blank area on the artboard. |