5.3. Creating WordML with stylesheets WordML is very rarely created by hand, because it is much easier for a person to format a document with Word than to compose the equivalent WordML representation. But that approach is most useful for one-off tasks. If you want to create Word renditions of multiple XML documents of the same document type, it is more efficient to generate WordML using XSLT. This technique also allows data from other sources to be incorporated into the Word documents. Moreover, multiple views of the same data (e.g. for different classes of user) can be created using several different transformations. This section provides an overview of the creation and use of stylesheets for Microsoft Word. For more information on XSLT stylesheets, please see Chapter 18, "XSL Transformations (XSLT)", on page 392. 5.3.1 Creating an XSLT stylesheet Each desired rendition is expressed as an XSLT stylesheet that is associated with a particular schema in the Word Schema Library. An XSLT stylesheet contains XSLT instruction elements (usually prefixed with xsl:) that select elements and attributes from the source document. The instructions are interleaved with elements from other namespaces that are to appear in the result document. For use with Word, a stylesheet must transform documents from your source vocabulary (e.g. article) to WordML. As we have seen, this can be a challenging task, since WordML is quite complex and not entirely intuitive. But fortunately, as we have also seen, you can copy most of the complex parts from an existing WordML document. If you have (or create) a Word document that has the settings you want to use – for example the styles and page margins – you can simply save that document as WordML. You can then paste the beginning of the document, which contains all the settings, into your stylesheet. 5.3.1.1 Stylesheet structure Worldwide Widget maintains an archive of its newsletter articles in XML so they can easily be reused. Authors frequently access the archive to rework old articles for new issues of the newsletter. The company has implemented a stylesheet that will transform an XML article (the source document) into a WordML/article combination (the result document). Example 5-10 shows the general structure of the stylesheet (named article_view.xsl) that accomplishes this. Example 5-10. Article stylesheet general structure (article_view.xsl) <xsl:stylesheet version="1.0" xml:space="preserve" xmlns:w="http://schemas.microsoft.com/office/word/2003/wordml" xmlns:art="http://xmlinoffice.com/article" xmlns:xsl="http://www.w3.org/1999/XSL/Transform"> <xsl:template match="/"> <w:wordDocument xml:space="preserve"> <w:lists> <!--taken from Word--> </w:lists> <w:styles> <!--taken from Word--> </w:styles> <w:docPr> <!--taken from Word--> </w:docPr> <w:body> <xsl:apply-templates select="/art:article"/> </w:body> </w:wordDocument> </xsl:template> <!--rest of template rules here--> </xsl:stylesheet>
Rather than start from scratch with the styles, we took the lists and styles elements from a Word document that had styles defined to our liking, as was recommended in 5.1.6.2, "Generating WordML style definitions", on page 101.[4] [4] The comment <!--taken from Word--> appears instead of the actual definitions to reduce the size of the example; for a full listing, see article_view.xsl. The body element contains the xsl:apply-templates instruction to apply the correct template rule to the source elements whose element-type name is article. (Only one such element is allowed by the article schema.)[5] [5] The xsl:template instruction element is actually a template rule; its content is the template. The xsl:apply-templates instruction actually applies template rules, which include match patterns as well as templates. 5.3.1.2 Template rules The article_view.xsl stylesheet has a template rule for every article schema element type. The template rule that matches the root element, article, is shown in Example 5-11. It inserts WordML paragraphs (p elements) for the title, author and date. It also applies other template rules that transform the article element's children. Example 5-11. Template rule for article schema element type (article_view.xsl) <xsl:template match="art:article"> <xsl:copy> <w:p> <w:pPr> <w:pStyle w:val="Heading1"/> </w:pPr> <xsl:apply-templates select="art:title"/> </w:p> <w:p> <xsl:apply-templates select="art:author"/> </w:p> <w:p> <w:pPr> <w:pBdr> <w:bottom w:val="single" w:sz="6" w:space="22" w:color="auto"/> </w:pBdr> </w:pPr> <xsl:apply-templates select="art:date"/> </w:p> <xsl:apply-templates select="art:body"/> </xsl:copy> </xsl:template>
The xsl:copy instruction copies a source element so that it also appears in the resulting WordML; it does not copy child elements or attributes. If you want a pure WordML document with no elements from the article vocabulary, you can leave out the xsl:copy instructions in the templates. The template rule shown in Example 5-12 is used to transform both author and date elements, since they are processed similarly. Their contents are simply included unchanged in a text element contained within a text run. Example 5-12. Template rule for author and date element types (article_view.xsl) <xsl:template match="art:author|art:date"> <xsl:copy> <w:r> <w:rPr> <w:b/> </w:rPr> <w:t><xsl:value-of select="."/></w:t> </w:r> </xsl:copy> </xsl:template>
A third template rule, for the section element type, is shown in Example 5-13. It includes a paragraph (p) for the header, then uses an XSLT for-each element to loop through the child paragraphs and process them individually. Example 5-13. Template rule for section element type (article_view.xsl) <xsl:template match="art:section"> <xsl:copy> <w:p> <w:pPr> <w:pStyle w:val="Heading2"/> </w:pPr> <xsl:apply-templates select="art:header"/> </w:p> <xsl:for-each select="art:para"> <xsl:apply-templates select="."/> </xsl:for-each> </xsl:copy> </xsl:template>
The result of applying the stylesheet is a WordML/article combination that can be displayed in Word with or without the article tag icons, as shown in Figure 5-5. Figure 5-5. Result of applying stylesheet to an article 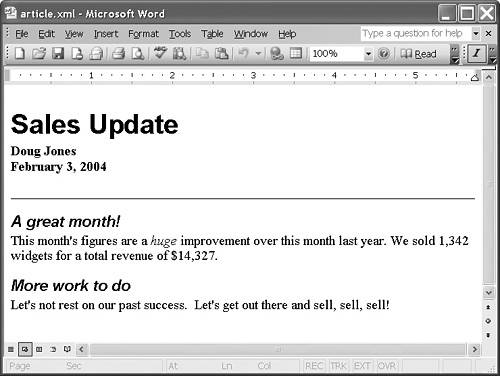
5.3.2 Using stylesheets This section explains how to use our newly-created stylesheet (article_view.xsl) with Word. 5.3.2.1 Associating stylesheets with schemas Stylesheets are associated with schemas using the Schema Library, where they are known as solutions. Multiple stylesheets can be associated with the same schema. First, let's associate the article_view.xsl stylesheet with the article schema. To do this: - 1. On the Tools menu, click Templates and Add-Ins.
- 2. Click the XML Schema tab.
- 3. Click Schema Library.
- 4. Select the article schema.
- 5. Click Add Solution.
- 6. Browse to the location of the article_view.xsl document and select it.
- 7. This will bring up the Solution Settings dialog shown in Figure 5-6.
Figure 5-6. The Solution Settings dialog 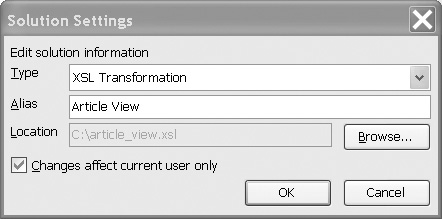
- 8. The default type is XSL Transformation, which is what we want in this case.
- 9. In the Alias box, enter a nickname for the solution, such as "Article View", and click OK.
- 10. The solution (stylesheet) now appears in the bottom half of the Schema Library dialog, as shown in Figure 5-7.
Figure 5-7. Solution listed in the Schema Library dialog 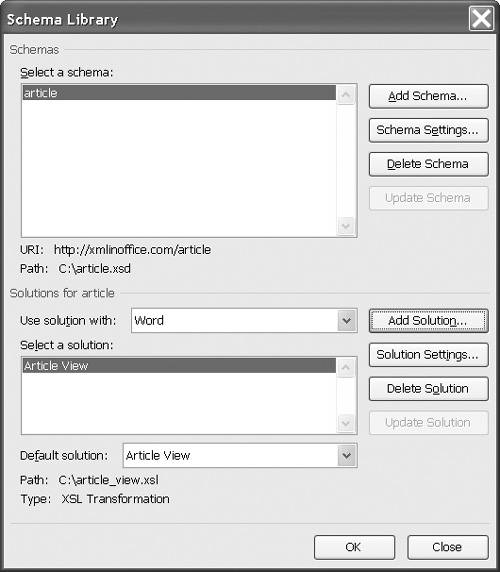
It is possible in the Schema Library dialog to specify a particular solution as the default. To do this, select a solution from the Default solution list. The default stylesheet is applied whenever a document associated with that schema is opened. 5.3.2.2 Opening a document with a stylesheet There are three ways to choose a stylesheet to apply while opening a document: by default, while opening the document, and after opening the document but before editing it. 5.3.2.2.1 Default stylesheet Opening a document whose schema is associated with a default stylesheet will result in that stylesheet being applied automatically. For example, now, when we open article.xml, the article_view.xsl stylesheet is automatically applied, as shown in Figure 5-8. Figure 5-8. Article with article_view stylesheet applied 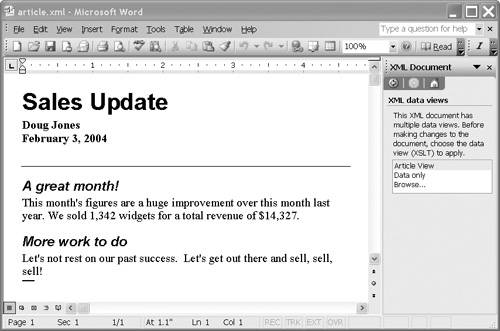
If you previously had the Show XML tags in document box checked, you will have to uncheck it in order to see the document rendered according to the stylesheet. You can do this on the XML Structure task pane. 5.3.2.2.2 Choose while opening If there is no default stylesheet for a schema, or if you wish to use a different style, you can choose a stylesheet while opening a document. To do this: - 1. On the File menu, click Open.
- 2. Select the file you wish to open.
- 3. Click the down arrow on the right side of the Open button, and select Open with Transform from the list.
- 4. Select the file name of the stylesheet you wish to use. The document will open using the specified transformation.
5.3.2.2.3 Choose before editing The XML Document task pane lists all the associated stylesheets, as well as the generic Data only rendition that is used as a default when no other stylesheet is available. You can check out the different renditions of the document simply by selecting them from this list. You can also click Browse to look for an additional XSLT stylesheet to apply. You can choose between stylesheets only until you have begun editing the document. Once you change the document in any way, the XML Document task pane closes and you lose the ability to change to a different rendition of the document. Tip  | Styles are not necessarily applied to newly added elements. For example, if you insert a new section in your article, its header element will not automatically be given the Heading2 style like the original section headers. However, if you save the document using Save data only, then reopen it, the stylesheet will format it appropriately. |
5.3.2.3 Saving a document using a transformation You can apply a stylesheet when you are saving a document. This may seem confusing, since styles are generally associated with the way a document is formatted and presented rather than the way it is stored. However, XSLT stylesheets are not just for formatting; you can also use them to transform XML documents from one vocabulary to another. This feature is useful if, for example, you want to allow the user to work with a small, simple vocabulary, but the documents need to be transformed into a more complex vocabulary to be used by another process. To specify a stylesheet when saving a document: - 1. On the File menu, click Save As.
- 2. Select XML Document (*.xml) from the Save as type list.
- 3. Check the Apply transform box.
- 4. Click the Transform... button to select a stylesheet.
- 5. Select the stylesheet you wish to apply and click Open.
- 6. Click Save.
|