4.2. Opening a document Once you have added the necessary schemas to the Schema Library, there are several ways to open an XML document for editing: -
Open an existing or new Word document and mark it up according to a schema. -
Open an existing XML document. -
Open an XML template that you've created for a particular schema. First, let's look at converting Doug's article.doc to article.xml. 4.2.1 Opening a Word document To convert a Word document to XML – either an existing one or a new empty one – there are two steps. First you associate a schema with the document, and then you apply markup to its elements. 4.2.1.1 Associating a schema A new document, or a Word document that has never been converted to XML, has no schema associated with it. Before you can begin to mark it up, you need to associate a schema. To do this (using article.doc as an example): - 1. Open article.doc in Word.
- 2. On the Tools menu, click Templates and Add-Ins.
- 3. Click the XML Schema tab.
- 4. Check the box next to article and click OK.
You will now see the XML Structure pane on the right side of the Word window, as shown in Figure 4-5. Figure 4-5. The XML Structure Pane 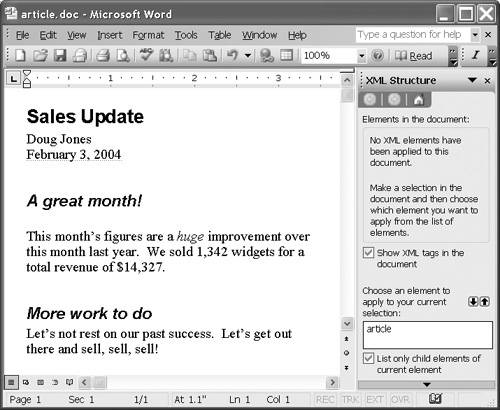
The XML Structure pane has two parts: -
The top part shows the hierarchical structure of the current document, based on the elements that have already been identified. When we first apply the schema to article.doc, no structure is shown because the document has not yet been tagged. -
The bottom part of the XML Structure task pane shows the available element types from the vocabulary. By default, it only shows the types of elements that can be validly inserted at the point in the document where the cursor is positioned. Tip  | If you ever lose the XML Structure task pane, or close it accidentally, click Task Pane on the View menu. Then, click the top bar of the task pane and click XML Structure. |
4.2.1.2 Applying markup to elements The first order of business is to identify the root element, in this case article. To do this: - 1. Select the word article in the bottom part of the XML Structure task pane.
- 2. This will bring up a dialog that asks whether the element to be tagged is the entire document, or the current selection only. Click Apply to Entire Document.
You will notice that a start-tag icon appears at the beginning of the article, and an end-tag icon at the end of the article. In addition, article now appears in the top part of the XML Structure pane, indicating that an article element has been identified in the document. To tag the rest of the document, you can simply select a section of the text and choose its element-type in the bottom part of the XML Structure task pane. Alternatively, you can select the text and right-click, click Apply XML Element, then choose the element-type name. Note | You aren't really "applying an element" to anything; the element is there in the document. Think of the term as shorthand for "apply markup to XML element". |
You can also insert a new element. To do this, position the cursor at the desired location and choose the desired element-type name in the bottom part of the XML Structure task pane. You can then type text between the start-tag and end-tag icons. This procedure is also followed when creating an XML document from a new empty Word document and when adding elements to an existing XML document. Once marked up, our document looks something like Figure 4-6. Figure 4-6. A marked up article document 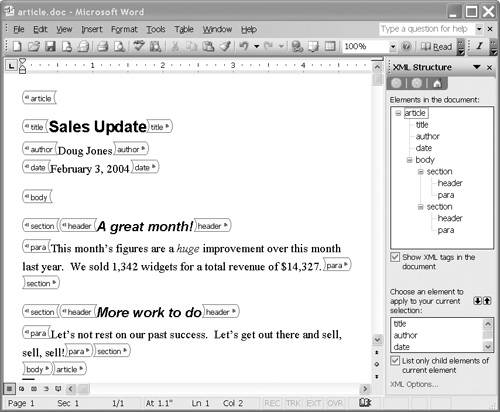
Tip | Start applying markup at the root element and work down the tree structure. For example, tag the body element before either of the section elements. This technique allows the appropriate valid element-types to appear in the bottom part of the XML Structure task pane. |
4.2.2 Opening an XML document You can open and edit any XML document in Word, even documents that have no schema in Word's Schema Library (or even no schema at all). To do so, you use the standard procedure for opening a document: that is, clicking Open on the File menu and selecting the document of interest. The XML document must have an XML declaration as its first line. This is the only way Word will identify it as an XML document; the file extension is ignored. For example: <?xml version="1.0" encoding="UTF-8"?>
In addition, the document must be well-formed, meaning that it follows all the rules of the XML language.[4] Upon opening the document, Word displays the XML Structure task pane. [4] These are described in Chapter 15, "The XML language", on page 350. Word then attempts to associate a schema with the document, as described in 4.1.3, "Adding a schema to the library", on page 63. If it fails, it allows all element types found in the document to occur anywhere in the document; no other element types are permitted. You can associate a schema with the document after it is opened, using the procedure described in 4.2.1.1, "Associating a schema", on page 69. If there is an associated schema, the document need not be valid with respect to it. Word will flag the errors in the XML Structure pane (see 4.3, "Validation", on page 74). 4.2.3 Opening a skeleton document Rather than starting a new XML document from scratch, you can take advantage of a document type's predictable structure by creating a skeleton document. A skeleton serves the same purpose as a Word template. It is a sample document that an end user can modify to create the actual document he wants. Figure 4-7 shows a skeleton document for the article schema. It uses placeholder text for all the elements, allowing the article writer simply to fill in the fields. When the user wants to enter content for an element, he just clicks the placeholder text and starts typing, much as if it were a field in a form. Figure 4-7. Skeleton document for articles (article struct.doc) 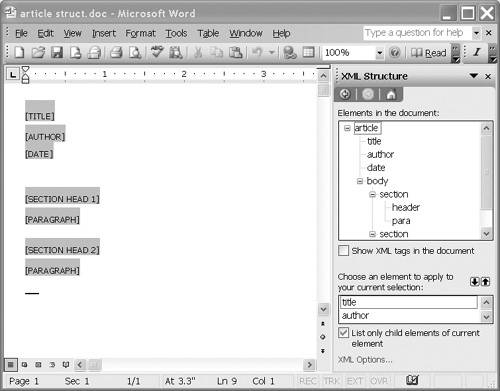
Placeholder text is only displayed when the tag icons are not shown, and only for elements that have empty content. Note that Show XML tags in the document is unchecked. Checking it will show the icons and hide the placeholder text (although the text will not be deleted permanently). You can create a skeleton by starting with an existing XML document and deleting the data content. Alternatively, you can start with a new empty document, associate a schema, and insert the desired elements (again without any data content). You can then specify placeholder text for each of the elements. When an element is empty, the placeholder text appears where the data content would normally appear. To specify placeholder text for an element: - 1. Right-click that element in the top part of the XML Structure pane, or in the document pane, and click Attributes on the context menu.
- 2. Type the placeholder text at the bottom of the dialog, and click OK.
Note that placeholder text is associated with an individual element in the document, not with an element type. In Figure 4-7, for example, the first header element has the placeholder text "[SECTION HEAD 1]" while the second header element has the placeholder text "[SECTION HEAD 2]". Tip | Choose placeholder text that is clearly not the actual content, and that explains what data to enter if it isn't obvious. Enclose the text in square brackets to make it look more like a field for data entry. |
|