Lesson 1: Personalizing Internet Explorer
As a DST, many of the requests that you will receive will have more to do with making something “look right” than actually performing an advanced troubleshooting task. In addition to making the interface pleasing to the eye, though, you will also be asked to make it more functional.
After this lesson, you will be able to
-
Format colors, font styles, and font sizes on Web pages.
-
Add language preferences so that websites, if content is available, can be viewed in another language.
-
View data, including Web browsing history, related sites, search results, and folders.
-
Set a home page.
-
Personalize Microsoft Internet Explorer’s title bar.
Estimated lesson time: 45 minutes
Configuring Accessibility
Users who have trouble viewing Web pages because of the colors, font size, or font type might ask you to configure Internet Explorer so that Web pages are easier to read and view. You can make these changes by using Internet Explorer menus and the Internet Options dialog box as detailed in the next two sections. However, these changes are not always applied when a user visits a website. For users to use these settings at all websites that they visit, you will need to tell them how to apply the changes by using the accessibility options and configure Internet Explorer to use these settings to override existing Web page defaults.
In the following three sections, you will learn to change the text size and default colors and fonts and how to configure the new settings to override any existing and specific Web settings.
Changing text size
If an end user asks you to change the default text size on a Web page, follow these steps:
-
Open Internet Explorer, point to View, and point to Text Size.
-
Select from the following choices: Largest, Larger, Medium, Smaller, and Smallest.
Changing colors and fonts
If an end user asks you to change the default colors and fonts used when she visits Web pages, follow these steps:
-
Open Internet Explorer, and on the Tools menu, select Internet Options.
-
In the Internet Options dialog box, select the General tab, and select Colors.
-
In the Colors dialog box that opens, shown in Figure 5-1, follow these steps:
-
Under Colors, clear the Use Windows Colors check box, and select the color box next to Text. Select a new color for the text, and click OK.
-
Under Colors, select the color box next to Background. Select a new color for the background, and click OK.
-
Under Links, select the color box next to Visited. Select a new color, and click OK.
-
Under Links, select the color box next to Unvisited. Select a new color, and click OK.
-
Under Links, select the Use Hover Color check box. Click the color box next to Hover. Select a color, and click OK.
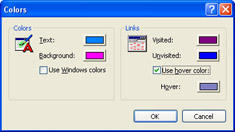
Figure 5-1: The Colors dialog box lets users customize the colors they see when visiting Web pages.
-
-
Click OK to close the Colors dialog box.
-
In the Internet Options dialog box, select Fonts.
-
In the Fonts dialog box, select a language script (if a change is needed), select a Web page font, and select a plaintext font. Internet Explorer uses Web page fonts to display formatted text on a Web page; it uses plaintext fonts to display unformatted text. Click OK.
-
Click OK to close the Internet Options dialog box.
Overriding Settings That Are Specified by Websites
The settings that are configured in Internet Explorer for text size, colors, and fonts might or might not be applied, depending on the website visited. Web pages that have no colors specified use the colors the user has configured, and the same is true of fonts. However, a Web page that specifies color or font overrides the choices that the user specifies.
Overriding color and font preferences
To ensure that the end user’s preferences for colors and fonts are always applied, follow these steps:
-
Open Internet Explorer, and on the Tools menu, select Internet Options.
-
In the Internet Options dialog box, select the General tab, and select Accessibility.
-
In the Accessibility dialog box, under Formatting, select the appropriate check boxes:
-
Ignore Colors Specified On Web Pages
-
Ignore Font Styles Specified On Web Pages
-
Ignore Font Sizes Specified On Web Pages
-
-
Click OK in the Accessibility dialog box, and click OK again in the Internet Options dialog box.
Exam Tip If a user complains that a Web page does not look the way it should, be sure you check whether a custom appearance is set and whether that custom appearance is configured to override the styles on Web pages.
Toolbar Button Icon Size
While on the phone or at an end user’s desk resolving an accessibility option call, ask the user whether she would like to customize the size of the toolbar button icons while you are there. If a user has asked you to make the Web text larger, she might also appreciate having larger toolbar icons, too. If the user has asked you to make Web page text smaller, she might also appreciate smaller toolbar icons.
Customizing toolbar buttons
If the user wants to customize the toolbar button icons, walk him or her through the following procedure:
-
Open Internet Explorer, and right-click any toolbar button or icon. On the shortcut menu, choose Customize.
-
In the Customize Toolbar dialog box, in the Icon Options drop-down list, choose Large Icons or Small Icons based on the user’s preference.
-
In the Text Options drop-down list, choose Show Text Labels, Selective Text On Right, or No Text Labels to finish the customization. Because the changes are applied immediately, the user can decide what she wants before committing by closing the dialog box. Once an appropriate choice has been made, click Close.
Using the Profile Assistant
The Profile Assistant is another option available to Internet Explorer users. The Profile Assistant stores personal information, which can then be sent automatically to a website when that information is requested. The Profile Assistant saves the information in a secure location on the client’s computer and prompts the user to send the information if the website supports this technology. The user can accept or deny this service each time she encounters it. This saves time for the user because she does not have to enter the same information each time she visits a new website, and it allows her to determine when and for what sites the Profile Assistant is used. As a DST, you might get requests from users who would like an easier way to enter personal information than by keying it in manually each time.
Configuring the profile assistant
To configure the Profile Assistant, open Internet Explorer, and follow these steps:
-
From the Tools menu, select Internet Options.
-
On the Content tab, under Personal Information, select My Profile. Note that the first time you open a profile, you are asked to create an entry in your address book (or choose an existing entry) to represent the profile.
-
In the Properties dialog box for the user, configure as much information as desired by accessing the following tabs: Name, Home, Business, Personal, Other, NetMeeting, and Digital IDs. (Digital IDs will be detailed later in this chapter.)
-
Click OK to close the Properties dialog box when you have finished; click OK in the Internet Options dialog box to close it.
Configuring Languages
Internet Explorer can display Web pages in many different languages, and if users’ Web surfing takes them to sites that are written in another language, Internet Explorer can update the computer with the character sets needed to view those sites. If you have multilingual end users and clients, you might be asked to configure Internet Explorer to work with these languages.
Changing language settings
To specify another language for Web page content, follow these steps:
-
Open Internet Explorer, and from the Tools menu, select Internet Options.
-
On the General tab, select Languages.
-
In the Language Preference dialog box, select Add.
-
In the Add Language dialog box, select the language to add, as shown in Figure 5-2, and click OK.
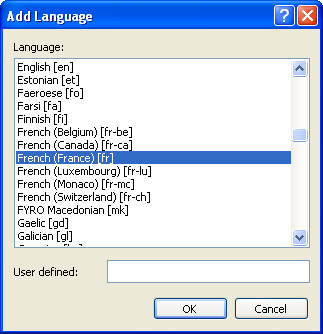
Figure 5-2: Users can add almost any language to Internet Explorer. -
Arrange the languages in order of priority by selecting them and using the Move Up or Move Down button. If a website offers multiple languages, content will appear in the language that has the highest priority. Click OK in the Language Preference dialog box.
-
Click OK to close the Internet Options dialog box.
Note Most Web pages contain information that tells Internet Explorer which language and character set to use. However, not all pages contain that information. When this is the case, Internet Explorer can usually determine the character set to use if Auto-Select is turned on. In Internet Explorer, click View, point to Encoding, and make sure Auto-Select is selected. If it isn’t, select it. Notice that you can also select a specific encoding from the list.
Resolving Common Interface Requests
End users often have requests that deal with locating information while using Internet Explorer and customizing Internet Explorer’s interface. Users might need to locate a website that they visited last week; they might be searching for information that is related to information they have previously found; they might need to be able to view search options, their Favorites, the Media bar, History, or their hard disk folders while they browse the Internet; or they might ask you to configure a home page or troubleshoot when they cannot set one themselves. You will learn how to resolve all of these requests in this section.
Viewing History
Users sometimes call to ask how they can access a site that they have previously visited. Users might add that they have forgotten the site name and Uniform Resource Locator (URL) but require the information they found earlier on the site. You will be required to help them locate the site again.
The History files can help you locate previously viewed websites that have been visited over the last three weeks, and the sites can be viewed in various ways:
-
By date
-
By site
-
By most visited
-
By order visited today
Locating a previously visited site
To assist a user in locating a previously viewed site, follow these steps:
-
Open History by either choosing the History button on the Standard toolbar or accessing it from the View menu. From the View menu, point to Explorer Bar, and select History.
-
On the Explorer bar, select View to see the History categories. Sort the files by choosing By Date, By Site, By Most Visited, or By Order Visited Today. Figure 5-3 shows the categories on the Explorer bar viewed by date.
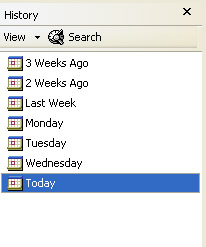
Figure 5-3: The Explorer bar with History sorted by date offers customized searching. -
Select any category to expand it, and choose any site in the list to return to the site.
Note Viewing the History sites by name organizes the site alphabetically. This can be useful if the user remembers a company name. Often a company’s name is the same as its website name.
Viewing Related Sites
The Related button is an available Standard toolbar button that can be an extremely helpful tool for users who need to access related information quickly. Clicking the Related icon opens the Explorer bar and offers a list of other Internet sites that contain information that is similar to what the user is currently viewing. Figure 5-4 shows an example. In this figure, the user is viewing the Windows XP Expert Zone, and the related information on the Explorer bar shows websites that offer similar information.
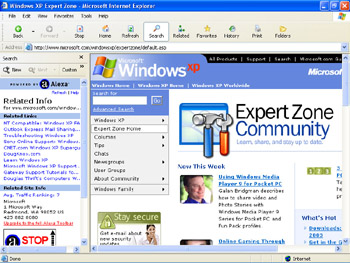
Figure 5-4: Locate related information using the Related button.
By default, Internet Explorer does not include the Related button on the toolbar, so the first step is to put it there. The following procedure also works for adding or removing other icons.
Using the Related button
To assist a user in using the Related button, follow these steps:
-
Open Internet Explorer, and right-click any Standard toolbar button. Select Customize.
-
In the Customize Toolbar dialog box, in the left pane under Available Toolbar Buttons, locate Related.
-
Select Related, and then select Add, and the Related button appears in the right pane under Current Toolbar Buttons.
-
Use the Move Up or Move Down button to place the new button anywhere on the toolbar. Click Close when finished.
Now, any time users need to locate information that is similar to what they are viewing, they need only to click the Related button. The Explorer bar will open automatically.
Viewing and Customizing the Explorer Bar
The Explorer bar was introduced briefly in the preceding section, but there are other Explorer bar options. To access these options, from the View menu, point to Explorer Bar, and select from the following:
-
Search The Search Explorer bar can help an end user find a Web page, a person’s address, a business, or a map; or look up a word, find a picture, or look through previous searches. You can also use the Search Explorer bar to search websites by keywords, as with any other search engine. MSN Search performs these searches.
-
Favorites The Favorites Explorer bar shows all of the end user’s favorites in the Explorer bar. This allows the user easy access to all of his or her favorite websites.
-
Media The Media Explorer bar opens WindowsMedia.com, where music videos, movie previews, radio stations, and news can be accessed quickly.
-
History The History Explorer bar leaves the History folders open and available at all times. Using the History bar, a user can access previously viewed websites easily.
-
Folders The Folders Explorer bar shows the folders on the user’s hard disk. This makes accessing those folders as easy as clicking them. When a user opens a folder, the folder’s contents appear in the right pane of Internet Explorer. Using the Back button returns the user to the previously viewed folder or Web page.
Note Users can close the Explorer bar by clicking the X in the upper right corner of the bar or by clearing it on the View, Explorer Bar menu.
Finally, although it is not technically an Explorer bar, selecting Tip Of The Day from the Explorer Bar menu opens a third pane at the bottom of the Web page; Internet Explorer will display tips in this pane. This might be a good choice for a new user, and you can suggest it when troubleshooting his or her Internet Explorer configuration either on the phone or at the user’s desk.
Setting a Corporate Home Page
Another common request of end users is to configure a home page that opens each time the user opens Internet Explorer. This home page can be the company’s website home page, a search engine, or a small business owner’s own website, among others.
Configuring a home page
To configure a home page, follow these steps:
-
Use Internet Explorer to browse to the website to set as the home page.
-
From the Tools menu, select Internet Options.
-
In the Internet Options dialog box, select the General tab.
-
In the Home Page area, type an address or select Use Current to make the current page the home page.
Note If a user complains that he cannot change his home page, chances are that it is against company policy. The home page is probably set, and rules are in place for changing it in the company’s Group Policy.
Personalizing the Title Bar
If a home user or a computer administrator wants to customize the Title bar of Internet Explorer with a browser title or custom logo, or if he or she wants to make customizations to the Standard toolbar, such as changing the toolbar background or adding buttons, you will need to know how to create and modify Group Policy settings. Administrators of a single computer or administrators in a workgroup can configure Group Policy. Group Policy settings configured on a single computer running Microsoft Windows XP Professional affect everyone who logs on to that computer. (In a domain, network administrators configure Group Policy, and these changes affect everyone who logs on to the domain.)
Creating a customized toolbar
To use Group Policy to change how the Internet Explorer interface looks by creating a customized title bar, or to further customize it for a small business owner or home user, follow these steps:
-
From the Start menu, select Run.
-
In the Run dialog box, type gpedit.msc. The gpedit.msc command opens the Group Policy console. Click OK.
-
In the Group Policy console, expand User Configuration (if necessary), expand Windows Settings, and expand Internet Explorer Maintenance. The left pane of the Group Policy console is shown in Figure 5-5.
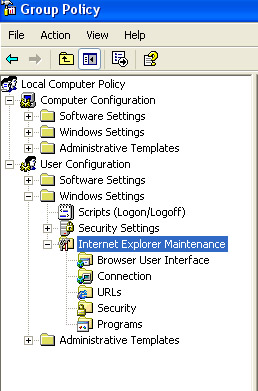
Figure 5-5: The Group Policy console’s left pane offers various customizable options. -
In the left pane, select Browser User Interface, and in the right pane, double-click Browser Title.
-
In the Browser Title dialog box, select the Customize Title Bars check box, and then type in the user’s name, company name, or other customization. The new Internet Explorer Title bar will read “Microsoft Internet Explorer Provided By” followed by what you type. Click OK.
-
In the right pane of the Group Policy console, double-click Custom Logo.
-
In the Custom Logo dialog box, select the Customize The Static Logo Bitmaps or Customize The Animated Bitmaps check box. (You can configure either or both.) Click Browse to locate the image. In the Browse dialog box, locate the image and click Open. Click OK in the Custom Logo box to apply it.
-
Open Internet Explorer, and view the changes. If satisfied, close the Group Policy console.
You can make many other changes to Internet Explorer by using the Group Policy console. You might have noticed that the Browser User Interface node also includes an option called Browser Toolbar Customizations, which allows the user to customize and even add toolbar buttons. In addition, you can make the following customizations under Internet Explorer Maintenance to customize URLs (refer to Figure 5-4):
-
In the left pane, select URLs, and in the right pane, choose Important URLs. Here you can customize the home page URL, the Search bar URL, and the online support page URL. The online support page is created by the company and then made available to users.
-
In the left pane, click URLs, and in the right pane, choose Favorites And Links. Here you can customize the Favorites folder and the Links bar by adding links to sites related to the company or the service the company offers. For instance, you can add Favorites folders for Help And Support or Corporate Online Help pages.
Note For information about how to configure Automatic Updates by using Group Policy, refer to Microsoft Knowledge Base article 328010. This KB article also contains a white paper on software update services.
Configuring Content Advisor
Another customizable option a user might ask about is Content Advisor. Content Advisor allows a user to control the Internet content that can be viewed on a single computer. The Content Advisor dialog box, shown in Figure 5-6, allows an administrator to configure which websites and content can and cannot be viewed based on the user’s preferences and the guidelines of the Internet Content Rating Association (ICRA). ICRA’s goal is to protect children from potentially harmful content while still preserving free speech on the Internet. Rating categories include Language, Nudity, Sex, and Violence. The Content Advisor also allows the user to specify customized and approved or disallowed sites.
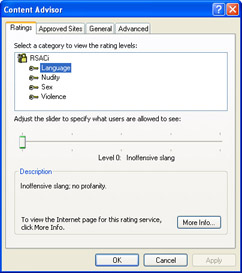
Figure 5-6: Content Advisor can be used to limit the Web content that can be viewed.
Configuring and Using Content Advisor
Content Advisor is accessed and configured by using Internet Explorer’s Internet Options dialog box:
-
Open Internet Explorer, select Internet Options, and from the Internet Options dialog box, select the Content tab.
-
From the Content Advisor section, select Enable or Settings.
-
From the Ratings tab, select a category. Move the slider to the left for more restrictive settings; move the slider to the right for less restrictive settings. As you move the slider, read the descriptions of the rating levels in the Descriptions area. Repeat this step for all four categories: Language, Nudity, Sex, and Violence.
-
To add a site to the Approved Sites list or to disallow access to any website, select the Approved Sites tab and enter the name of the website in the Allow This Web Site area. Choose Always to make the page always viewable, or Never to make sure it cannot be viewed.
-
From the General tab under User Options, if desired, select Users Can See Sites That Have No Rating or Supervisor Can Type A Password To Allow Users To View Restricted Content or both. If desired, select Create Password or Change Password and configure an administrator password. Click OK to close this dialog box.
-
To configure advanced settings such as using a specific ratings bureau or importing or installing rules, select the Advanced tab and make the appropriate changes. Click OK to close Content Advisor.
-
Click OK to close the Internet Options dialog box.
Practice: Personalize Internet Explorer
In this practice, you will set a home page, configure accessibility options, choose languages for Internet Explorer, view History, configure Internet Explorer to start with a blank home page, and configure a favorite site for offline use.
Exercise 1: Setting a Home Page
-
Log on to Windows XP.
-
On the Start menu, select Internet Explorer.
-
On the Standard toolbar, click the Stop button (a red X).
-
In Internet Explorer, on the Tools menu, select Internet Options.
-
In the Internet Options dialog box, on the General tab, in the Home Page section, in the Address text box, type http://support.microsoft.com and click OK.
Exercise 2: Configuring Accessibility
-
Log on to Windows XP.
-
On the Start menu, select Internet Explorer.
-
In Internet Explorer, in the Address text box, type http://www.microsoft.com.
-
On the View menu, select Text Size and then select Largest.
-
In Internet Explorer, on the Tools menu, select Internet Options.
-
In the Internet Options dialog box, click Accessibility. In the Accessibility dialog box, in the Formatting section, select the Ignore Font Sizes Specified On Web Pages check box, and click OK.
-
Click Colors.
-
In the Colors dialog box, click the Unvisited color swatch.
-
In the Color selector box, in the Basic Colors section, select a bright color swatch without blue in it, such as hot pink. Click OK.
-
In the Colors dialog box, click OK.
-
In the Internet Options dialog box, on the General tab, click Accessibility.
-
In the Accessibility dialog box, in the Formatting section, select the Ignore Colors Specified On Web Pages check box. Click OK.
-
In the Internet Options dialog box, click OK.
Exercise 3: Choosing Languages
-
Log on to Windows XP.
-
On the Start menu, select Internet Explorer.
-
In Internet Explorer, on the Tools menu, select Internet Options.
-
In the Internet Options dialog box, click Languages.
-
In the Languages Preference dialog box, click Add.
-
In the Add Language dialog box, select a language, and click OK.
-
In the Language Preference dialog box, click Cancel. (If you wanted to change the language preference, you would click OK.)
-
In the Internet Options dialog box, click OK.
Exercise 4: Viewing History
-
Log on to Windows XP.
-
On the Start menu, select Internet Explorer.
-
In Internet Explorer, to create a browsing history, browse to about 10 separate pages within the support.microsoft.com Web space.
-
On the Standard toolbar, click the History button (a clock with an arrow curving counterclockwise).
-
On the History toolbar, in the View drop-down list, select By Order Visited Today.
Exercise 5: Starting Internet Explorer with a Blank Home Page
-
Log on to Windows XP.
-
On the Start menu, select Run. In the Run dialog box, in the Open text box, type iexplore -nohome and press Enter.
-
In Internet Explorer, on the Tools menu, select Internet Options.
-
In Internet Explorer, on the Standard toolbar, click the Home button.
-
On the Tools menu, select Internet Options.
-
In the Internet Options dialog box, on the General tab, in the Home Page section, click Use Blank. Click OK.
Lesson Review
The following questions are intended to reinforce key information presented in this lesson. If you are unable to answer a question, review the lesson materials and try the question again. You can find answers to the questions in the “Questions and Answers” section at the end of this chapter.
-
A user reports that he has changed his text size to Largest, but when he visits sites, sometimes the text on the sites is large and sometimes it is not. He reports this happens occasionally with colors and font styles, too. What does the user need to do to make sure these settings are always used, no matter what website he visits?
-
Use the Internet Options dialog box in Internet Explorer, and from the General tab, select Accessibility, and make the appropriate changes in the Accessibility dialog box.
-
Open Control Panel, open Accessibility Options, and on the Display tab, select the Override Web Settings check box.
-
Use the Internet Options dialog box in Internet Explorer, select the General tab, choose Advanced, and in the Accessibility choices, select the Override Web Settings check box.
-
Use the Internet Options dialog box in Internet Explorer, select the General tab, choose Accessibility, and in the Accessibility dialog box, select the Format Documents Using My Style Sheet check box.
-
-
A small business owner wants to personalize the Internet Explorer title bar on the computer that visitors access when they come into her store. She also wants to configure a default home page that users cannot change. Which of the following commands is used on the Run line to open the appropriate application for configuring these computerwide settings?
-
msconfig.exe
-
sigverif.exe
-
cmd.exe
-
gpedit.msc
-
-
A home user wants you to configure his Windows XP computer so that his 12- year-old son cannot access websites that contain offensive language, nudity, sexual references, or violence that involves fighting or killing. He would like to be able to override those settings if ever necessary by using an administrator password. The user wants to spend the least amount of money possible. What should you tell the user to do?
-
Tell the user to purchase and install inexpensive third-party parental control software. Teach the user how to configure it.
-
Configure Content Advisor, included with Windows XP.
-
Create a separate account for the son, and purchase and install parental control software. Apply the software only to the son’s account.
-
Configure digital certificates, included with Windows XP, and accept digital certificates only from reputable sites.
-
Configure the Profile Assistant to limit what sites the son has access to.
-
Lesson Summary
-
To personalize Internet Explorer, users can change the text size, colors, fonts, and font styles shown on Web pages, and they can customize the toolbars.
-
To configure languages so that websites can be viewed in a user’s native language, change the language option in the Internet Options dialog box of Internet Explorer.
-
To secure and personalize a Web user’s experience, Content Advisor, Digital Certificates, and the Profile Assistant can be configured.
EAN: N/A
Pages: 237