Lesson 1: Configuring Windows XP for Performance
As a DST, you should be able to configure the Windows XP operating system to optimize performance. Windows XP provides a number of methods for increasing actual system performance and the perceived performance to the user.
After this lesson, you will be able to
-
Optimize Windows startup.
-
Stop unnecessary background applications.
-
Optimize hard drive performance.
-
Turn off Fast User Switching.
-
Disable visual effects to increase performance.
-
Configure advanced performance options.
Estimated lesson time: 25 minutes
Optimizing Windows Startup
After you first install Windows XP, the operating system begins to automatically optimize system settings to speed up subsequent startups. Similarly, Windows XP optimizes program files so that applications launch more quickly as you use them. For this reason, you should allow a sufficient number of restarts and launches to let Windows perform these configurations before deciding whether you need to optimize the performance of a computer.
Windows startup is fairly complicated (and you can learn the details about the Windows startup process in Chapter 2, “Installing Windows XP”), but there are many ways that you can optimize the process for a quicker startup time:
-
Check the basic input/output system (BIOS) settings for your computer to see if there are unnecessary actions that you can eliminate from the startup process. For example, on many computers, you can skip the memory check that occurs when you turn on your computer—something that can take quite some time when you have a lot of memory.
-
If a computer is configured with multiple operating systems, you can reduce the amount of time that Windows displays the menu of operating system choices at startup. Configure this setting by opening Control Panel, selecting the Advanced tab, and then clicking Settings in the Startup And Recovery section.
-
Remove any unnecessary applications that start automatically with Windows. Preventing applications from starting with Windows is covered in the section called “Removing Unnecessary Background Applications,” later in this lesson.
-
When you remove a hardware device from your computer, make sure that you also remove any drivers and software that were installed with the device. You can learn more about working with hardware devices in Chapter 6, “Installing and Managing Hardware.”
Removing Unnecessary Background Applications
Many applications install software that runs in the background as you use Windows. Normally, this software is a useful piece of the application, such as the monitor that allows your antivirus software to check files for viruses during download. Often, this software is a program that you could easily live without. When this is the case, it is best to prevent the software from loading with Windows so that the software does not consume system resources.
You can sometimes tell what background programs are running because the programs are represented by icons in the notification area, but this is not always the case. Even if there is an icon present, turning off different programs usually requires different steps, depending on the program.
To prevent unnecessary background applications from running, try the following:
-
If there is an icon in the notification area, right-click or click the icon to see if a menu opens. Often, there is a command for setting preferences that you can use to figure out how to prevent the program from loading when Windows starts. You can learn more about the notification area in Chapter 4, “Supporting the Windows Desktop.”
-
If there is no menu for the icon, check the Startup folder on the Start menu. Often, programs place shortcuts here to load components at Windows startup. You can also try running the program that is associated with the icon to see if there are instructions for preventing the program from loading.
-
You should also check the Startup folder for applications that load, but do not place an icon in the notification area.
Windows also includes the System Configuration Utility, which you can use to control Windows startup. Run the program by typing msconfig at the Run dialog box or command prompt. The System Configuration Utility, shown in Figure 12-1, contains many tabs that you can use to configure different aspects of the startup process, including the following:
-
General Use the General tab to select a type of startup to use the next time that Windows starts. A diagnostic startup is the same thing as starting Windows XP in safe mode. A selective startup allows you to choose which types of components should be loaded (represented by the other tabs on the utility).
-
SYSTEM.INI, WIN.INI, BOOT.INI These tabs allow you to control the system files that Windows XP uses primarily for compatibility with previous versions of Windows. In earlier versions of Windows, these files were used instead of a centralized system Registry. Turning items on and off by using these tabs is generally safer than editing these files directly.
-
Services This tab presents a list of services that load with Windows. Although you can use this tab to prevent services from loading, it is much safer (and just as easy) to use the Services node in the Computer Management window.
-
Startup This is probably the most important tab used for optimizing Windows startup. It presents a list of all program components that load with Windows, whether or not they are represented in the notification area or not. Turn off the programs you do not want to load and restart Windows. You can return and reselect the applications whenever you want.
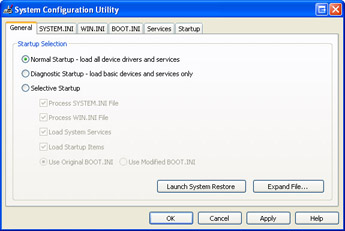
Figure 12-1: Use the System Configuration Utility to control Windows startup.
Optimizing Hard Disk Performance
Many of the functions in Windows XP rely on having enough disk space free to operate, including Windows’ virtual memory system and programs that need to create temporary files, to name just two of the most important. In addition, almost every function in Windows relies on quick hard disk access. Windows includes a number of utilities that can help you optimize hard disk performance, including the following:
-
Disk Cleanup Wizard Scans your hard disk looking for files that can be safely removed, helping you to free up disk space.
-
Disk Defragmenter Rearranges the data on your hard drive so that files are written to disk contiguously. During the defragmentation, it also places more frequently used files toward the front of the disk so that they load faster.
-
Chkdsk Scans the files and directory structure of your disk to make sure that they are free of errors.
You can find details on using each of these utilities in Chapter 8, “Supporting Storage Devices in Windows XP.”
| Note | Disk Defragmenter does not provide a built-in way to schedule the automatic defragmentation of a drive, which is a major selling point of many third-party defragmentation programs. However, with a small Visual Basic script and the Windows Task Scheduler, you can set up an automated defragmentation schedule quickly and easily. The script and instructions for its use are included in the Tools folder on the CD included with this book. |
Turning Off Fast User Switching
Fast User Switching in Windows XP allows users to switch between different user accounts without logging off. Each user can even have his own applications running while another user uses the computer. Although this feature presents obvious advantages, it also comes with an equally obvious disadvantage. The more applications that your computer runs at the same time, the slower the computer will perform, regardless of whether those applications are run by one or multiple users. If users frequently have problems with other users leaving applications running, and if this situation tends to slow down the computer, suggest that users turn off the Fast User Switching feature. You can learn more about Fast User Switching in Chapter 3, “Supporting Local Users and Groups.”
| Exam Tip | When a user who is not in a domain environment (especially in a home where multiple home users might use the same computer) complains that a computer performs slowly at some times and performs fine at other times, Fast User Switching is a likely candidate for the problem. |
Disabling Visual Effects
Many of the new visual effects that are available in Windows XP can slow the perceived performance of a computer by making dialog boxes, windows, and menus take longer to open and work with. By default, Windows enables visual effects based on the capabilities of a computer, but you can enable or disable specific visual effects to strike your own balance between performance and appearance.
Windows XP provides quick access for enabling and disabling visual effects. From the Start menu, right-click My Computer and then choose Properties. In the System Properties dialog box, on the Advanced tab, click Settings in the Performance section to open the Performance Options dialog box, shown in Figure 12-2.
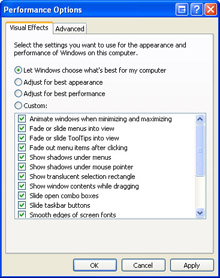
Figure 12-2: Use the Performance Options dialog box to disable unnecessary visual effects.
You can choose from the four options for visual effects:
-
Let Windows Choose What’s Best For My Computer
-
Adjust For Best Appearance, which enables all the effects
-
Adjust For Best Performance, which disables all the effects
-
Custom, which allows you enable and disable the effects yourself
Table 12-1 lists the visual effects along with descriptions of those that are not self-explanatory.
| Visual Effect | Description |
|---|---|
| Animate windows when minimizing and maximizing | Causes a zoom effect when you minimize or maximize a window. Disabling this effect makes windows minimize and maximize faster. |
| Fade or slide menus into view | Causes menus to fade or slide into view instead of simply appearing. Disabling this effect makes menus appear more quickly. |
| Fade or slide ToolTips into view | Causes ToolTips to fade or slide into view instead of simply appearing. ToolTips are the pop-up descriptions that appear beside certain items when you hold your pointer over them. Disabling this effect makes ToolTips appear more quickly. |
| Fade out menu items after clicking | Causes menus to fade out after you select a command. Disabling this effect makes menus disappear instantly after selecting a command. |
| Show shadows under menus | Causes Windows to display a drop shadow behind menus for a three-dimensional effect. Disabling this effect makes menus appear more quickly. |
| Show shadows under mouse pointer | Causes Windows to display a drop shadow behind the mouse pointer. Disabling this effect can make the mouse more responsive. Also, some older applications do not work well when this feature is enabled. |
| Show translucent selection rectangle | Draws a filled-in rectangle when selecting multiple items on the desktop instead of just a rectangle outline. Disabling this effect slightly increases the speed with which you can select items. |
| Show window contents while dragging | Causes Windows to redraw a window while the window is being moved. Disabling this command makes dragging open windows noticeably faster. |
| Slide open combo boxes | Causes combo boxes to slide open instead of simply appear. A combo box is a drop-down list of items that you open from within a dialog box. Disabling this effect makes combo boxes appear more quickly. |
| Slide taskbar buttons | Causes taskbar buttons to slide to the left when other programs are closed or to the right when new programs are opened. Disabling this effect makes taskbar buttons appear instantly in the new location instead of sliding. Disabling this effect makes taskbar buttons available more quickly when they change locations. |
| Smooth edges of screen fonts | Makes screen fonts easier to read, especially at higher resolutions. Disabling this effect increases the speed at which Windows displays windows and dialog boxes. |
| Smooth-scroll list boxes | Causes the contents of a list box to scroll smoothly when you click the scroll bar rather than just jump down a few items in the list. Disabling this effect makes scrolling list boxes faster, but often disorienting. |
| Use a background image for each folder type | Different types of folders in Windows XP can use different background images. Many of the special Windows folders, such as Control Panel, make use of this effect. |
| Use common tasks in folders | Causes folders in Windows to display a task pane on the left side of the folder. The task pane lists tasks that are related to the files in the folder. |
| Use drop shadows for icon labels on the desktop | Creates a transparency effect on text labels for icons, but this transparency really only allows you to see any other icons obscured by an icon on top. The transparency does not allow you to “see through” to the actual desktop background. Disabling this effect causes Windows to display the desktop more quickly. |
| Use visual styles on windows and buttons | This setting is an important one in that it controls the new look of Windows XP. If you disable it, your desktop will look like previous versions of Windows. |
Managing Virtual Memory Paging Files
Like most modern operating systems, Windows XP uses virtual memory, which is created by extending the physical memory assigned to an application to the computer’s hard drive. Windows can assign some memory to an application, but not necessarily enough to satisfy all that application’s needs. Instead, Windows monitors memory access and continuously reorganizes memory structure to meet applications’ needs. By correctly anticipating applications’ needs, and by storing pages of memory to hard disk as necessary, Windows uses virtual memory to allow a computer to operate with less physical memory.
When Windows stores memory to hard disk, it uses a special file called a paging file. You can configure some aspects that relate to how Windows uses the paging file by using the Virtual Memory dialog box, shown in Figure 12-3. To open the Virtual Memory dialog box, follow these steps:
-
From the Start menu, right-click My Computer and select Properties.
-
In the System Properties dialog box, on the Advanced tab, click the Settings button in the Performance section.
-
In the Performance Options dialog box, on the Advanced tab, click Change.
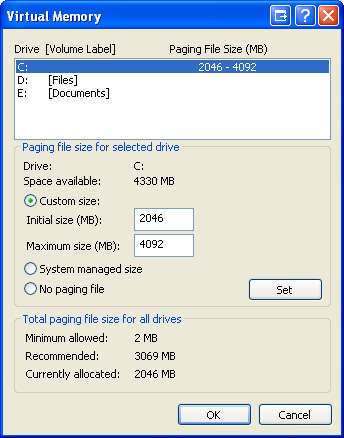
Figure 12-3: Use the Virtual Memory dialog box to control the paging file.
The Virtual Memory dialog box shows the size of the paging file for each disk on a computer and the total paging file size for all the drives combined. The files on all disks are combined and treated as a single area for paging memory to disk. Breaking the paging file up across multiple disks (especially disks on different disk controllers) can decrease the time it takes to write memory information to the paging file. Note, however, that breaking up a file across multiple volumes on the same hard disk can actually decrease the performance of the paging file.
For the most part, Windows does a good job of managing the size of the file itself. Unless you have a good reason for changing the paging file, you should probably just leave it alone. However, if possible, you want to avoid having your paging file on the same disk as your system files.
| Exam Tip | You can increase performance by storing the virtual memory paging file on a different physical disk from the Windows system files. |
Setting Advanced Performance Options
The Advanced tab of the Performance Options dialog box, shown in Figure 12-4, also contains two other performance options for configuring a computer to run under special circumstances. These options are the following:
-
Processor Scheduling By default, Windows optimizes the use of the processor for running programs. You can set this option to optimize the processor for running background services. This option is best if the computer that you are configuring is acting mainly as a file, print, or Web server.
-
Memory Usage Windows also optimizes memory for running programs by default. If the computer that you are configuring is running mainly services instead, select the System Cache option.

Figure 12-4: Use the Advanced tab of the Performance Options dialog box to adjust processor scheduling and memory usage.
Practice: Configure Visual Effects
In this practice, you will configure visual effects on a computer running Windows XP for best appearance and for best performance.
-
From the Start menu, select Control Panel.
-
In Control Panel, select Performance And Maintenance.
-
In the Performance And Maintenance window, select System.
-
In the System Properties dialog box, on the Advanced tab, in the Performance section, click Settings.
-
In the Performance Options dialog box, on the Visual Effects tab, select Adjust For Best Appearance. Click OK.
-
Spend some time opening windows and dialog boxes, starting programs, and configuring options in Windows.
-
Return to the Advanced tab of the System Properties dialog box and in the Performance section, click Settings.
-
In the Performance Options dialog box, on the Visual Effects tab, select Adjust For Best Performance. Click OK.
-
Perform the same types of actions you performed in Step 6 and see whether you can tell a difference in the perceived performance of your computer.
-
Return to the Advanced tab of the System Properties dialog box and in the Performance section, click Settings.
-
In the Performance Options dialog box, on the Visual Effects tab, select Custom and then adjust the individual visual effects to best suit your needs. Click OK to return to the System Properties dialog box, and then click OK again.
Lesson Review
The following questions are intended to reinforce key information presented in this lesson. If you are unable to answer a question, review the lesson materials and try the question again. You can find answers to the questions in the “Questions and Answers” section at the end of this chapter.
-
List some common measures that you can take to help improve startup performance.
-
Which of the following tools can you use to control the Windows startup process?
-
System Information
-
System Configuration Utility
-
Chkdsk
-
Virtual Memory
-
Lesson Summary
-
After you first install Windows XP, the operating system begins to automatically optimize system settings to improve subsequent startup times. After letting Windows start up several times, you can judge and then try to improve the startup performance.
-
Many applications install software that runs in the background as you use Windows. You can sometimes tell which background programs are running because they are represented by icons in the notification area, but this is not always the case. Even if there is an icon present, turning the program off usually requires different steps, depending on the program.
-
Many of the functions in Windows XP rely on having enough disk space free to operate, including Windows’ virtual memory system and programs that need to create temporary files. Make sure to use Disk Cleanup, Disk Defragmenter, and Chkdsk regularly.
-
Many of the new visual effects in Windows XP can slow the perceived performance of a computer by making dialog boxes, windows, and menus take longer to open and work with.
EAN: N/A
Pages: 195