Creating an X.400 Connector
After you’ve created an MTA transport stack, you must create the X.400 Connector itself. To do so, in the Exchange System snap-in, navigate to the Connectors container of the routing group in which you want to create the connector, as shown in Figure 21-4. Choose New TCP X.400 Connector from the Action menu. This opens the property sheet for the new X.400 Connector. The next several sections discuss the tabs on this property sheet.
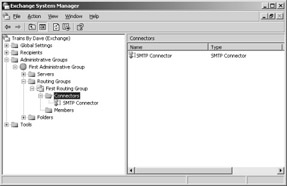
Figure 21-4: Finding the Connectors container.
General Tab
The General tab, shown in Figure 21-5, defines basic naming and connection information for the connector. You can configure the following settings on this property sheet:
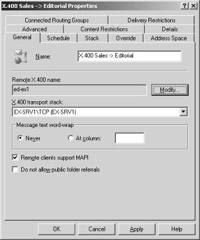
Figure 21-5: Configuring general connection properties for a new X.400 Connector.
-
Name Gives the name of the connector as it will appear in the Exchange System snap-in. Notice that there is no default value here, as there is for the display names of most other configuration objects. We suggest using a name that includes the type of connector (X.400) and the routing groups, servers, or locations you are connecting. An example might be to type X.400 Rgroup1 -> Atlanta X.400.
-
Remote X.400 Name Indicates the name of the remote server to which the local connector will connect. Click the Modify button to change the remote X.400 name and password. The password can be specified to prevent unauthorized connectors from opening an association to it. If a remote connector has been assigned such a password, you must enter it in this field.
-
X.400 Transport Stack Indicates the connector transport stack that the X.400 Connector is currently configured to use. You can change the stack used at any time.
-
Message Text Word-Wrap Contains options that enable or disable word wrap on outgoing messages. Some messaging systems do not allow messages to use word wrap, in which words automatically wrap to the next line rather than trailing off the right edge of a message window when windows are resized. Select Never to disable word wrap on all outgoing messages. This is the default. Select At Column and enter a number to have Exchange Server automatically insert a carriage return at the specified column on all outgoing messages.
-
Remote Clients Support MAPI When selected, indicates that the remote messaging system and clients support Messaging Application Programming Interface (MAPI). Exchange Server will transmit rich text and MAPI characteristics along with messages.
-
Do Not Allow Public Folder Referrals When selected, prevents users of the remote system from accessing public folders configured in the local routing group.
Schedule Tab
The Schedule tab on X.400 Connector’s property sheet, shown in Figure 21-6, lets you restrict the times at which the X.400 Connector can be used. By default, the X.400 Connector can be used at any time (Always); for the most part, you will want to leave this value alone. There might be times, however, when you want to limit connectivity, such as on a very busy network or when you need to bring a network down for maintenance.
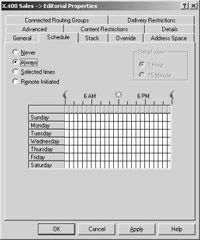
Figure 21-6: Scheduling the availability of an X.400 Connector.
You can set an X.400 Connector schedule to one of four values:
-
Never Disables the connector altogether. This setting is useful for bringing the connector down while performing maintenance.
-
Always Allows connections to be made to and from the server at any time.
-
Selected Times Allows you to define specific times at which the X.400 Connector is available. This setting can be useful on a busy network. If immediate messaging is not a concern, you can schedule messages to be sent only at specific periods during the day, when network traffic is otherwise low.
-
Remote Initiated Allows remote servers to connect to the current server, but does not allow the local server to initiate a connection. This setting can be useful if sending outgoing messages immediately is not a big concern but receiving incoming messages is.
Stack Tab
Use the Stack tab, shown in Figure 21-7, to specify transport address information about the foreign X.400 system. After you’ve specified the host name or IP address of the foreign system, you can provide outgoing OSI addressing information, if necessary, for the foreign system to which you are connecting.
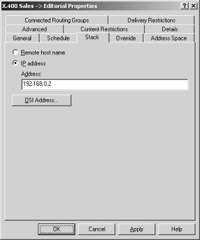
Figure 21-7: Configuring transport address information for the foreign X.400 system.
Override Tab
The Override tab, shown in Figure 21-8, lets you configure certain settings that override the local MTA settings when messages are sent over the X.400 Connector. For the most part, you can leave these advanced settings alone, particularly if you are using the X.400 Connector to connect to another Exchange routing group. If you are connecting to a foreign X.400 system, that system’s administrator will be able to tell you whether you need to adjust any of these settings.
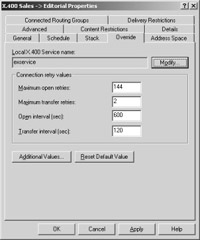
Figure 21-8: Overriding values for local MTA information.
You can also override the name and password of your local MTA on this tab. These options are used mainly when the name and password of the local MTA are too long or when they use characters or spaces that MTAs on foreign systems cannot accept. The overriding values are used only for the X.400 connection.
Address Space Tab
Foreign systems typically do not use the same addressing scheme as Exchange Server 2003. For this reason, the Exchange MTA relies on address spaces to choose foreign gateways over which messages should be sent. An address space is the part of an address that designates the system that should receive the message. For example, a typical Internet address takes the form user@company.com. Everything after the @ sign is the address space. The format of the address space is enough to tell the MTA that the message should be sent via SMTP.
The Address Space tab, shown in Figure 21-9, allows you to configure an address space for the foreign X.400 system to which you are building a connection. The Exchange MTA compares the destination address of outgoing messages with this address space to determine whether the outgoing messages should be sent over the X.400 Connector.
To add an address space, click Add. The Add Address Space dialog box opens (Figure 21-10). This dialog box allows you to specify the type of address space you want to add. Because you are connecting to a foreign X.400 system, you will want to configure an X.400 address space. Click OK.
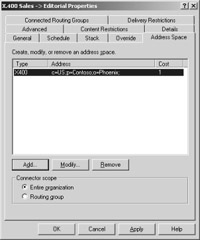
Figure 21-9: Configuring an address space for the X.400 Connector.
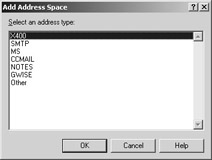
Figure 21-10: Choosing the type of address space.
The X.400 Address Space Properties screen appears, as shown in Figure 21-11. The administrator of the foreign system should be able to provide the addressing information that you need to configure here. X.400 addresses are case-sensitive and need to be typed exactly as provided.
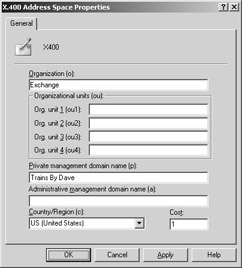
Figure 21-11: Configuring the new X.400 address space information.
Connected Routing Groups Tab
The Connected Routing Groups tab of the X.400 Connector’s property sheet, shown in Figure 21-12, is used only when you are using an X.400 Connector to connect an Exchange 2003 routing group with an Exchange 5.5 site. (Remember, the Exchange 2003 Routing Group is the equivalent of an Exchange 5.5 site.) Although messaging between the groups can work if you leave the Connected Routing Group tab blank and configure an address space for the remote server, Exchange Server will not know that it is communicating with an Exchange 5.5 site. As a result, the two environments will not allow each other access to their public folders. Click New to display a dialog box in which you can enter the name of the Exchange 5.5 site to which you are connecting. When you add a routing group, an address space for that group is generated.
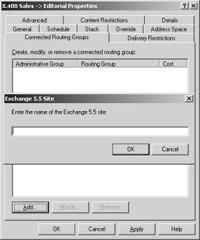
Figure 21-12: Letting Exchange Server know that you are connecting to an Exchange 5.5 site.
Exchange MTA compares the destination address of outgoing messages with this address space to determine whether the outgoing messages should be sent over the X.400 Connector.
Delivery Restrictions Tab
The Delivery Restrictions tab, shown in Figure 21-13, gives you control over which users can and cannot send messages over the X.400 Connector. You can control this in one of two ways:
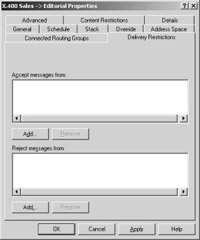
Figure 21-13: Restricting the use of an X.400 Connector.
-
You can choose to prohibit all users from transferring messages over the X.400 Connector except for those whom you specifically allow. This option is represented on the top part of the tab. By default, all users are allowed to use the connector. To allow only certain users, click the Add button and select the users from the address book.
-
You can choose to permit all users to transfer messages over the X.400 Connector except for those whom you specifically disallow. This option is represented on the bottom part of the tab. By default, no users are disallowed. To disallow certain users, click the Add button and select the users from the address book.
Advanced Tab
The Advanced tab, shown in Figure 21-14, is used to specify options for MTA conformance, links, and message attributes. The settings depend primarily on the specifications of the foreign system to which you are connecting. The following options are available:
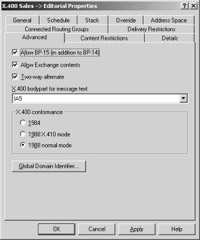
Figure 21-14: Configuring advanced X.400 properties.
-
Allow BP-15 (In Addition To BP-14) The Body Part 15 (BP-15) standard is part of the 1988 X.400 recommendation and supports several advanced messaging features, such as the encoding of binary attachments. The Body Part 14 (BP-14) standard is part of the older 1984 X.400 recommendation, which supports fewer features. If you do not select the Allow BP-15 option, only the BP-14 standard will be used.
-
Allow Exchange Contents Exchange Server supports the use of Extended MAPI–compliant clients, which in turn support such features as rich text format. Make sure that any foreign X.400 system to which you are connecting supports such features before you allow them to be transferred.
-
Two-Way Alternate The two-way alternate specification is an X.400 standard in which two connected X.400 systems take turns transmitting and receiving information. If the foreign system to which you are connecting supports this option, enabling it can greatly improve transmission speed.
-
X.400 Bodypart For Message Text This option specifies how message text should be formatted. Unless you are communicating with foreign systems that use foreign-language applications, leave this value at its default setting, International Alphabet 5 (IA5).
-
X.400 Conformance X.400 standards are published periodically as recommendations. Exchange Server 2003 supports the two primary recommendations: those issued in 1984 and those issued in 1988. Updates have been made to the standard since 1988, but they don’t really form a new recommendation. The 1988 recommendation has two versions: normal mode and X.410 mode. The default setting is 1988 normal mode, and you can expect it to work with most foreign X.400 systems.
-
Global Domain Identifier The global domain identifier (GDI) is a section of the X.400 address space of the target system. It is used to prevent message loops that can occur with outgoing messages. The administrator of the foreign X.400 system will let you know whether you need to modify these values.
Content Restrictions Tab
The Content Restrictions tab, shown in Figure 21-15, is used to restrict certain types of messages. The following options are available:
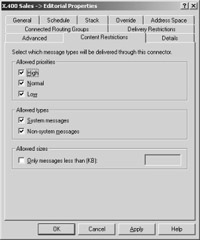
Figure 21-15: Content Restrictions tab.
-
Allowed Priorities Messages sent across this connector can be restricted by message size.
-
Allowed Types You can choose whether this connector supports system messages (like public folder replication messages) or nonsystem messages (like standard interpersonal messages).
-
Allowed Sizes Messages sent across this connector can be restricted by message size.
EAN: 2147483647
Pages: 254
- ERP Systems Impact on Organizations
- Challenging the Unpredictable: Changeable Order Management Systems
- Enterprise Application Integration: New Solutions for a Solved Problem or a Challenging Research Field?
- The Effects of an Enterprise Resource Planning System (ERP) Implementation on Job Characteristics – A Study using the Hackman and Oldham Job Characteristics Model
- Context Management of ERP Processes in Virtual Communities